Angled Pocket Fun Fold Card

Angled Pocket Fun Fold Card

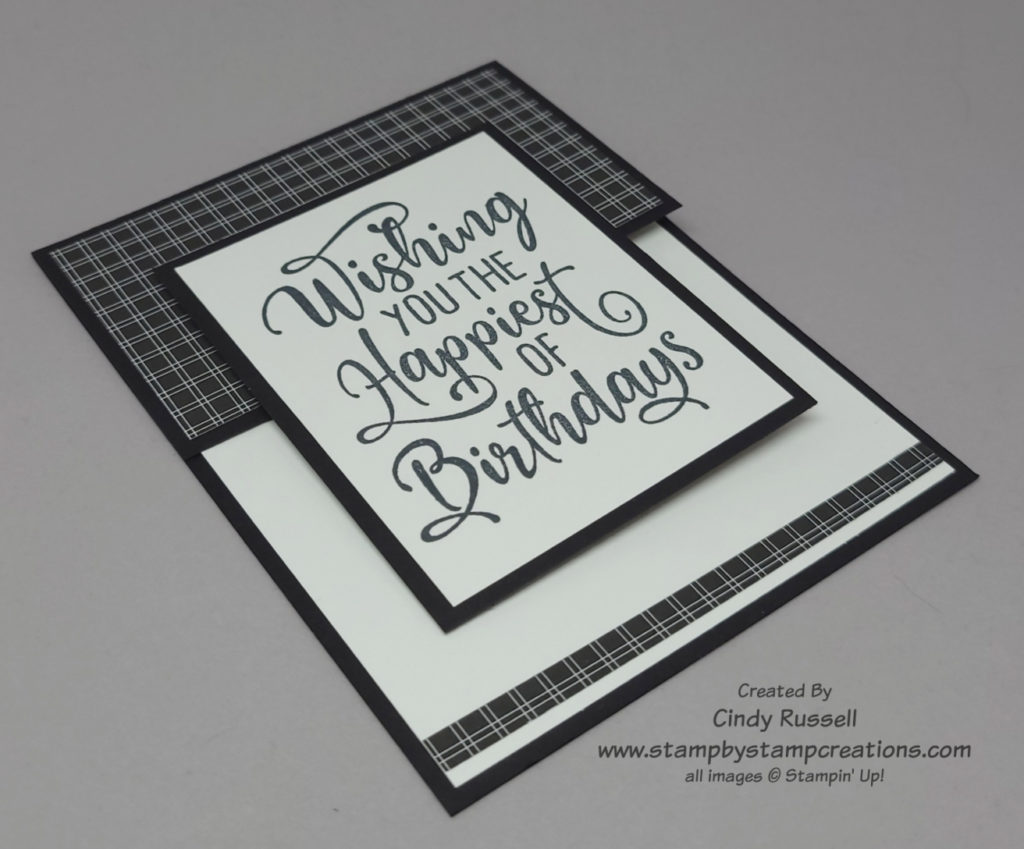
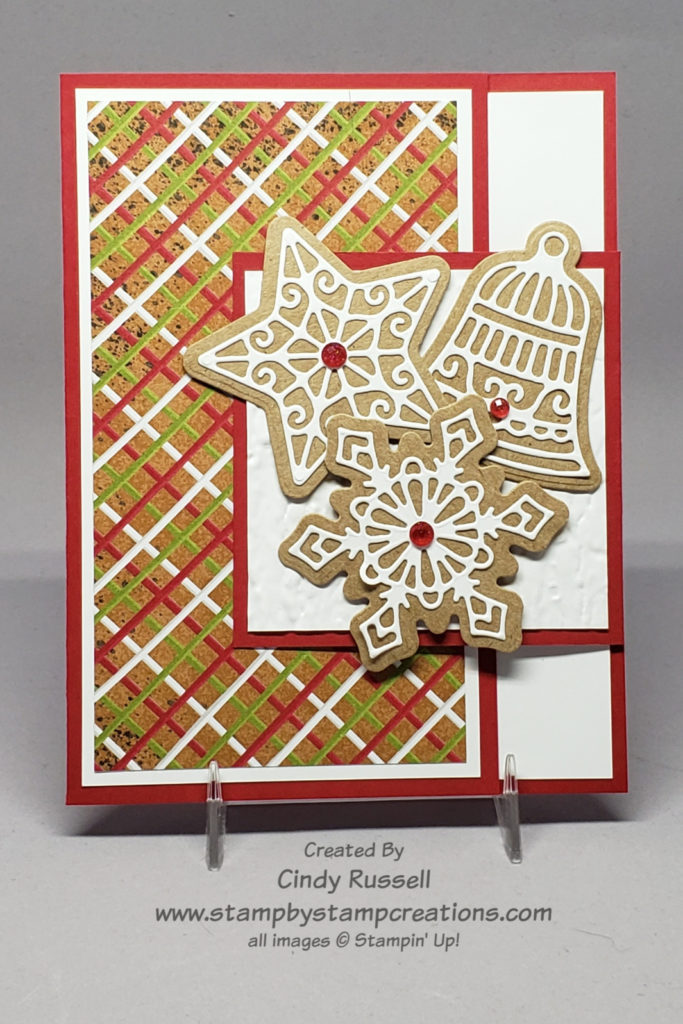
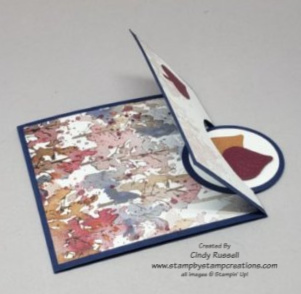
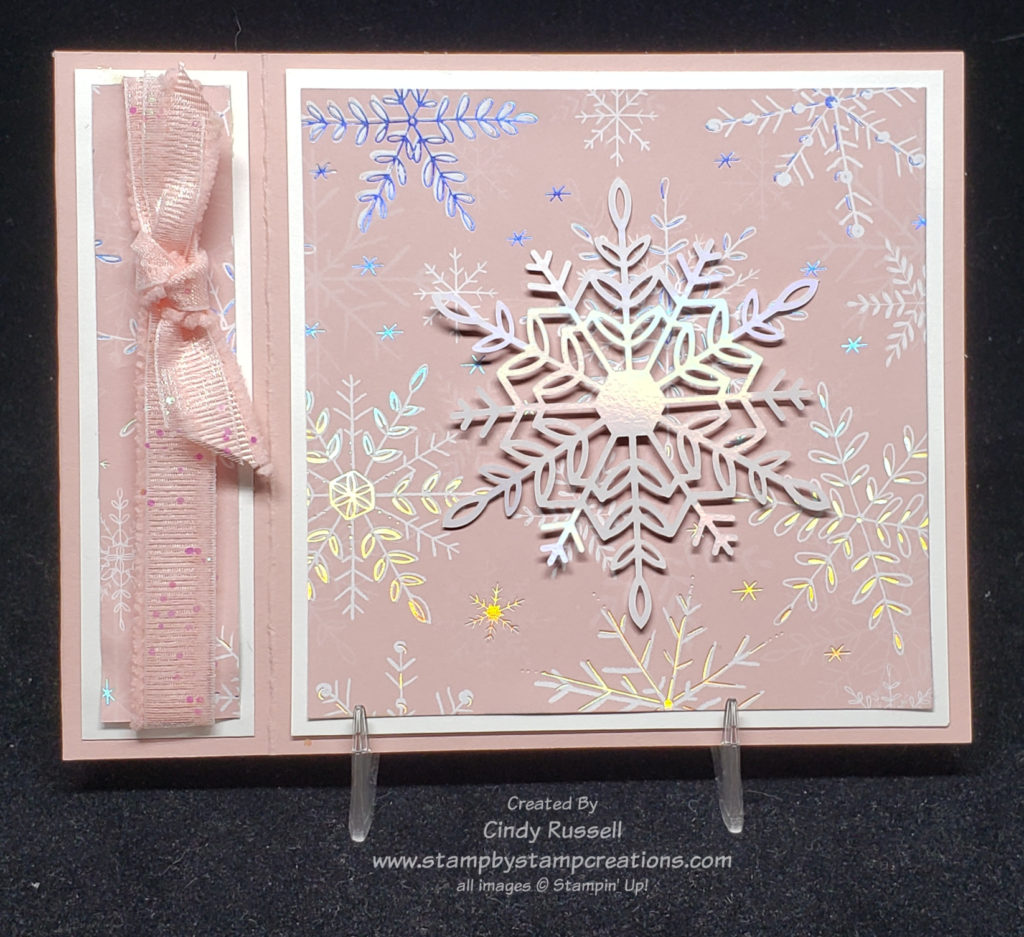
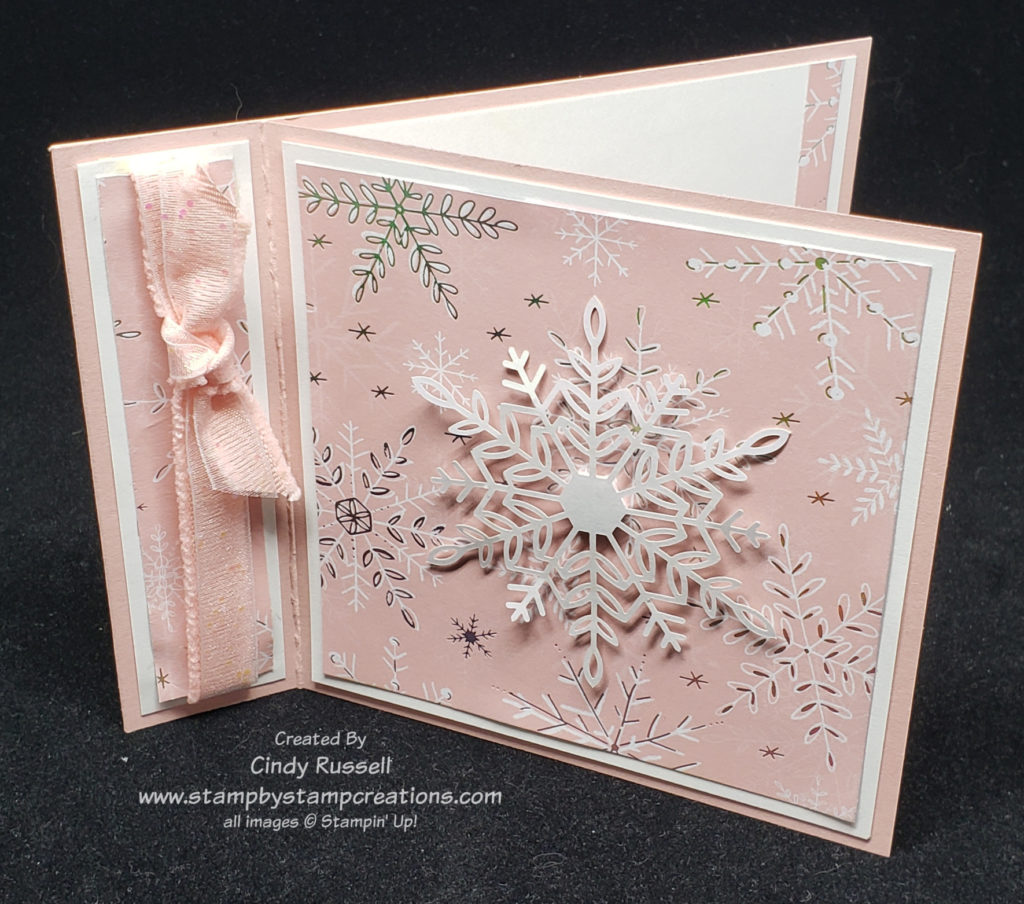
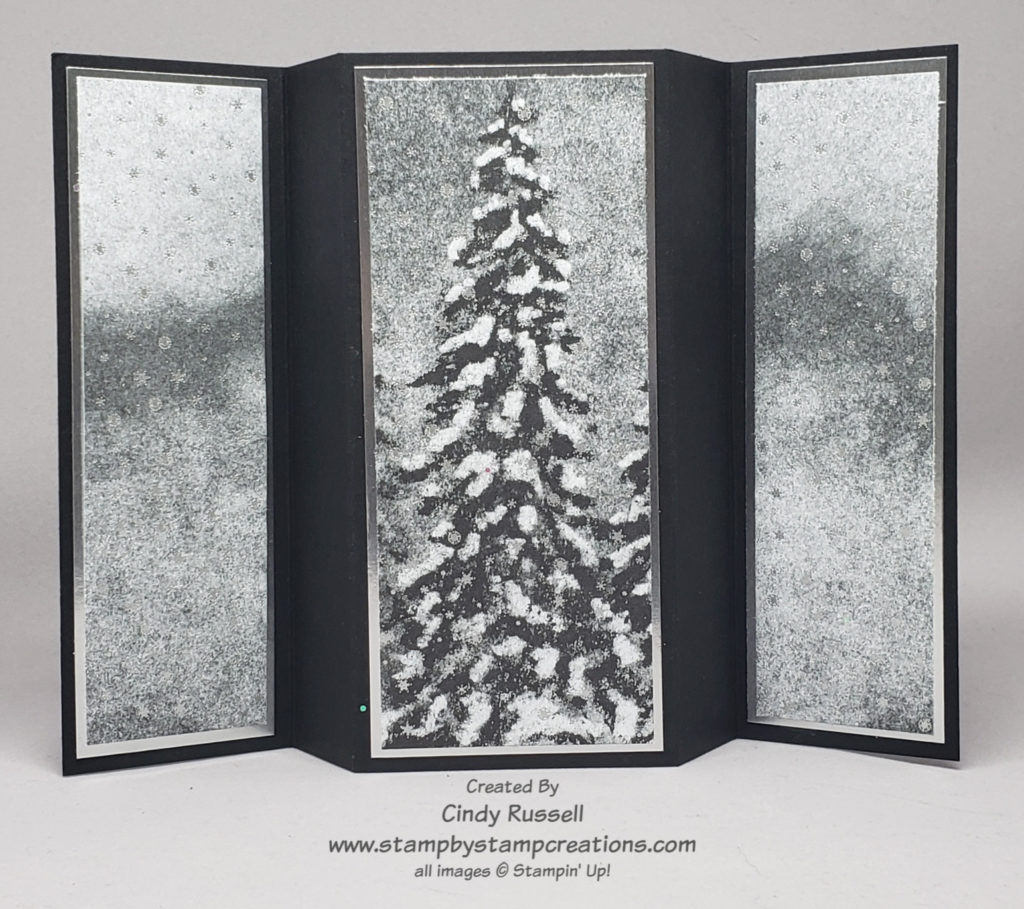
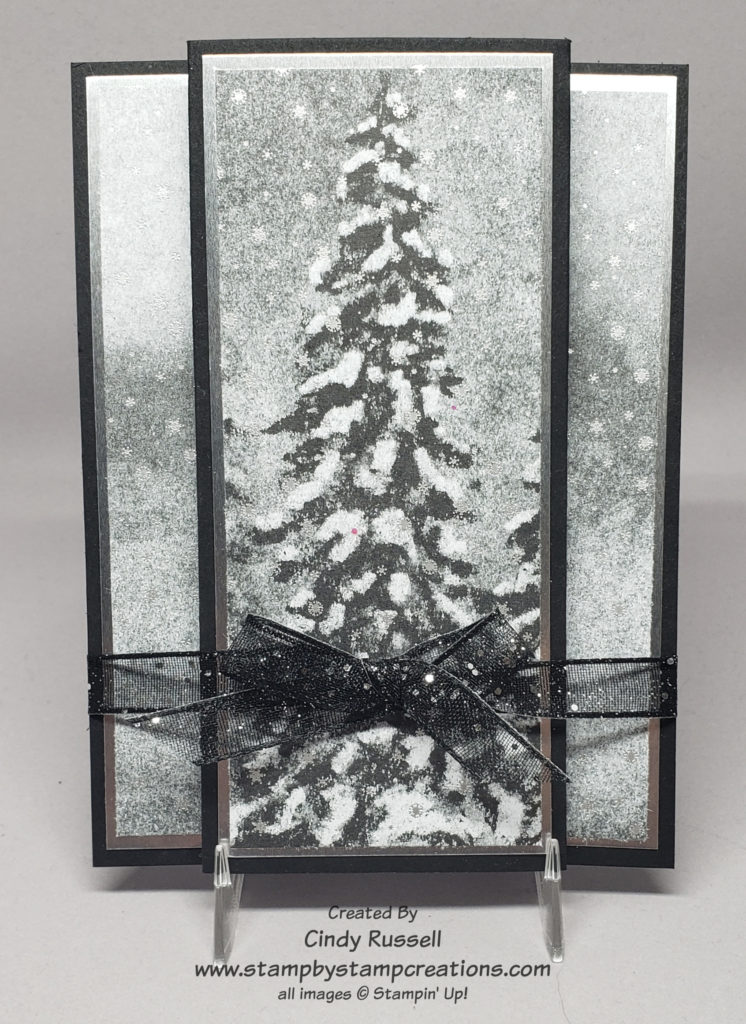
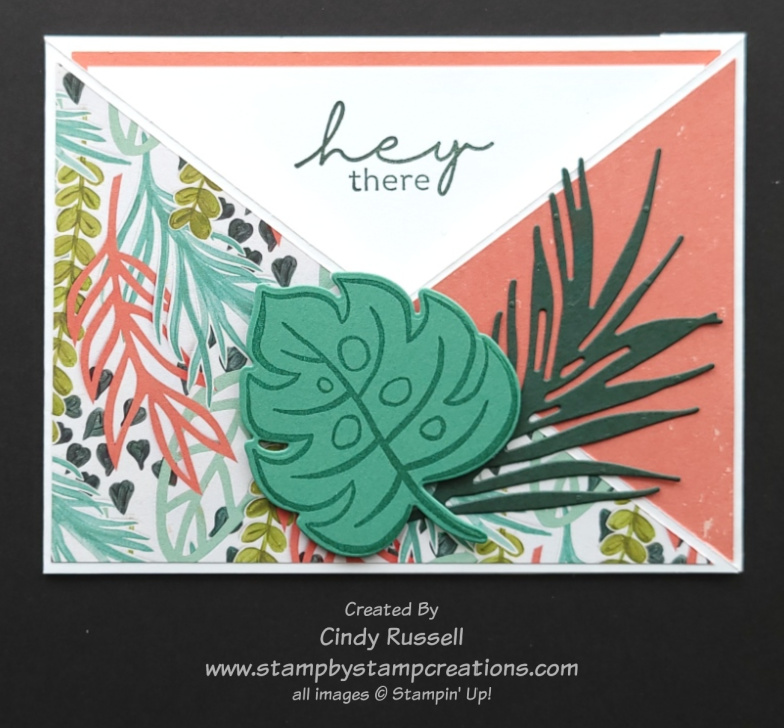
Today’s Fun Fold is an Angle Pocket Fun Fold.  So fun and easy if you follow the instructions.  Below you will find step-by-step instructions with photos on how to make it.  I do have a disclaimer…on my samples in the instructions the card stock base doesn’t really match the rest of the parts of the card but I wanted to make sure you could see the different steps.   

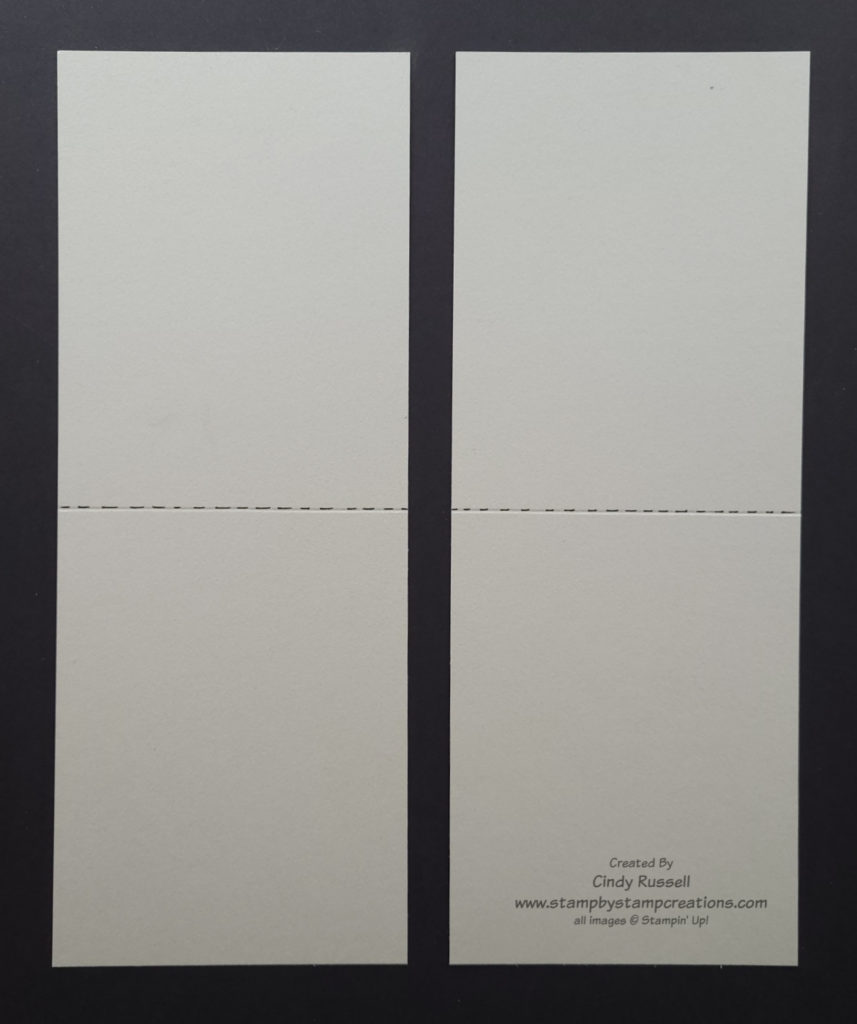
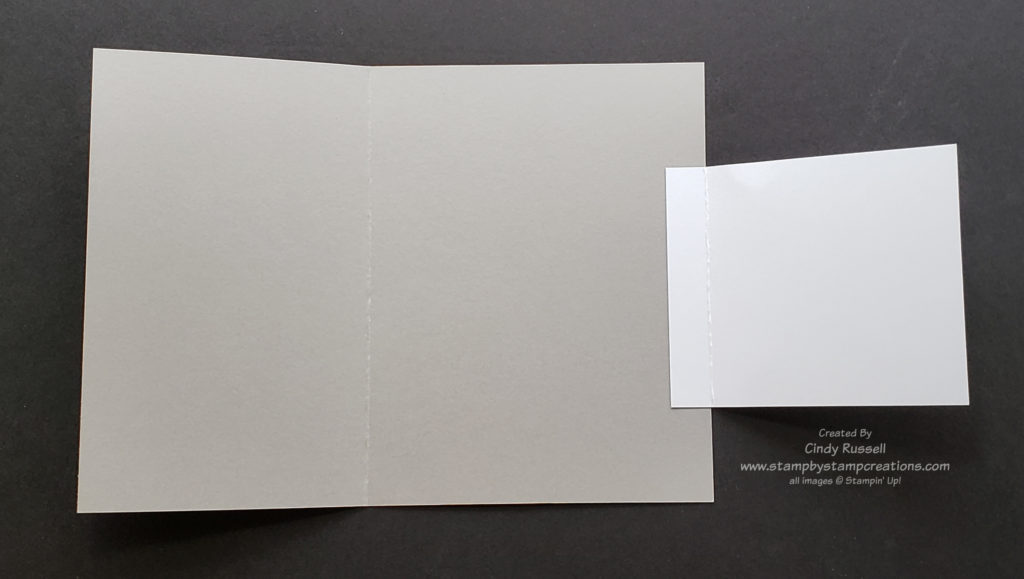
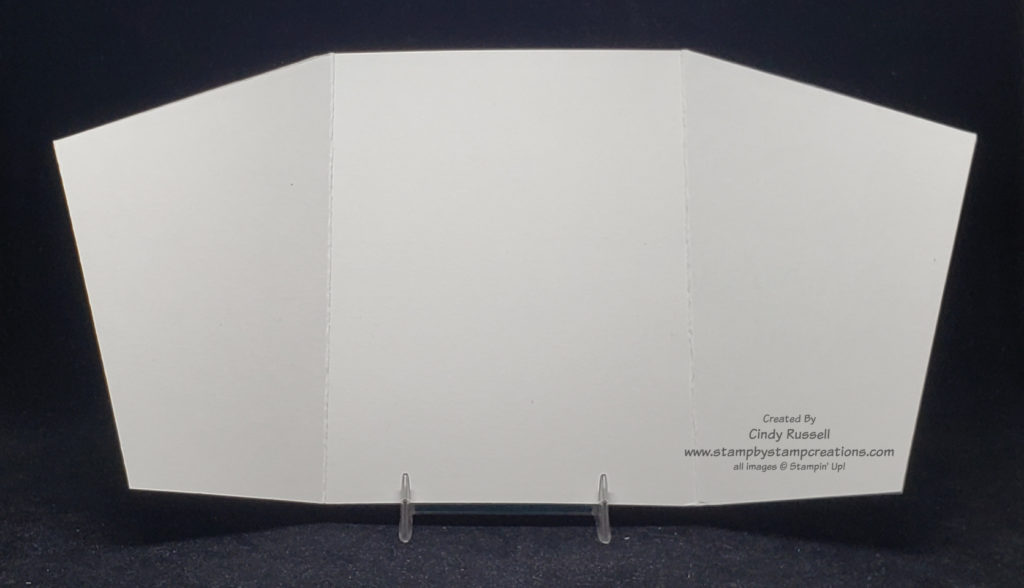
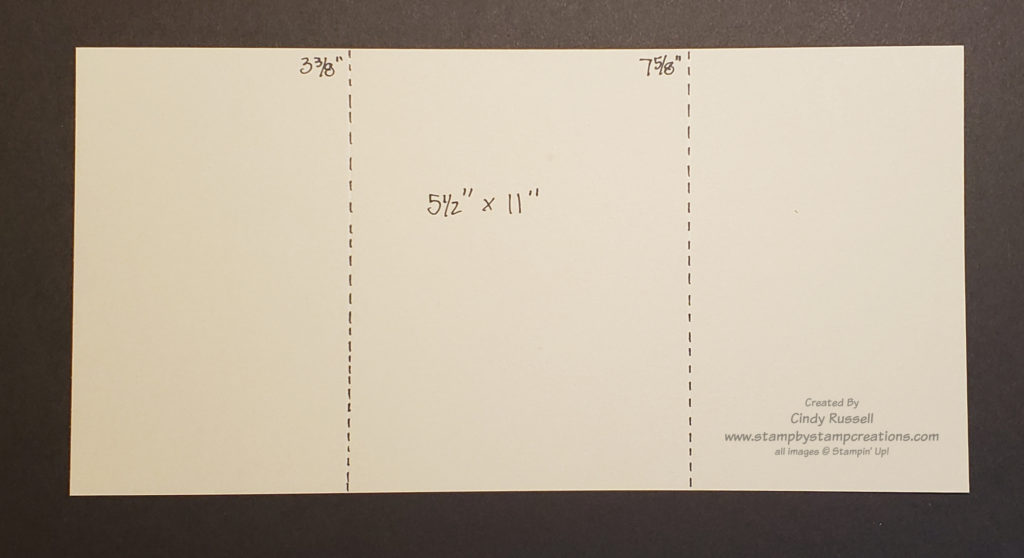
For the base of this card you need to start with a full sheet of cardstock.  With the long side of the cardstock at the top of your score board, score at 5 ½”.  The next step is to cut the card stock in half along the short side (at the 4 ¼” mark) so that you have two pieces of cardstock that are 4 ¼”x 11” and scored in half.  At this point you want to make sure that both pieces are the exact same size because they will overlap.

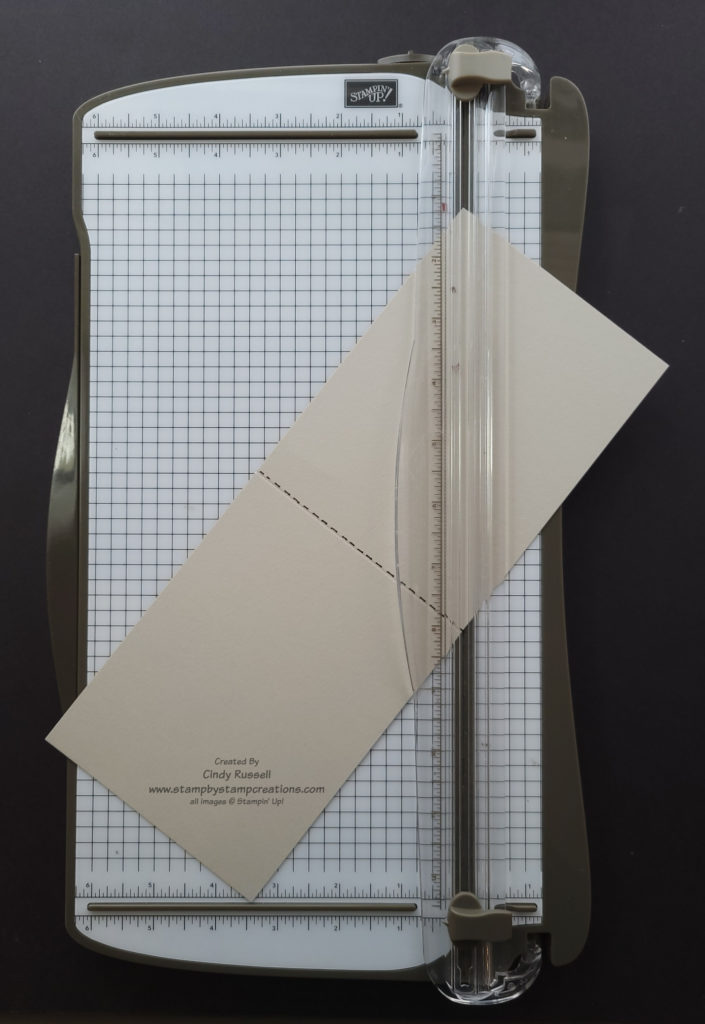
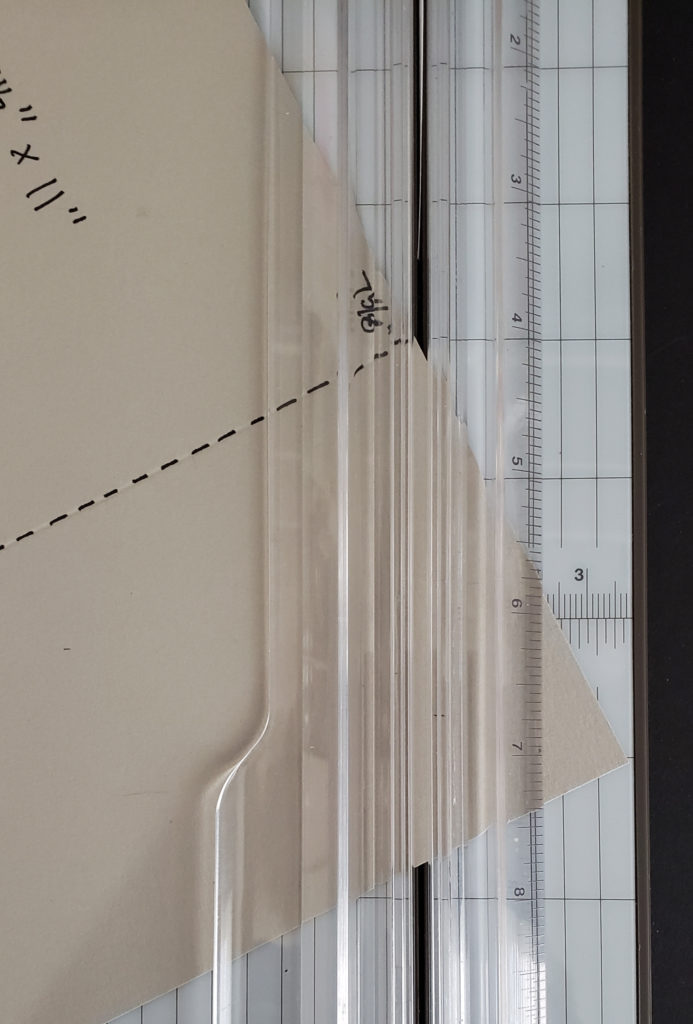
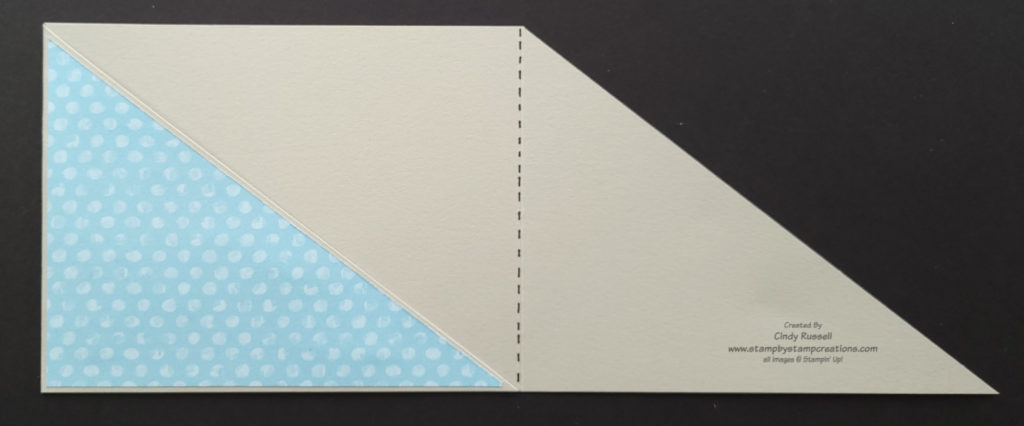
Place one of the 4 1/4″ x 11″ pieces of cardstock vertically on the Paper Trimmer (short side towards the top).  Start at the top left corner and cut diagonally to the right side of the score line.

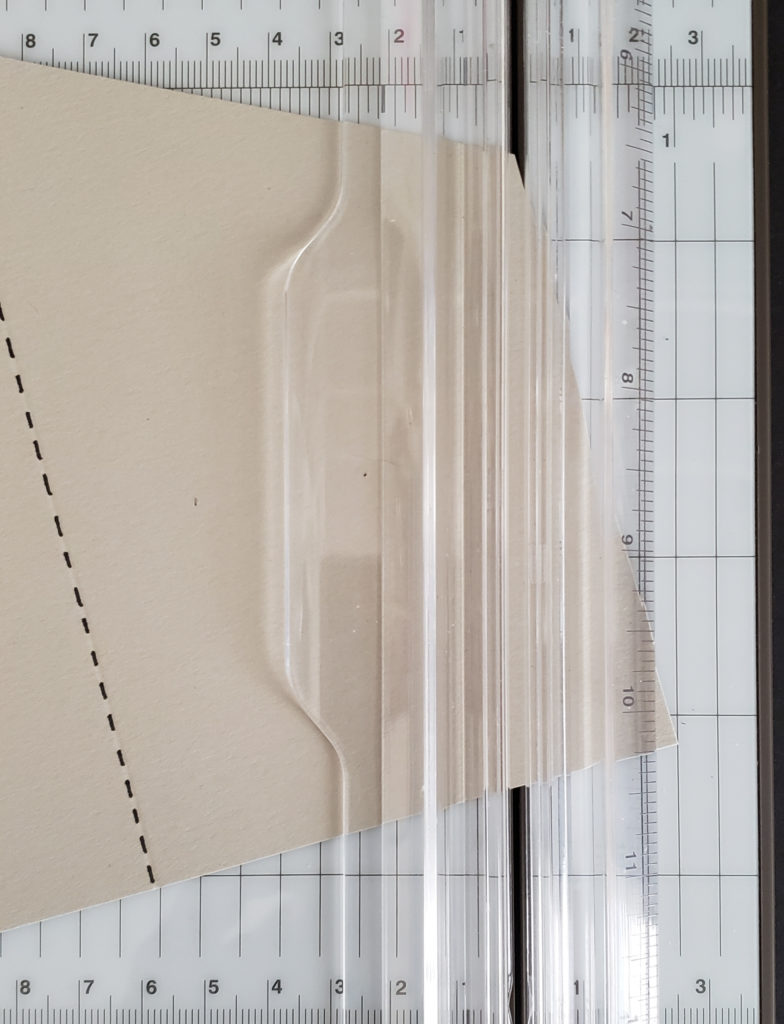
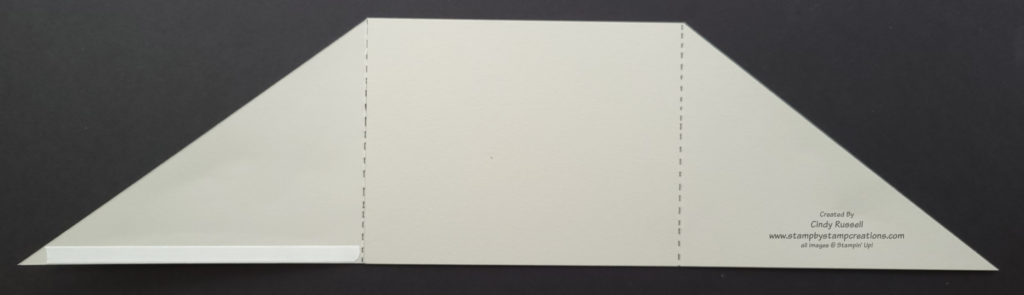
On the second piece of 4 1/4″ x 11″ cardstock start at the right side of the score mark and cut diagonally to the bottom left corner.

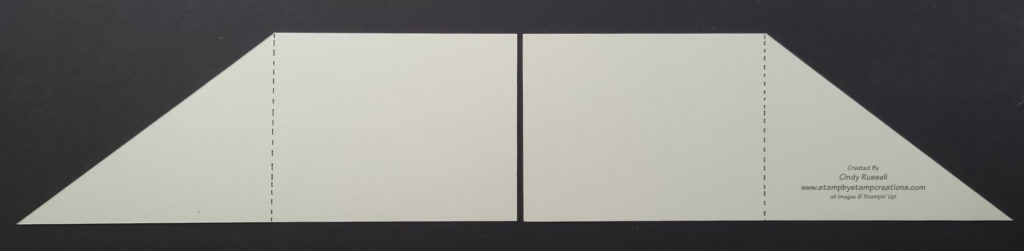
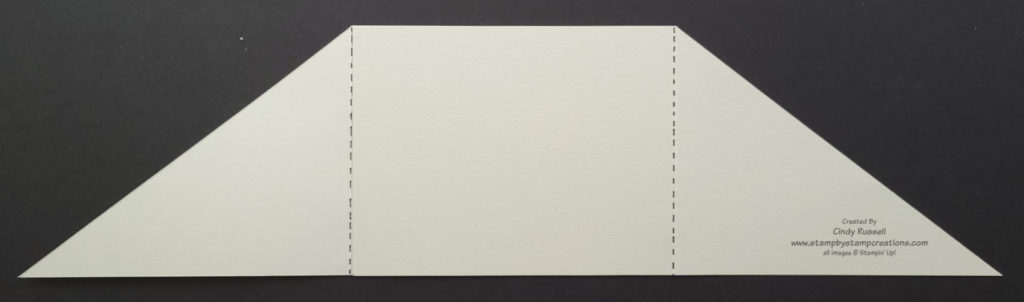
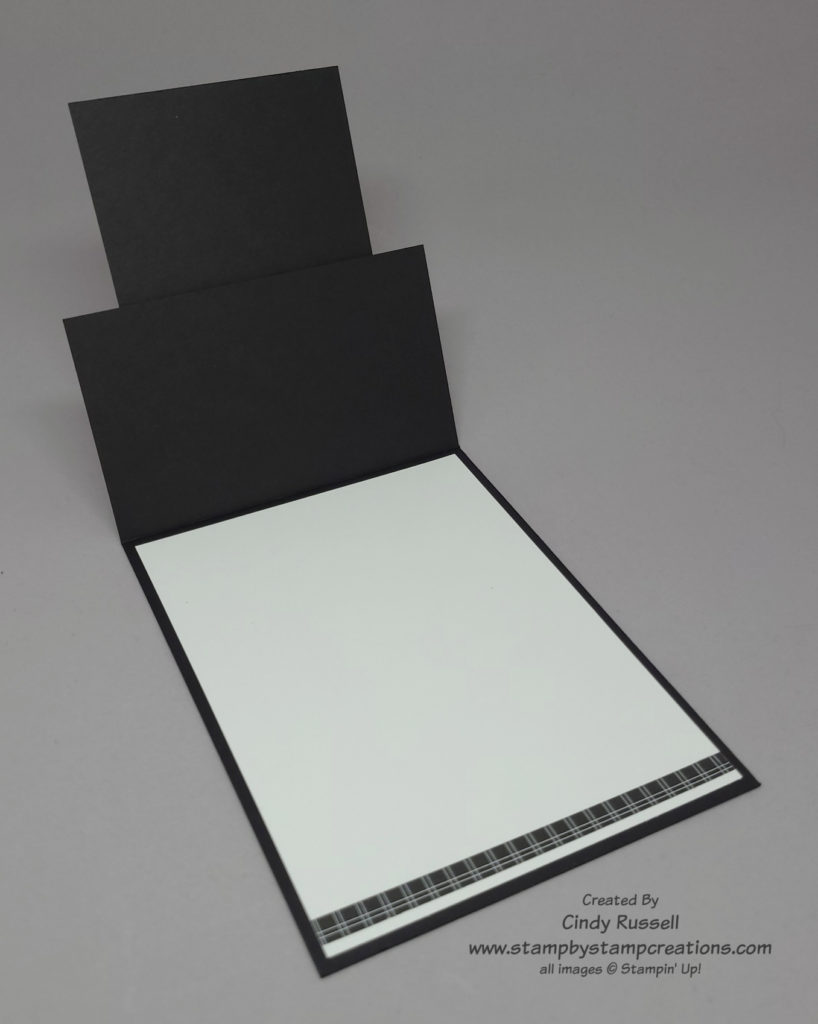
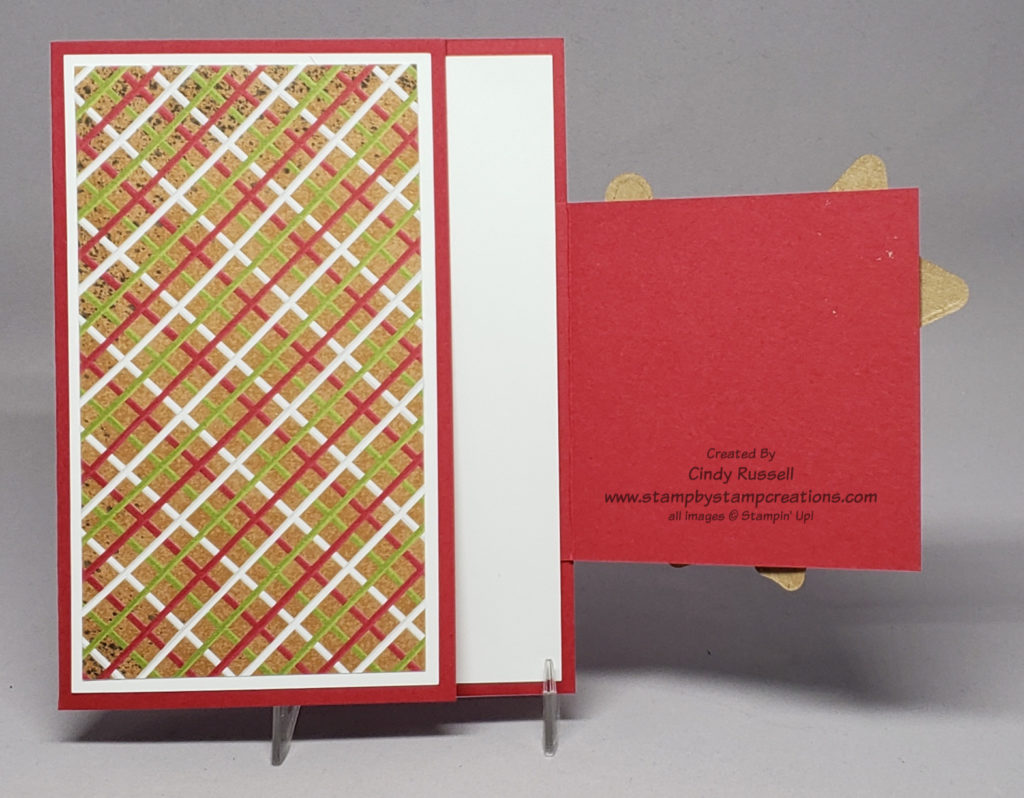
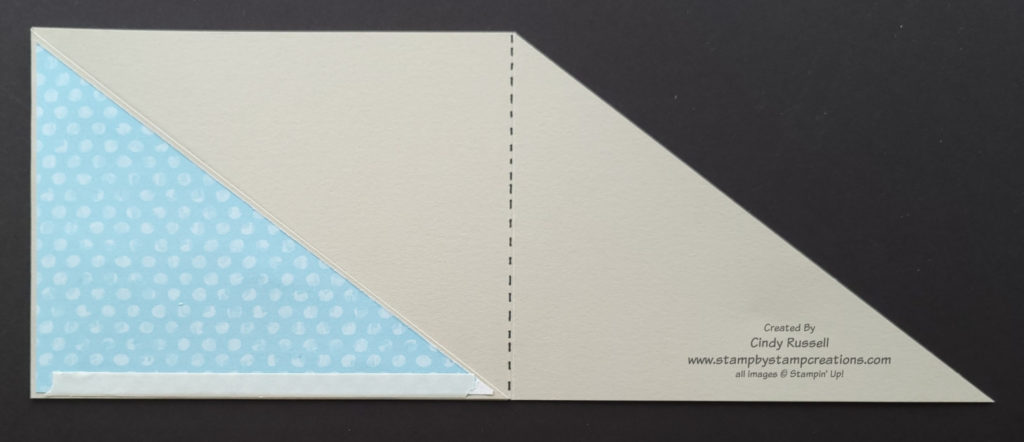
Fold both pieces along the score lines making sure that edges and points/corners line up straight.  Lay the two pieces horizontally with the angled pieces to the outside.  Adhere the two rectangular sections together, making sure all edges line up square.   

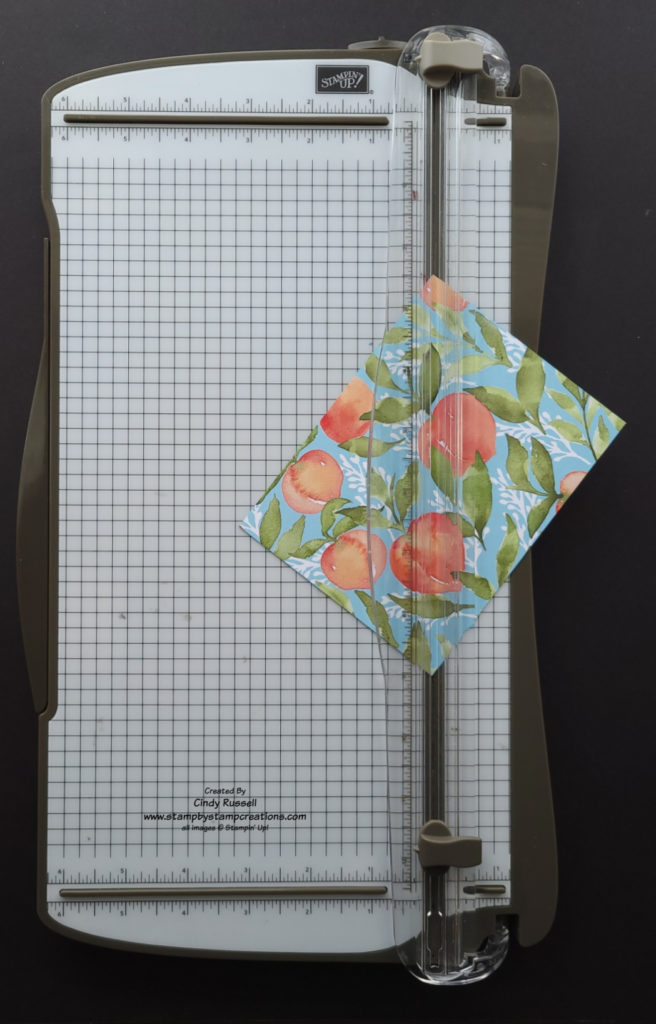
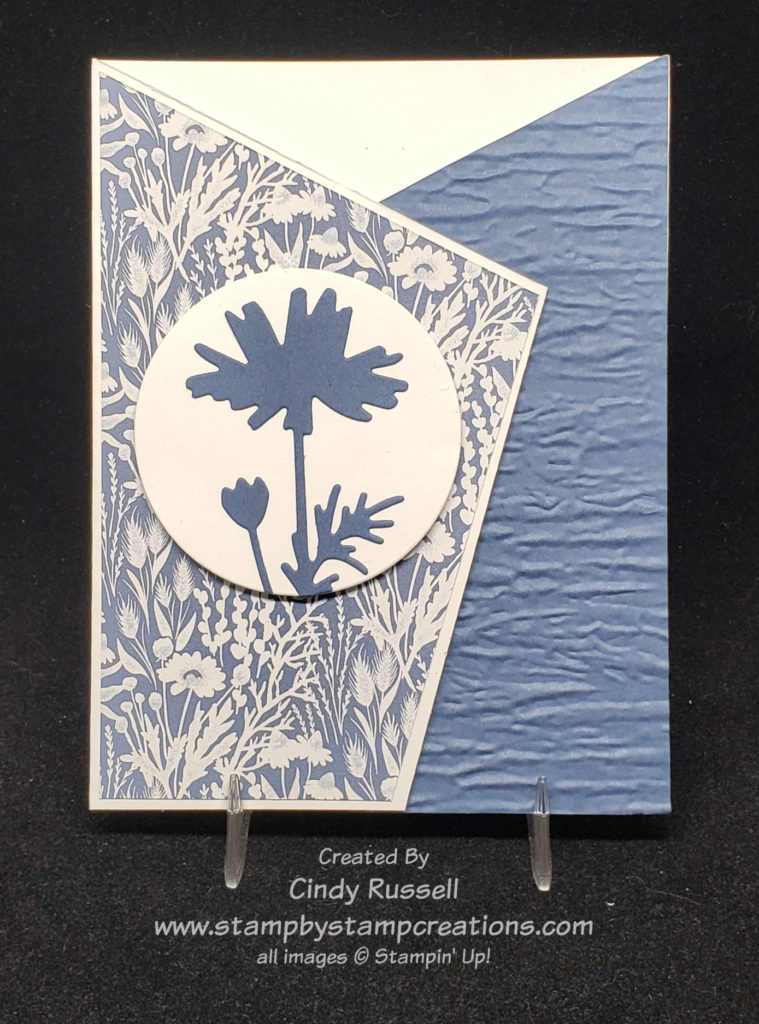
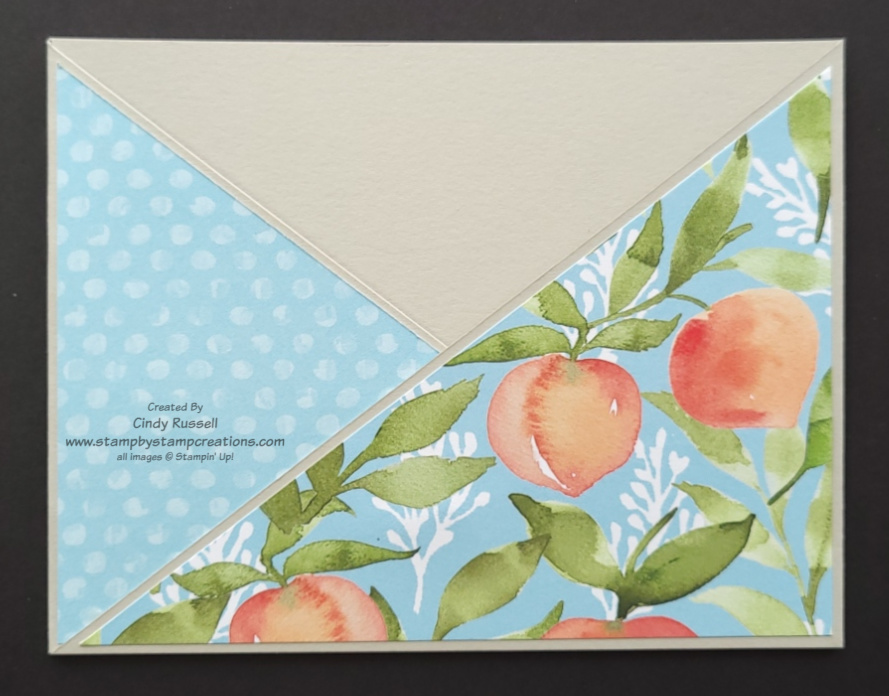
The angled sections of the card need to be decorated before you complete the pocket.  It’s easiest if you start with a piece of designer paper that you want to use both sides of.  Cut the designer paper to 5 ¼” x 4”.  If the patterns you want to use aren’t on the same sheet of designer paper, you will need to cut two different 5 ¼” x 4” pieces.  The side of the paper facing up will be adhered to the angled section on the right side of the card.  Cut the designer paper diagonally from the upper left corner to the lower right corner. If the designer paper has a pattern where it matters if something is upside down, be sure to take this into consideration before cutting the paper.  You will notice that on my card at the beginning of this post that the leaves are pointing down.  Lucky for me this doesn’t really matter with leaves. (I forgot to take my own advice! Ha!).  In the sample photo to the left you see that it will matter if the peaches are upside down so I had to take that into consideration.

Adhere the designer paper pieces to the angled sections of the card base.  Make sure you have the sections in the “closed” position so you don’t adhere the paper to the wrong side of the section.  I like to use liquid glue so that I have to a little room to slide the piece and make sure I get it in the correct position.

To make the pocket, place a strip of Tear & Tape adhesive as close to the bottom edge of one of the angle sections as possible .  You will want to adhere the adhesive to the angled section that will be “underneath” and will be covered by a portion of the other angled section.  In this example photo I placed my adhesive on the left angled section.  Remove the backing from the Tear & Tape, fold the section over towards the center and adhere.

To adhere the second angle section over the first, place a piece of Tear & Tape adhesive close to the bottom edge of the first angle section (which is already adhered to the center of the card).  Make sure not to get too close to the left side (in my example) so that the adhesive doesn’t show when the angled piece is adhered.

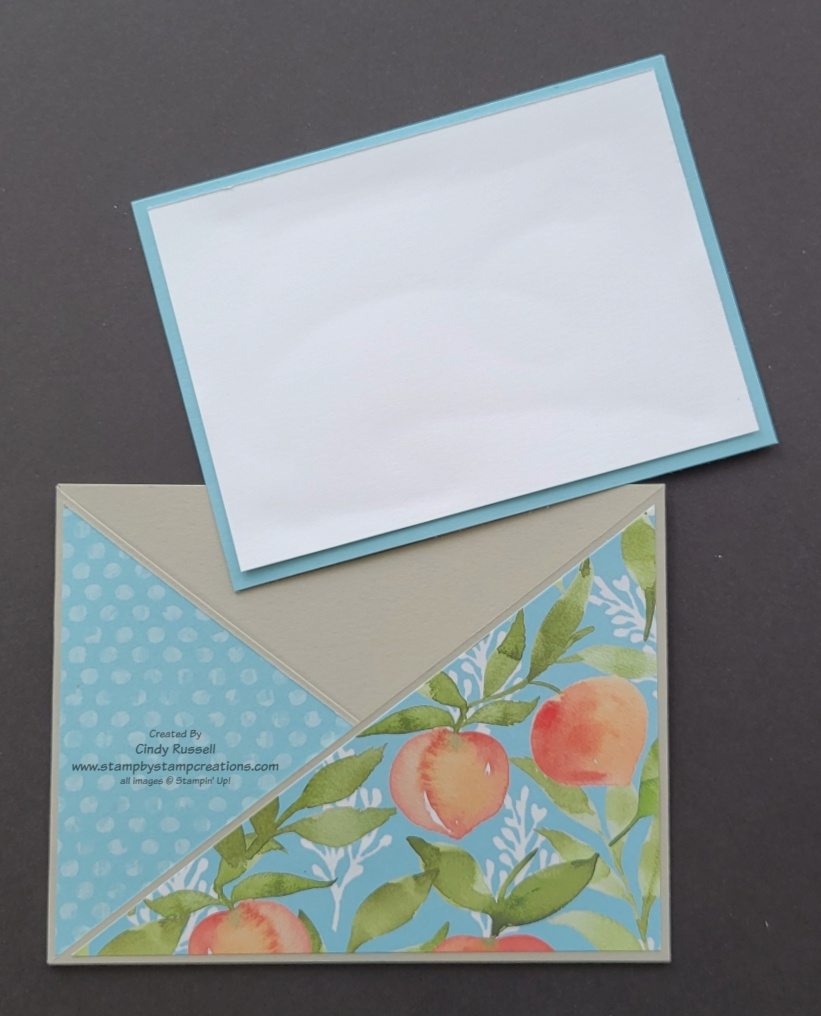
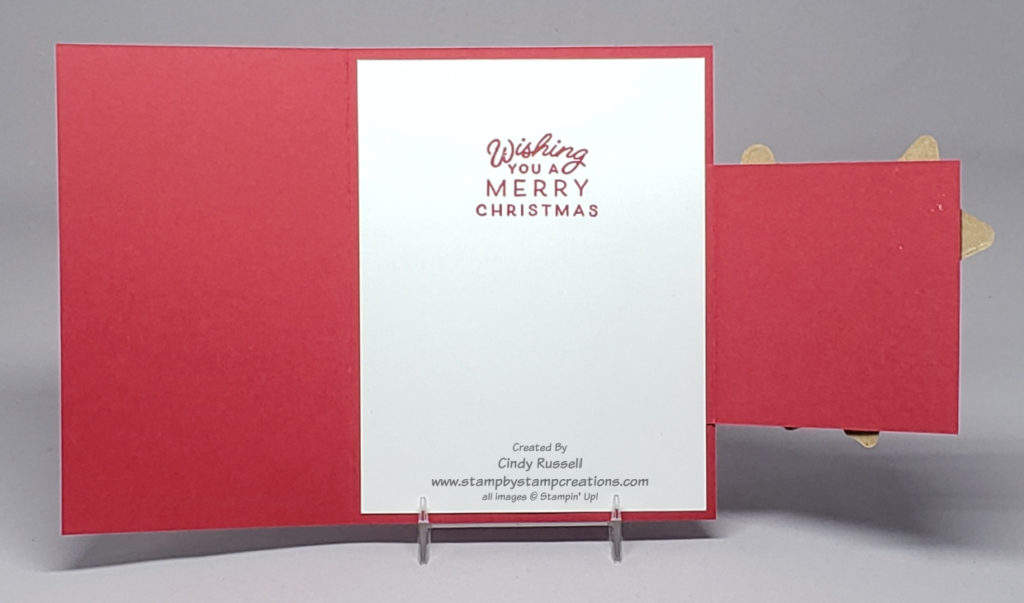
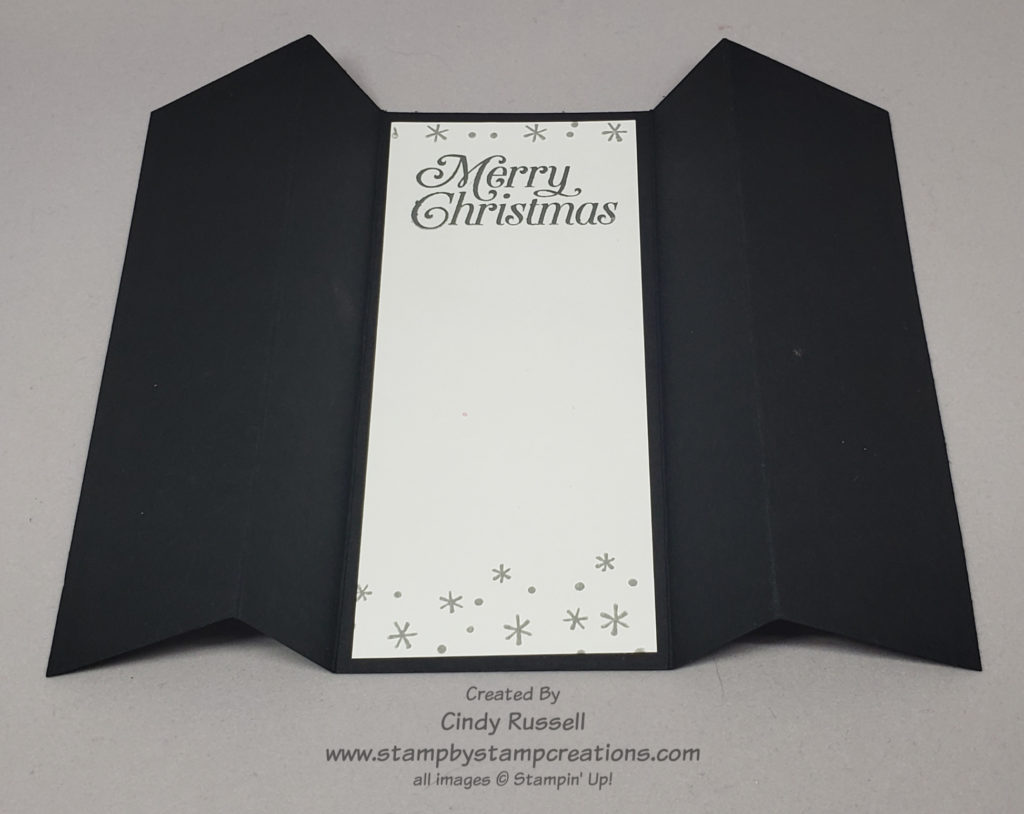
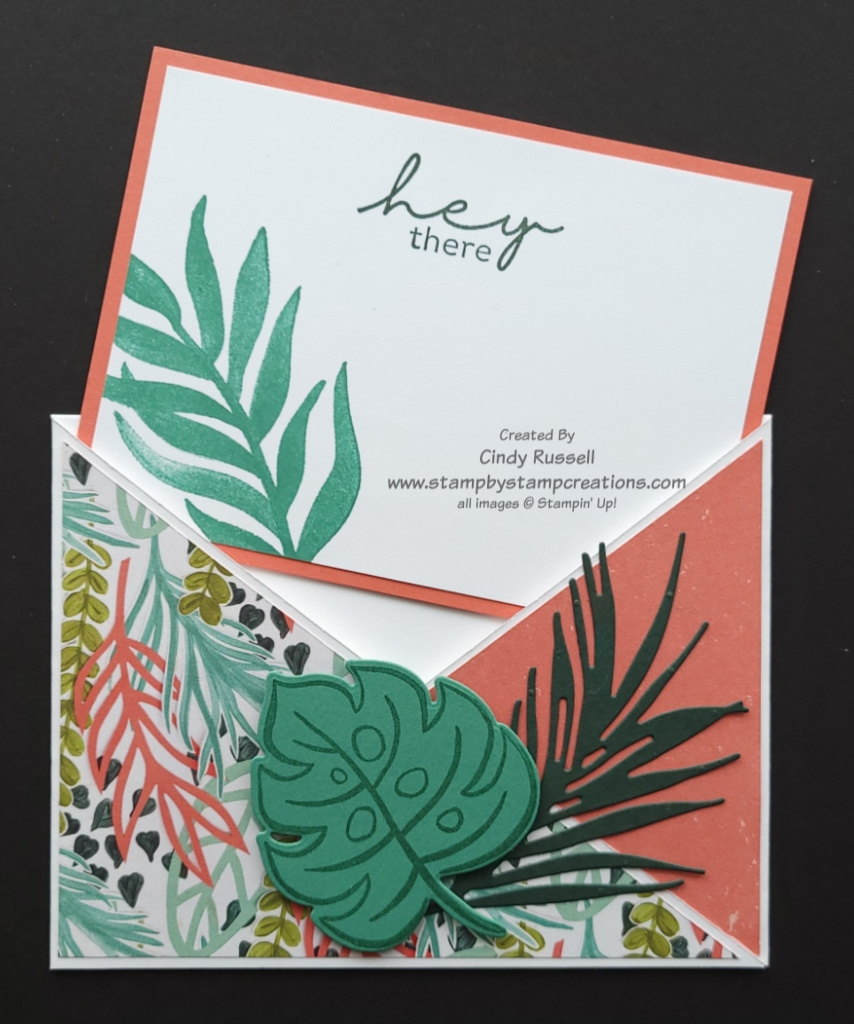
For the pocket insert cut the base piece 5 1/8” x 3 ¾”.  The Basic White piece which you will decorate/write on should be cut 4 7/8” x 3 ½”.

Despite my lengthy instructions and all of the photos, this card is pretty easy to make. Have fun recreating it!

Have a great day! Take care and Happy Stamping!

Black & White Half Front Fun Fold Card

It’s a Fun Fold Card that highlights the fun All Together Designer Series Paper! This Half-Front Fun Fold is easy peasy!

I cut my cardstock 4 1/4″ x 11″ and scored it at 5 1/2″. Then I trimmed 3″ off of one of the sections which left the “front” of the card 2 1/2″. The large piece of designer paper is 2 1/4″ x 4″. I added a strip of 4″ x 1/4″ designer paper to the bottom of the inside piece (5 1/4″ x 4″) to add a little interest.

The sentiment focal point piece of Basic White cardstock is 2 3/4″ x 3 1/2″. The sentiment is from the Happiest of Birthdays stamp set. I love that it is so large and can be used as a focal point on a card.

This black & white birthday card would be perfect any guy in your life. Guy cards are so hard to design but you can’t go wrong with black & white!

It’s been a fun week playing with black & white cards but next week I think we’ll move back to some color!

Have a great day! Take care and Happy Stamping!

A Fun Fold and Stamped Ribbon

It’s Fun Fold Friday!  Not only do I have a fun fold card for you but it’s a swap card as well.  This fun fold is very similar to one I showed you back in October.  You can view that post here.  I called that fun fold in October the Side Flap Fun Fold.  This card is the same idea but the flap is a different size and in a different location on the card.

The image on the front of the card is from the Amazing Silhouettes stamp set in Stampin’ Up!’s January – June Mini catalog. The “thanks” is from the Biggest Wish stamp set in the Annual Catalog.

I have to tell you that my favorite part of Melissa’s card is that she stamped the sentiment directly on the ribbon! I have never done that. Have you? I’m especially impressed because this ribbon is very textured.

I was going to tell you that you should probably use StazOn ink when stamping on ribbon but then I thought I’d give it a try with regular Stampin’ Up! ink. Guess what? It worked just fine! Check out the second photo.

Stamping On Ribbon

I didn’t expect it to turn out so well! When I placed the inked stamp on the ribbon I held it in place for a few seconds and then lifted the stamp straight up. No problems at all! Hmm…I may have to try this on one of my own cards!

If you’re wondering, this ribbon is the White Frayed Ribbon (#158138 $7.50) found on page 33 of Stampin’ Up!’s January – June Mini Catalog.

Here’s a photo of the inside of Melissa’s card. I like the way she used the Sale-a-bration paper, Daffodil Afternoon, to add a little something extra to the inside of the card.

No naked envelopes and no naked insides of your cards! If you’re going to the trouble of making a special card, make the envelope and the inside of the card special too.

Have a great day! Take care and Happy Stamping!

Pocket Fun Fold ValentineCard

I love Fun Fold cards and the easier, the better! The complicated ones can be amazing but it’s so much easier to duplicate the easier ones. Last week’s fun fold was very simple and this week’s Pocket Card comes pretty darn close.

This fun fold makes a really cute valentine but just change up the stamp set, dies and designer paper and you can make any type of card. I’ve used this design for a sympathy card.

The pocket portion of this card is only one piece of cardstock!  4 1/4” x 11” scored at 1 ¼” and 5 ½”.  The insert for the pocket is 5” x 3 ¼” and you can choose to put a “handle” to grab on the top or leave it off. 

If you’d like to recreate this project you can view my step-by-step instructions for this Pocket Card Fun Fold here.  These instructions also include a complete supply list.

Have a great day! Take care and Happy Stamping!

It’s All About The Candy

It’s all about the candy, right? I’m talking about Valentines Day. Where would Valentine’s day be with out the heart shaped box of chocolates or the fun little pink and red treats?

Valentines Day may be all about candy but so is this sheet of Stampin’ Up!’s Sweet Talk Designer Series Paper. This sheet of paper is perfect for this easy-peasy Fun Fold!

This card isn’t so much a Fun Fold as it is a unique card design. The cardstock portion of the card isn’t the usual 5 1/2″ x 8 1/2″ scored at 4 1/4″. The cardstock portion of this card is 5 1/2″ x 5 1/4″ with the score mark at 1″ on the 5 1/4″ edge.

The designer paper is cut at 5 1/4″ x 4″ and adhered to the 1″ flap of the cardstock. In the second photo that I’ve posted here you can see that the designer paper is not butted up against the fold of the cardstock. To get the designer paper lined up properly, I opened the cardstock and centered the designer paper on the large section. I placed my adhesive on the 1″ flap (being careful not to get it too close to the center fold) and then closed the cardstock so the adhesive adhered to the designer paper.

There are a couple of things you want to remember when working with the white insert for your card. First of all want to cut it slightly smaller than 5 1/4″ x 4″. You do this to make sure that none of the white shows when the card is closed.

The second thing to note is that you’re not going to just place adhesive on the back of the white cardstock and adhere it to the inside of the card. You’re going to place the adhesive on the back of the white cardstock and then center the front of the white cardstock on the backside of the designer paper. Once you have the white cardstock centered, you will close the card and your white cardstock should be perfectly centered on the inside of the card.

This card design will work for any of your favorite patterned papers. I’ve written up step-by-step directions for this card which include dimensions and supplies. You can view them here. Have fun creating your own Designer Paper Card Front Fun Fold card! Have a great day! Take care and Happy Stamping!

Cookies and a Fun Fold

I love fun fold cards!  They make an ordinary card a bit more special.  When I find a fun fold that I want to recreate and it’s only called “fun fold” the hard part begins.  What do I call it? How do I describe it to you?  That’s where my unoriginal descriptive names come in.  Ha!

I am calling today’s fun fold the Side Flap Fun Fold because…it has a side flap.  Yep.  Original.  Whatever….let’s forget about the name and talk about how to make this fun card.  Basically, you take a regular-sized card, trim the front and add the side flap.  Easy peasy.

The base is 5 ½” x 7 ½” or a regular 5 ½” x 8 ½” card base with 1” trimmed off the front of the card.  The side flap is 3 ½” x 3”.  Score at the 3” mark on the 3 ½” side.  The ½” section of the flap is the part that gets adhered to the inside of the card back. 

After you’ve folded the card base along the score line it’s time to adhere the flap.  Fold the flap all the score line.  With the flap still folded, place adhesive on the small section.  Now, with the card base open, line up the fold of the flap with the right edge of the card base.  Adhere the flap to the card base.  That’s it.  You’ve made the Side Flap Fun Fold.  Now it’s time to decorate.

I used products form Stampin’ Up!’s Gingerbread & Peppermint Suite of products.  The sentiment on the inside of the card is from the Frosted Gingerbread stamp set and the “cookies” on the flap of the card are cut using the coordinating Gingerbread dies.  I love how you can die cut the “cookie” and the intricate “frosting”.  I just wish I could make cookies that look so good.  Ha!  The designer paper is from the Gingerbread & Peppermint Designer Series Paper pack.  Gotta love all that coordination!  The jewels on the “cookies” are Wonderful Gems.

Here are some additional dimensions for the layers on the card.
Basic White:  5 ¼” x 4”, 5 ¼” x 3”, 2 ¾” x 2 ¾” Designer Paper:  5” x 2 ¾”

This was a pretty easy fun fold card to make.  I hope you’re enjoying fun folds as much as I am.  Have a great day!  Take care and Happy Stamping!

A Squirrely Fun Fold Card

Window Double Card Fun Fold

I was going through my stash of cards the other day and came across this Fun Fold that I call the Window Double Card Fun Fold.  It’s a rather easy fun fold and I decided to give it a try for today’s card.  Next was to figure out what supplies to use on it.  As I searched my shelf of stamps, I came across the adorable Nuts About Squirrels stamp set from the current Mini Catalog and knew it was perfect for this fun fold.

The little squirrels in this stamp set are so dang cute and the sentiments are cute too. The outline of the squirrel is stamped in Early Espresso and the shading of the squirrel is in Cinnamon Cider. The insides of the acorn are stamped with Soft Suede and Crumb Cake.

This fun fold gets it’s name because it’s basically two cards in one.  You have the outside decorative card and then you have another piece of cardstock folded into a card on the inside of the card.  The outside of the card is a basic 5 ½” x 8 ½” piece of cardstock folded in half.  The inside piece is a 4 ¾” x 7” piece of cardstock folded in half. 

I added the designer paper (from the Beauty of the Earth package) to the front of the card before die-cutting the circle.  After die-cutting the circle I die cut the circular frame to fit around it.  I started by die-cutting the larger circle and then chose the next smallest circle die from my Layering Circles Dies.  The outside of the smaller die fit the edges of the die-cut larger circle perfectly.  The leaves on the front of the card are stamped on Basic White cardstock and then cut out by hand.  Fussy-cutting isn’t my favorite thing but these little leaves finished off the front of my card perfectly!

This fun fold could easily be made without the window in the front but the little peek-through makes it so fun!  Have a great day.  Take care and Happy Stamping!

The Overlapping Flap Fun Fold Card

Overlapping Flap Fun Fold

Today’s Fun Fold Card is the Overlapping Fun Fold. The person online where I first saw this fold just called it a “Fun Fold”. I like to be a little more descriptive with my titles as it makes it easier to go back and find. I couldn’t think of anything real creative so I just called it like it was. There are two side flaps on this card and they overlap each other. That’s as clever as I got with this one. Ha!

This fun fold isn’t difficult but it’s not as easy as some of the others I’ve been sharing with you either. The only “tricky” part of this fold is adhering the front flaps of the card so they don’t show on the back.

The fun part of making this card is deciding on your pattern(s) of designer paper. I said pattern or patterns because you could go from having all of the patterns of paper the same to having them all different! I used Stampin’ Up!’s Heartwarming Hugs Designer Series Paper which you can find in the July-December Mini Catalog on page 57. I was so glad to see these papers carry over from last year because they are fun patterns in your traditional Christmas colors.

The key to getting everything lined up correctly on this card is to first adhere the small strips of designer paper to the top and bottom of the inside sheet of cardstock. You want to do this so that you can line up your flaps on them.

Below is a video that shows the basics on how to put this card together.

Here are the dimensions of the pieces you need for this card:

Garden Green (base): 5 1/2″ x 4 1/4″ Real Red Layer: 5 1/4″ x 4 Basic White: 5 1/8″ x 3 7/8″ Real Red Left Panel: 4″ x 3 1/2″ score 1/2″ on 4″ side Real Red Right Panel: 3 1/2″ x 3″ score 1/2″ on 3 1/2″ side Designer Paper: 3/4″ x 4″ (cut 2), 3 1/4″ x 3 1/4″, 2 3/4″ x 2 3/4″

I hope you enjoy this fun fold. Have a great day! Take care and Happy Stamping!

Fall Leaves Tent Topper Fun Fold Card

Tent Topper Fun Fold Card

You’re probably tired of hearing me say this but I’m ready for FALL!!!!! Give me that cool weather and those colored leaves.

Since I’m so ready for those colored leaves I knew I wanted to use Stampin’ Up!’s gorgeous Beauty of the Earth Designer Paper on today’s fun fold. Don’t you love the color combination on this pattern? Night of Navy, Merry Merlot and Cinnamon Cider!

This fun fold is pretty easy to make. You only need two pieces of colored card stock, two pieces of designer paper, two pieces of Basic White cardstock and your embellishments/stamps. For tools you will need your Simply Scored or your Paper Trimmer with a scoring blade, your Stampin’ Cut & Emboss Machine and your Layering Circle Dies.

I used my favorite Stitched Leaves Dies to embellish the card. A stamped image would work well in the focal point circle also but I seem to be on a die kick. I’d rather find a die that works for my project than stamps and ink. Yes, it’s kind of weird. Hopefully this is just a phase I’m going through. Ha!

Here is another view of the card. You can see how the top flap opens up and that the circle is part of the base of the card. (You also can see more of that gorgeous designer paper!)

These two photos show you the two different sides of the card. The photo on the left shows the inside and the photo above shows the “outside”. These photos give you a good idea on how the card is put together.

I’ve posted a video below with some tips and tricks for putting this fun fold card together. The fun fold isn’t hard to make, it’s just easier with these tips and tricks.

Dimensions for the card:

Night of Navy cardstock: 4 1/4″ x 11″, 2 1/4″ x 2 1/4″ Basic White cardstock: 4″ x 4″, 2 1/4″ x 2 1/4″ Designer Paper: 4″ x 4″, 2 1/4″ x 4″ scraps for leaves

Here is a quick video to show you how to make the Tent Topper Fun Fold card along with some tips and tricks.

I hope you’ve enjoyed this fun and easy card. Have a great day! Take care and Happy Stamping!

Fun Fold: Angled Gate Fold Card

Angled Gate Fold Card

As soon as I saw this Angled Gate Fold card I knew I had to give it a try.  It’s so interesting with the different angles.  You can have either the left flap or the right flap of the card be the one that has your focal point on it.  The sample I saw had the focal point on the right side but wanted to change it up and have my focal point on the left.  Personally, I like it better on the left.

The card base for this card is pretty easy to make once you’ve figure out the little tricks to it.  You are going to start with a 5 ½” x 11’ piece of cardstock.  Score it along one the long sides at 3 3/8” and 7 5/8”.

The easiest way to figure out how to cut the angles on the flaps of the card base is to watch the quick video below that I recorded. I’ve also posted a few photos below.

To make the top angle you want to line up the 7 5/8″ score mark in the cutting grove of your Stampin’ Up! Trimmer. Then line up the top corner of the card base at the right edge of the trimmer grid. This actually is at 1 1/2″. Then cut along the cutting grove.

The second or bottom angle of the flap is just as easy to make. This time you are going to line up the corner piece that you just cut in the cutting grove and then line up the bottom corner of the card base with the 1″ mark. You can view this in the photo below.

To cut the angles on the left flap of the card base I completely flipped my card base over and repeated the steps above.

It was easier to flip the card so that I could use the same measurement points on the right side of my Paper Trimmer.

To cut the designer paper and/or cardstock to layer on top of the card base flaps you will want to start with a piece which is 3 1/4″ x 5 3/8 . The important thing to remember when trimming these pieces is that it is not going to exactly match up to the flap. Your borders may not be exactly equal. If you are super particular about your crafting you may need to tweak things a bit.

You will trim the 3 1/4″ x 5 3/8″ pieces the exact same way that you trimmed the angles on the flaps. Instead of starting the first angle on the score mark you will start it at the left top corner of the paper.

Most of the samples I saw using this fun fold had the same pattern of designer paper on both the left flap and the right flap of the card. I tried that but with the pattern I was using and with the white card base it was just too much white. My card needed a little contrast so I decided to cover the right flap with Misty Moonlight cardstock which I embossed with the Bark 3D Embossing Folder. It was just what my card needed!

I hope you like this week’s fun fold. Give it a try and leave a comment with your project. I’d love to see it! Have a great day! Take care and Happy Stamping!

Book Binding Fun Fold Christmas Card

Book Binding Fun Fold

When I first saw the Whimsy & Wonder Suite in Stampin’ Up!’s July – December (Holiday) Catalog I had a hard time with it. To me Christmas items should be red and green with maybe some blue, silver or gold thrown in. Pink, although it’s my favorite color, does not say Christmas to me.

Then I started messing around with the Whimsy & Wonder Specialty Designer Series Paper. Too fun! I kind of got into the pink and other light colors of the paper. This card made rethink the whole “no pink for Christmas” thing. Ha!

Book Binding Fun Fold – open

Today’s Fun Fold is the Book Binding Fun Fold and is SO easy! Start with an 11″ x 4 1/4″ piece of cardstock for the card base. Score at 4 1/4″ and 5 1/2″. Fold the score marks in opposite directions. Adhere the small section of the card front to the inside of the card base. This will leave you with a 4 1/4″ x 4 1/4″ section that opens for your card and a 4 1/4″ x 4 1/4″ section on the inside of your card. Then on to decorating!

I used all of the accessories/embellishments in the Whimsey and Wonder Suite of products on my card. The gorgeous paper, the iridescent foil snowflake and the fun Blushing Bride pink ribbon. The Basic White layers on my card are 4″ x 4″ and 1″ x 4″. The designer paper layers are 3 3/4″ x 3 3/4″ and 3/4″ x 3 3/4″. I adhered the snowflake to the front of the card with a Stampin’ Dimensional which fits perfectly in the center of the snowflake.

What you may not have noticed in the first two photos I shared of this card and which is still a little difficult to see in this photo is that I actually used two different ribbons layered together on my card.

The Blushing Bride 3/8″ Frayed Ribbon looked nice on the card but it seemed a little flat. That’s where the fun, new White 3/8″ Glittered Organdy Ribbon comes in. When layered with the pink, the glitter ribbon gives the last perfect, sparkly touch to the card!

That Rule of 3 came into play again on this card. The designer paper sparkles, the snowflake sparkles/shimmers and the ribbon sparkles. Three different items that make my card shine!

If you like the look of fun fold card but some seem a little involved for you be sure to give the Book Binding Fun Fold a try. It’s the perfect fun fold to get you started.

Have a great day! Take care and Happy Stamping!

Fun Fold: Modified Z-Fold 2.0

In my newsletter early this week I shared a card that was similar to this with a single leaf and the same color combination. I liked it so much that I wanted to use it again with a fun fold.

Today’s card is a modified Z-Fold. I’m actually calling it a Modified Z-Fold 2.0 because I’ve already shared one type of modified Z-Fold card with you. You really can do a lot with a Z-Fold.

Modified Z-Fold Fun Fold Card

As you can see in the photos above, the front and back of the card aren’t connected to each other at all. The inside Z-fold section connects the front and the back of the card. It’s a fun little modification to change things up a little.

Each of the outside panels are 5 1/2″ x 4 1/4″. The inside Z-fold is a piece of cardstock that is 11″ long and 3 1/2″ wide. It is scored on the long side at 1 1/2″ and 6 1/4″. Fold the 1/2″ score mark into a mountain fold and the 6 1/4″ score mark into a valley fold.

The large outside section of the Z-Fold is adhered to a 5″ x 3 3/4″ piece of Cherry Cobbler cardstock which is then adhered to the back section of the card. To adhere the front piece of the card to the small section of the Z-fold first close up the Z-fold and place adhesive on the small section. Now line up the front of the card with the back of the card and press down so the adhesive adheres. The card base should be complete and ready to decorate.

I love the way the Stitched With Whimsy die perfectly frames the leaf and sentiment on the card front. It also brings out the stitching on the Stitched Leaf die. The “hello” is from the Biggest Wish stamp set and the speckles behind the leaf are from the Gorgeous Leaves stamp set.

Below you will find a quick video on how I made the base of the card.

Modified Z-Fold Card

Have a great day! Take care and Happy Stamping!

Fun Fold: Panel Card

Panel Card Fun Fold

This Fun Fold card is so fun and easy!  Four score marks, gorgeous designer paper and some coordinating pieces of paper for the layers.  I used Stampin’ Up!’s absolutely stunning Peaceful Place Specialty Designer Series Paper that you will be able to find on page 37 of the new (Holiday) Mini Catalog.  The only colors in this package of papers are Smoky Slate, Basic Gray, Basic Black and Silver.  Amazing!  You will definitely want to check out this paper.

For the card base of this fun fold card you start with a piece of cardstock that is 8 ½” x 5 ½”.  Score along the long side at 1 7/8”, 3”, 5 ½” and 6 5/8”.  When folding along the score lines the two outside score marks will be valley folds and the two inside score marks will be mountain folds.  When folded closed, the card measures 5 ½” x 4”.

The sheet of designer paper that I chose for this card has large snow-covered trees on the bottom portion and silver snowflakes falling from the sky on the top portion.  I used the top portion for my two outside panels and cut them 5 1/8” x 1 ½”.  Then I used one of the smaller trees and cut a panel that is 5 1/8” x 2 1/8”.  I cut the silver foil layers 5 ¼” x 1 5/8” (2x) and 5 ¼” x 2 ¼”.

I did add a piece of Basic White cardstock to the back of the large panel so I could add a sentiment.  Since I didn’t have the coordinating Peaceful Cabin stamp set (which is on my wish list!) yet I had to search my stash for a sentiment that would fit.  Most of the sentiments in the Peaceful Cabin stamp set should fit perfectly.  I guess I’m going to put that on my August shopping list so I can recreate this card!

After looking at the Peaceful Place Suite in the new Mini Catalog it dawned on me that I could maybe “close” my card with a belly band of the gorgeous White Glittered Organdy Ribbon.  Of course, as I was grabbing it off my ribbon shelf I noticed the Black Glittered Organdy Ribbon.  Oh, dear. Decisions, decisions!  Since I couldn’t decide, I cut a 20” piece of each of the ribbons and made two belly bands.  Now I need your help?  If you were going to recreate this card which ribbon would you use for your belly band?  White or Black?  Please let me a comment below and help me make this decision!  Have a great day!  Take care and Happy Stamping!

Fun Fold: Tri-Fold Card

Check out this fun birthday card that my friend Tena made for me.  It’s an easy tri-fold card decorated with the Sweet Symmetry Designer Series Paper and the coordinating In Symmetry stamp set.  And it’s PINK! Yes, I still love my pink!  😊

The base of this card is quick and easy.  Start with a piece of cardstock that is 5 ½” x 11”.  Score along the long edge at 3 ¾” and 8”.  This makes it so that a little of the folded in right panel shows and is especially pretty when decorated with a coordinating piece of designer paper.

Tena layered her two piece of designer paper on to Flirty Flamingo cardstock to make it pop.  She did have to fussy-cut all of the flowers and greenery though.  Thanks Tena for putting so much time and effort into this lovely card!  Not only did Tena make a lovely card for me but she also decorated the envelope with the same designer series paper!

Do you love designer paper as much as I do?  Don’t forget that Stampin’ Up! has 9 different packages of designer paper on sale this month.  Don’t miss out!  There’s only a few weeks left of the sale!   Check out what’s on sale right here

Fun Fold: Interlocking Gatefold Card

Interlocking Gatefold Card

Can you believe that I found another type of gatefold card?  There are SO many and they’re SO fun!  This fun fold isn’t too difficult, especially since I used the Stitched Rectangles Dies to make my interlocking pieces.  What’s really fun about this fun fold is that you can use any kind of shape(s) to make your interlocking pieces!

The base of my card is the usual for a gatefold card. 5 ½” x 8 ½”.  Score in from each short side at 2 1/8” and make sure the sides meet in the middle of the card base when you fold both sides in towards the center.

The frame of my card is made from Stampin’ Up!’s gorgeous Beauty of the Earth Designer Series Paper.  (Yes, this is one of the patterns that is on sale this month!).  To give my frame a little extra support I adhered a piece of the designer paper to a piece of Basic White cardstock before die cutting.  To make the frame I chose two different sized rectangles.  I first die cut the inside of the frame with the rectangle that is the 5th largest (outside measures about 2 3/8” x 3 ¾”).  Then I centered the 3rd largest frame (outside measure about 3 1/8” x 4 ½”) around the opening I had created.  When you go to adhere the frame to the card remember that you only want to adhere the left side of the frame to the left flap on the front of the card.

The solid Basic White piece that interlocks with the frame was also die cut from the 3rd largest rectangle of the Stitched Rectangle Dies.  The stitched design I added to this piece of Basic White cardstock is a border piece from the Stitched Leaves Dies.  I die cut the leaf using the same die set.  It is die-cut from another piece of designer paper from the Beauty of the Earth package.  I love gorgeous paper!

When I adhered the right side of the Basic White piece of cardstock to the right flap of the card base I had the card closed so that I could make sure that it fit perfectly inside of the die-cut frame.  Then I added the die-cut leaf and decorated with a piece of linen thread.  Done!  Oh…in the last picture did you notice that I added a little strip of designer paper to the piece of cardstock on the inside of the card?  Don’t forget to decorate the inside!

Interlocking Gatefold Card

Have a great day! Take care and Happy Stamping!