It’s All About the Paper!

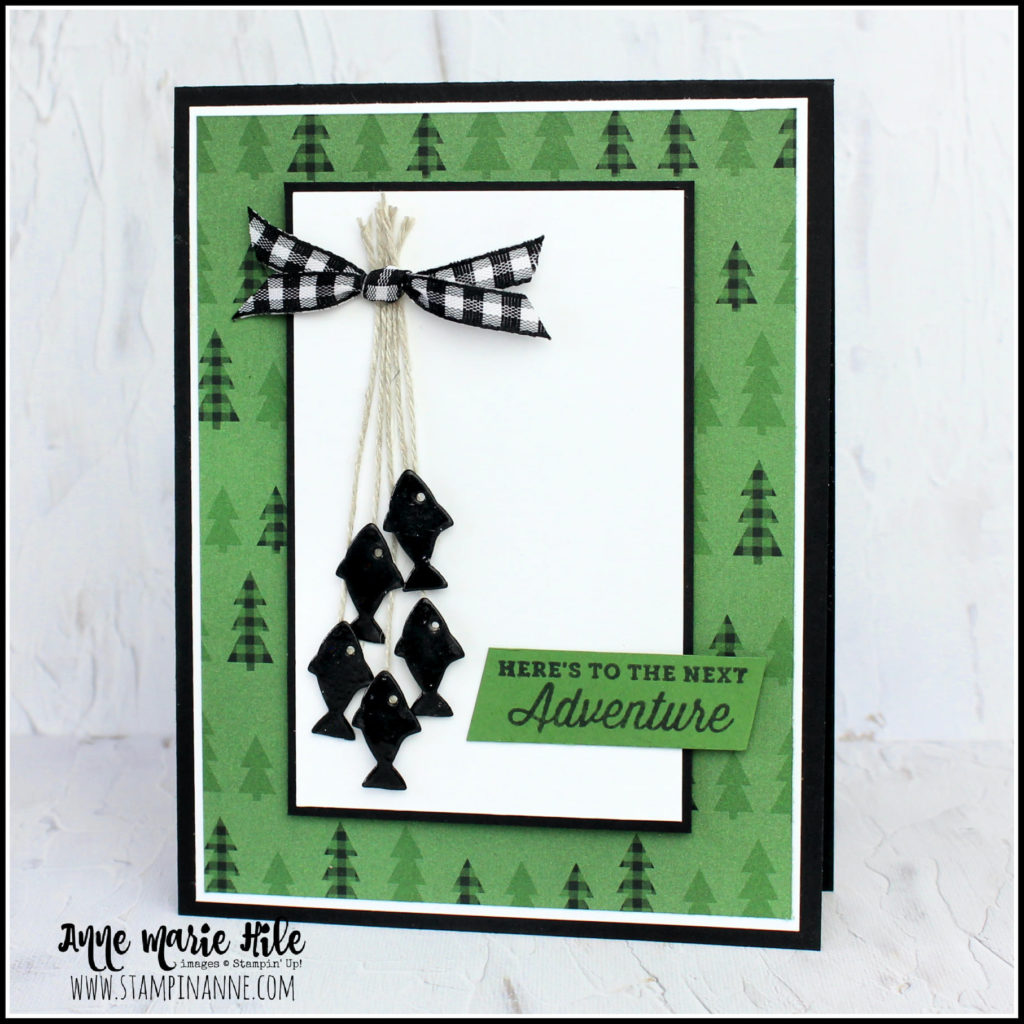
It’s all about the paper (ok…and the adorable little fish….) with this card.  How can you go wrong with fun designer paper that has little pine trees all over it….and plaid pine trees at that?!  Two of my favorite things!  When I think of pine trees I think of the Minnesota Homeland and our family property in Canada.  I can’t wait to get back there.  Oh….as you read this I AM in the Minnesota Homeland hanging with my mom and dad.  I’ll be here for a week before hubby joins me and we head up to the cabin.  Woo Hoo! I’m excited to hopefully spend some time in the upper midwest!

This card really came together once I was inspired Anne Marie’s card. She hit the trifecta on her card. Plaid trees on the paper, plaid ribbon and the little fishies! The fish were what first caught my eye! They’re so cute!

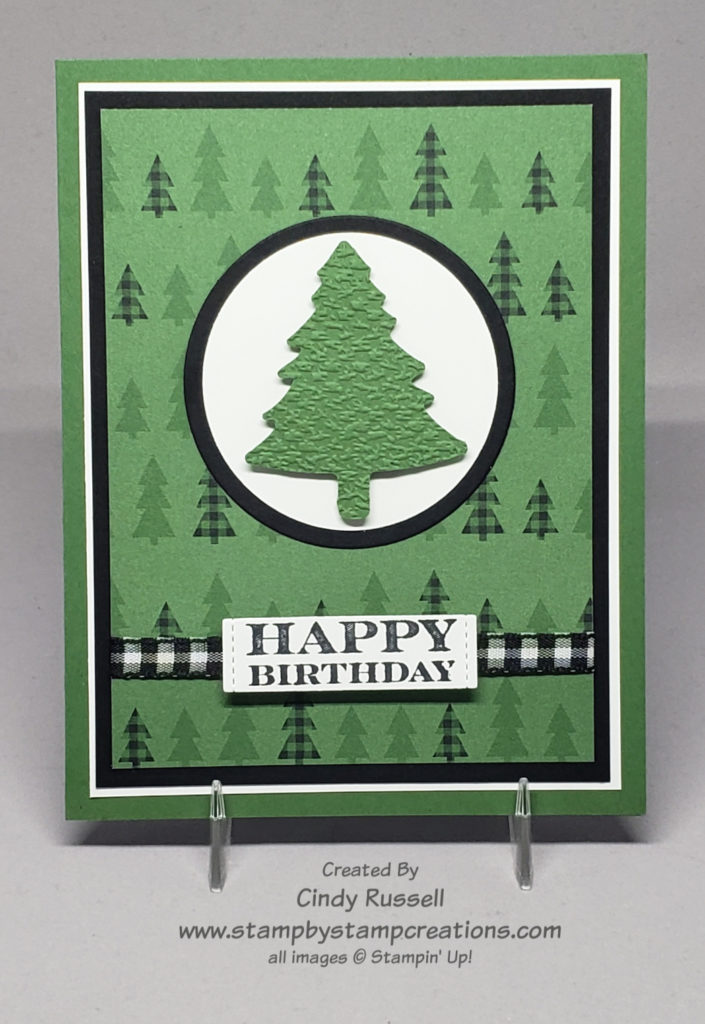
I wanted to incorporate the fish on my card without completely copying Anne Marie’s card but I just couldn’t make it work so I decided to go with the Pine Tree Punch. Did you notice that I ran the punched tree through the Stampin’ Cut & Emboss Machine with the Tasteful Textile Embossing Folder? This really gave it a nice texture.

This color combination of black, white and Garden Green is very striking. I’m not sure I’ve used it before. Hope about you? Have you checked out the Peaceful Prints Designer Series Paper in the Sale-a-bration Brochure yet? So many fun designs! If you like it, you need to get it soon! Sale-a-bration is almost over! Only a few weeks left! With a $50 purchase you can choose this package of designer paper for FREE!!! Don’t miss out!

I’m pleased with the way my card turned out. Guess what? You could use it for lots of occasions including Christmas! Hmm….

Have a great day! Take care and Happy Stamping!

Book Binding Fun Fold Christmas Card

Book Binding Fun Fold

When I first saw the Whimsy & Wonder Suite in Stampin’ Up!’s July – December (Holiday) Catalog I had a hard time with it. To me Christmas items should be red and green with maybe some blue, silver or gold thrown in. Pink, although it’s my favorite color, does not say Christmas to me.

Then I started messing around with the Whimsy & Wonder Specialty Designer Series Paper. Too fun! I kind of got into the pink and other light colors of the paper. This card made rethink the whole “no pink for Christmas” thing. Ha!

Book Binding Fun Fold – open

Today’s Fun Fold is the Book Binding Fun Fold and is SO easy! Start with an 11″ x 4 1/4″ piece of cardstock for the card base. Score at 4 1/4″ and 5 1/2″. Fold the score marks in opposite directions. Adhere the small section of the card front to the inside of the card base. This will leave you with a 4 1/4″ x 4 1/4″ section that opens for your card and a 4 1/4″ x 4 1/4″ section on the inside of your card. Then on to decorating!

I used all of the accessories/embellishments in the Whimsey and Wonder Suite of products on my card. The gorgeous paper, the iridescent foil snowflake and the fun Blushing Bride pink ribbon. The Basic White layers on my card are 4″ x 4″ and 1″ x 4″. The designer paper layers are 3 3/4″ x 3 3/4″ and 3/4″ x 3 3/4″. I adhered the snowflake to the front of the card with a Stampin’ Dimensional which fits perfectly in the center of the snowflake.

What you may not have noticed in the first two photos I shared of this card and which is still a little difficult to see in this photo is that I actually used two different ribbons layered together on my card.

The Blushing Bride 3/8″ Frayed Ribbon looked nice on the card but it seemed a little flat. That’s where the fun, new White 3/8″ Glittered Organdy Ribbon comes in. When layered with the pink, the glitter ribbon gives the last perfect, sparkly touch to the card!

That Rule of 3 came into play again on this card. The designer paper sparkles, the snowflake sparkles/shimmers and the ribbon sparkles. Three different items that make my card shine!

If you like the look of fun fold card but some seem a little involved for you be sure to give the Book Binding Fun Fold a try. It’s the perfect fun fold to get you started.

Have a great day! Take care and Happy Stamping!

Spot On With A Wintery Card Sketch

I hope you agree with me that I hit the nail on the head with this card sketch. I didn’t add anything and I didn’t change anything. Can you believe it? With recreating projects I have a hard time leaving well enough alone.

How about you? When you are inspired by a project do you copy it verbatim or do you switch things up to follow your own personal style more? Even with step-by-step instructions right in front of me I change things up….mostly because I didn’t read the directions correctly or I wasn’t paying close enough attention to the video/instructor.

Whether you do follow something step-by-step or completely change things up, the important thing is that you are happy with the results. You need to enjoy what you do and that includes enjoying the finished product!

Go create and enjoy! Have a great day! Take care and Happy Stamping!

Fun Fold: Panel Card

Panel Card Fun Fold

This Fun Fold card is so fun and easy!  Four score marks, gorgeous designer paper and some coordinating pieces of paper for the layers.  I used Stampin’ Up!’s absolutely stunning Peaceful Place Specialty Designer Series Paper that you will be able to find on page 37 of the new (Holiday) Mini Catalog.  The only colors in this package of papers are Smoky Slate, Basic Gray, Basic Black and Silver.  Amazing!  You will definitely want to check out this paper.

For the card base of this fun fold card you start with a piece of cardstock that is 8 ½” x 5 ½”.  Score along the long side at 1 7/8”, 3”, 5 ½” and 6 5/8”.  When folding along the score lines the two outside score marks will be valley folds and the two inside score marks will be mountain folds.  When folded closed, the card measures 5 ½” x 4”.

The sheet of designer paper that I chose for this card has large snow-covered trees on the bottom portion and silver snowflakes falling from the sky on the top portion.  I used the top portion for my two outside panels and cut them 5 1/8” x 1 ½”.  Then I used one of the smaller trees and cut a panel that is 5 1/8” x 2 1/8”.  I cut the silver foil layers 5 ¼” x 1 5/8” (2x) and 5 ¼” x 2 ¼”.

I did add a piece of Basic White cardstock to the back of the large panel so I could add a sentiment.  Since I didn’t have the coordinating Peaceful Cabin stamp set (which is on my wish list!) yet I had to search my stash for a sentiment that would fit.  Most of the sentiments in the Peaceful Cabin stamp set should fit perfectly.  I guess I’m going to put that on my August shopping list so I can recreate this card!

After looking at the Peaceful Place Suite in the new Mini Catalog it dawned on me that I could maybe “close” my card with a belly band of the gorgeous White Glittered Organdy Ribbon.  Of course, as I was grabbing it off my ribbon shelf I noticed the Black Glittered Organdy Ribbon.  Oh, dear. Decisions, decisions!  Since I couldn’t decide, I cut a 20” piece of each of the ribbons and made two belly bands.  Now I need your help?  If you were going to recreate this card which ribbon would you use for your belly band?  White or Black?  Please let me a comment below and help me make this decision!  Have a great day!  Take care and Happy Stamping!