A bone folder is used to score, crease, and smooth paper. I use my Bone Folder all the time. As a matter of fact I own at least five of them and there are probably 2 or 3 on my desk at any one time when I’m creating.
The most popular use for Bone Folders, at least for us paper crafters, is to crease a fold. We will either simply fold a piece of cardstock in half to form our cards and then crease the fold well with our Bone Folder or we will make a score line using another tool (Simply Scored or Paper Trimmer) and then crease that well with the Bone Folder.
You can also use your Bone Folder to score your paper. Butt it up against a straightedge, like a ruler, and then draw your score mark along the straightedge. This is especially helpful when you are working on 3D projects and need and angled score mark.
A Bone Folder is also helpful when you want to break down the fibers in your paper. I do this when I want to give my paper a little curl. Do you ever curl ribbon with your scissors or another tool? This is the same idea. I especially like to do this with flowers like those you’d make with the Daisy Punches. It helps give your die-cut or punched shape a little dimension.
If you don’t own a Bone Folder (or two or three), you should. They are relatively inexpensive and SO useful! Have a great day! Take care and Happy Stamping!
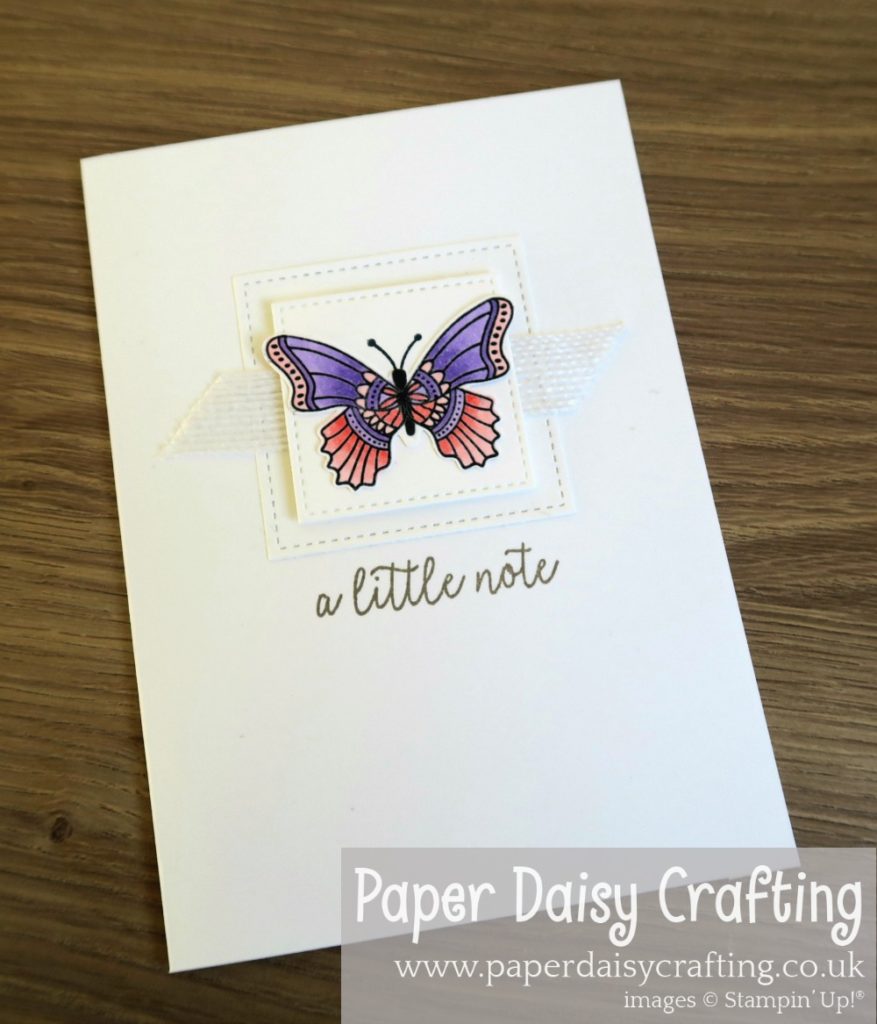
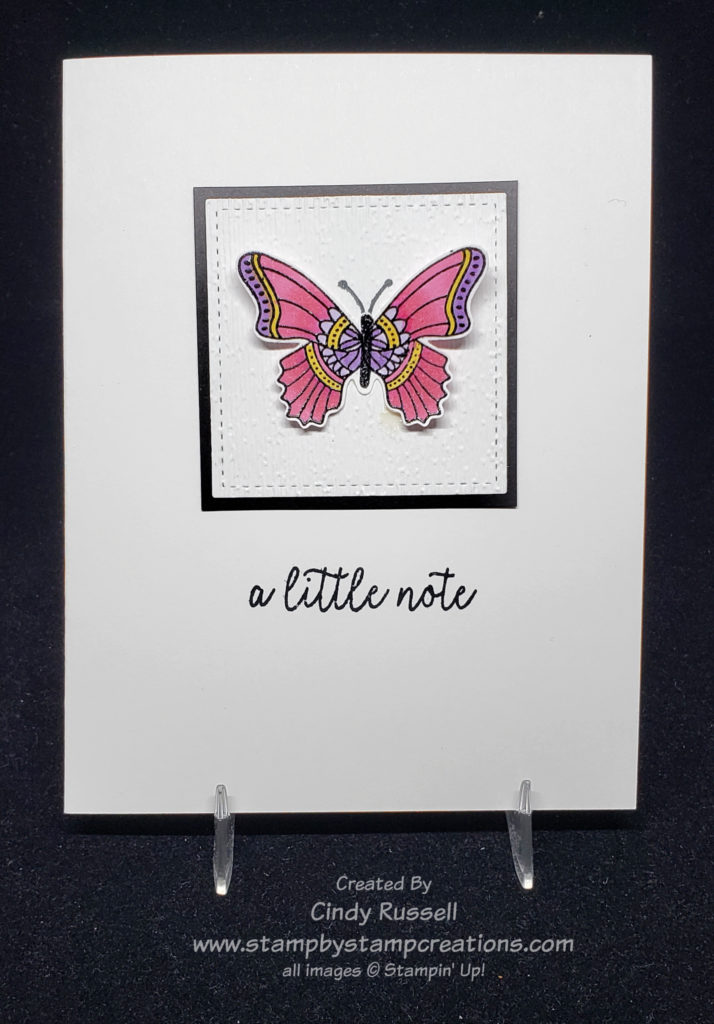
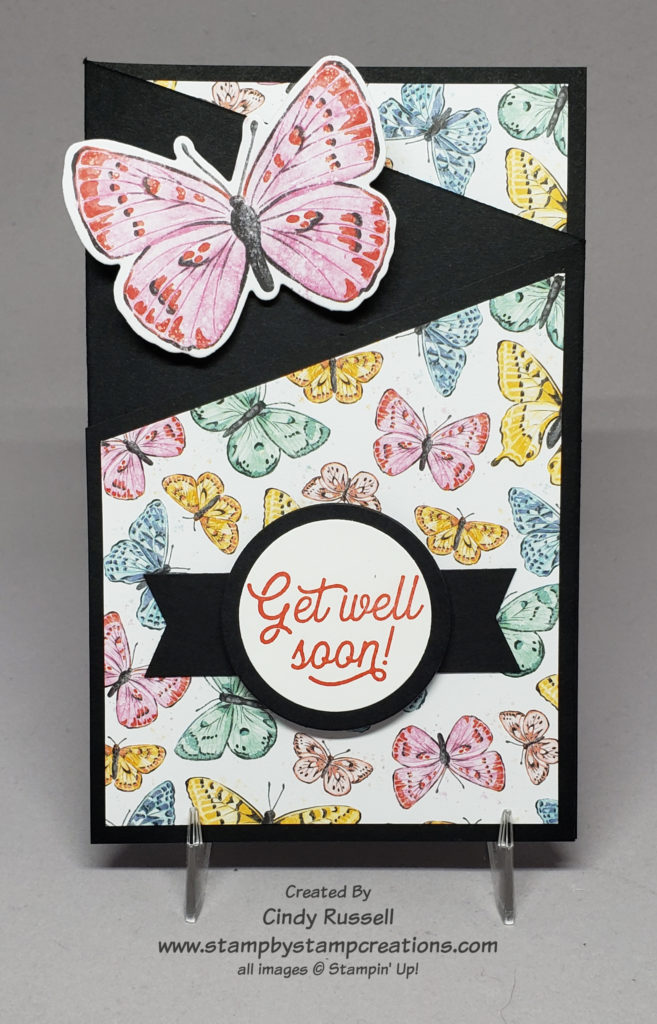
Since the Last-Chance Products List came out last week I’ve been removing the retiring items from my craft room. As I was doing this I came across the Butterfly Gala stamp set and noticed how pretty these butterflies were. I knew then that I needed to share a card with you using this stamp set and the coordinating Butterfly Duet Punch. You know me, I love coordination! Did you know that the Butterfly Duet Punch also coordinates with Butterfly Wishes stamp set? Unfortunately that stamp set is retiring also.
Since this is a Make It Mine post (even though it’s Thursday…) I had to find a card that I liked that used the Butterfly Gala stamp set and the Butterfly Duet Punch. Once again, Pinterest saved the day! While scrolling through, I found this simple and lovely card made by Jill from Paper Daisy Crafting. Jill did a beautiful job of coloring her butterfly.
I kept my card pretty darn close to the original. I used a couple of layers for my butterfly but I changed the bottom layer on my card to black and left off the ribbon.
Stampin’ Blends Markers were perfect for coloring the butterfly. I will admit that Jill’s butterfly turned out a bit more vibrant than mine.
I do like the simplicity of this card. If you’ve seen enough of my designs you know that I have a bit of trouble with “simple”. Having Jill’s inspiration though really helped me out.
I like this card so much that I’m trying to decide whether or not to keep this stamp set and the coordinating punch in my stash! Decisions, decisions!
What is your favorite stamp set/bundle that’s on the Last-Chance List and leaving us? Leave me a comment and let us know.
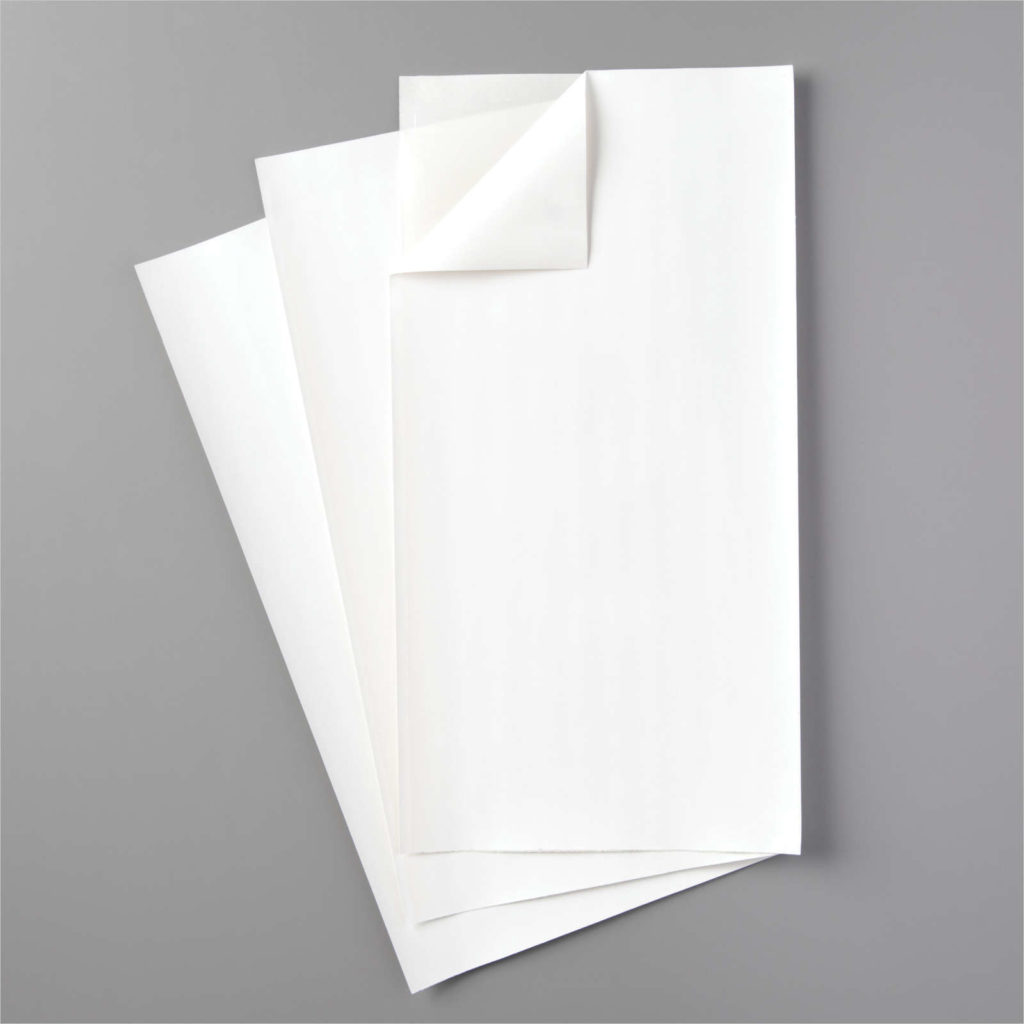
I wanted to share a Fun Fold Origami Treat Holder with you in time for Easter so I’m changing things up this week. A Ghirardelli chocolate square fits in it perfectly. I’m actually going to make these for my Easter table and put a couple of their little Easter chocolates in it. So fun!
No adhesive is needed to make the treat holder itself. The only adhesive you may need would be for your focal point on the front. I’ve made a short video showing you how to make the treat holder.
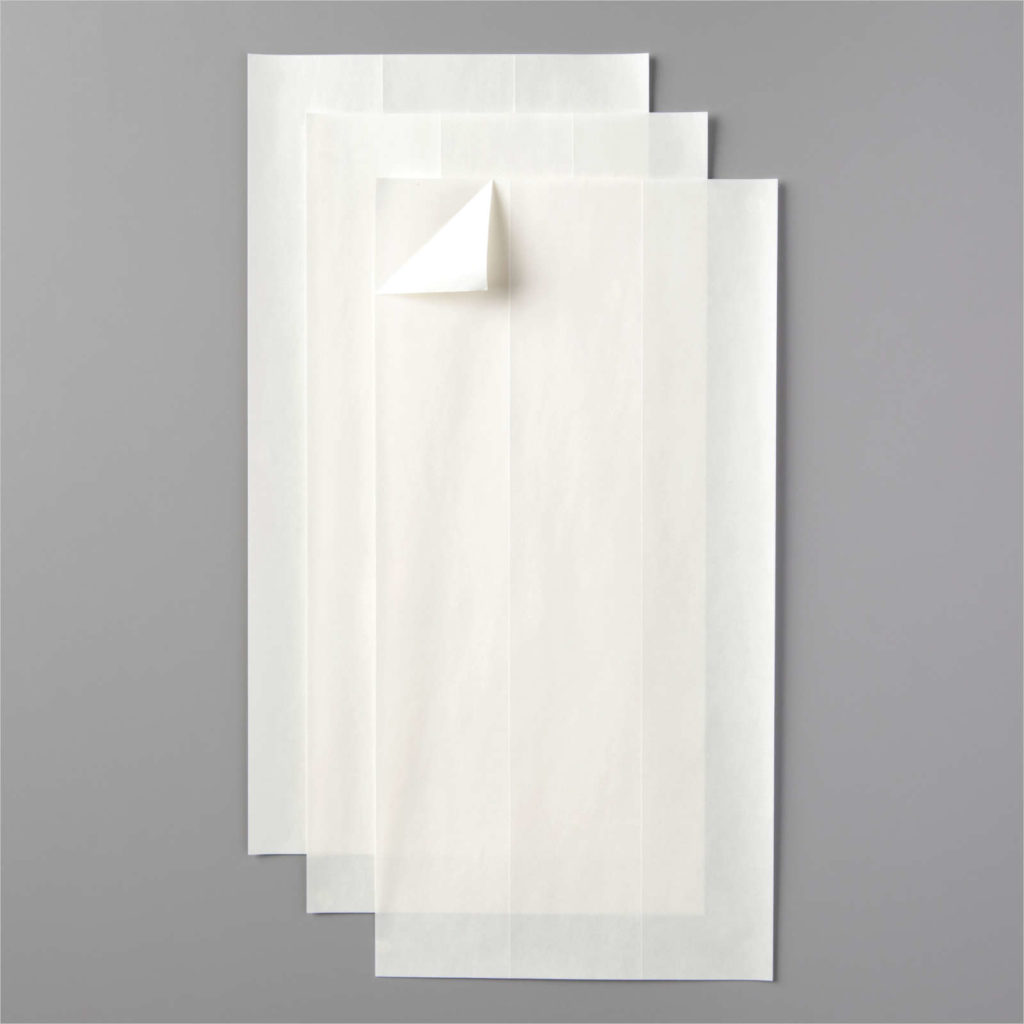
Here are the important measurements for you:
8 ½” x 8 ½” piece of designer paper
After folding designer paper in half diagonally, score along the long folded edge at 2 ½”, 4 ¼”, 7 ¾” and 9 ½”
Once you’ve made one or two of these they go pretty easily. You can leave the treat holder plain or you can add a focal point if you’d like.
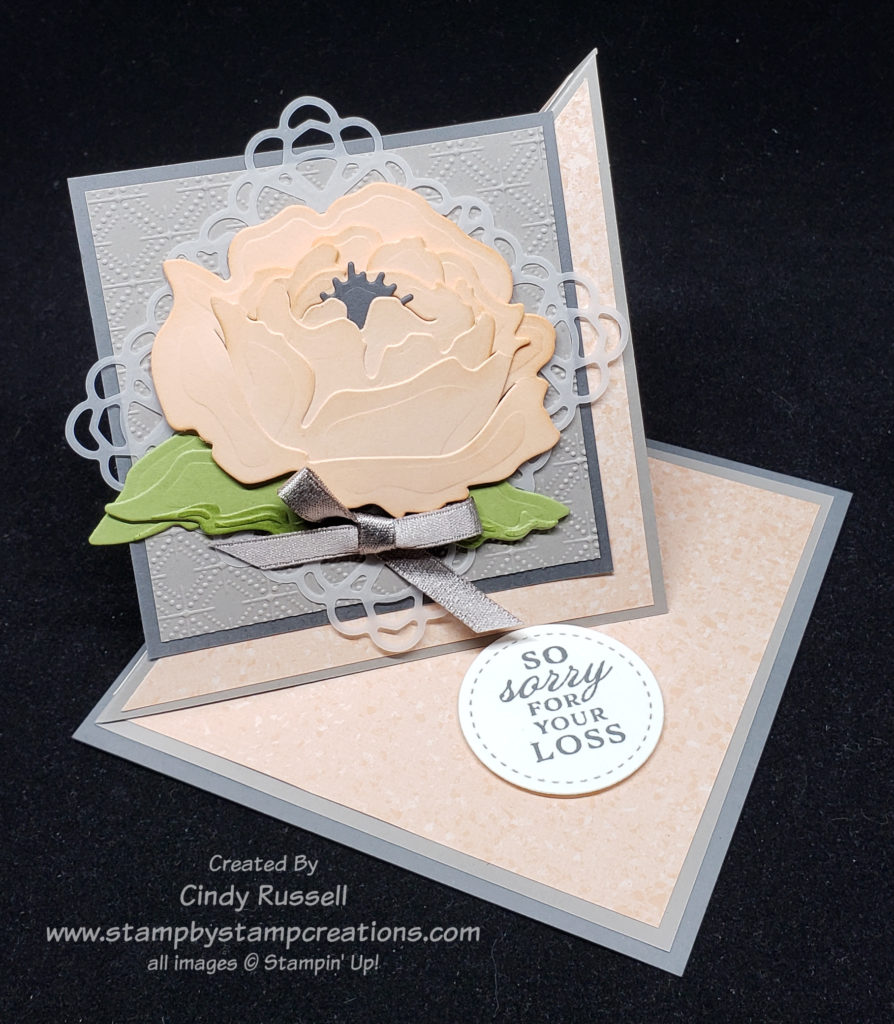
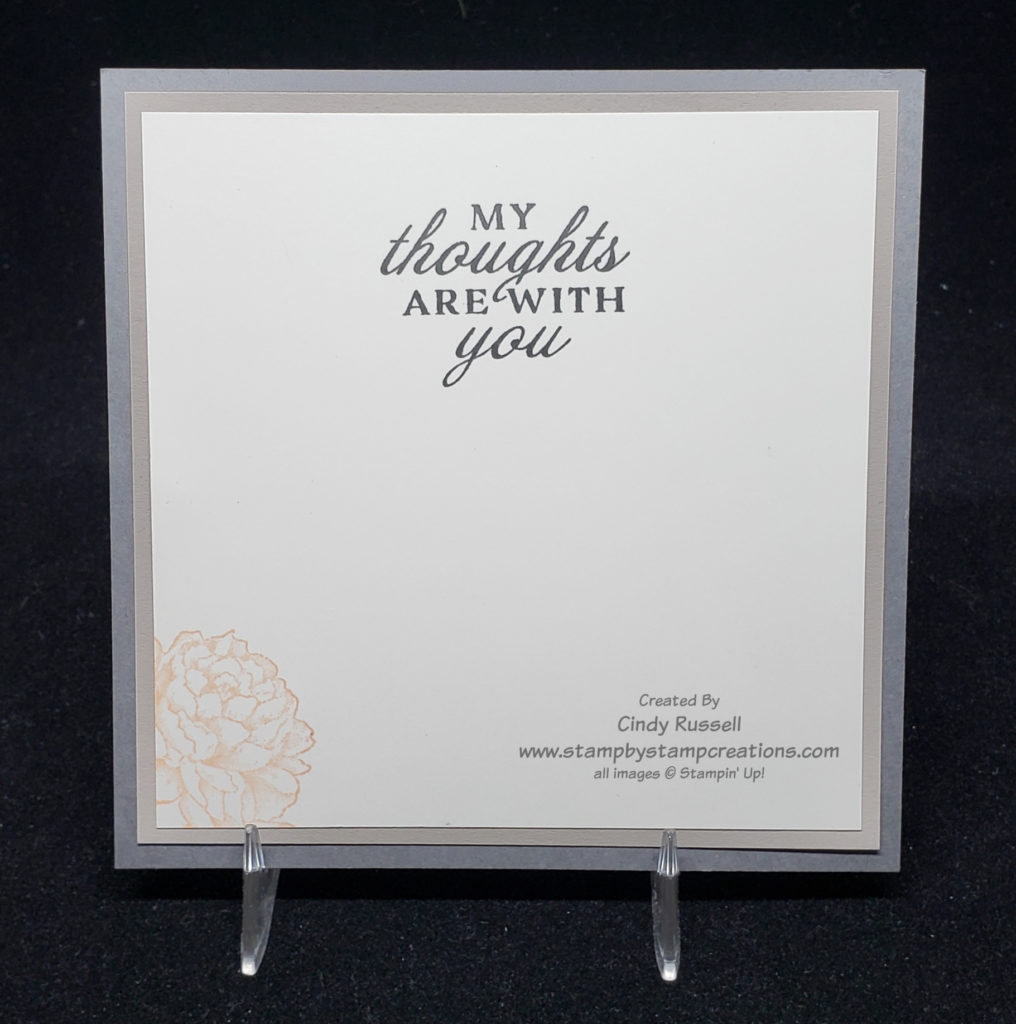
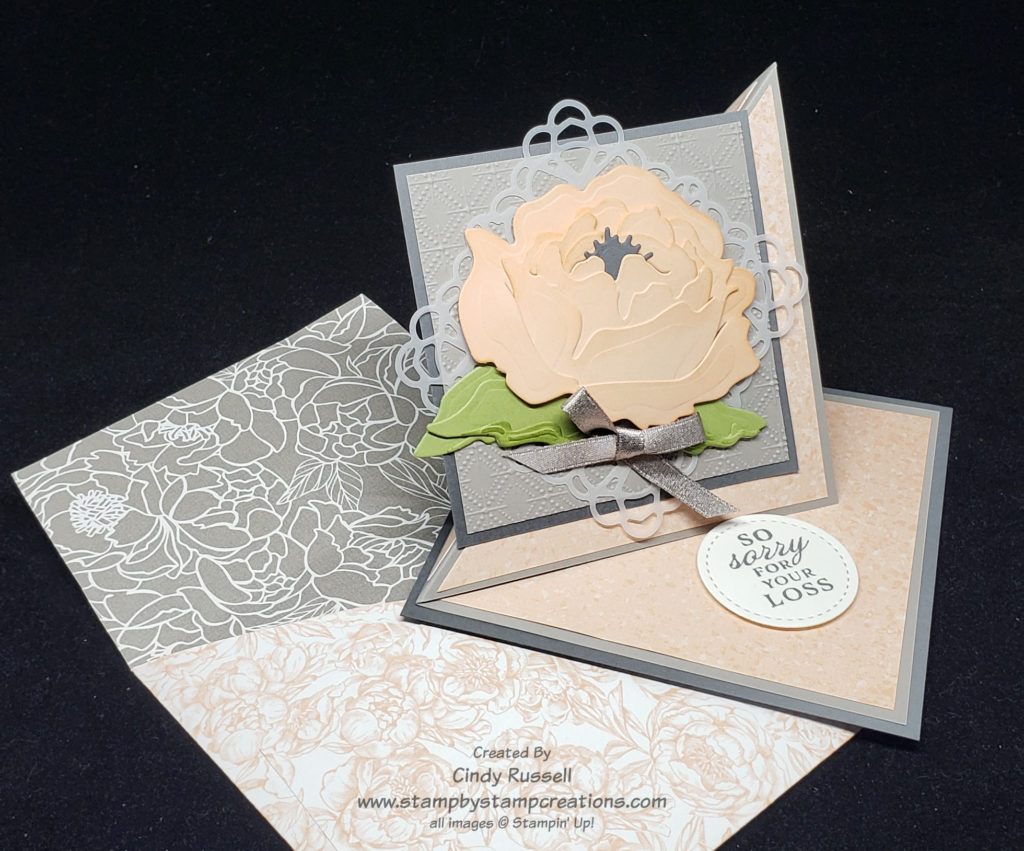
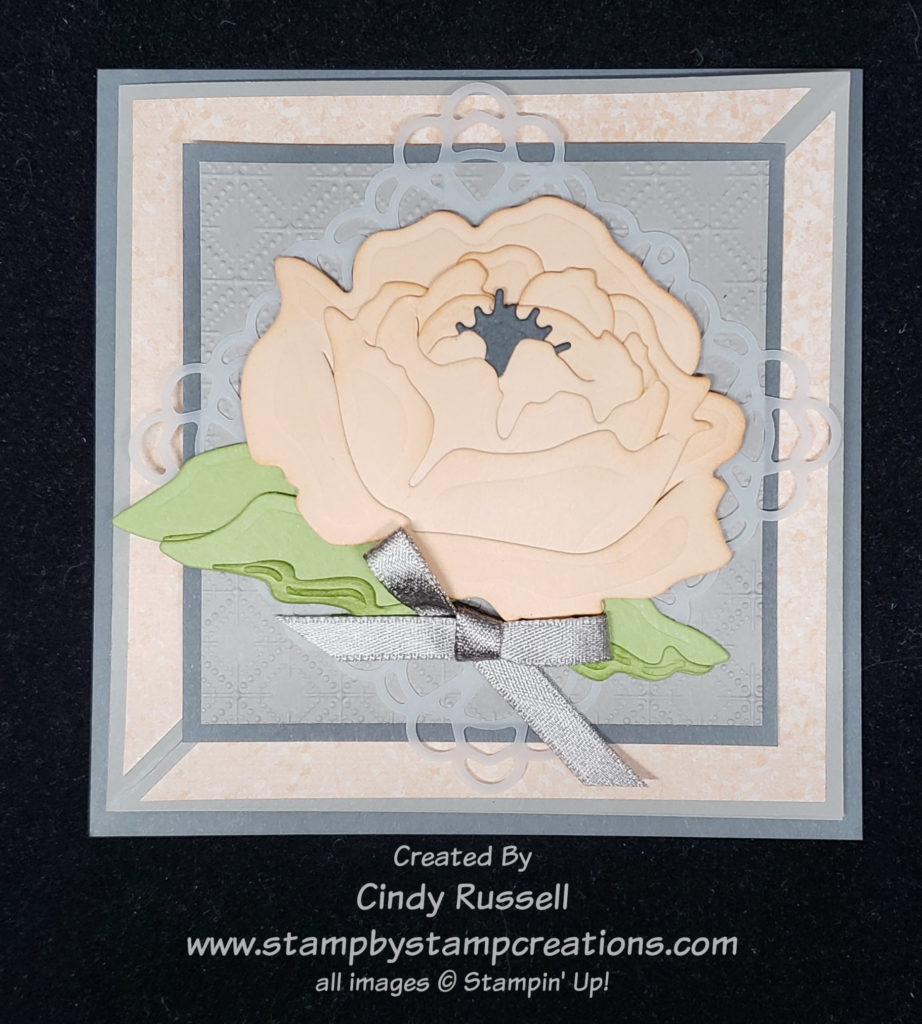
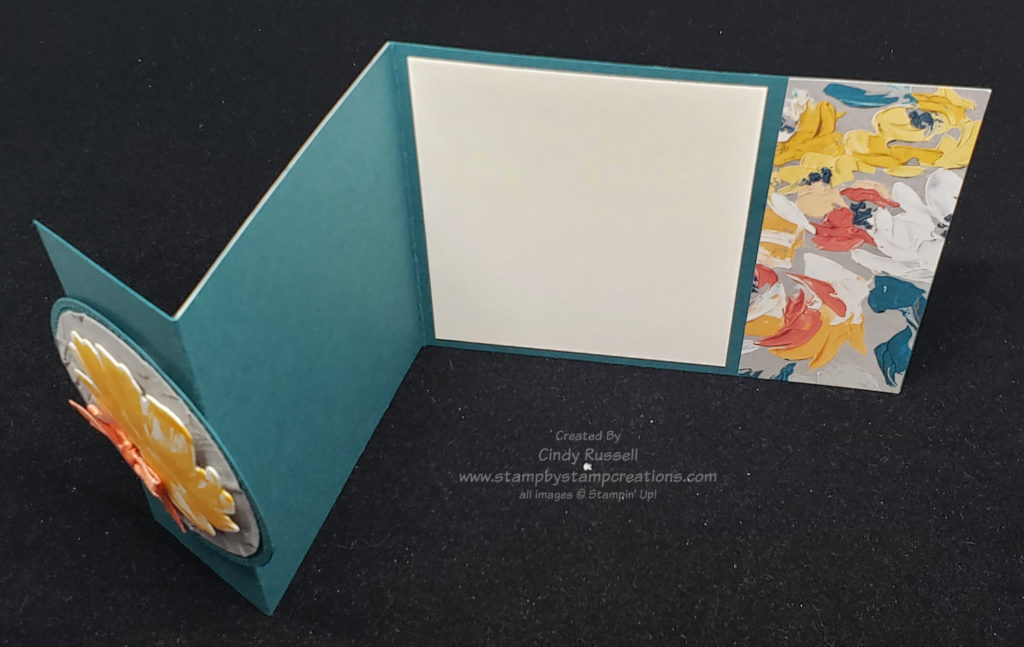
Last month I shared with you a Z-Fold Easel card. Today I want to share with you the Twisted Easel Card. The base of this card is easy to make. You can either start with a 4 1/4″ x 11″ card base or a 4 1/4″ x 8 1/2″ card base.
Of course if you want to change things up like I did on my card you can start with a 4″ x 8″ card base. I then added the bottom/back of the card to a 4 1/4″ x 4 1/4″ piece of cardstock.
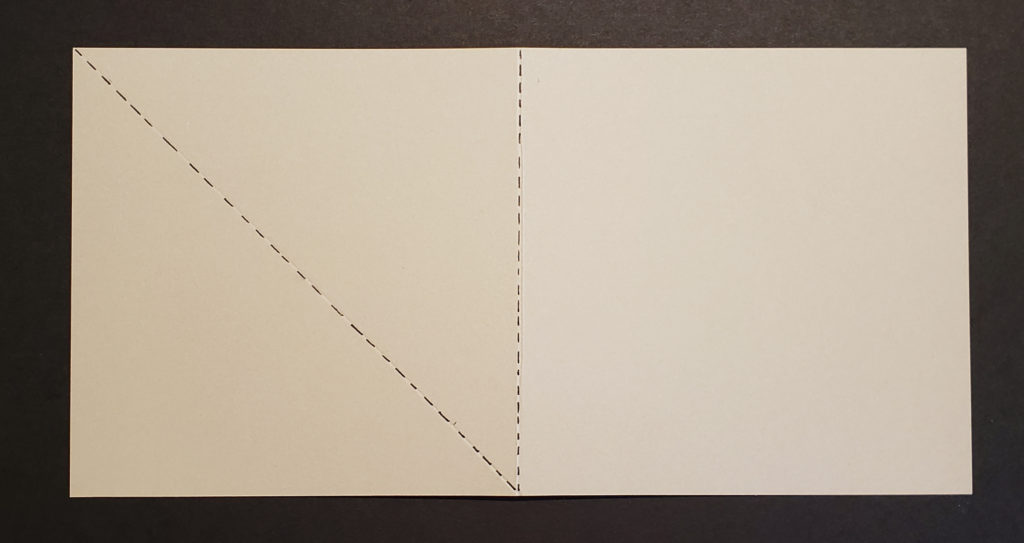
No matter the size of the card base that you start with you are going to make the easel part the same. You first want to score your card base in half. Then you will make a score mark from the upper left corner down to the bottom of the score mark you made at the half way point.
Twisted Easel Card Template
The template above is for a square card but you will make your score marks the same if your completed, closed card is 5 1/2″ x 4 1/4″. The triangles you make with the angled score mark will just longer and skinnier.
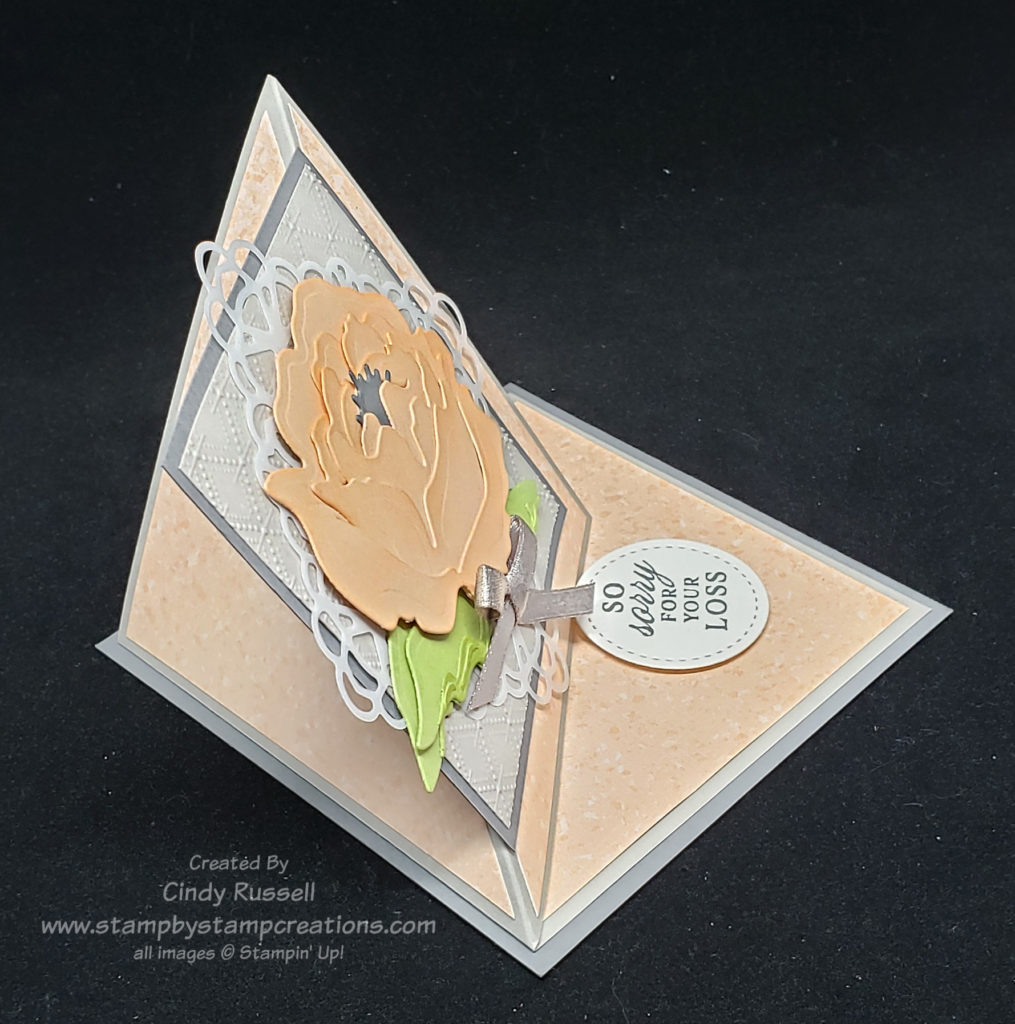
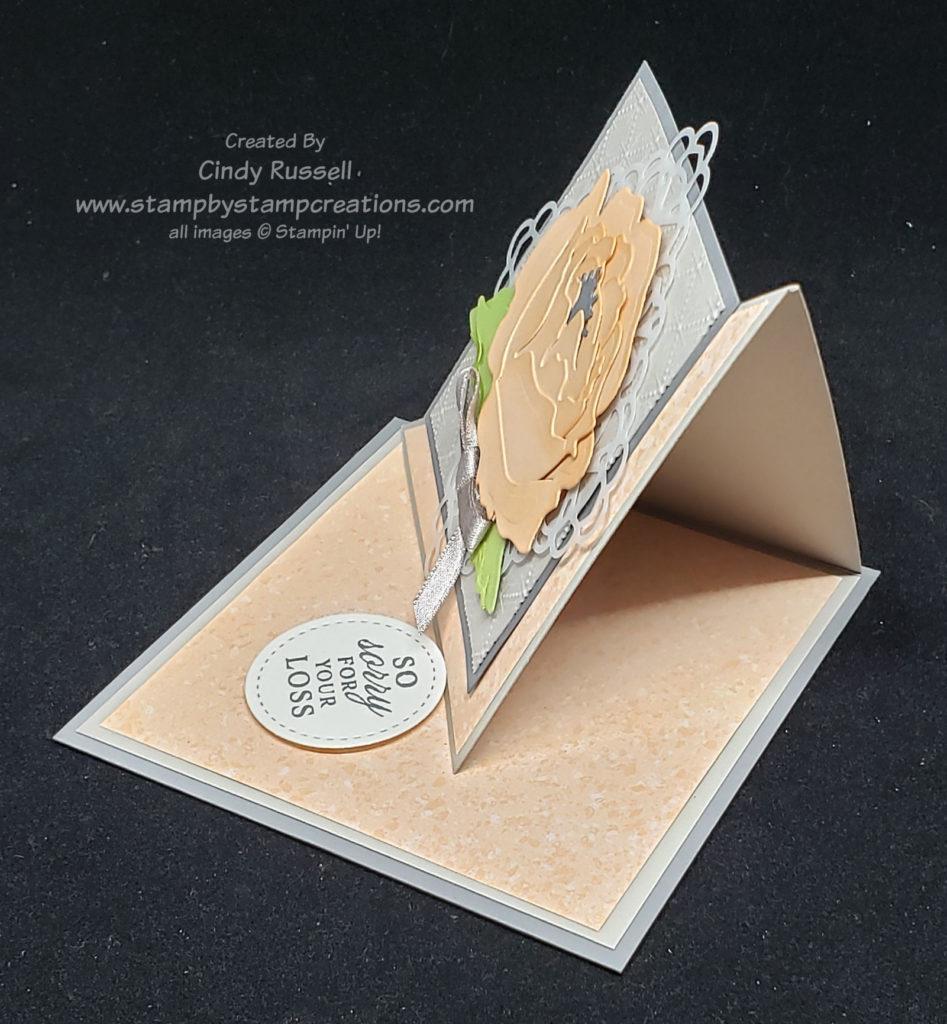
In the photos above you can see a couple of different views of the easel card. The second photo is especially helpful because it shows you how the front of the card folds and forms the easel. Both photos show how the sentiment is the “stop” for the easel to stand. It’s helpful to use Stampin’ Dimensionals on the piece for the “stop”.
As you are looking at the photos above you may be wondering where you’re going to sign the card or write a little message. I decided to add a piece of Basic White cardstock to the back for my message. It worked perfectly!
I made this card for a friend whose mother passed away last week. I could have sent it in a regular sized envelope which would have had a little extra space in it but I decided a card this fancy needed it’s own envelope. Lucky for me I taught you all how to make your own envelope not too long ago!
Twisted Easel Card & Matching Envelope
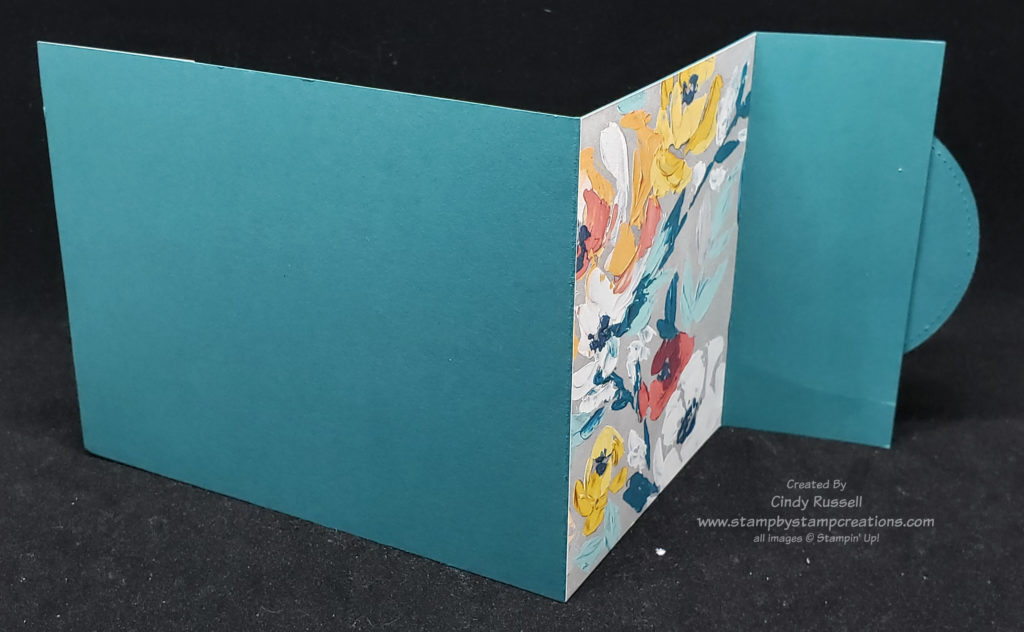
Twisted Easel Card Closed
In the photo of the closed card you can see the angled score mark where the card will fold. Just make sure when you are adhering the focal point on the front of the card that you only adhere the bottom right portion! Otherwise you won’t be able to make the easel. I had fun making this card. Give it a try!
It’s the last week of talking about adhesives. This is the post that will talk about all of Stampin’ Up!’s Adhesives that don’t fit our previous categories of Glues, Tapes or Foam Adhesives.
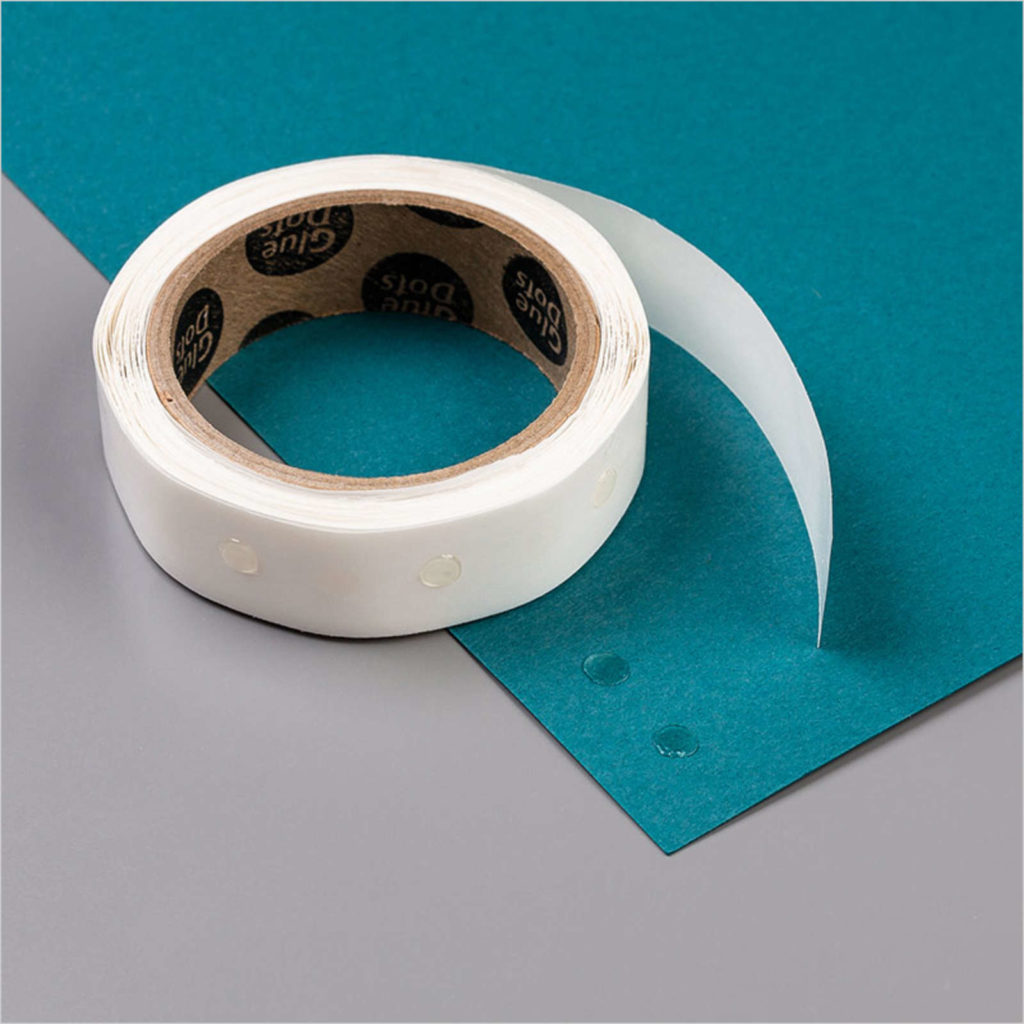
Let’s talk about Mini Glue Dots. These little dots of glue have so many uses. In Stampin’ Up!’s Online Store they list Mini Glue Dots as an adhesive for embellishments. In their catalog they say that Mini Glue Dots will “hold heavier embellishments, ribbon cardstock and detailed die cuts.
When I’m layering die cuts or cut out items on my project I like to use Stampin’ Dimensionals for the layer I want popped up the most, glue or Stampin’ Seal for the layer I want right on my card and Mini Glue Dots to raise a layer just a little bit. I also like to use Mini Glue Dots to adhere bows to my projects.
Adhesive Sheets
If you own a die-cutting machine you definitely need adhesive sheets! They are the perfect adhesive for adhering die cut images to any project. They make adhering small/intricate die-cut images so easy!
Adhesive Sheets are 6″ x 12″ and there are 12 sheets in a package. Each Adhesive Sheet is double-sided. To use adhesive sheets first start with the piece of paper that you’re going to die cut. Now cut a piece of Adhesive Sheet slightly smaller than your paper. Remove the backing of the Adhesive Sheet and adhere it to your paper. Die cut your image. You may have to run the die through a couple of times to make sure that you cut through the paper and the adhesive sheet, especially if you’re die cutting an intricate design. Once you’re done die cutting, remove the backing on the adhesive sheet and adhere the die to your project.
Cling Adhesive
Cling Adhesive is very similar to Adhesive Sheets but it has a totally different use. Cling Adhesive is designed to make your old red rubber stamps into Cling Stamps. Cling Adhesive is just like the label sheets that come with Cling Stamps and is used in the same way.
One side of a Cling Adhesive sheet is sectioned into rectangles. Peel the paper backing off one of the sections, place your stamp over the section of adhesive with the rubber facing up, press down to adhere the adhesive to the stamp and lift! Easy Peasy. There are even instructions on the back of the cardboard insert that tells you exactly how to use the Cling Adhesive!
This completes my overview of Stampin’ Up! Adhesives. I hope I’ve given you some new information that you may not have know. Next week I’ll move on to a new type of Tool of the Trade. Have a great day! Take care and Happy Stamping!
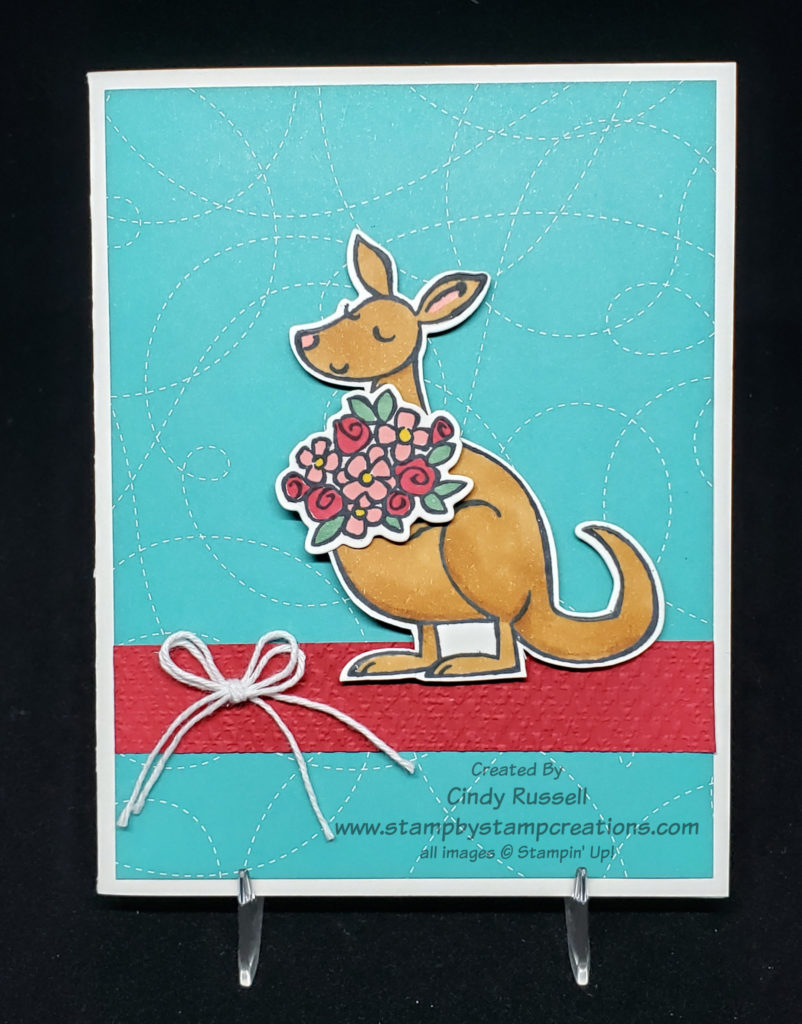
How cute is the Kangaroo & Company Bundle? Have you checked it out on page 17 of Stampin’ Up!’s January-June Catalog? If not, you should! Cute little kangaroos, cute sentiments and more!
This first card is one I made following instructions that I received in an online class that I took. So cute! All sorts of products were used on the card. The Kangaroo & Company Bundle, the Snail Mail Designer Paper and the Resin Hearts and white baker’s twine from the Snail mail Twine Combo Pack. I loved the card but it was a little busy for me. I know, you’re thinking “isn’t this the gal who can’t make a card without 10 layers? What does she mean ‘too busy’?”. Ha!
Kangaroo & Company version 2
Here’s my simplified version. I just left off some of the background layers and the Resin Hearts. That’s it. I kept the same color palette as well as the red strip and the baker’s twine bow. On both cards I colored the kangaroo with my Stampin’ Blends Markers. Cinnamon Cider is the perfect color for the kangaroo.
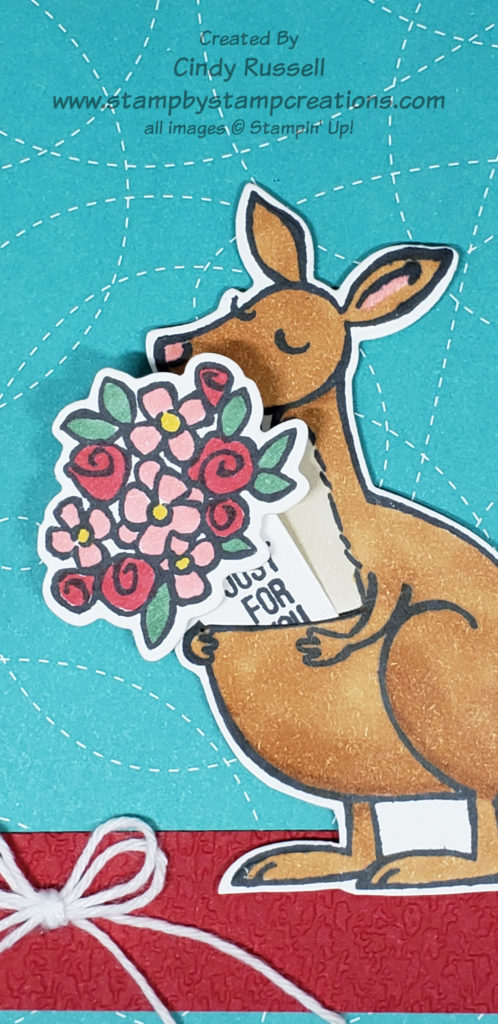
Do you know the secret to the kangaroo die? This kangaroo can hide messages. There’s a special die that slips perfectly into the die-cut slit in the kangaroo. Stamp one of the small sentiments on cardstock and die cut with the special little sentiment die. Attach the flower bouquet or the bouquet of hearts to the sentiment die and slip it in the kangaroo’s pouch!
Kangaroo & Company hidden pouch
The thing to remember when “hiding” messages in the kangaroo pouch is not to put any adhesive in the way of the part the slides down in the slot. I used Stampin’ Dimensionals and I had to move them a couple times to make sure my sentiment would slide right. The key is to slide the sentiment in the slot and then add your dimensionals or adhesive. This way you know it will slide correctly when on the card.
I can’t wait to try another card with the fun Kangaroo & Company Bundle. Too fun!
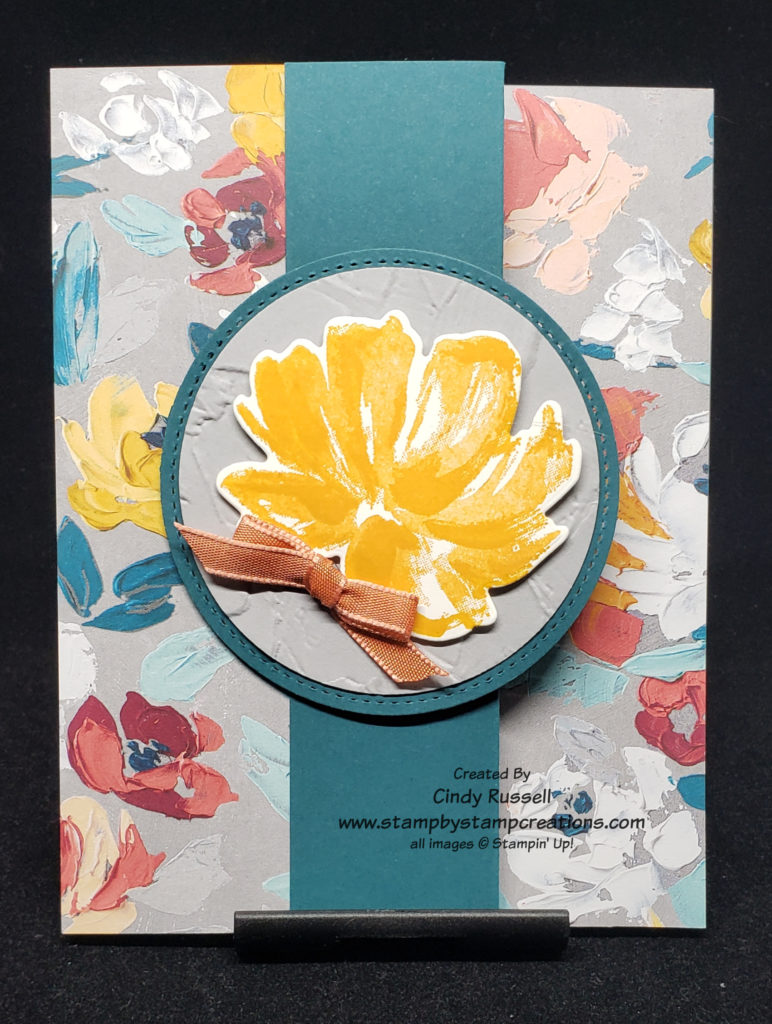
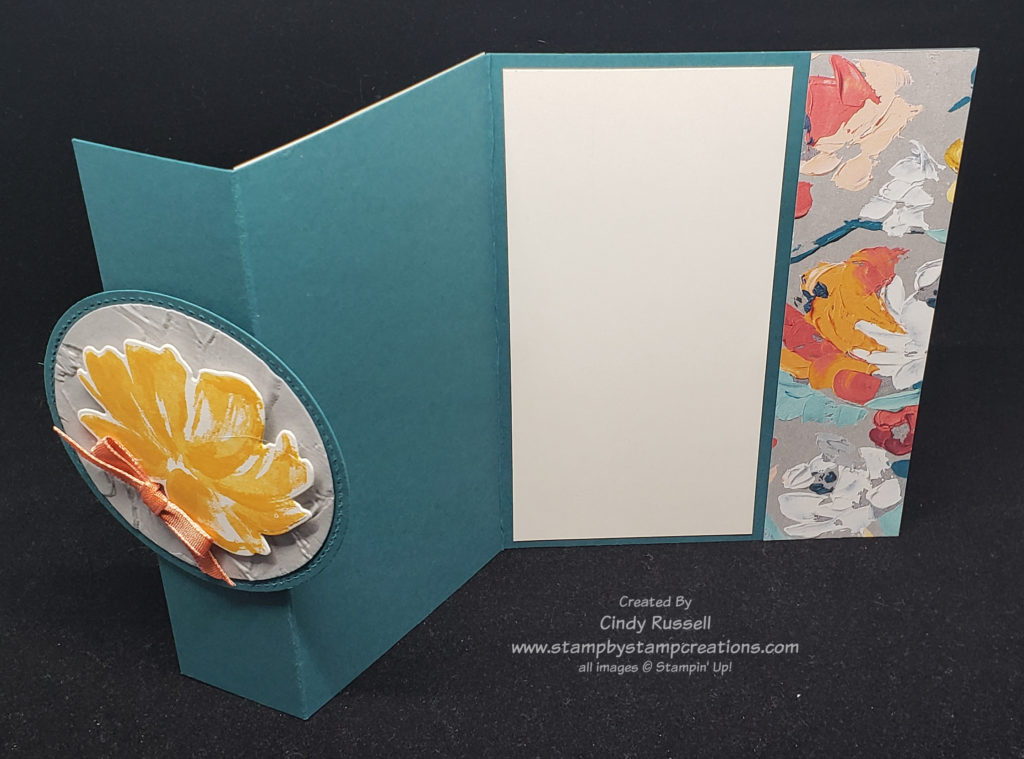
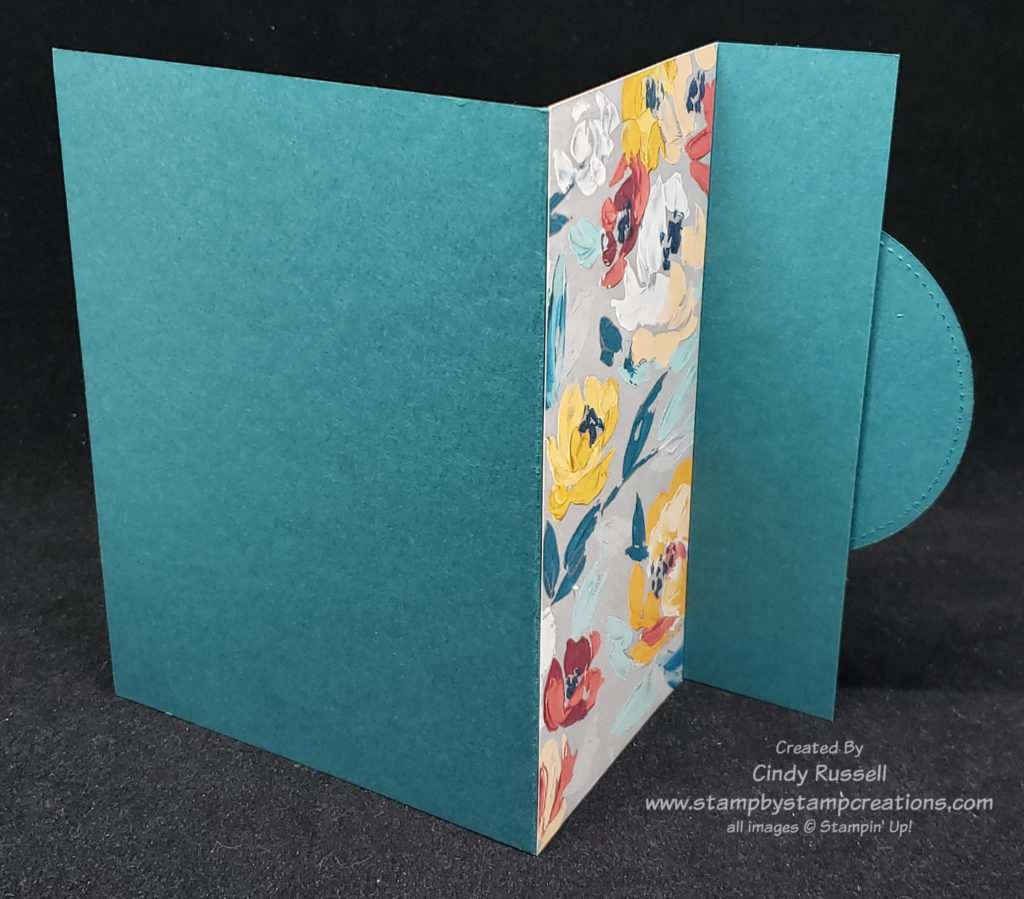
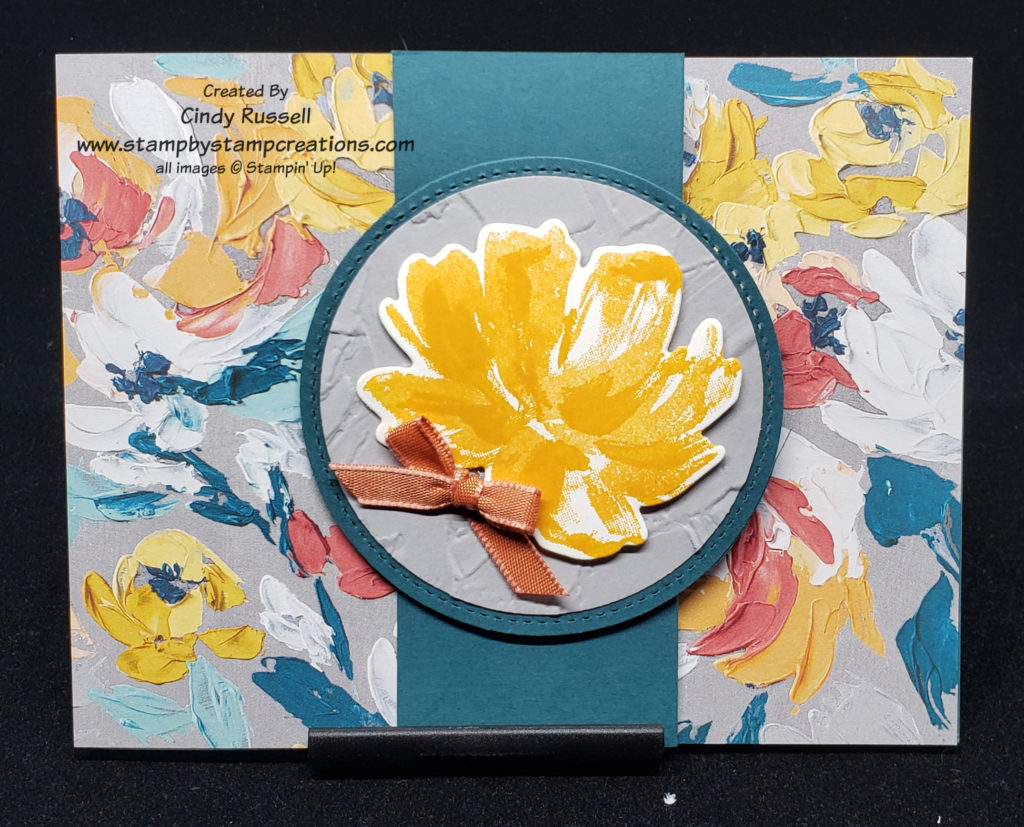
I’ve been talking a lot about Z-fold cards recently. There’s just so many different types. Today I have another one to share with you. It’s the Modified Z-Fold. Yes, it’s a name that I made up but it works. On the Z-fold cards I’ve share with you in the past the front section is usually divided perfectly in half so that the first two section of your “Z” are equal widths. With the Modified Z-Fold card you only fold over a small portion of the front. The first section of the “Z” is much smaller than the second section.
On my card, when the card was closed, I tried to make the three areas that you can see approximately the same size. To do this I made my first section of the “Z” (the solid colored section) 1 3/8” wide. This is the section that I adhered my focal point (the flower) to. This means that I scored my card base at 1 3/8” and 4 ¼” to make my “Z”.
I then added a piece of designer paper to the part of the second section of the “Z” that would show when my card was closed. This measured 5 ½” x 2 7/8”. I also added a piece of designer paper to the inside of the card that would show when my card was closed. This meant I had to make the piece of white cardstock that I write on a little smaller than usually. The inside piece of designer paper is 5 ½” x 1 ½”. The piece of white cardstock on the inside of the card is 5 ¼” x 2 ½”.
Horizontal Modified Z-Fold Card
This card was the first time I’d made this type of Modified Z-Fold and I like it. It’s a great way to showcase your designer paper. When I finished this card I got to thinking about the tip I gave in this week’s newsletter. In my newsletter I mentioned that you should try changing the orientation on your cards sometimes….so I did. I made the exact same card in a horizontal format. On this card the solid section is 1 ¾” wide.
On both of my cards the stamped flower is from the Art Gallery stamp set. It’s a two-step stamping set. I found that it worked best if I stamped off the larger first stamp before stamping on my card and then stamped the smaller, more detailed stamp full strength. If I had stamped them both full strength you wouldn’t see as much detail on the flower.
Another Fun Fold card completed. I’m really enjoying finding fun folds to share with you. Are you enjoying them? Please leave a comment and let me know.
Do you love adding some dimension to your craft projects? I definitely do. Foam adhesives are the way we papercrafters add dimension to our projects. Stampin’ Up! carries five different foam adhesives: Stampin’ Dimensionals, Mini Stampin’ Dimensionals, Black Stampin’ Dimensionals, Foam Adhesive Strips and Foam Adhesive Sheets.
All of these foam adhesives are double sided. To use them you peel them off the waxy sheet they come on, adhere them to the piece you want to pop-up on your project, remove the backing and adhere to your project.
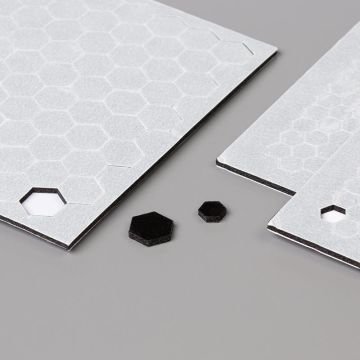
Stampin’ Dimensionals
Stampin’ Dimensionals are the hexagon-shaped disks of foam that you are probably most familiar with. They come in white and black as well as regular size and mini. The regular sized Stampin’ Dimensionals (both white and black) are about 3/8” wide and about 1/16” thick. The Mini Stampin’ Dimensionals (both white and black) are a little less than ¼” wide and the same thickness.
Foam Adhesive Sheets are 4 ½” x 4 5/16” pieces of foam that are about 1/16” thick. Adhesive sheets can be cut with scissors or die cut with open dies (dies that outline something). They don’t work with intricate dies (I’ve tried…).
Foam Adhesive Strips
Foam Adhesive Strips are perfect for making shaker cards. These strips are 9” long, 1/8” wide and have a thickness of 1/8”. They also work well when making cards/projects that have pieces that slide.
You shouldn’t have a problem adding dimension to any of your projects with all of these different choices of foam adhesives.
The important thing to remember is this: you are not a true crafter until you find the backing pieces from Stampin’ Dimensionals all over your home in the most unusual places. Sometimes I just need to start laughing! Once I found one on my Pilates mat AT the studio. It must have been stuck to my sock or pants. Another time I found one at our family cabin in Canada when I didn’t have any crafting supplies with me! Crazy! Where is the oddest place that you’ve found the backing to a Stampin’ Dimensional? I’d love to know!
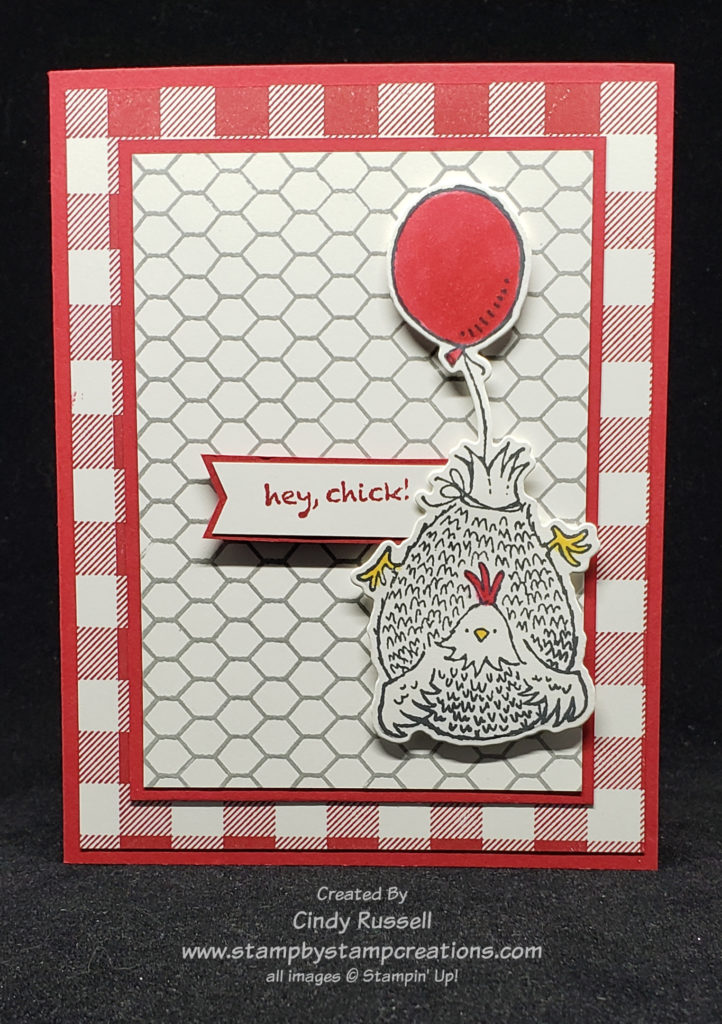
I can’t say it enough….I love the Hey Chick and the Hey Birthday Chick stamp sets (and of course the coordinating dies!)! TSC…Too Stinkin’ Cute!
Now pair those adorable chickens with red plaid and chicken wire and you have the perfect combination! Right?!
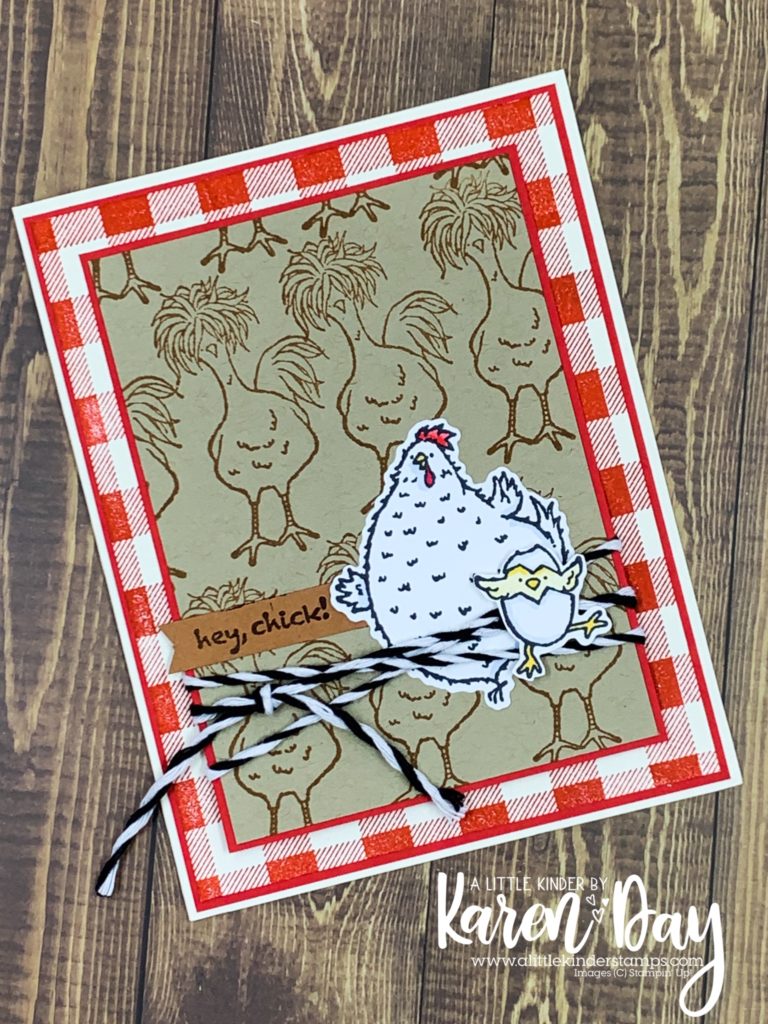
I got the inspiration for my card from a card by Karen Day that I saw posted online. (You can see her card below.) It was definitely the red Buffalo Check background that caught my eye. I knew I wanted to use the All Wired Up background stamp too. I mean why wouldn’t you use a chicken wire background if your’e stamping chickens! Ha!
card by Karen Day
I started with the chubby dancing chicken on my card but it just didn’t seem to fit with the banner I had made. Then I grabbed the chicken floating with the balloon and tada! my card was complete!
Sometimes you just have to keep playing around. You may have a vague vision in your head of what you want but you just need to keep shuffling things around until it comes together.
Even when you’re copying someone’s card exactly this may happen. You’re cutting and gluing things together and all of the sudden….”OOO, what if I change this or add this…”. Be open to change.
I love browsing Pinterest and the Facebook page just for Stampin’ Up! Demonstrators that have SO many ideas! I may see a card that I want to copy exactly but in the end I usually end up changing up a little something.
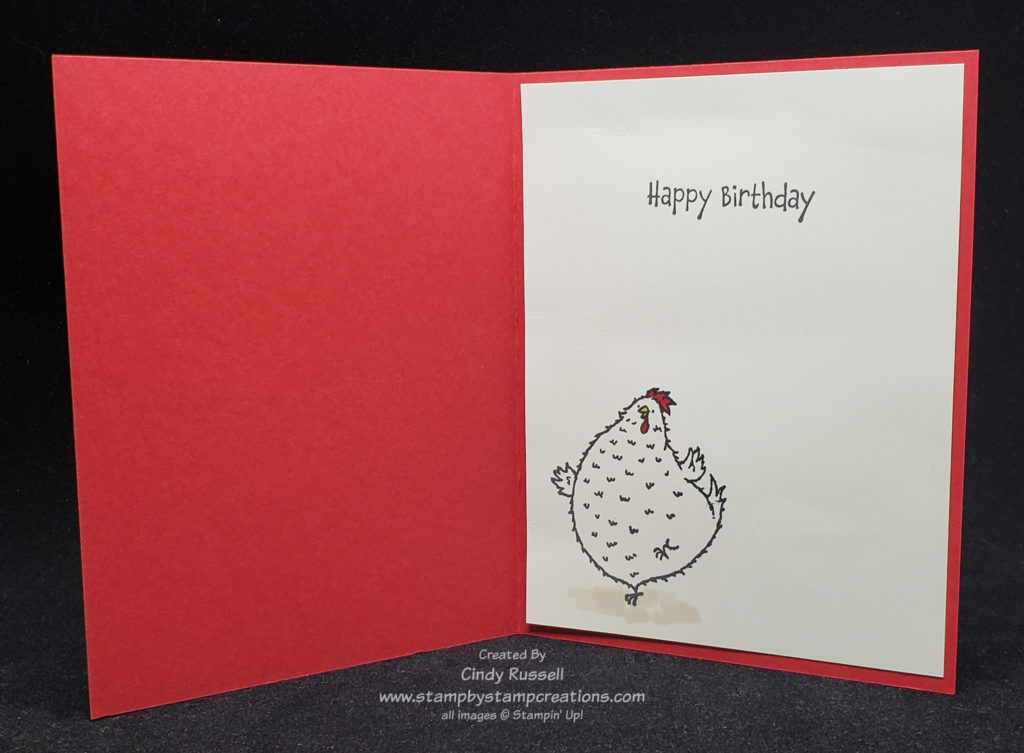
Happy Birthday Chick card – inside
Don’t forget that if you’re going to all the trouble to make the outside of your card adorable you should add a little bit of that to the inside of the card (and envelope) too! I may not have used the chubby dancing chicken on the outside of my card but she definitely made it on the inside. I’m pretty sure she’ll be on the envelope too!
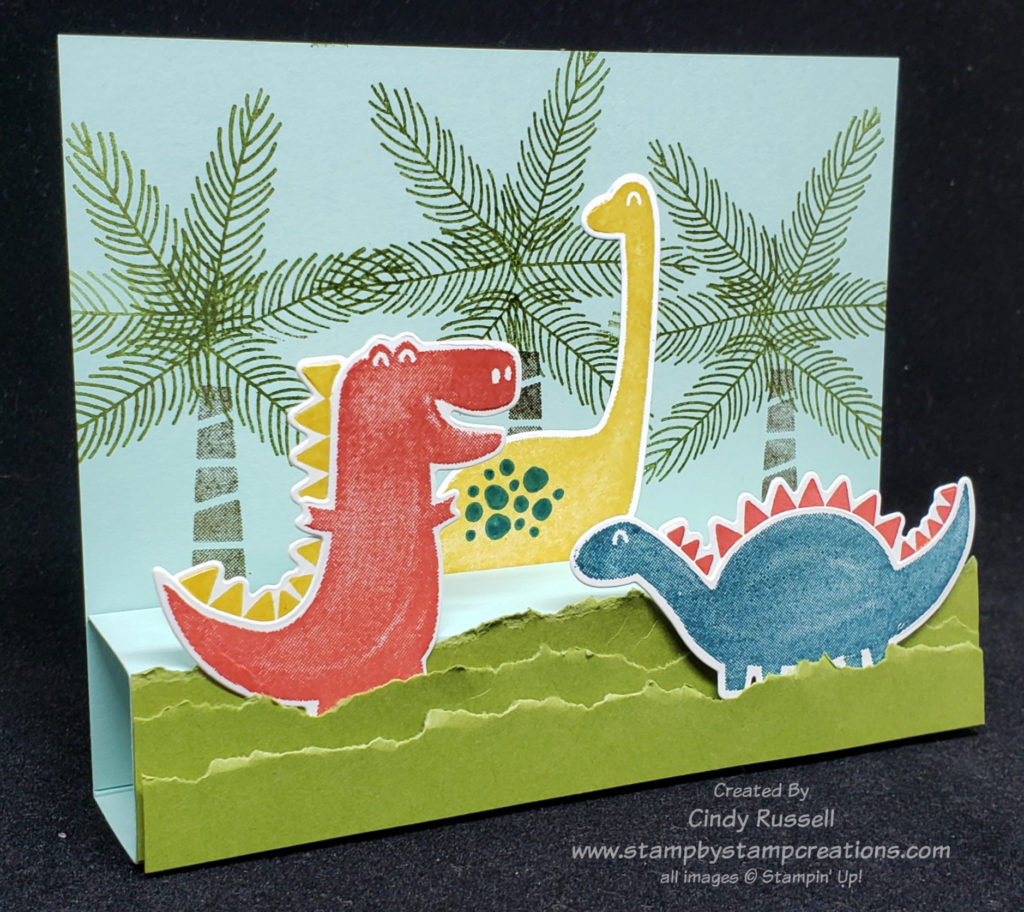
I have no idea what this type of card is actually called but I’m calling it a Box Base Card. The base is a box and the card is attached to it. Sometimes you just need to go with those descriptive words. 😊
A week or so ago a friend of mine texted me wondering if I had any dinosaur cards for her grandson’s upcoming birthday. Naturally I didn’t but figured it was a good time to get out my Dino Days stamp set and the coordinating Dino Dies. I then did what every good crafter does when they can’t figure out where to start and I hopped on Pinterest.
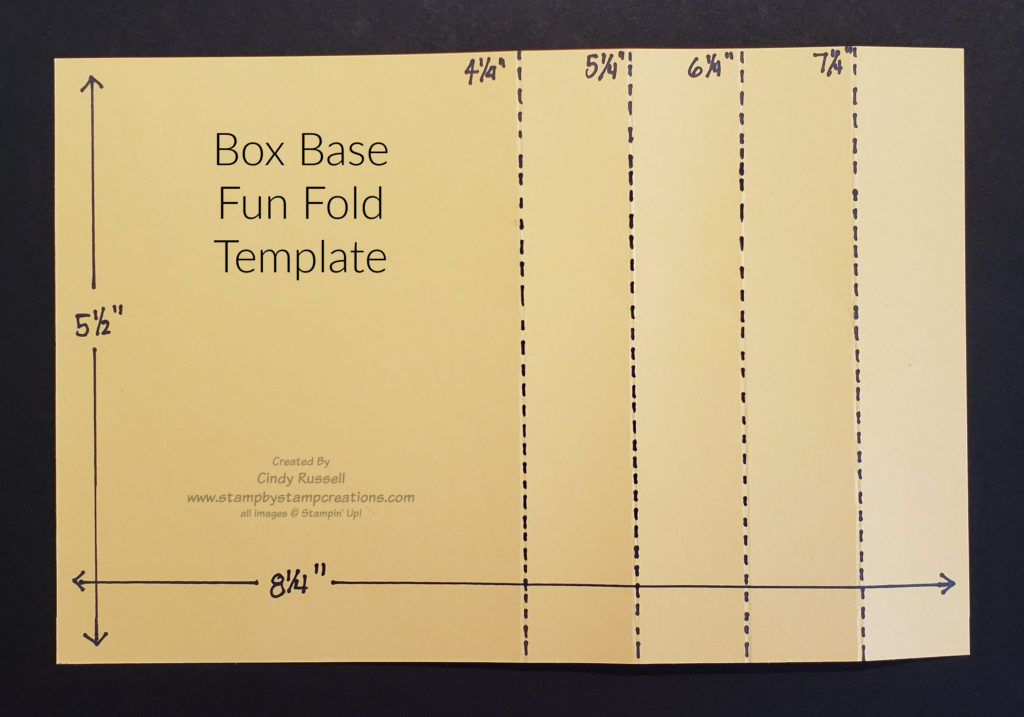
Box Base Fun Fold Card Template
I’ll be honest, I pretty much copied the card I found on Pinterest. I fell in love with this fun fold because it’s so EASY! You start with a piece of cardstock that’s 8 ¼” x 5 ½”. This is a quarter inch shorter than a regular card base. You then score it along on the long edge at 4 ¼, 5 ¼”, 6 ¼” and 7 ¼”. Crease all score marks well. Once you’ve creased the score lines you can see how the card will be put together.
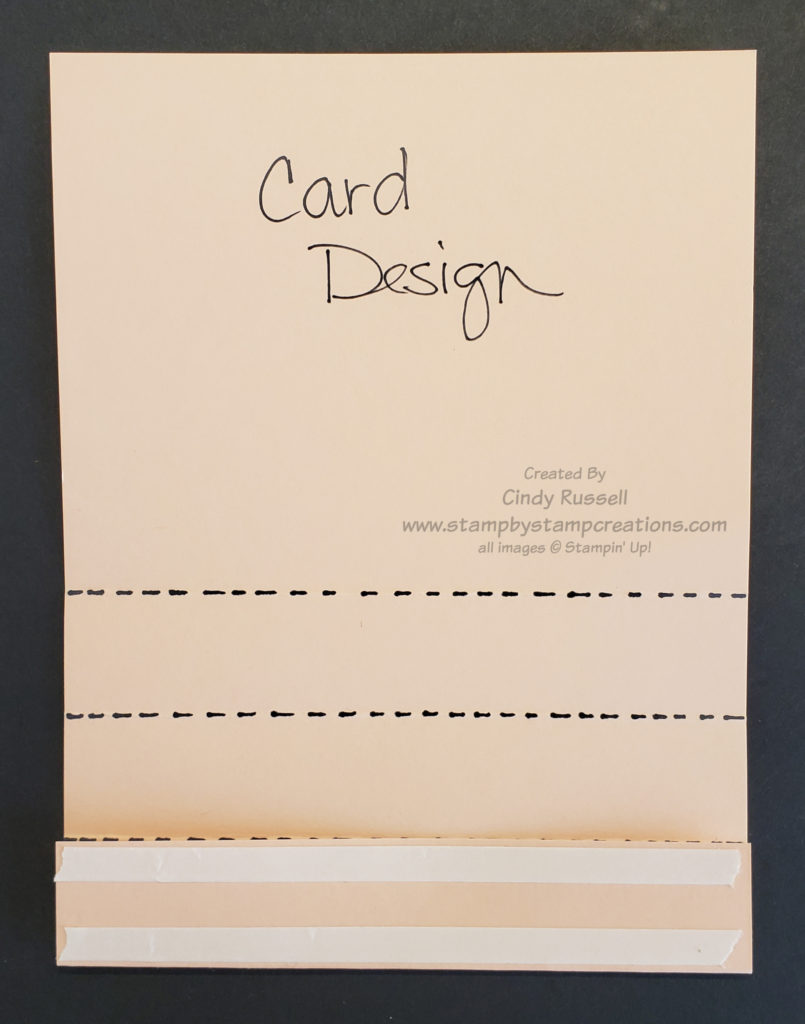
On my card I needed to make sure that I decorated legs of the yellow dinosaur and the bottoms of the trees are covered by the “box” portion of my card. Even if part of the design isn’t going to be covered by the “box” it will probably be easier to decorate the card front before adhering the “box”.
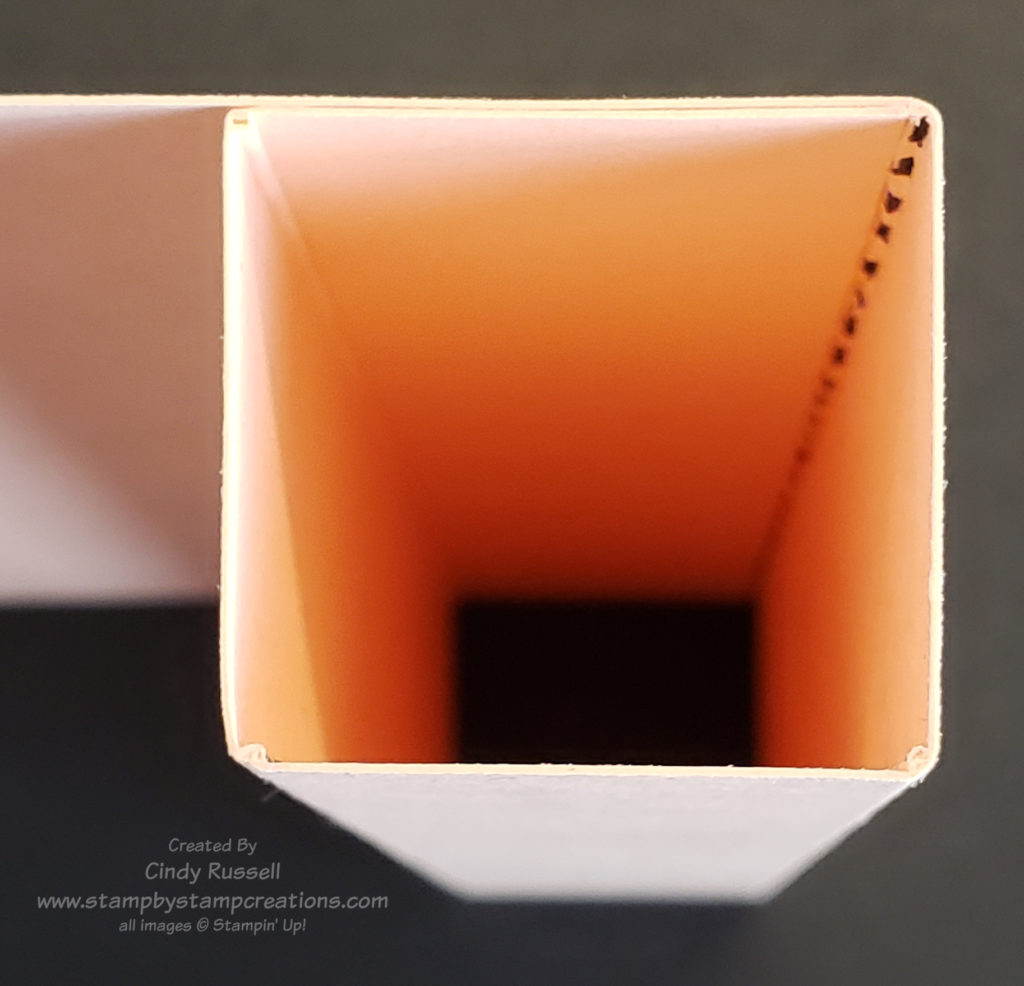
To form the “box” you want to lay the card base in front of you with the card design facing up. Fold over the bottom section of the “box”. This is where you will place your adhesive. Now fold up the other sections. The edge of the bottom section will meet up with top score line and adhere to the bottom portion of the card design area.
When you’ve got the card put together you just need to finish decorating it by possibly adding decoration to the “box” portion of the card. You can also add a piece of cardstock to the back of the card so you have a place to write your message.
This Box Base Fun Fold card was fun and easy to make. Give it a try! Have a great day! Take care and Happy Stamping!
There are so many different types of tape and many different uses for tape. Today we’re going to talk about double-sided tape, especially those that Stampin’ Up! carries.
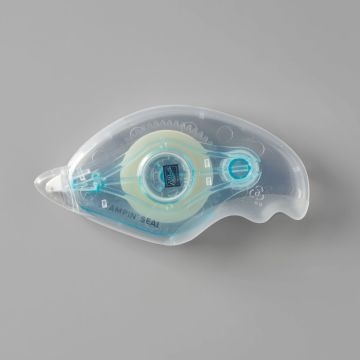
As paper crafters we are most familiar with and mostly use double-sided tape. We use it to adhere the different layers of our projects together. Stampin’ Up! carries three different types of double-sided adhesives. Stampin’ Seal, Stampin’ Seal +, and Tear & Tape.
Stampin’ Up!’s Stampin’ Seal Tape Adhesive
Stampin’ Seal is the new basic tape adhesive that replaces SNAIL adheisive. Stampin’ Seal is a double-sided tape that comes on a cartridge in it’s own dispenser. When the tape runs out you can replace the cartridge simply by opening the dispenser and dropping in the new cartridge. The catalog description of Stampin’ Seal says that it’s an instant-bond, permanent adhesive.
I like using Stampin’ Seal. I have to disagree with the “instant-bond” part of the description though. When I’m adhering two things together and haven’t got them quite straight I’ve found that as long as I haven’t pressed the two things together real hard I can carefully separate them and realign them. I find this to work at least 80% of the time. It’s one of my favorite things about this adhesive!
Stampin’ Seal is also easy to use. You just place the end of the dispenser on to your paper, pull to adhere the tape and then lift up. Once in a awhile when you pull to adhere the tape it won’t work but then you just move the wheel on the end of the dispenser with your finger until you feel the adhesive. If you’re in the middle of placing the tape on the paper and it stops you can also just place the end of the dispenser on a section that already has tape on it and start from there. This get the adhesive rolling on the wheel again.
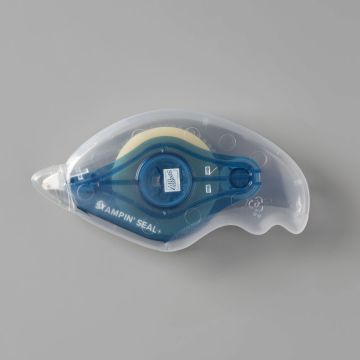
Stampin’ Up!’s Stampin’ Seal +
There is also a Stampin’ Seal + adhesive. Stampin’ Seal + adhesive has a stronger bond than regular Stampin’ Seal adhesive. You would use it on 3D projects or on heavier layers such as Foil Sheets or Glimmer Paper.
Stampin’ Seal + is similar to Stampin’ Seal in that it comes on a replaceable cartridge in it’s own dispenser. The dispensers for both of the adhesives are exactly the same. The cartridges of the two adhesives are the same size but different colors. The Stampin’ Seal + cartridge is a dark blue while the cartridge for the Stampin’ Seal is a light blue. This makes it easy to distinguish between the two.
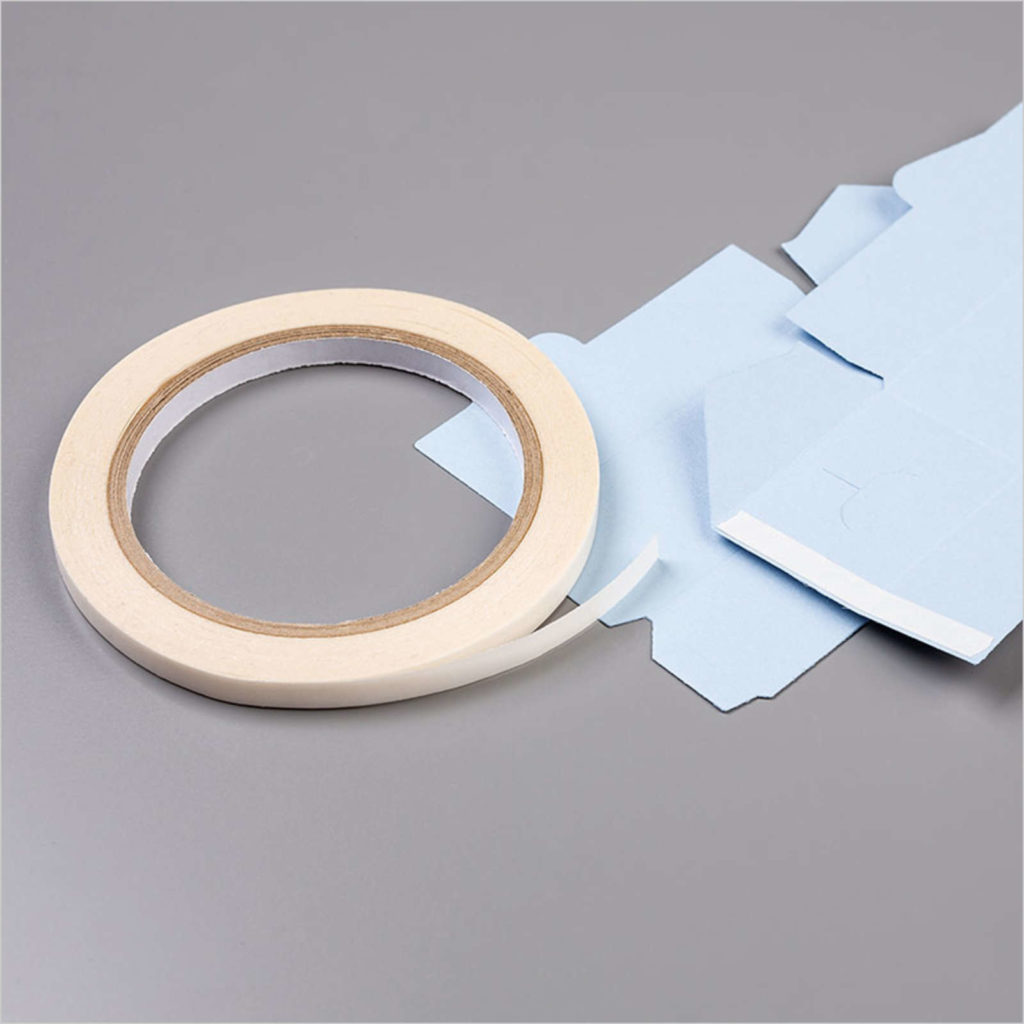
Stampin’ Up!’s Tear & Tape
The last type of tape that Stampin’ Up! carries is Tear & Tape. This used to be the only strong tape adhesive that Stampin’ Up! carried. You would use Tear & Tape in the same situations that you would use Stampin’ Seal +. Tear & Tape is “a strong adhesive with tearable paper backing for easy sticking”.
To use, you tear a length of Tear & Tape off the roll, adhere it to your paper, remove the backing and adhere the paper where you want it.
Each type of tape has it’s own uses. Of course I have all three in my craft room. Do you?
Today I thought I’d try something a little out of my comfort zone. I decided to try a new size card. Have you seen these long, skinny cards? The card is 4” x 9 ¼” and fits perfectly in a letter-size envelope (9 ½” x 4 1/8”).
Butterfly Bouquet Long & Skinny Card
This is the card I saw that I wanted to make my own. Isn’t it pretty? I love the background and all of the different colored butterflies. I copied the basic design of the original card, along with the butterflies, but that’s about it.
My Butterfly Bouquet Long & Skinny Card
I decided to keep my colors simple and used Blushing Bride, Basic White and Smoky Slate. I needed the Blushing Bride butterflies to pop a little more so I used my new Blending Brushes and lightly colored Velum Cardstock with the Smoky Slate ink. It was just enough to make the Blushing Bride butterflies and the little velum butterflies pop against the Basic White background. One other thing I did to help make the butterflies pop against the background was to use a Sponge Dauber and add a little color around the edges of the butterflies. It really made a difference on the card.
Another little secret is how I was able to emboss the Basic White background without a seam since the cardstock is longer than the embossing folder. I put the cardstock in the embossing folder about halfway. Then I ran it PARTIALLY through my Stampin’ Cut & Emboss Machine. I made sure the end of the embossing folder didn’t go all of the through the roller of the machine. I had to roll it back towards me to get the folder out and then turned the cardstock around and repeated the process. It worked like a charm! If you try this, you definitely don’t want to try it with a folder that has a distinct design. I used the Subtle Embossing Folder that didn’t need anything to line up.
On all of my butterflies I only adhered the bodies down to let the wings flutter. I used the Elegant Faceted Gems to add a little sparkle the butterflies too.
This was a fun card size to make. I’m not sure how often I’ll make this card size since it’s such a large area to fill. I’d have to be working with just the right products (like butterflies!) to make it work.
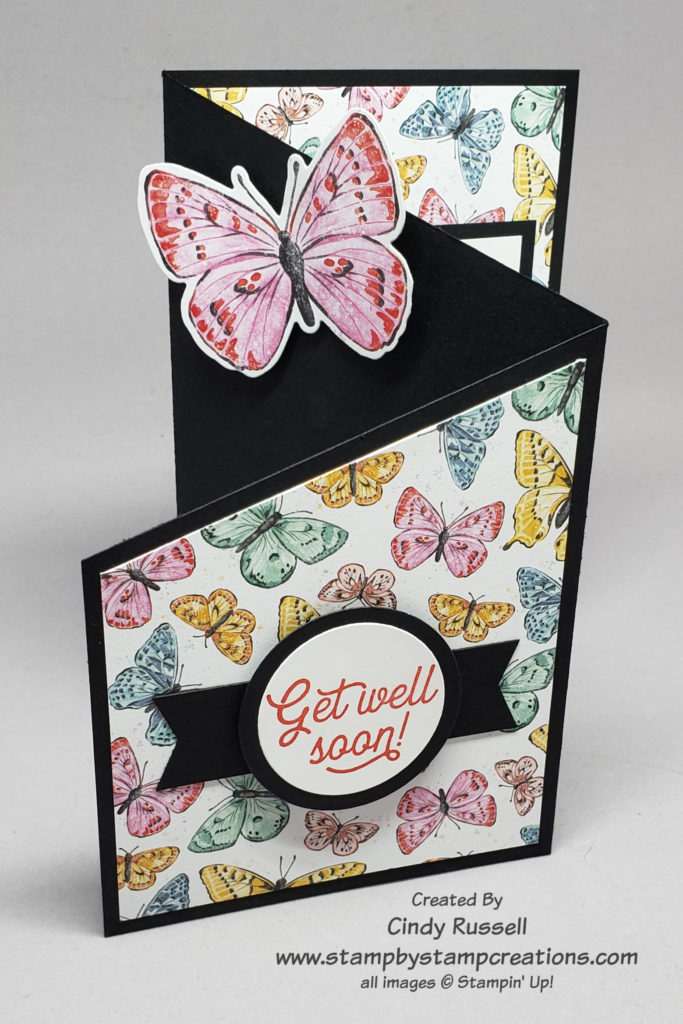
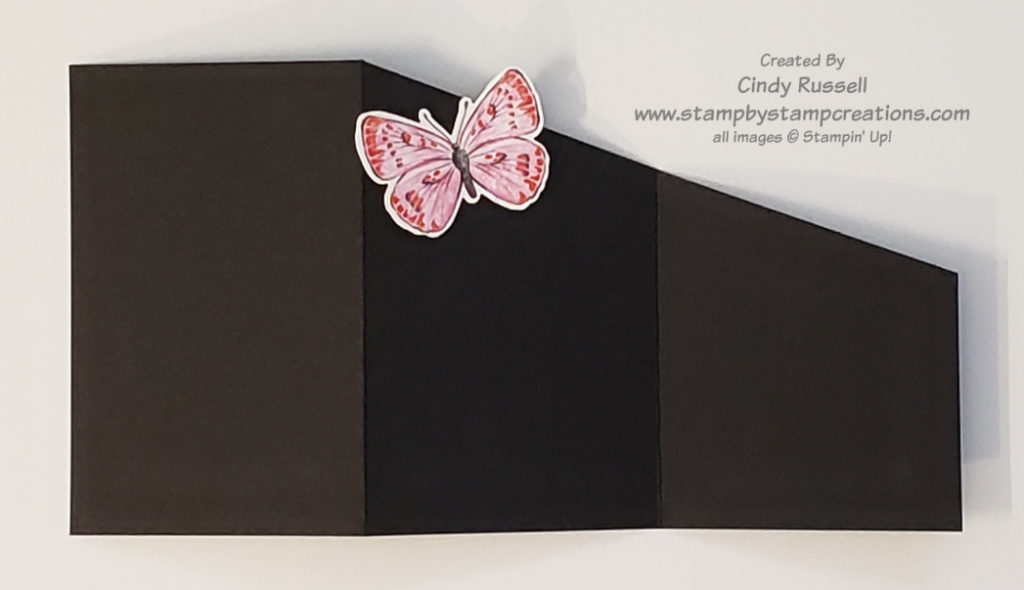
Lately we’ve been talking about many different types of Z-Fold cards and today is no different. Today I want to introduce you to the Angled Z-Fold cord or Angled Tri-Fold card. I think most people call it Angled Tri-Fold but you fold the three panels into a Z so to me it’s an Angled Z-fold!
Butterfly Bouquet Angled Z-Fold Card
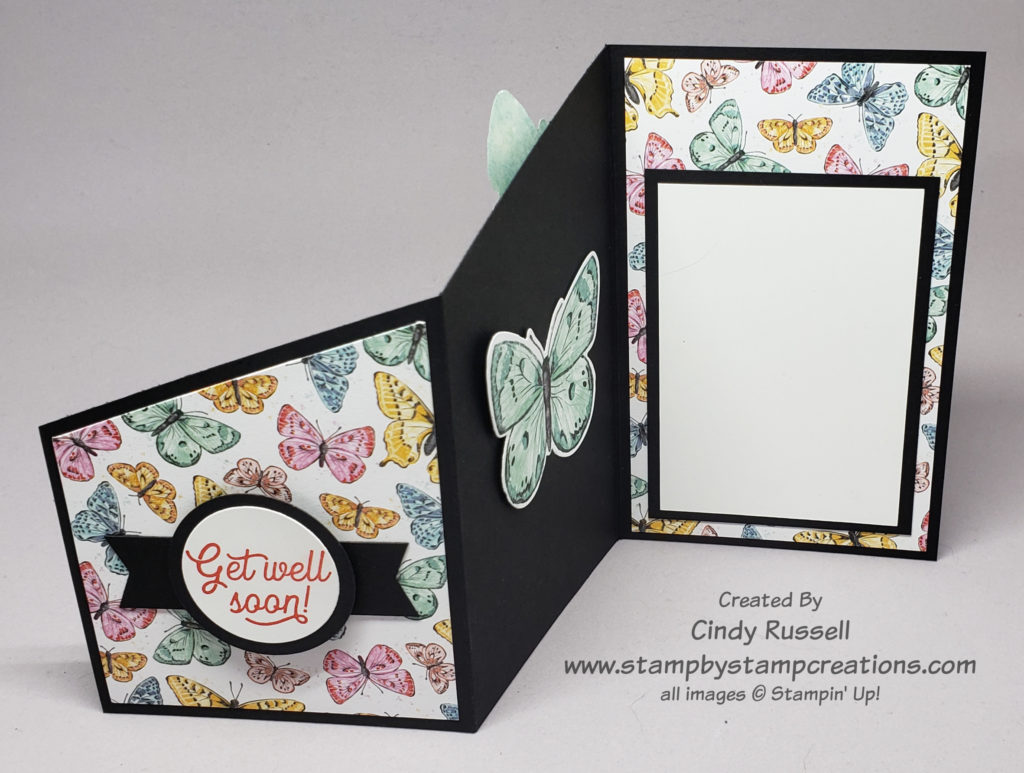
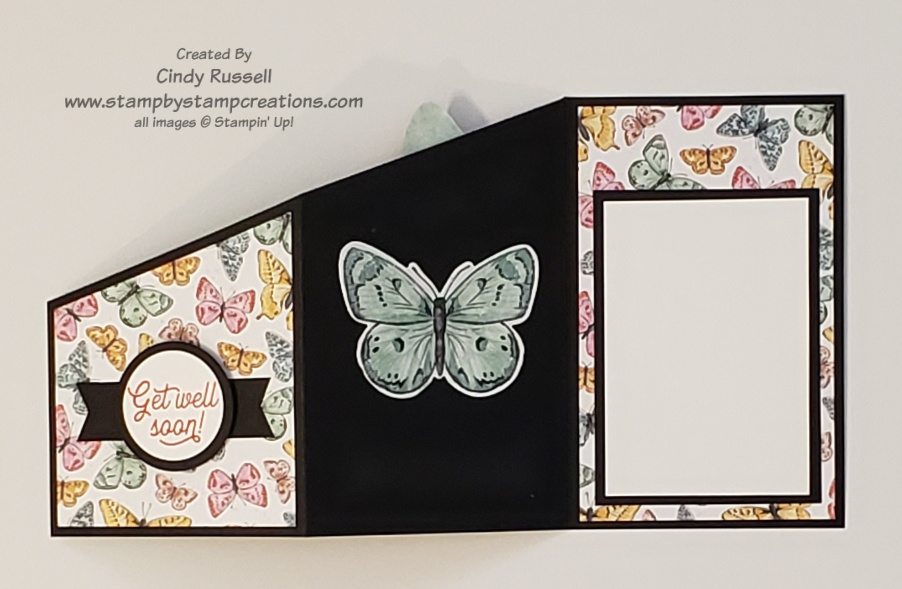
Butterfly Bouquet Angled Z-Fold Card open
When you look at the card in it’s closed position you can see that there is going to be some type of special fold to it. You see the front panel with the designer paper and you can see a little bit of the designer paper on the “inside” or back panel. As you open the card it’s easy to see the angled top edge.
I used the exciting new Butterfly Bouquet products on my card. Gotta love those butterflies! The large pink butterfly is die-cut from the designer paper! You can view all of the products in this collection here. The stamp set and the dies from this collection are actually sneak previews from Stampin’ Up!’s upcoming 2021-2022 Annual Catalog. How fun is that?!
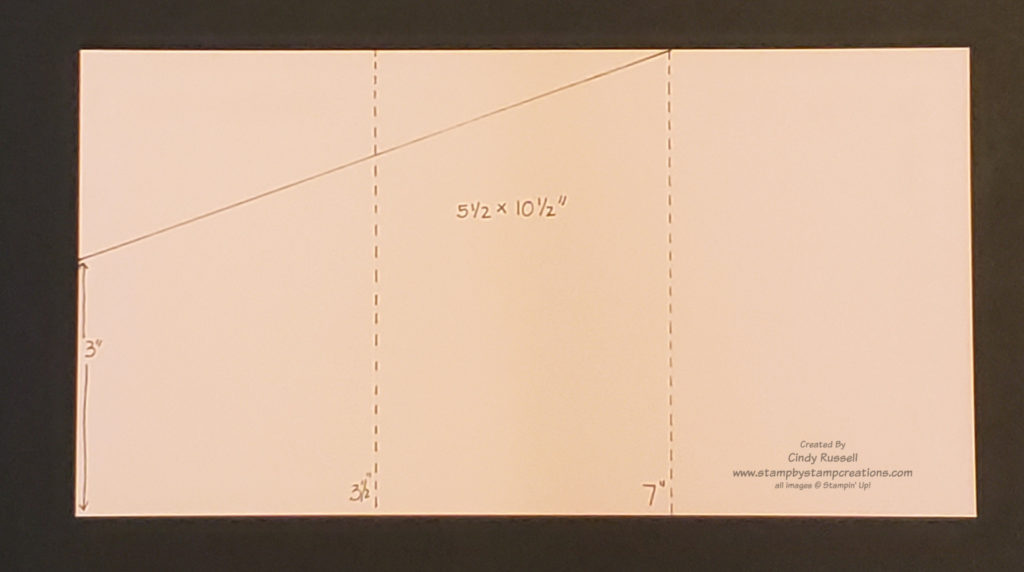
Template for Angled Z-Fold Card
My card is made from 5 ½” x 10 ½” piece of cardstock and will fit in a standard Stampin’ Up! envelope. When closed, the card measures 3 ½” x 5 ½”. Score the 5 1/2″ x 10 1/2″ piece of cardstock along the long side at 3 ½” and 7” to form your panels. To get the angled edge you will then measure 3” up from the bottom on the left short side. Make a light pencil mark. Then draw a light line from the pencil mark to the top of the 7” score mark and then cut along this line. The base of the card is now done and you just need to decorate!
The angled piece of designer paper on my card is 3 ¼” across. The short side measures 2 ¾” and the long side measures 3 7/8”. The larger piece of designer paper on the back panel measures 5 1/4″ x 3 1/4″.
You can make an Angled Z-fold card in many different sizes. The key is to make sure that you can evenly divide the long edge of your cardstock by 3 so that your panels are all the same size. The starting point for you angled edge can be anywhere on the left edge and you can either end your angle at the second score mark like I did or you can take the angle all the way to the upper right corner of the cardstock.
I hope you like this fun and easy Fun Fold! Have a great day! Take care and Happy Stamping!
Adhesives are definitely a must-have tool for any craft room. How else are we going to stick our projects together? There are so many adhesives for crafters to choose from. How do you decide which one to use?
Over the next few weeks I’m going to talk about adhesives. I’ll cover the different types and when to use them. The type of adhesive you use is definitely a personal choice. I’ll be talking about the adhesives that Stampin’ Up! carries.
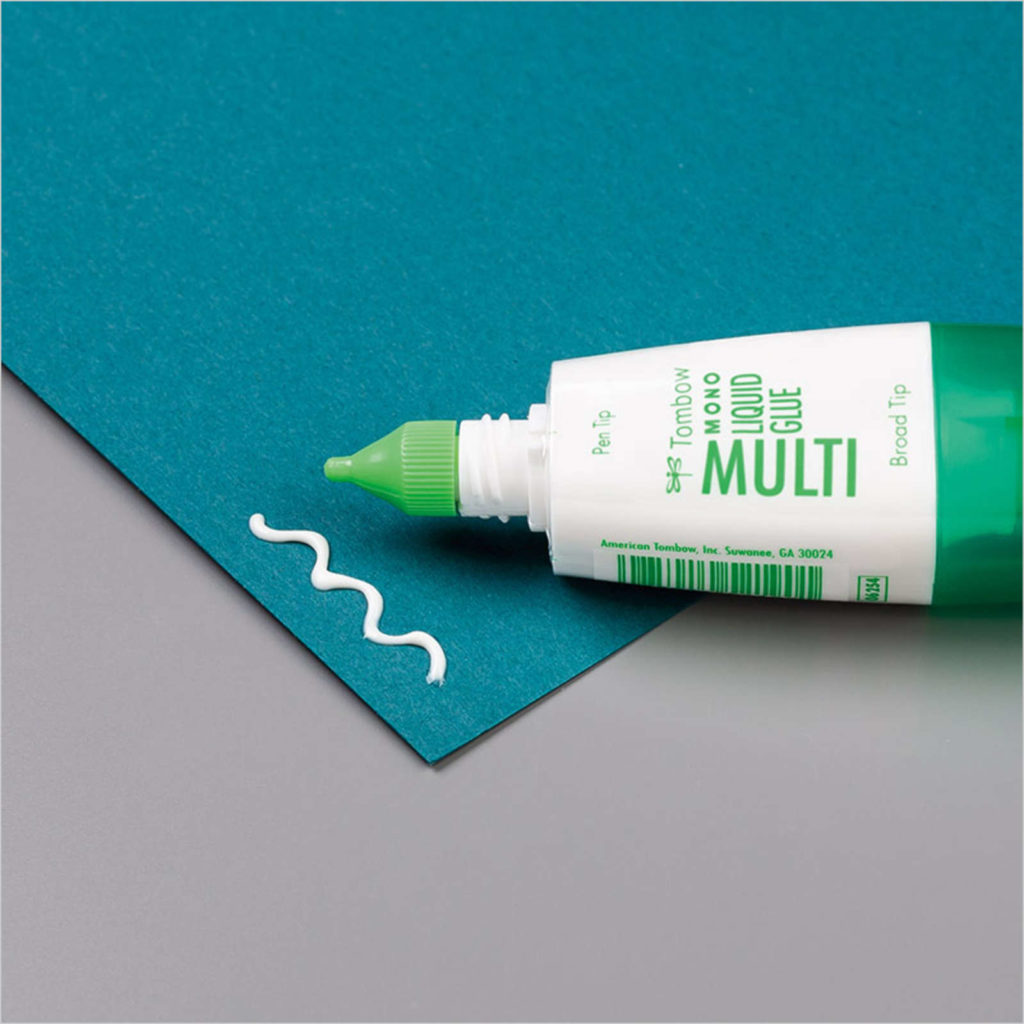
Multipurpose Liquid Glue
The first type of adhesive we’re going to talk about is liquid glue. Liquid glue goes on wet and dries clear. Liquid glue works well to adhere paper to paper as well as embellishment to paper. I actually use a little drop of liquid glue when adhering any small embellishment to my project, even when they’re self-adhesive. Better to be safe than sorry. Liquid glue works well on cards and smaller 3D projects. I don’t think it’s a good adhesive for scrapbooks though. You’d hate to ruin your photos. Stampin’ Up! carries two different types of liquid glue: Mulitpurpose Liquid Glue and the Fine-Tip Glue Pen.
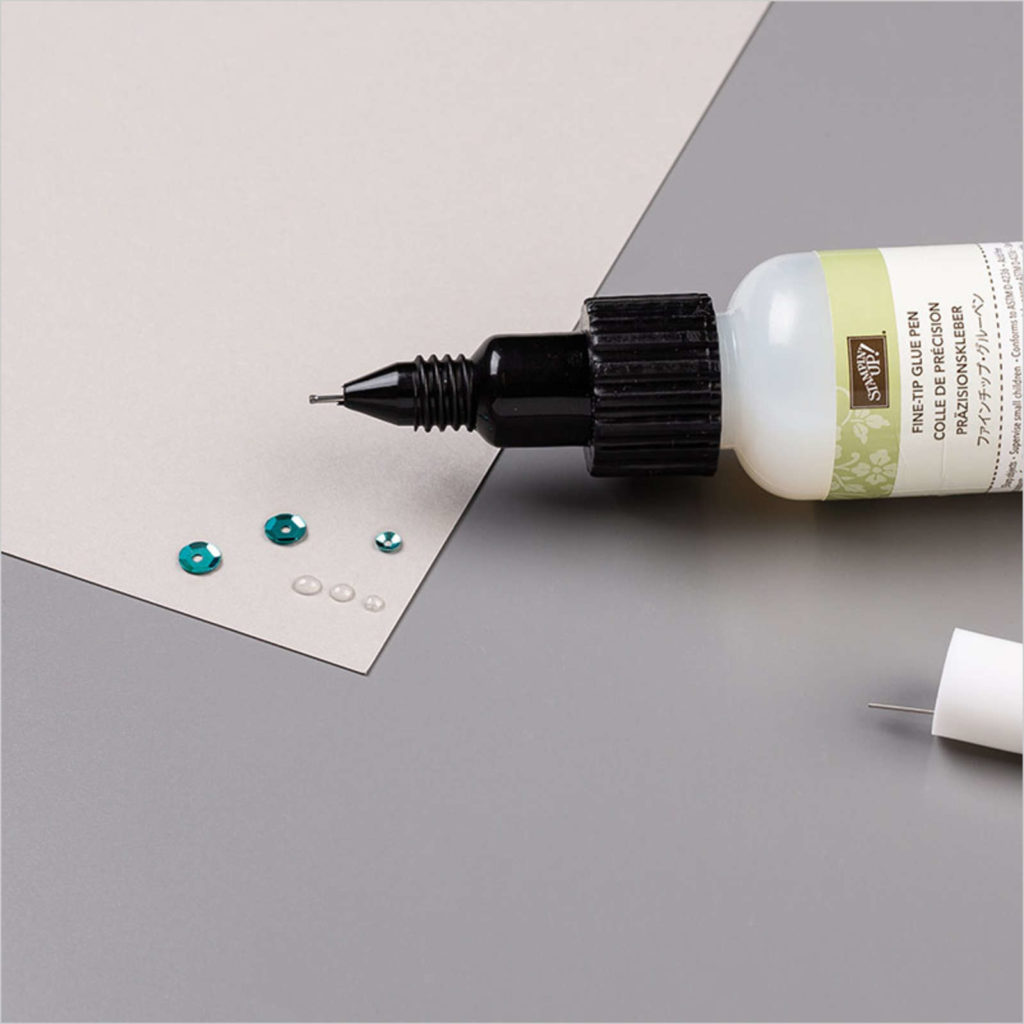
Stampin’ Up!’s Fine-Tip Glue Pen
In the past I didn’t use liquid glue much. Yes, it has it’s purpose but I found it to be a little messy. I was always getting it in places it shouldn’t be, including my fingers. (Ok…it may have been operator error…) I have started using liquid glue more though. I like the fact that it needs a little time to dry so you’re able to wiggle things around a bit if they’re not straight. If you’re careful, liquid glue is perfect for adhering small intricate designs. The Fine-Tip Glue Pen is especially great for intricate designs and small areas.
If the die pieces are especially small and you don’t want to use the Fine-Tip Glue Pen there is an easy way to use the Multipurpose Liquid Glue without putting little dots of glue all over the back. Simply squirt a little glue on to your Silicone Mat or a paper plate. Then dab your Stampin’ Sponge in the glue making sure not to get too much glue on the sponge. Once you have some glue on the sponge lightly dab the glue onto the back of the die. This puts a light coat of glue on the whole die.
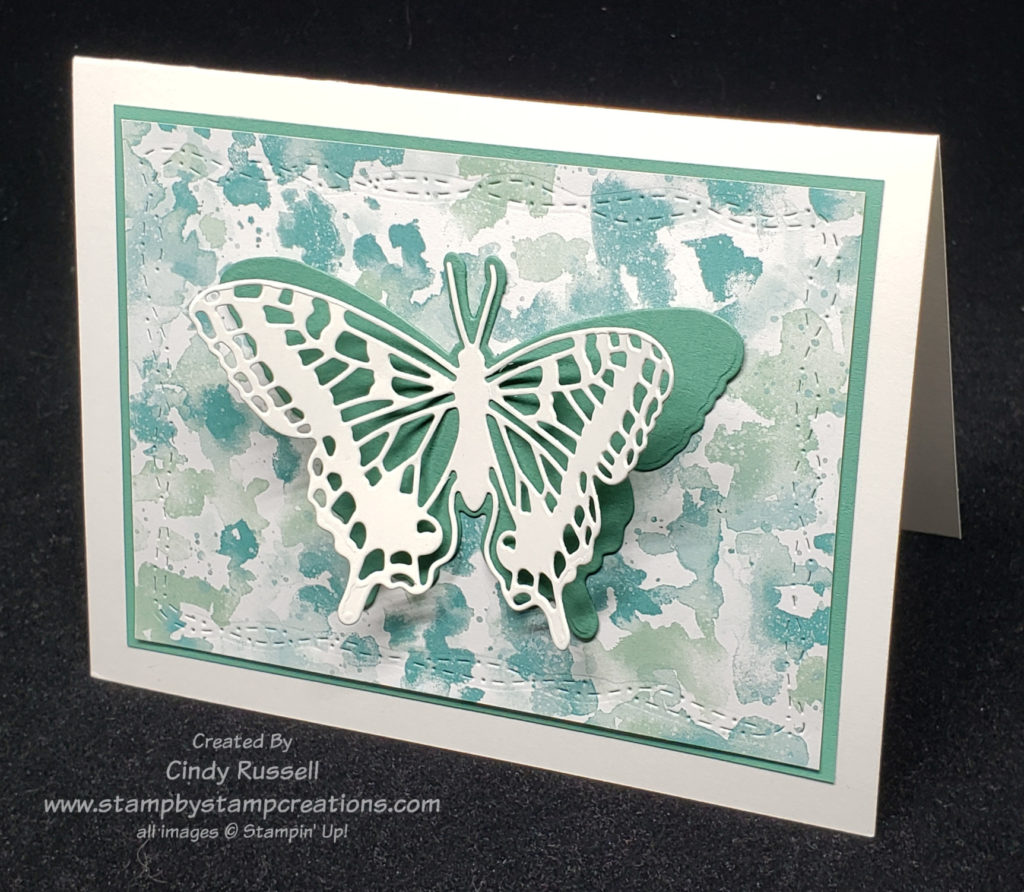
Did you get my weekly email on Tuesday? (If not, enter your information in the box at the right.) In my email I shared this card with you. To adhere the more intricate butterfly I used liquid glue only on the butterfly’s body and then I bent the wings up a little to give it some dimension. This would have been a little harder to do with a tape type of adhesive.
As the name says, multipurpose liquid glue is….multipurpose! It’s a great option for all sorts of projects and situations. It’s not the go-to adhesive in my craft room but it does have it’s purposes and I’ve been using it more and more. Face it…it’s hard to make craft projects without adhesive!
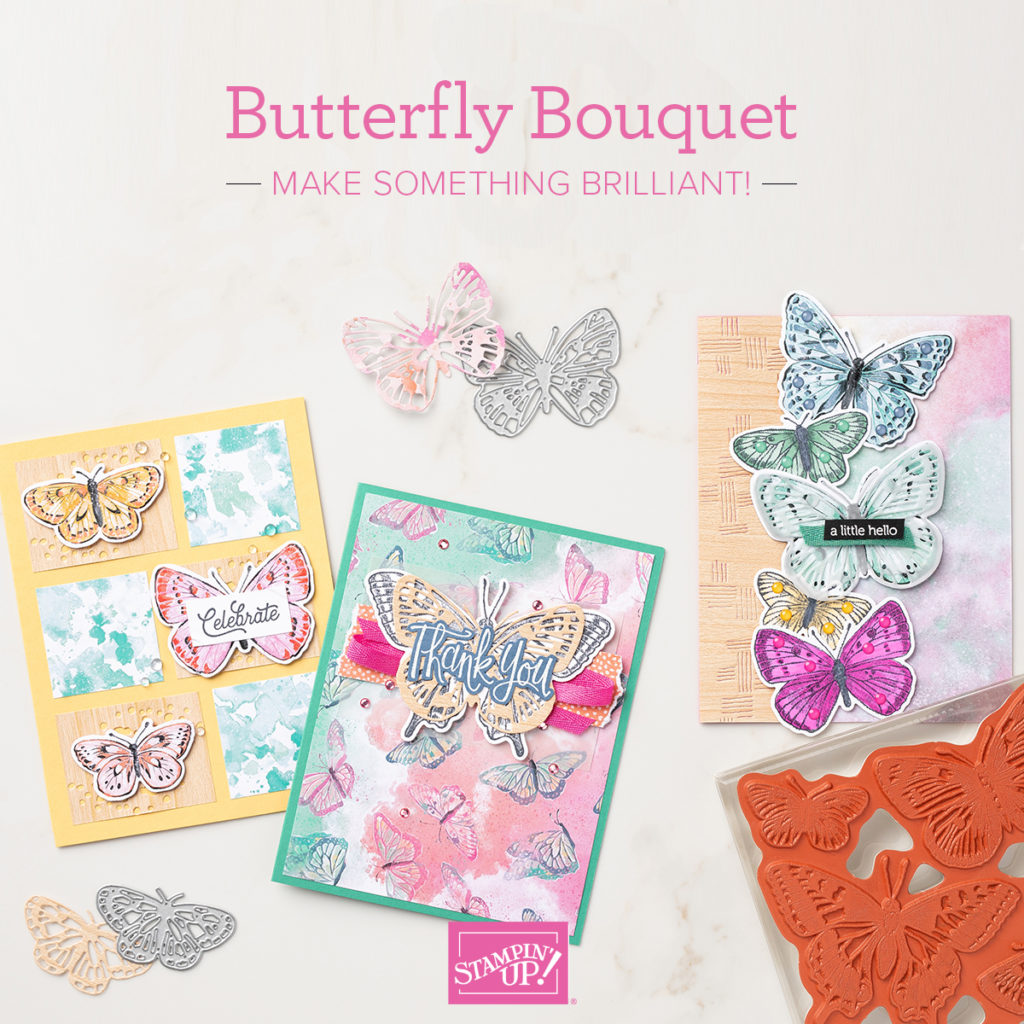
It’s time to thing Spring with Stampin’ Up!’s new Butterfly Bouquet products! Butterfly stamp, buttefly dies and buttefly paper! All sorts of butteflies!
I didn’t really think I was a butterfly person but as I’ve been playing with these products over the last week they’ve just made me smile….and I haven’t even inked up the stamp yet!
The stamp and dies are an early release from Stampin’ Up!’s upcoming new 2021-2022 Annual Catalog. The designer paper in the Butterfly Bouquet collection however will only be available until May 3rd.
You may be wondering why I am saying “stamp” versus “stamp set”. Take a look at the photo above. The butterflies are all connected. It’s one large stamp! Ink up this stamp and you will stamp 6 butterflies at once! And guess what? There is a die that will die cut all six of them at the same time! One of the sheets of designer paper has these butterflies printed on it so you’ll be able to die cut them also with the single die.
There are both solid butterfly dies as well as intricate dies in the die set. This card was made using the designer paper and the intricate dies. So fun!
You can view these Butterfly Bouquet products here in my online store. Get a head start on those Spring projects with the Butterfly Bouquet collection!
Have a great day! Take care, happy stamping and Think Spring!