Make It Mine: Beauty of the Earth

Stampin’ Up! makes such beautiful paper that sometimes you just need to make it the focal point of your card.   The first card that I’m sharing here is the card that inspired me.  Simple, yet elegant.  I received this card in a swap and unfortunately there was no name on it so I don’t know who to credit.

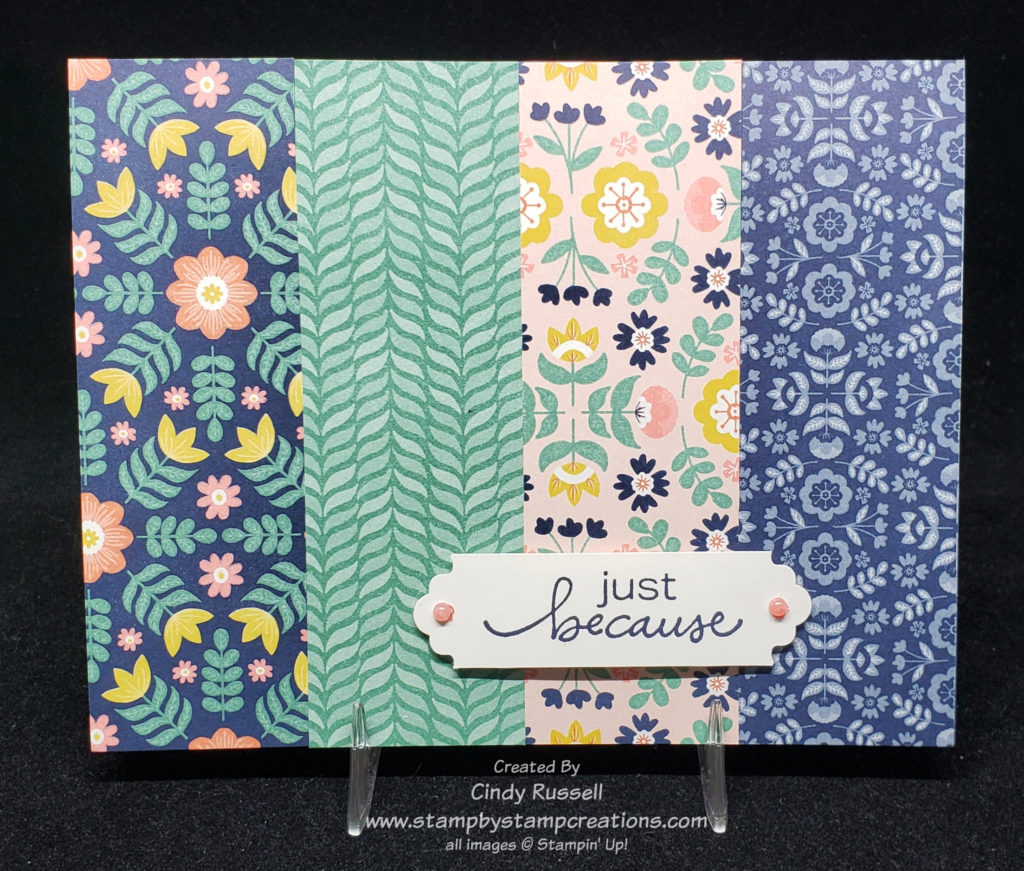
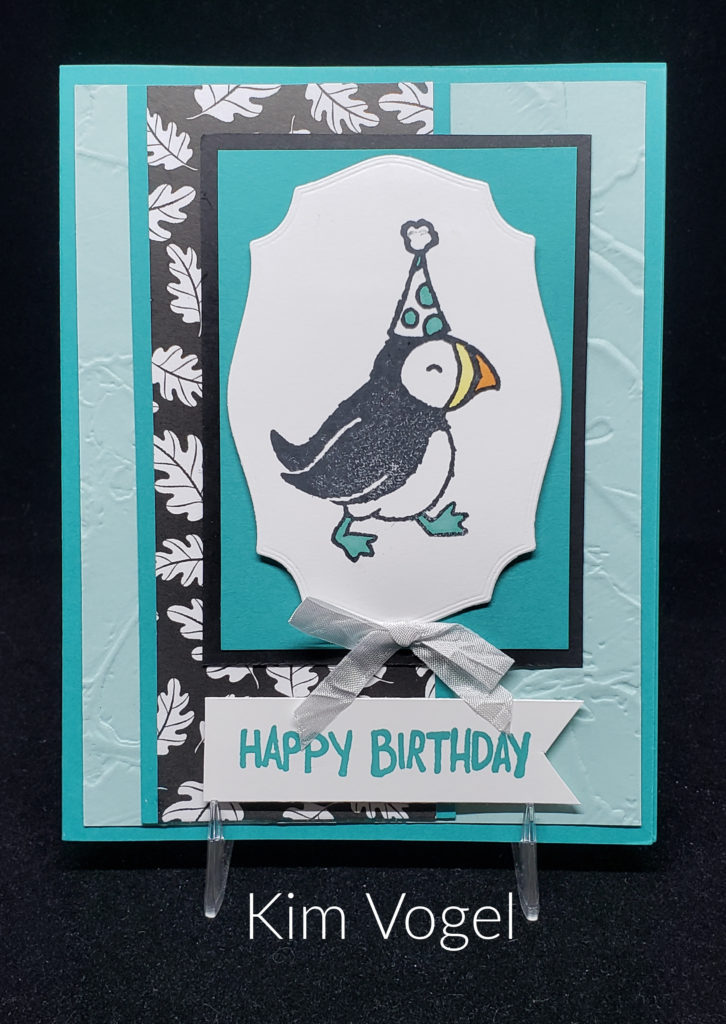
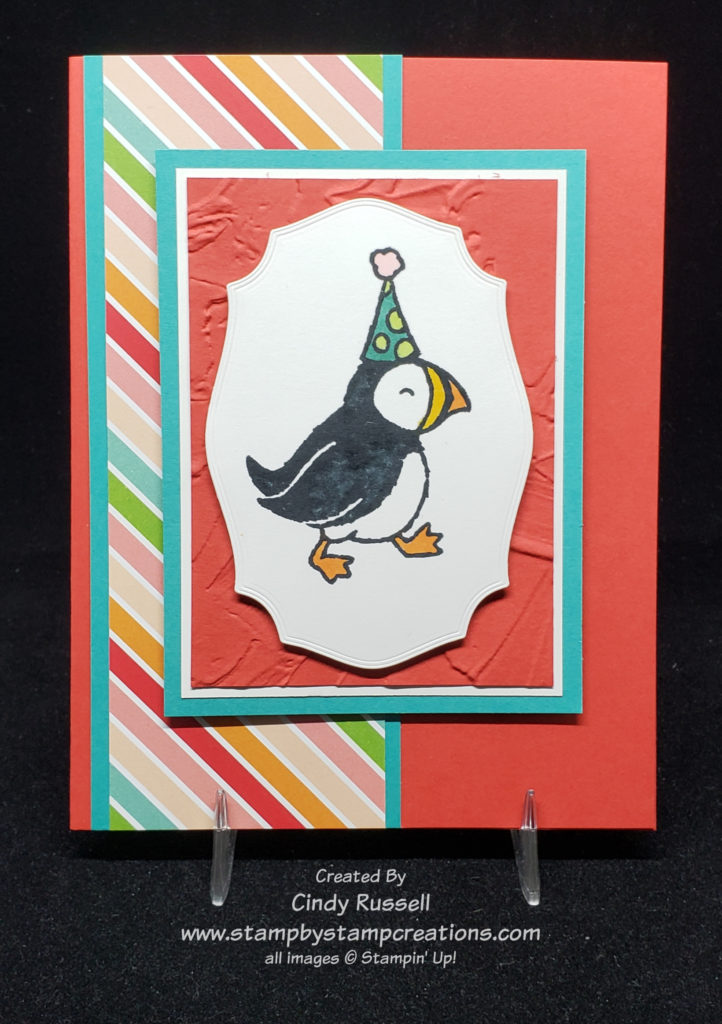
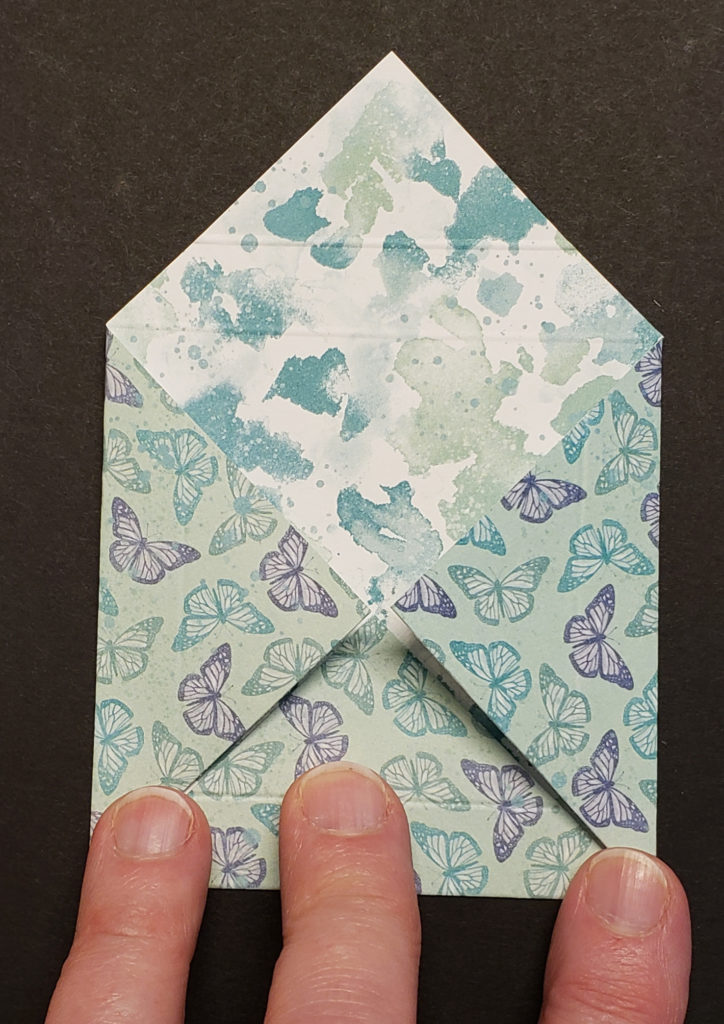
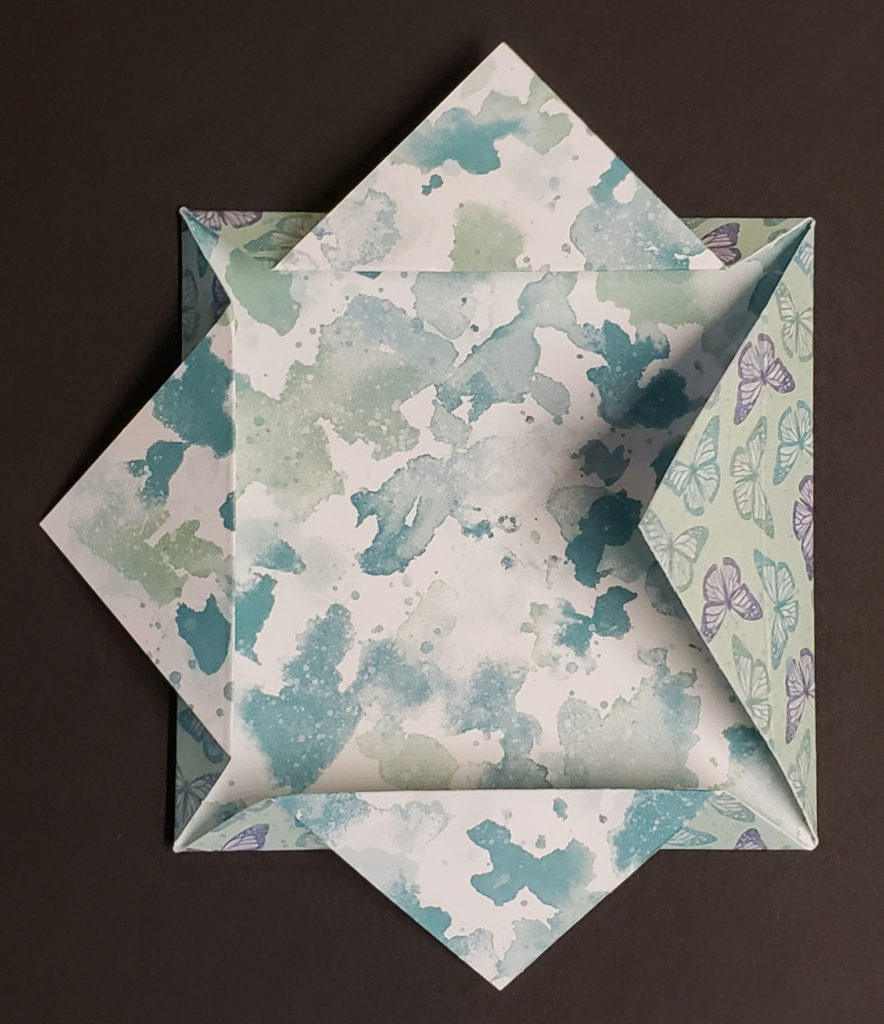
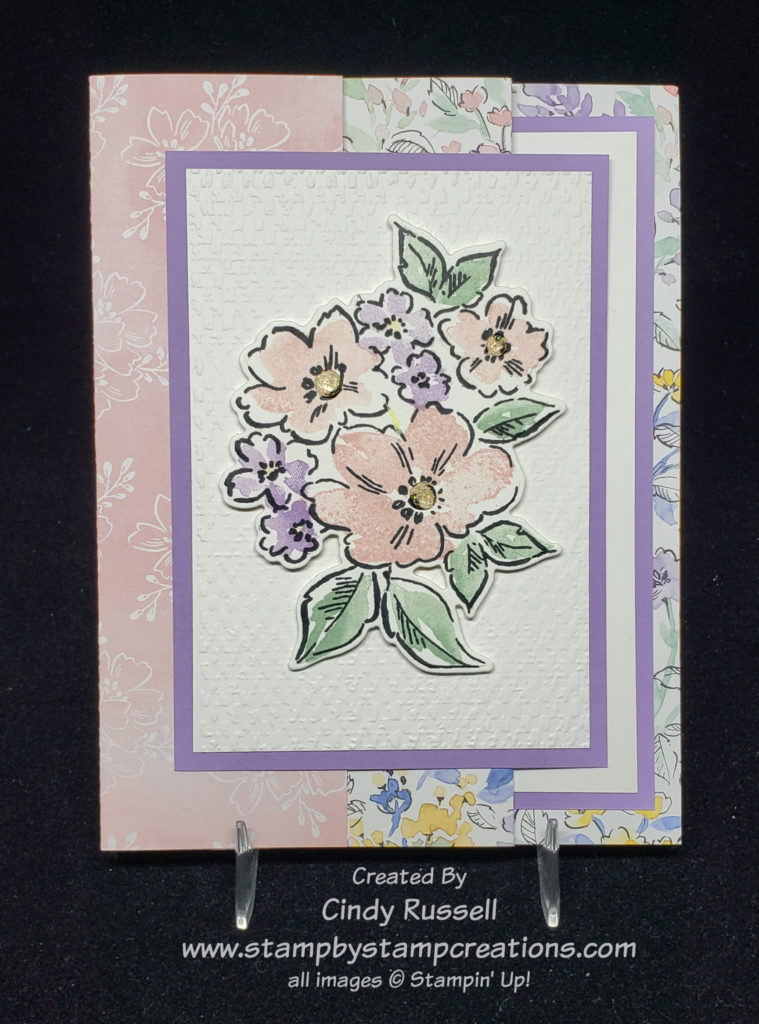
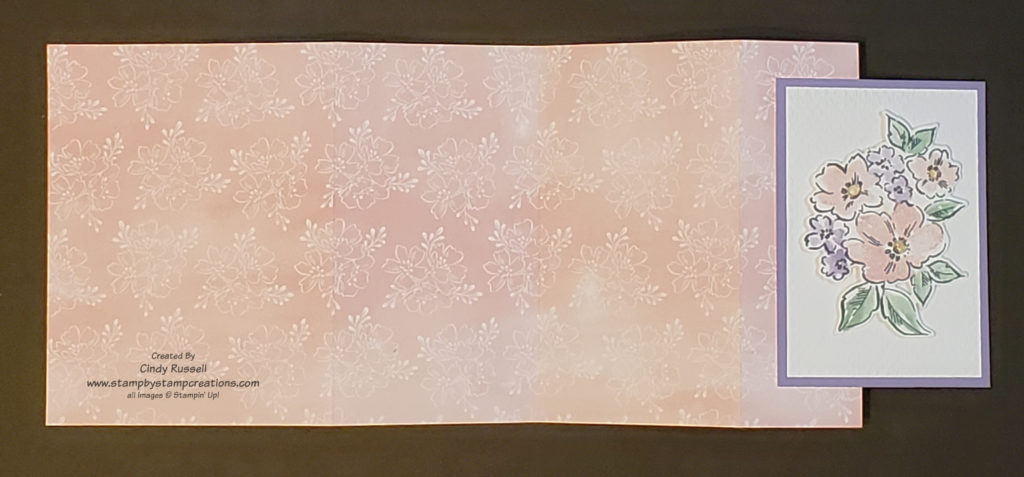
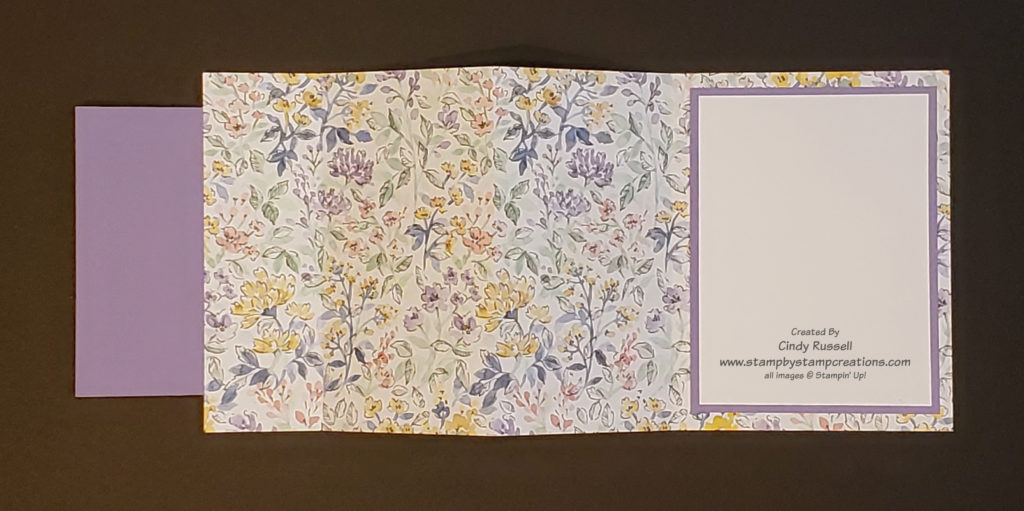
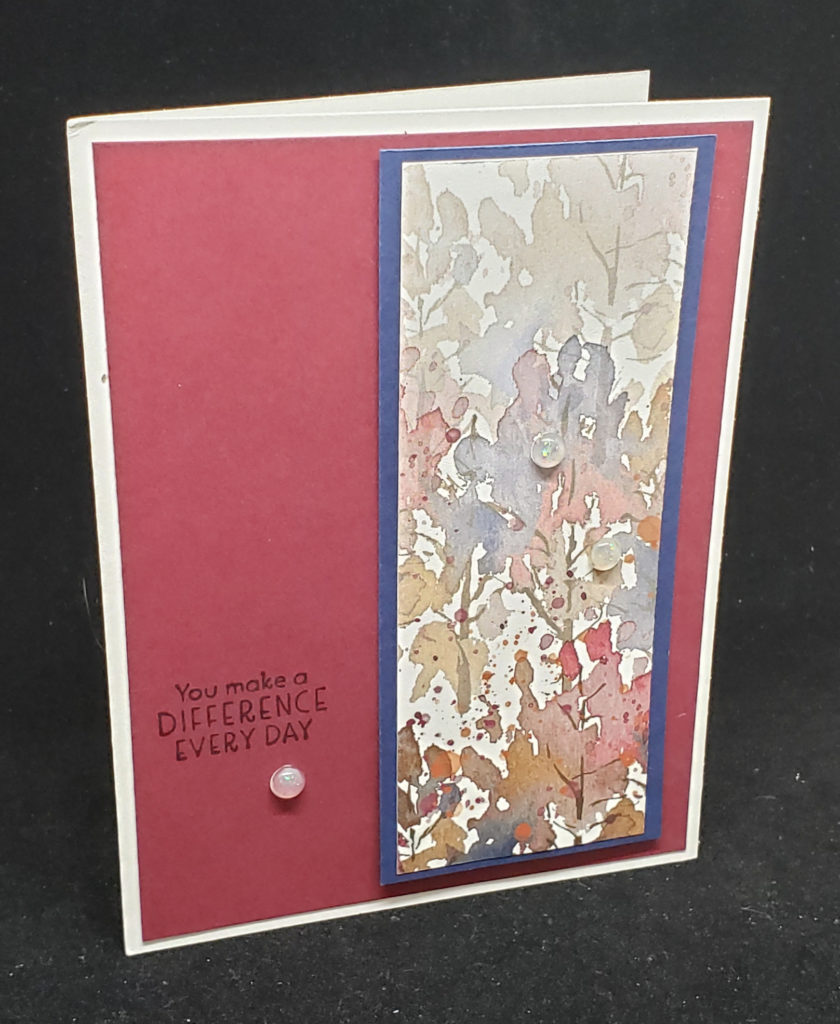
The piece of designer paper used on this card is from the Beauty of the Earth package.  It is beautiful and layering it on Night of Navy cardstock makes it pop.  Those of you who have been around me for a while know that I have a hard time with “simple”.  I usually have to add layers and embellishments to my cards.  However it was the simplicity of this card that caught my eye and I knew I had to give it a try.

Beauty of the Earth Sympathy Card

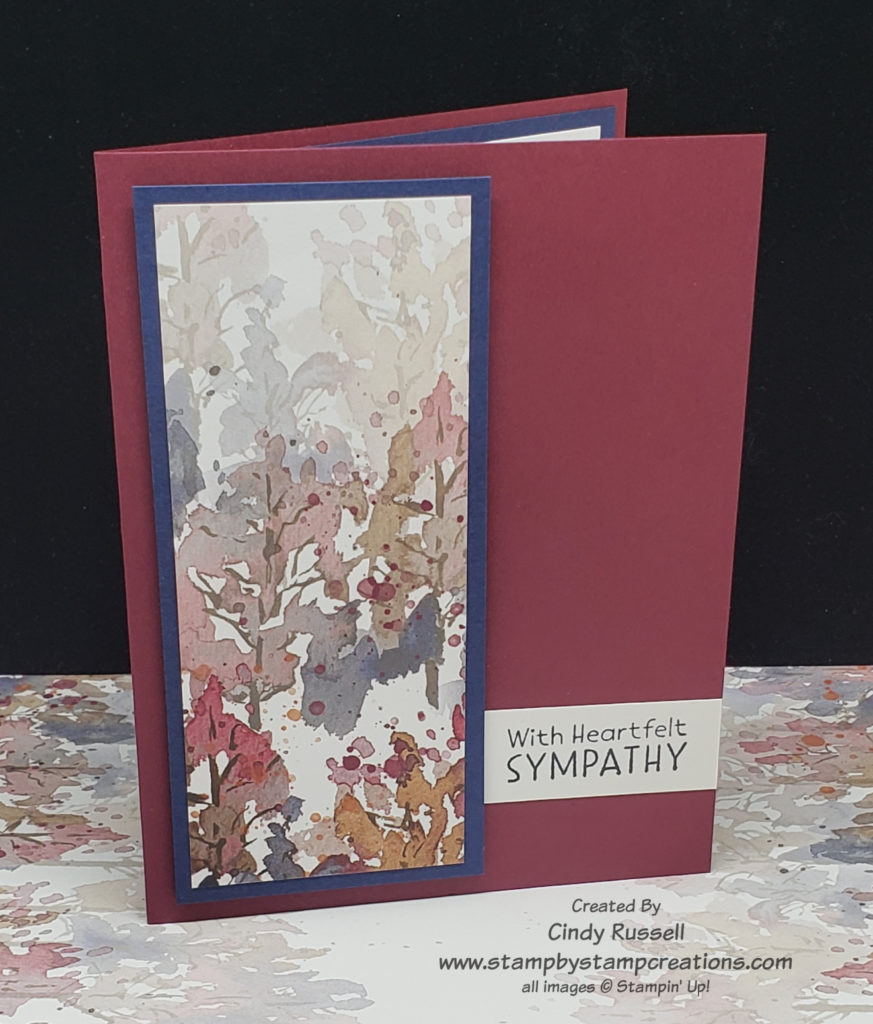
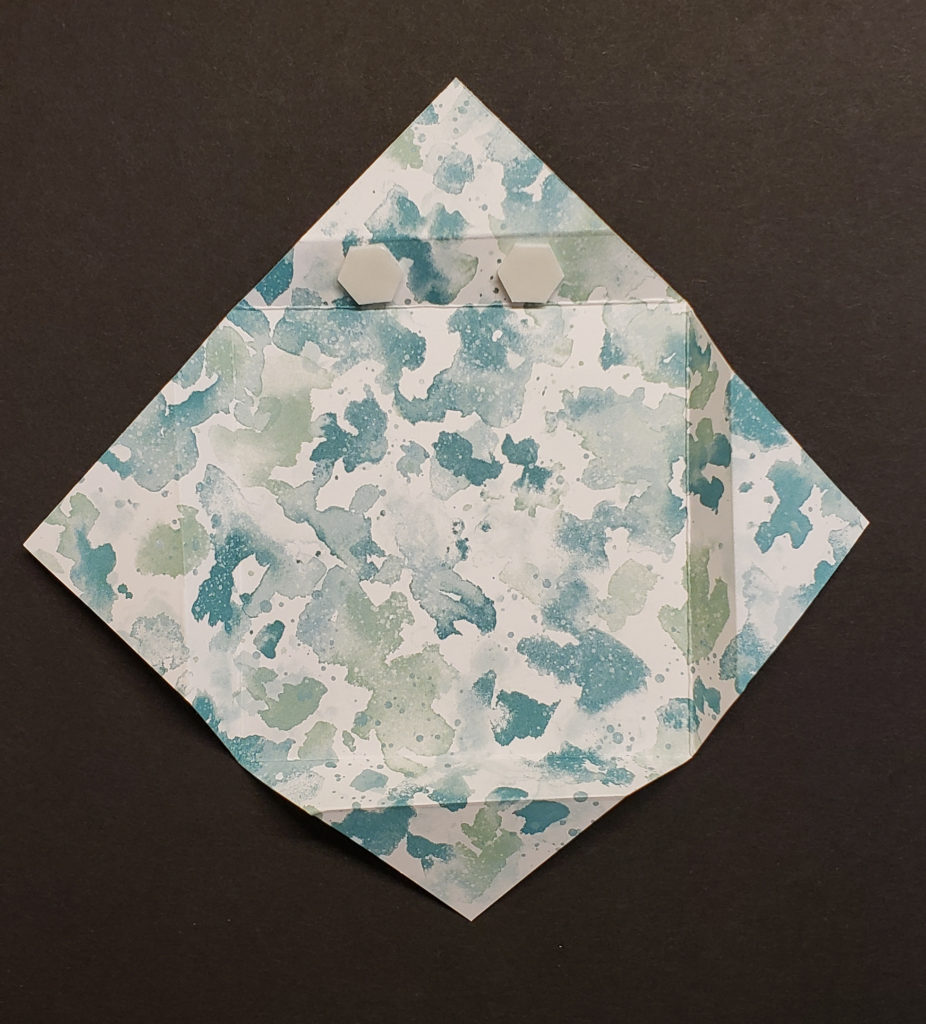
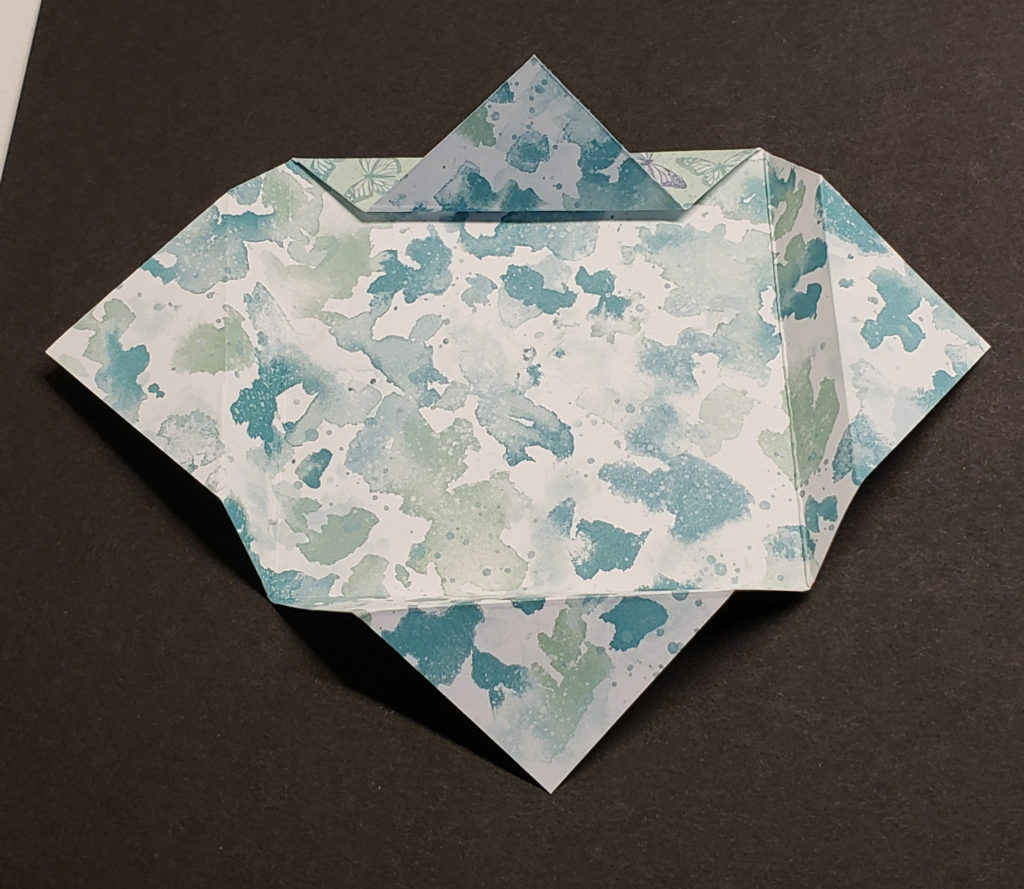
If you look closely at my version of the card you will notice that this time I actually used one less layer!  What? I know, it’s pretty different for me.  I tried layering my version like the original but I felt that by just layering the designer paper and popping it up on the card base with Stampin’ Dimensionals kept the focus on the designer paper better.

On the original card the sentiment is stamped directly on to the Merry Merlot cardstock with Night of Navy ink.  I felt this was a little hard to read.  I didn’t want to stamp my sentiment on a label because I thought that that would fight with my designer paper focal point.  I thought I’d just try a strip of Basic White cardstock and tuck it under the focal point.  Guess what?  I LOVE it!  What do you think?  I am definitely going to have to try this little trick again.  It’s just enough to add a little something-something to the front of the card but not enough to detract from the focal point. 

Do you love designer paper as much as I do?  Don’t forget that Stampin’ Up! has 9 different packages of designer paper on sale this month.  Don’t miss out!  Check out what’s on sale right here

Fun Fold: Interlocking Gatefold Card

Interlocking Gatefold Card

Can you believe that I found another type of gatefold card?  There are SO many and they’re SO fun!  This fun fold isn’t too difficult, especially since I used the Stitched Rectangles Dies to make my interlocking pieces.  What’s really fun about this fun fold is that you can use any kind of shape(s) to make your interlocking pieces!

The base of my card is the usual for a gatefold card. 5 ½” x 8 ½”.  Score in from each short side at 2 1/8” and make sure the sides meet in the middle of the card base when you fold both sides in towards the center.

The frame of my card is made from Stampin’ Up!’s gorgeous Beauty of the Earth Designer Series Paper.  (Yes, this is one of the patterns that is on sale this month!).  To give my frame a little extra support I adhered a piece of the designer paper to a piece of Basic White cardstock before die cutting.  To make the frame I chose two different sized rectangles.  I first die cut the inside of the frame with the rectangle that is the 5th largest (outside measures about 2 3/8” x 3 ¾”).  Then I centered the 3rd largest frame (outside measure about 3 1/8” x 4 ½”) around the opening I had created.  When you go to adhere the frame to the card remember that you only want to adhere the left side of the frame to the left flap on the front of the card.

The solid Basic White piece that interlocks with the frame was also die cut from the 3rd largest rectangle of the Stitched Rectangle Dies.  The stitched design I added to this piece of Basic White cardstock is a border piece from the Stitched Leaves Dies.  I die cut the leaf using the same die set.  It is die-cut from another piece of designer paper from the Beauty of the Earth package.  I love gorgeous paper!

When I adhered the right side of the Basic White piece of cardstock to the right flap of the card base I had the card closed so that I could make sure that it fit perfectly inside of the die-cut frame.  Then I added the die-cut leaf and decorated with a piece of linen thread.  Done!  Oh…in the last picture did you notice that I added a little strip of designer paper to the piece of cardstock on the inside of the card?  Don’t forget to decorate the inside!

Interlocking Gatefold Card

Have a great day! Take care and Happy Stamping!

Card Sketch: Make It Simple!

This card sketch couldn’t have been any easier.  Four pieces of designer paper that are 1 3/8” wide by 4 ¼” tall.  That’s it!  The hardest part of using this sketch was finding just the right combination of designer paper!  

The sketch didn’t call for a sentiment but I thought my card needed a little something more on the front. This sentiment is from the Lovely You stamp set and the label that my sentiment is on was punched with the Lovely Labels Pick A Punch.  So easy!  I did have to color the pearls with my Flirty Flamingo Stampin’ Blend Marker so they would match the paper.  That’s just me being picky though.  😊

I used Stampin’ Up!’s Sweet Symmetry package of Designer Series Paper on my card.  Such fun patterns!  And yes, this package of paper is one of the one’s that is on sale this month for 15% off!  Be sure to check out the pdf of all of the patterns on sale here or view them directly in my online store here.

I’d love to see what you do with this sketch!  Leave a comment with your card or send me a photo!  Have a great day!  Take care and Happy Stamping!

Make It Mine: Party Puffins Birthday

July is birthday month!  Yep, I’m having another birthday and we’re going to celebrate.  I’m going to share a birthday card with you that I made my own but first I want to share something I’m going to do for you! 

Send me a handmade birthday card this month and your name will be entered in a drawing.  The first person’s name that I draw will get to choose a current Stampin’ Up! stamp set (valued at $30 or less).  The second person’s name that I draw will get to choose a kit from Stampin’ Up!’s new Kit Collection!  How fun!  Birthday cards can be mailed to me at:

Cindy Russell 1640 Mountain Maple Ave. Highlands Ranch,  CO  80129

Let’s get to our cards today!

Here’s a birthday card that I received in a swap.  These Party Puffins are SO cute!  This stamp set makes the best birthday cards!  Thank you Kim for the inspiration with your card.  I stayed pretty true to Kim’s card design just changing up the color scheme and the arrangement of the layers.  I also left off the ribbon and moved the sentiment to the inside of the card.

Kim and I both used the Pattern Party package of designer paper that is only available for hosts with Stampin’ Rewards.  It’s one of my favorite papers in the new catalog! One of my favorite things about this package of paper is that one side is bright colors while the second side is black and white. So versatile!

Is it weird to admit that the little fish on the inside of the card is my favorite part of the card? Ha! Too cute!

Have a great day! Take care and Happy Stamping!

Fun Fold: Origami Window Fold

On Tuesday in my newsletter I shared a gorgeous origami frame with you that another talented demonstrator made.  As I was searching around the web trying to find out how to make it (I’m still searching), I came across this fun and easy Origami Window Fold.  The card itself isn’t a fun fold but you use this Origami Window Fold as the focal point of the card.

When you first look at this fold it’s a bit intimidating but once you have the measurements it’s quite easy.  Start with a square piece of designer paper that is 4 ¼” x 4 ¼”.  As with most origami folds you want the two sides of your paper to coordinate.  I tried starting with a couple of squares that were a bit smaller but I couldn’t get the other measurements to quite work out.  I’ll let you know if I get that figured out.

Lay your square of paper diagonally on the Simply Scored scoring board with the top and bottom points lined up on the 3” mark.  Now score along the 1” and the 1 ½” marks.  Turn the paper 90 degrees and repeat.  Continue until you have four sets of score marks.

If you don’t have a Simply Scored to make your score lines and want to use your Paper Trimmer you line things up a bit differently.  You still start by placing the paper diagonally on the Paper Trimmer.  You will line up the top and bottom points at the 2” mark and score.  Then slide the points over to line up on the 1 ½” mark and score.   Turn paper and repeat three more times.  Fold along the inside marks toward the center and them fold the other score marks to the outside.

Fold along the inside score marks towards the center of the paper.  They should all meet in the center.  Then fold the other score marks back towards the outside.

To complete the fold and give it a little dimension you want to add a couple of Stampin’ Dimensionals to the inside of each side of the frame.  See the photo to the left to see where I placed them.

The Origami Window Fold is done.  Now it’s time to decorate.  I chose to mount my Origami Window Fold on another piece of cardstock (3 ¼” x 3 ¼”)  before adhering it to the card.  I also lined the inside of my frame with a coordinating piece of designer paper (2 7/8” x 2 7/8”) to make my flower pop.  If I hadn’t, the inside of my frame would have been the gingham checked print like the folded out flaps. 

This was a fun and easy fold to make that adds a lot of “wow” to my card.  Give it a try.  I think you’ll like the results!  Have a great day!  Take care and Happy Stamping!

Card Sketch: Summer Daisy

Do you think of summer when you see daisies?  I know I do.  And you can’t beat a yellow, white and black color combination.  Oh, wait a minute….yes you can….PINK, white and black.  Ha!

Whatever color you like to pair with black and white, this simple card sketch is for you.  Three strips of designer paper, a sentiment and the focal point.  That’s it! I really like the simplicity of this sketch. Clean and simple.

Did you notice that I kept pretty darn close to the sketch with this card.  The only “extras” I added were the Matte Black Dots.  That’s pretty good for me!

Fun Fold: Acordion Fold

Accordion Fun Fold
Accordion Fun Fold

This fun fold card is both gorgeous and easy.  The key is to get all of your score lines straight so that everything lines up.  I’ve seen this Accordian Fun Fold card around but had never tried it.  When I saw Stampin’ Up!’s package of Hand-Penned Designer Series Paper I knew I found the perfect paper for this card.

The base of this card is made from half a sheet of 12” x 12” designer series paper.  As you can see from the photo, you can see both sides of the paper at the same time so when you choose your paper for your card you want to make sure that both sides coordinate.  I made this card for a swap I participated in and I have to tell you, I was able to use all six patterns of this paper to make this card!  You don’t always see that in the paper packages.

You are going to start with a 5 ½” x 12” piece of designer paper.  Score the paper at 1 ½”, 4 ½” and 6 ¾”.  That’s it!  The 1 ½” and the 6 ¾” score marks will be valley folds and the 4 ½” score mark will be a mountain fold.  Once you’ve creased the score marks your card base is done!  All’s that’s left is to decorate your card.   If you’re using Stampin’ Up!’s Designer Series Paper decorating is easy.  There is usually a stamp set or bundle that coordinate with the paper.  That’s what I did on my card.  I used the Hand-Penned Petals and Penned Flowering Dies for the focal point on my card.  Easy Peasy!

Dimensions for Card:

Designer Paper:  5 ½” x 12” scored at 1 ½”, 4 ½” and 6 ¾”

Colored cardstock:  5” x 3 ¾”, 4 3/8” x 3 1/8”

White cardstock:  4 ¾” x 3 ½”, 4 1/8” x 2 7/8”

This was a fun and easy card to make. I hope you try it! Have a great day! Take care and Happy Stamping!

Make It Mine: Sweet Strawberry

Summer is officially here and that means it’s strawberry season!  Not only do we get to eat these tasty berries in summer but we need to get out our Sweet Strawberry stamp set and make some strawberry cards!

I received this card in a swap and liked the simplicity of it as well as the color combination.  You can’t go wrong with black and white with a pop of color.

I was browsing through the catalog and on page 43 I found the Sweet Strawberry stamp set. What made me giggle was one of the card samples that I saw. Let’s just say that Diane likes to “Make It Mine” too. I know where she got her inspiration. 🙂

Sweet Strawberry

As you can see by comparing the photos I kept pretty close to the original. I did add a layer behind the designer paper and I arranged the strawberries differently. My sentiment was a bit smaller and I added the red rhinestones.

This was a fun and easy card to make. We’re making it my first post-Covid in-person card class tomorrow. Having an in-person card class is a really big step for me. For some reason, even though I’ve been fully vaccinated since April, I’m still a little skittish about everything Covid. One step at a time, right?

Be sure to check out page 43 in Stampin’ Up!’s Annual Catalog so you can compare the three cards. Similar…yet diferent.

Have a great day! Take care and Happy Stamping!

Pretty Perennials Card Sketch

It’s Card Sketch Day! I can’t begin to tell you how much fun I’m having with these. I spent a whole day last weekend playing with them.

These card sketches are great because they get me searching all the stamp sets on my shelf to find the right one to use with the sketch I’m working with.

The Freshly Made Sketches website that I’m getting my sketches from runs a contest each week with that week’s sketch. Then the next week they publish the winning card along with the others that were submitted. This gives you a lot of inspiration on where to start.

Pretty Perennials

Here is the card I came up with for this sketch. The words are from the Pretty Perennials stamp set which is retiring on June 30th. The designer paper is from the Pattern Party paper set which is a host only pack.

I did change up the sketch a bit by changing the orientation of the card as well as adding layers and an extra focal point (happy) to my card.

Once again I want to encourage you to give card sketches a try. They are fun and a little addicting. Ha!

Have a great day! Take care and Happy Stamping!

Make It Mine: Hey Chick

Hey Chick

Before I get into the details of todays card(s) I want to remind you that June 30th is the very last day that you can order the Hey Chick stamp set, the Chick Dies or the bundle that includes both items. Don’t miss out on these fun items!

But back to our originally scheduled post….

As I was searching for a card made with the Hey Chick Bundle I came across this card. I really liked the unique layout and thought I’d give it a try.

Hey Chick

It’s kind of funny, but the thing I really liked about the original card is the first thing I changed on mine. On the original, I liked that everything in the background was the same color. Since I couldn’t decide what color I would use I just switched everything up.

I made my chicken wire die out of Smoky Slate cardstock and used a wood pattern from the In Good Taste Designer Paper on my card. Of course, I added a layer too.

Even though I left my chicken white it still pops against the background since I embossed it with the Tasteful Texture Embossing Folder.

How would you have made the original card yours? Leave me a comment and let me know!

Have a great day! Take care and Happy Stamping! Don’t forget to grab the Hey Chick Bundle before it’s gone!

Card Sketch: Hey Birthday Chick

It’s time for this week’s card sketch. I know this is only the second one I’ve done but it’s kind of fun. It can definitely be a challenge too. The sketch looks simple enough but then I need to figure out which of my supplies to use.

The first thing I did after deciding on this sketch was to find a stamp/die that would fill most of the white space on the sketch. After browsing my shelf of stamps I chose Hey Birthday Chick with the adorable chicken being lifted in the air by a balloon.

As you can see, I added a couple of layers to the card. My sentiment is a bit lower as I didn’t want to cover up the adorable chicken. Other than that I kept pretty close to the card sketch. I used a blending brush to lightly add Bermuda Bay ink for the sky.

Have you tried working with card sketches yet? Give this one a try and then either post your photo in the comments below or email me (cindy@stampbystampcreations.com) a photo of your card. I’d love to see what you come up with!

Have a great day! Take care and Happy Stamping!

Make It Mine: Hats Off!

When I first saw the Hats Off stamp set in Stampin’ Up!’s new annual catalog I thought it would be a great masculine stamp set. Of course, girls wear baseball caps too, right?

I came across this bright and cheerful card by Lisa Cummings and knew I wanted to recreate it. I had also come across a couple of hat cards that had flowers on them so that’s what I wanted to incorporate on my card along with color combination.

Before I share my version of Lisa’s card with you I want to share a little tip I learned. To give your ball cap a little dimension, use your bone folder to give it a little ben like you do with curling ribbon. Then, when you adhere the cap to the card (or other project) place some dimensionals in the center of the cap. That’s all I used on my card to adhere the cap.

Feminine Hats Off Card

Here’s my card. It looks a little more washed out than Lisa’s but we both used Polished Pink on our card. I used Bermuda Bay but I think Lisa may have used Coastal Cabana.

After completion, this card was one of those that just tickles your fancy because it turned out cuter than you imagined. 🙂

You can see be the shadow under the brim of my ball cap how I curved it a little. I think it really adds to the card.

The little flowers on my card are from the Pierced Blooms dies (one of my favorites that makes me sad it’s retiring). The “hello” is from the Artistically Inked stamp set and the pennant die is from the Tasteful Lables dies.

I love the new 3/8″ Open Weave Ribbon that comes in the new in-colors. It’s got a little stiffness to it that makes it easy to make the perfect bow, even small ones.

Here’s a photo of the inside of my card. I had to share it with you so you could see the smaller little ball cap die. It’s about 1 1/4″ x 7/8″. So cute!

Be sure to check out the Hats Off bundle. I think you’re going to like it!

Have a great day! Take care and Happy Stamping!

Card Sketch & Challenge!

It’s a new month so I think it’s time to try something new.  We’re going to move on from Tools of the Trade to Card Sketches!

What is a Card Sketch?  It’s exactly what the name says.  It’s a sketch of a design you can use as the basis for your card.  Many of us have a difficult time making decisions.  (Yep!  That’s me!).  A card sketch gives you the design starting point for your card.  From there you choose the stamp set, colors and embellishments you want to add to the card.

You can come up with your own card sketches but I’ve found this fabulous site called Freshly Made Sketches that has almost 500 sketches on it and they keep adding to it! Be sure to check it out sometime! I will be sharing one of their sketches every week along with the card I make using it.

When using a card sketch you can keep your project as close to the sketch as you want.  As you can see on my card, I kept the basic elements of the shape in the upper left corner with the diagonal strips behind it.  But I added to that.  I (naturally) added a couple of layers and I also added a sentiment on the front of my card.

Working with card sketches should be pretty fun.  I don’t think I’ve worked with them much.  Here’s my challenge for you.  My challenge for you is to make a card using this sketch and send it to me.  I really would like to see what you do with the sketch.  Then, I would like to share your creations on my blog and possibly my Facebook Page (with your permission of course).  You can email your card to me at cindy@stampbystampcreations.com or add it to the comments for this post. Will you join the challenge and play along?  I hope so!

Have a great day!  Take care and Happy Stamping.  Don’t forget to join the challenge!  I can’t wait to see your projects!

Make It Mine Monday: Pink & Black

Of course Barb Mullikin’s card caught my eye! It’s probably my favorite color combination. Of course, black does go well with a lot of colors. It makes the other color pop!

I really like the simplicity of this card. Barb gave this card a little extra something-something by using this fun scalloped border from the Basic Borders dies. I’m sure I’ve mentioned this before but this die set is one of my favorites in Stampin’ Up!’s new Annual Catalog. It’s so versatile with six different border dies to choose from!

Did you notice how Barb made the flowers pop by adding just a hint of color? What a fun technique!

I liked Barb’s card so much I decided not to stray too far from the orignal. Naturally I added another layer. Could there be a Make It Mine card where I didn’t? Ha!

I embossed the Polished Pink background with the Tasteful Textile 3D Embossing Folder which just happens to be my go-to for a hint of texture. I also added a little color to the centers of my flowers with Pale Papaya.

You’re probably wondering how Barb and I added that little bit of color to our flowers. Sponge Dauber! That little sponge tool was perfect for both making a little circle of pink around the center of the flowers and for dabbing a spot of color in the middle of the flower.

You can’t go wrong with a pink and black card (unless you really don’t like the color pink!). Have a great Memorial Day! Take care and Happy Stamping!

Fun Fold: Twisted Gate Fold Card

Twisted Gate Fold Card

Today’s Fun Fold is the Twisted Gate Fold or Diagonal Gate Fold card.  This unique fold is a lot easier to make than it looks.  I would almost call it the Twisted Double-Flap Gate Fold because like the regular Double-Flap Gate Fold card that I showed you a few weeks ago, you fold the front panels back on themselves. In this fun fold though you fold the front panels back on the diagonal.

I just had to use the Hey Chick stamp set again before it is gone for good. It’s only available until June 30th or until supplies last and that goes for the fabulous coordinating dies. If you love them as much as I do be sure to get them while you can!

Here is the template for the base of the card. The dimensions are 7 1/2″ x 4 1/4″. Score along the long side at 2 1/2″ and 5″. Then score diagonally as shown on the template.

These are the two decorative pieces of designer paper. They both measure 4″ x 2 1/4 and are cut on the diagonal but one is cut from the upper left to the lower right and the other is cut from the upper right to the lower left.

The four triangles are labeled for you in this photo and the photo below shows where to adhere them on the card. I found it was easier to figure out where to place them while I had the card closed. I’ve labeled the pieces here so you can see where I placed them on the card below.

Honestly, figuring out where to put these four decorative pieces was the hardest part of making the card. When you are adhering your focal point to the front of the card you need to make sure you only adhere it to the L1 piece or you won’t be able to open the card.

I’ve attached a couple more photos of the card below so you can see it both fully open and partially open. It really is a fun fold and it will fit into a regular-sized envelope.

Have a great day! Take care and Happy Stamping