Fall Inspiration With Gorgeous Leaves

Fall has finally come to Colorado! The highs are finally only going to be in the 60’s so I can finally get my long-sleeves and jeans out! Woo Hoo!

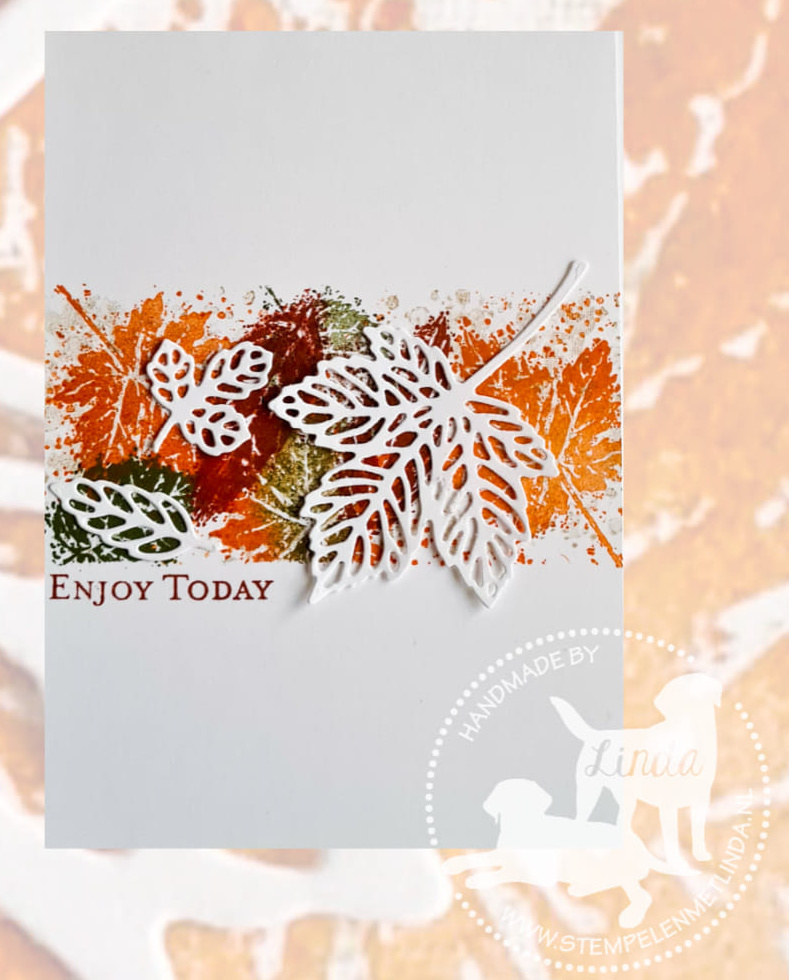
This lovely fall card made with Stampin’ Up!’s Gorgeous Leaves stamp set and the Intricate Leaves Dies was my inspiration for today’s Make It Mine Monday.

I love how Linda masked portions of the card before stamping her background of leaves. So pretty! To do this take a piece of scrap paper and with either washi tape or a removable adhesive, adhere the scrap paper to the portion of the card front you don’t want stamped. Don’t use too much adhesive, just enough so the scrap paper doesn’t move while you are stamping. On this card, you want to mask both at the top and the bottom.

Confession time….I wanted to try to recreate Linda’s card but it just wasn’t working. My background just didn’t turn out as nicely as hers the rest of the card wasn’t working out the way I wanted so I really changed things up.

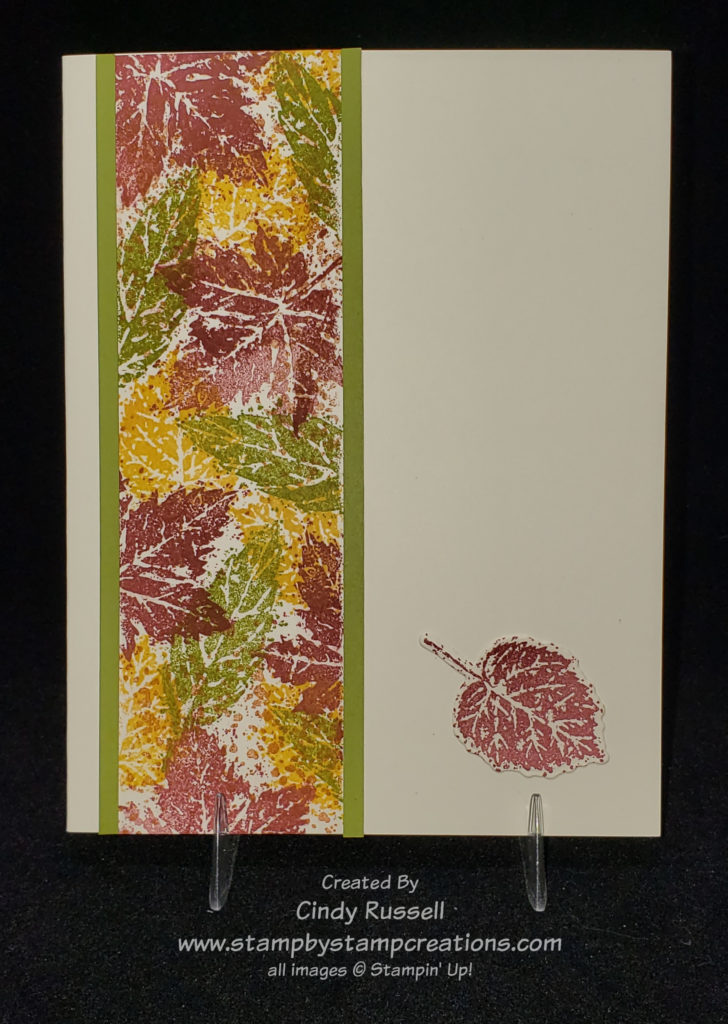
To start with, I stamped my leaves background vertically instead of horizontal and kind of framed it with strips of cardstock. As I liked the masked edges on Linda’s card, mine wasn’t working but when I added the frame of Old Olive cardstock it really made my leaves background pop.

Then instead of using the intricate leaf dies to add a leaf to my card I stamped the leaf and die cut it before adhering it to the card from. This added a little bit of dimension to the leaf.

I definitely made Linda’s card my own. The only thing on my card that remotely resembles her card is the leaf background. That’s ok though. I was inspired! I may just have to take another run at recreating Linda’s card. Her design is so “clean”.

Trying to recreate Linda’s card reminded me that even when you’re trying to recreate someone else’s card as close as possible it’s ok to go off on your own tangent. Go where your creative juices are leading you!

Have a great day! Take care and Happy Stamping!

Make It With Vellum!

Vellum always adds a little something-something to a project. I wish I would remember to use it more often on my projects!

These projects by Anne were just the nudge I needed. They’re very simple but the embossed vellum makes the cards pop! I couldn’t wait to get my supplies out and start creating!

Anne used the Wintery 3D Embossing Folders from Stampin’ Up!’s Annual Catalog to make her cards. Both the snowflake folder and the pine bough folder come in a set together. These are smaller folders that fit perfectly in the Mini Stampin’ Cut & Emboss Machine. Of course they work just fine in the full size model too.

Here’s my take on Anne’s projects. I decided to only use the snowflake folder on my card and kept the snowflake theme by adding a few Stitched Snowflakes to the card. Naturally I had to add a few layers to my card too. Ha!

The issue when using vellum is adhering it so that the adhesive doesn’t show through. To adhere the vellum on my card I added a strip of adhesive to the edge of the vellum that would stick under the Misty Moonlight strip of cardstock.

The “Season’s Greeting” sentiment is from the Merry Everything stamp set. I also used one of the other sentiments from this stamp set on the inside of the card. I die-cut the sentiment using one of the labels from the Tasteful Labels Dies. This is definitely one of my go-to sets of dies. I love all the different sizes and shapes of labels it has.

This is a fun and easy card! I hope you like it. Have a great day. Take care and Happy Stamping!

It’s All About the Paper!

It’s all about the paper (ok…and the adorable little fish….) with this card.  How can you go wrong with fun designer paper that has little pine trees all over it….and plaid pine trees at that?!  Two of my favorite things!  When I think of pine trees I think of the Minnesota Homeland and our family property in Canada.  I can’t wait to get back there.  Oh….as you read this I AM in the Minnesota Homeland hanging with my mom and dad.  I’ll be here for a week before hubby joins me and we head up to the cabin.  Woo Hoo! I’m excited to hopefully spend some time in the upper midwest!

This card really came together once I was inspired Anne Marie’s card. She hit the trifecta on her card. Plaid trees on the paper, plaid ribbon and the little fishies! The fish were what first caught my eye! They’re so cute!

I wanted to incorporate the fish on my card without completely copying Anne Marie’s card but I just couldn’t make it work so I decided to go with the Pine Tree Punch. Did you notice that I ran the punched tree through the Stampin’ Cut & Emboss Machine with the Tasteful Textile Embossing Folder? This really gave it a nice texture.

This color combination of black, white and Garden Green is very striking. I’m not sure I’ve used it before. Hope about you? Have you checked out the Peaceful Prints Designer Series Paper in the Sale-a-bration Brochure yet? So many fun designs! If you like it, you need to get it soon! Sale-a-bration is almost over! Only a few weeks left! With a $50 purchase you can choose this package of designer paper for FREE!!! Don’t miss out!

I’m pleased with the way my card turned out. Guess what? You could use it for lots of occasions including Christmas! Hmm….

Have a great day! Take care and Happy Stamping!

Nothing’s Better Than Cocktails!

Nothing’s Better Than

Nothing’s better than cocktails, right?  Ok…not everyone drinks alcohol but Stampin’ Up!’s Nothings’ Better Than stamp set not only has cocktails, but it has chocolate, cookies and coffee too!  You could easily switch this focal point and the corresponding sentiment on this card. This stamp set even has a coordinating die set called Love You More Than. So fun! When I’m crafting there is nothing better than a stamp set and dies that coordinate! This stamp set has some really fun sentiments in it and you can cut out the words cocktails, chocolate, cookies and coffe with the dies. Be sure to click the links above (name of stamp set or dies) and check them out. Too fun!

Connie Stewart, who designed these samples that inspired my card, helped design this stamp set!  When a Stampin’ Up! Demonstrator reaches the $1,000,000 milestone in career sales they get to help design a stamp set!  How fun is that?!  And no….I’m not even close.  Ha!

You can see Connie’s samples to the left.  Her projects were made using the Basic White Notecards & Envelopes.  I needed more layers and more PINK on my card so I went with a full size card.  The double circles (and the cocktail glass!) are what initially caught my eye on Connie’s cards.  So cute, fun and retro!  I love the little stars.  They just say “1960’s” to me.

On Connie’s cards you can see how easy it is to use the same template or card sketch and just change the images and sentiments.

Here you can that I added my sentiment to the inside of the card instead of having it on the front. Just another one of those changes I made.

I was definitely inspired by these fun little samples but I didn’t stick very close to the original when making my card. That’s the fun of Make It Mine Mondays (or any other day)….you’re inspired and have that starting point for your project.

I hope you’re inspired. Have a great day! Take care and Happy Stamping!

A Non-Traditional Halloween Card for Make It Mine Monday

Nontraditional Halloween Card with Sparkle of the Season

Today I really changed things up with Make It Mine Monday!  Both cards are made using the fun and versatile Sparkle of the Season Bundle but after that…..well, you decide!  Ha!

There were two things on the original card that caught my eye and made me want to make it mine.  The first was my favorite checked ribbon and the second was the little bats on the card.  I love stamped, punched or die-cut bats but I’m pretty sure I’d be totally freaked out if I encountered a real bat.  After including the those two items on my card all bets were off and the card was my own.  I guess I did use the same pattern of the Cute Halloween designer paper.

The bundle used to create both the original card and my card is the Sparkle of the Season Bundle (page 58 in Stampin’ Up!’s Mini Catalog).  In the Seasonal Swirls dies that coordinate with the Sparkle of the Season stamp set there are three different swirled wreath dies.  One has Christmas greenery, one has leaves and the last one has stars.  On the card that inspired me the creator used the wreath with leaves and added pumpkins.  For a Halloween card I wanted to use the wreath with the stars and I wanted my stars to be yellow which is why my Halloween card is black and yellow instead of black and orange.  Now that I’m writing this I guess I could have used the traditional Halloween colors but…I didn’t.

Have a great day!  Take care and Happy Stamping!

Celebrate With Sunflowers: Make It Mine

This lovely card made with Stampin’ Up!’s Celebrate Sunflowers stamp set really caught my eye. My first thought was “nice card but sunflowers are yellow!”. Well, I had to look it up but apparently you can find sunflowers in colors other than yellow if they are crossbred. Who knew? I admire the creator of this card for stepping outside the box. I also admire them for doing such a nice job of coloring with their Stampin’ Blends Markers!

How do you switch up such a nice card? Well, you first make the sunflower yellow! Ha! I guess I’m a purist. Of course then I had to decide which of Stampin’ Up!’s yellows to use. As with many of the color decisions I make when creating a project I let my ribbon make the decision for me. After seeing the lovely original I knew that I wanted to add ribbon and thought that the Bumblebee Gingham Ribbon would work perfectly with a sunflower.

Celebrate Sunflowers

Lately, I’ve really been into using dies on my projects so that is what I chose to do with my sunflower. I’m not very good at coloring either.

I stamped both the flower image and the leaves before die-cutting the solid portions and then I die cut the intricate pieces after adding a piece of Adhesive Sheet to the back of the cardstock.

The more I thought about it, I guess I did change up quite a bit on the card. The only things that I didn’t change were the basic layout of the card and the stamp set I used. That’s the whole idea of Make It Mine Monday. Get inspired! Take a card that catches your eye and start from there.

Have a great day. Take care. Happy stamping. Be inspired!

Make It Mine With Daisy Garden

Daisy Garden

You may have missed the Daisy Garden stamp on your first, second and maybe even third time through Stampin’ Up!’s Annual Catalog. It’s a hidden gem on page 106. The colored samples on the page are what catch your eye and the image of the stamp is on the smaller size.

Daisy Garden is a single large stamp. It’s perfect for backgrounds but also works well as a focal point. Once I finally noticed it I knew I needed it on my stamp shelf. Who doesn’t like daisies? (wink, wink!)

When looking for a card to make with the fun Daisy Garden stamp I came across this striking black and white card. It’s simplicity caught my eye. There I go again with the simple cards. My tastes must be changing. Anyway, I liked this card so much I decided to Make It Mine.

The first thing I had to do was add another layer to the card. You know me and my layers. Then I decided it needed a little color so I added the layer of Bumblebee cardstock and colored the centers of the flowers with my Bumblebee Stampin’ Write Marker. Next was adding the Bumblebee Gingham Ribbon.

As you can see from the photo of my card I didn’t stop there. I liked the card but it looked a little flat. I had seen another card online where the creator had stamped the daisies a second time, cut out three of them and popped them on to the card with Stampin’ Dimensionals. So that’s what I did and it made the card just right! It gave the card a little dimension.

What you can’t see from the phot is that I also added a little Wink of Stella Glitter Brush to the centers of the flowers. Such a fun and summery card! I love the way it turned out!

Have a great day! Take care and Happy Stamping!

Make It Mine Monday: Flowers of Friendship

The Flowers of Friendship stamp set can be found in Stampin’ Up!’s current Annual Catalog.  I wasn’t going to purchase this set but finally gave in.  Once I saw this card by Tracy Bradley I was glad I did.  Tracy’s card is clean and fresh.  I like the red and white with just that little pop of green.  The sentiment is from one of my new favorite stamp sets, Biggest Wish, which I first shared with you last week.  Tracy also used the new Pretty Flowers Embossing Folder.

When you like an original card so much how do you change it up to make it your own?  I actually started with the embossing folder and used the side that Tracy didn’t use.  I love the fact that you can get two different looks when using an embossing folder.

The next thing I changed on Tracy’s card was to add a layer behind the scalloped rectangle.  Now the focal point really pops.  Did you notice that instead of adhering the scallop rectangle to the red rectangle and popping that up I adhered the red rectangle directly to the card front and popped up the scallop rectangle.  When I di it this way I feel it really makes that focal point pop. 

I only made two other small changes.  I added another leaf so that there would be an odd number and I stamped the sentiment in black instead of red.  I was going back and forth between black and red for the sentiment but black finally won out.

How would you have changed Tracy’s card? Leave a comment and let me know or better yet share a picture of your Make It Mine!

Have a great day! Take care and Happy Stamping!

Make It Mine: Party Puffins Birthday

July is birthday month!  Yep, I’m having another birthday and we’re going to celebrate.  I’m going to share a birthday card with you that I made my own but first I want to share something I’m going to do for you! 

Send me a handmade birthday card this month and your name will be entered in a drawing.  The first person’s name that I draw will get to choose a current Stampin’ Up! stamp set (valued at $30 or less).  The second person’s name that I draw will get to choose a kit from Stampin’ Up!’s new Kit Collection!  How fun!  Birthday cards can be mailed to me at:

Cindy Russell 1640 Mountain Maple Ave. Highlands Ranch,  CO  80129

Let’s get to our cards today!

Here’s a birthday card that I received in a swap.  These Party Puffins are SO cute!  This stamp set makes the best birthday cards!  Thank you Kim for the inspiration with your card.  I stayed pretty true to Kim’s card design just changing up the color scheme and the arrangement of the layers.  I also left off the ribbon and moved the sentiment to the inside of the card.

Kim and I both used the Pattern Party package of designer paper that is only available for hosts with Stampin’ Rewards.  It’s one of my favorite papers in the new catalog! One of my favorite things about this package of paper is that one side is bright colors while the second side is black and white. So versatile!

Is it weird to admit that the little fish on the inside of the card is my favorite part of the card? Ha! Too cute!

Have a great day! Take care and Happy Stamping!

Make It Mine: Sweet Strawberry

Summer is officially here and that means it’s strawberry season!  Not only do we get to eat these tasty berries in summer but we need to get out our Sweet Strawberry stamp set and make some strawberry cards!

I received this card in a swap and liked the simplicity of it as well as the color combination.  You can’t go wrong with black and white with a pop of color.

I was browsing through the catalog and on page 43 I found the Sweet Strawberry stamp set. What made me giggle was one of the card samples that I saw. Let’s just say that Diane likes to “Make It Mine” too. I know where she got her inspiration. 🙂

Sweet Strawberry

As you can see by comparing the photos I kept pretty close to the original. I did add a layer behind the designer paper and I arranged the strawberries differently. My sentiment was a bit smaller and I added the red rhinestones.

This was a fun and easy card to make. We’re making it my first post-Covid in-person card class tomorrow. Having an in-person card class is a really big step for me. For some reason, even though I’ve been fully vaccinated since April, I’m still a little skittish about everything Covid. One step at a time, right?

Be sure to check out page 43 in Stampin’ Up!’s Annual Catalog so you can compare the three cards. Similar…yet diferent.

Have a great day! Take care and Happy Stamping!

Make It Mine: Hey Chick

Hey Chick

Before I get into the details of todays card(s) I want to remind you that June 30th is the very last day that you can order the Hey Chick stamp set, the Chick Dies or the bundle that includes both items. Don’t miss out on these fun items!

But back to our originally scheduled post….

As I was searching for a card made with the Hey Chick Bundle I came across this card. I really liked the unique layout and thought I’d give it a try.

Hey Chick

It’s kind of funny, but the thing I really liked about the original card is the first thing I changed on mine. On the original, I liked that everything in the background was the same color. Since I couldn’t decide what color I would use I just switched everything up.

I made my chicken wire die out of Smoky Slate cardstock and used a wood pattern from the In Good Taste Designer Paper on my card. Of course, I added a layer too.

Even though I left my chicken white it still pops against the background since I embossed it with the Tasteful Texture Embossing Folder.

How would you have made the original card yours? Leave me a comment and let me know!

Have a great day! Take care and Happy Stamping! Don’t forget to grab the Hey Chick Bundle before it’s gone!

Make It Mine Monday: Pink & Black

Of course Barb Mullikin’s card caught my eye! It’s probably my favorite color combination. Of course, black does go well with a lot of colors. It makes the other color pop!

I really like the simplicity of this card. Barb gave this card a little extra something-something by using this fun scalloped border from the Basic Borders dies. I’m sure I’ve mentioned this before but this die set is one of my favorites in Stampin’ Up!’s new Annual Catalog. It’s so versatile with six different border dies to choose from!

Did you notice how Barb made the flowers pop by adding just a hint of color? What a fun technique!

I liked Barb’s card so much I decided not to stray too far from the orignal. Naturally I added another layer. Could there be a Make It Mine card where I didn’t? Ha!

I embossed the Polished Pink background with the Tasteful Textile 3D Embossing Folder which just happens to be my go-to for a hint of texture. I also added a little color to the centers of my flowers with Pale Papaya.

You’re probably wondering how Barb and I added that little bit of color to our flowers. Sponge Dauber! That little sponge tool was perfect for both making a little circle of pink around the center of the flowers and for dabbing a spot of color in the middle of the flower.

You can’t go wrong with a pink and black card (unless you really don’t like the color pink!). Have a great Memorial Day! Take care and Happy Stamping!

Make It Mine: Hand-Penned

I will admit (again…?) that the Hand-Penned Suite in Stampin’ Up!’s in new annual catalog is one of my favorites!  I can’t seem to get enough of it!  I really love the designer paper.  You will see a lot of it in my projects.

The card that inspired me today was made by Julie Sperman.  Thank you Julie!  Pale Papaya isn’t my favorite color but it looks so nice with Misty Moonlight!  Julie used the Penned Flower Dies as well as the Tailor Made Tags Dies. These tag dies are becoming another favorite of mine! (Honestly, there aren’t too many Stampin’ Up! products that I don’t like!) She also used the Genial Gems on her card that coordinate perfectly with the Hand-Penned Designer Paper.  Coordination!  Love it!

I liked Julie’s card so much I was having trouble figuring out how to change it! How do you alter something so lovely?

I started with the card base itself.  On her card, Julie layered a piece of Pale Papaya on a Pale Papaya card base.  To change it up I decide to go with a Misty Moonlight card base.  Even after telling you to check your die sets for nice border dies I left off the scallop border on my card and used a larger piece of the designer paper since it’s so pretty!  The tags on both of our cards are pretty similar but I threaded my ribbon differently and used my gems as the centers for the flowers.

Have you tried any Make It Mine projects?  You should!  It’s pretty fun.  Go ahead and give it a try!

Have a great day! Take care and Happy Stamping!

Make It Mine: Party Puffins!

The Party Puffins stamp set was another one of those stamp sets that I didn’t think I needed. Once again, I was wrong. Sheesh! You try to be good and then someone posts a really cute card and you want to copy it.

I was looking at this adorable stamp set sitting on my shelf and knew that I wanted to use it for today’s post. So I hit the internet looking for a fun sample. Caroline’s card here was the one that caught my eye. Isn’t it cute?

If you’re looking at this fun paper and trying to figure out where it is in the catalog I’m going to give you a hint….it’s on page 171 and is a hostess only choice. Honestly, it might be worth it to host a gathering (or place a large order) just so that you can choose the Pattern Party 12 x 12 Designer Series Paper. It will only cost $18 of your hostess rewards and you get 48 sheets of 12″ x 12″ paper! One side is fun and colorful and the other side is black and white. Too fun!

Party Puffins Birthday Card

But let’s get back to the card. Of course the first thing I had to switch up on Caroline’s card was to add a few layers. Red always looks good with black and white so I added a red layer on both the front and the inside of the card.

I would have been remiss if I hadn’t included the little fishies with bows on my card. They’re actually one of my favorite parts of the stamp set! Ha!

Party Puffins Birthday Card – inside

The other thing I changed was that I just used one sentiment and put it on the inside of the card.

I was tickled with how cute this fun little card turned out and I can’t wait to make more of them! You’ll definitely see me sharing more cards using this adorable stamp set!

Have a great day! Take care and Happy Stamping!

Make It Mine: 2 For 1

I saw this card on Pinterest and liked the simplicity of it.  It was the perfect card to showcase the gorgeous new Soft Succulent In-Color as well as the fun silhouette dies from the Meadow dies. (These dies can be bundled with the Quite Meadow stamp set).

The first thing I thought of after admiring this card was “2 for 1”!  I’m not sure if Carol die cut the floral image from the green or if she die cut it from the white and the green we see is from the background layer.  It doesn’t really matter because I saw it both ways and figured I could make two cards with one die-cut image! So that’s what I did!

Here are the two cards that I made from Carol’s inspiration. As you can see, I die cut the floral silhouette from Basic White cardstock to make the focal point for both cards.

On the white card I used the die-cut space of white cardstock as the focal point and on the Soft Succulent card I used the die-cut image.

From there I simply added layers and coordinating ribbon to finish off my cards. As I was creating these cards I kept thinking to myself that they needed something else….maybe an embossed or stamped background or something but then I decided that the simplicity of the cards made them work. Sometimes it’s good to remember that less is more.

The Meadows dies are gorgeous. There are 6 floral/greenery silhouette images along with 2 butterflies, 2 labels and some small leaves. I can’t wait to begin my next project using these dies and the coordinating Quite Meadow stamp set!

Have a great day! Take care and Happy Stamping!