Make It Mine Monday: Hey Chick Double Z-Fold

Hey Chick Double Z-Fold by Patti Bagin

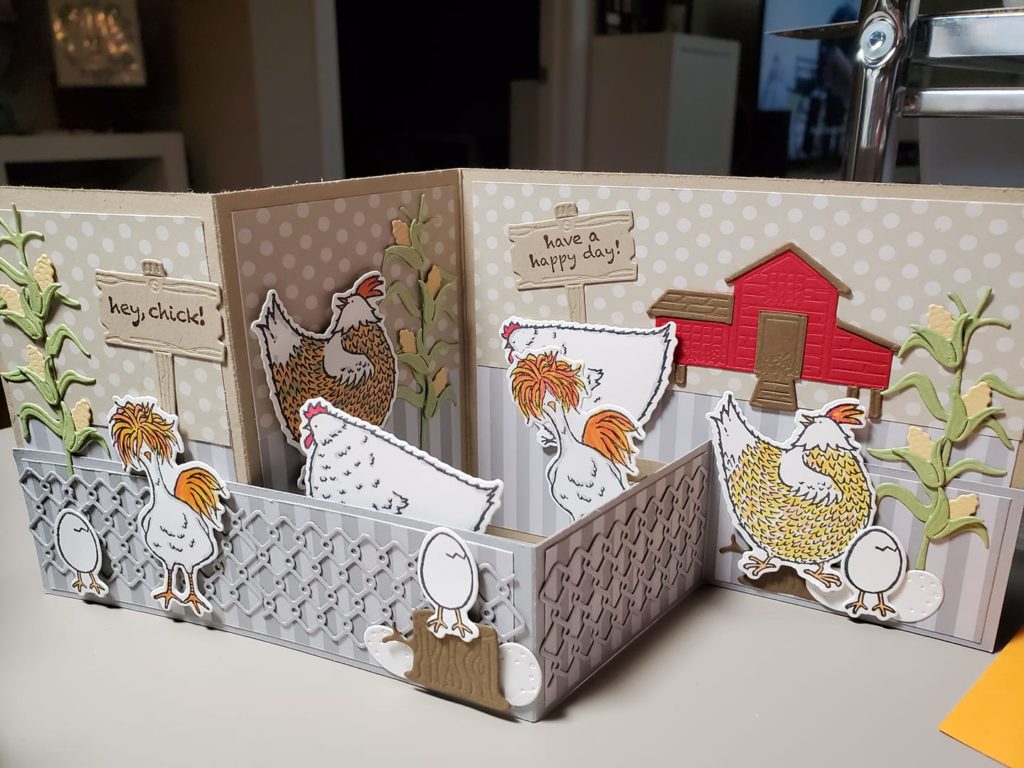
Check out this fun Hey Chick Double Z-Fold card by my fellow demonstrator Patti Bagin! There’s so much happening and so many chickens! When I first saw this card I knew that I wanted to give it a try. But to make it my own I had to figure out where to start.

I couldn’t just copy Patti’s card because to start with I didn’t have the designer paper that she used. I did love how Patti made a fence and used that as the second Z of her Double Z-Fold. If you’re not sure what I’m talking about when I say “Double Z-Fold” check out my blog post from Friday. It’s all about the Double Z-Fold.

My Hey Chick Double Z-Fold Card

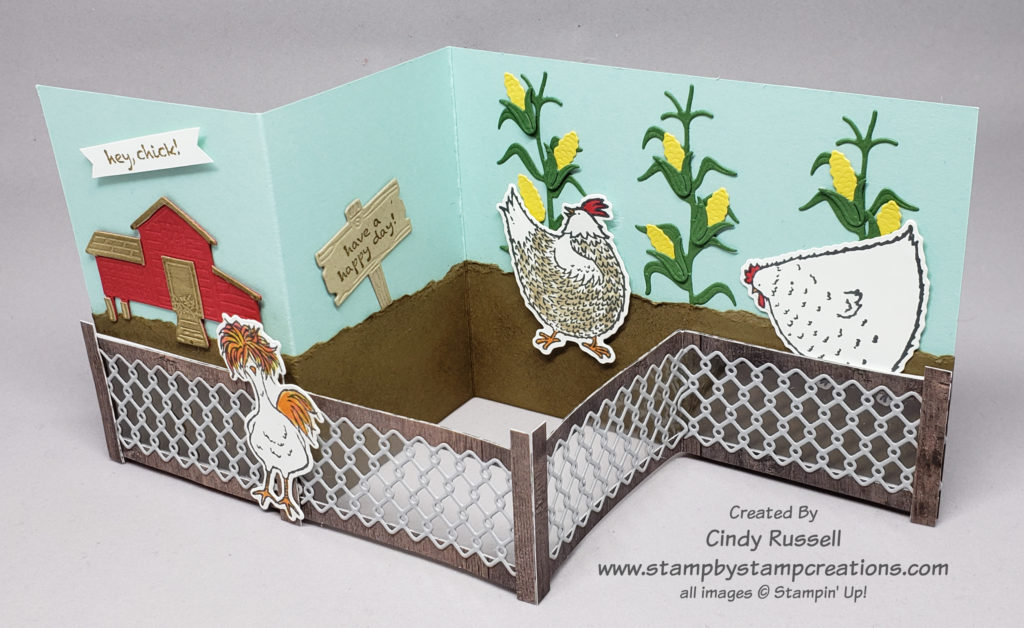
My card began with the fence. I knew I wanted to use the chicken wire on my fence but since I didn’t have the gray designer paper I had to come up with another option. I decided to a strip of clear Window Sheet and adhere by chicken wire to that. I then needed to add fence posts! The fence turned out just how I wanted it to. The only probably with it is that the Window Sheet doesn’t fold very easily. If I ever mail this card I’m going to have to probably put it in a larger envelope and pay extra postage.

I didn’t want to adhere my fence directly to the card so I used the foam adhesive strips that you’d use when making a shaker card. They worked perfectly! To get the two-tone chicken coop I die cut one from Real Red cardstock and one from Crumb Cake cardstock. I then cut out the tiny pieces from the Crumb Cake chicken coop and adhered them to the red one.

My tip when die cutting the corn stalks and the ears of corn is to to use Adhesive sheets. These pieces are so thin and so small it would be difficult to get adhesive on the back of them.

I didn’t include quite as many chickens on my version of this card as Patti did but I’m pleased with the results. Too fun!

Have a great day! Take care and Happy Stamping!

Fun Folds: Double Z-Fold Card

Sweet Ice Cream – Horizontal Double Z-Fold

Today I have another variation of the basic Z-Fold card for you….the Double Z-Fold!

The Double Z-Fold card is just what the name suggests. It’s two Z’s put together. My sample is made with the fun Ice Cream Corner Suite.

Included in this fun suite of products are the Sweet Ice Cream stamp stamp that can be bundled with the Ice Cream Cone Builder Punch, Blackberry Bliss Striped Ribbon, Ice Cream Corner Sprinkles, and the Ice Cream Corner Designer Series Paper. Of course they all coordinate perfectly together!

Sweet Ice Cream – Horizontal Double Z-Fold opened.

But back to the fun fold! In this picture you can see the 2 Z’s that for the the Double Z Fun Fold. The larger one is the card base and the smaller one is where the sentiments and the images are.

On both the large and the small pieces that form Z’s you will first score/fold your cardstock in half and then one of the sections will be scored/folded again just as you do on a regular Z-Fold card. Opposites attract. If you can remember this, you can figure out how to make the Double Z-Fold. The large section of the small piece of cardstock gets attached to the small section of the large piece of cardstock and the small section of the small piece of cardstock gets attached to the large section of the large piece of cardstock. Large to small and small to large.

Sweet Ice Cream – Vertical Double Z-Fold open

The card above is in a horizontal orientation but it can easily be made into a vertical orientation. The only thing you’re going to change when making the vertical orientation is the direction that your images and sentiments are placed.

You will make your vertical card the same way: large to small and small to large. As I mentioned before, this is the key.

To make sure that everything gets lined up perfectly when I adhere the small Z to the large Z I first close up the small Z so that the small section is folded up behind the large Z.

Back of small Z-fold

Place your adhesive on both of these sections. To correctly place this section on the large Z card base make sure the card base is closed . Then you will butt the center folds of the large piece and the small piece together and adhere.

You can see this in the side view picture below. When the card is all closed up the small sections butt up to each other.

Double Z-Fold Side View
Sweet Ice Cream – Vertical Double Z-Fold

One final thing to note about the Double Z-Fold Fun Fold card is that it won’t open to lay flat. You can kind of see this in both of the pictures of the open cards.

To left is a photo of the Vertical Double Z-Fold card in the closed position.

These cards are fun to make! Enjoy!

Have a great day. Take care and Happy Stamping!