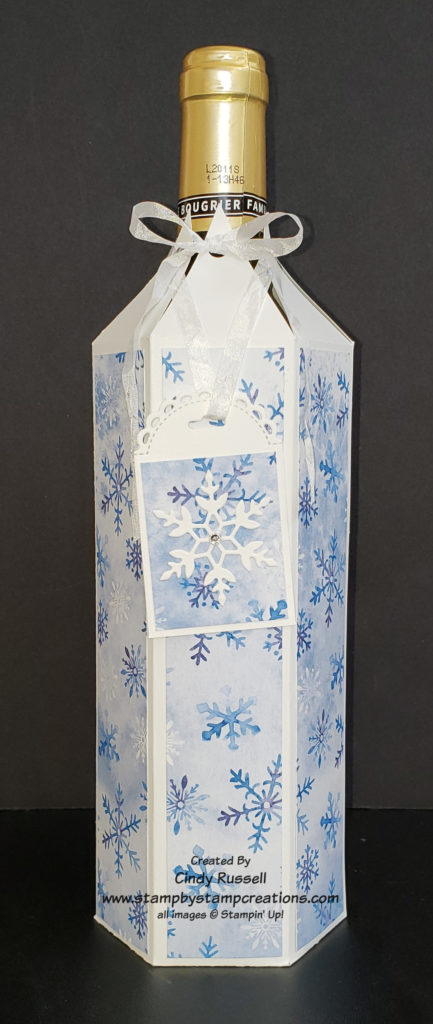
It’s time to throw in some 3D projects during our 12 Weeks of Christmas. This week I have a fun and easy Wine Bottle Cover for you.
Scored Wine Bottle Cover
This project is pretty easy to make and just by changing out the designer paper you can make it for any time of the year! You will need the following items to make this project:
a 12″ x 12″ piece of cardstock
a 12″ x 12″ piece of designer paper
Simply Scored, Stampin’ Trimmer or any other device that will score your 12″ x 12″ cardstock.
a ruler
a pencil
scissors
ribbon (1/8″ or 1/4″)
a hole punch that will punch the same size hole as your ribbon’s width
strong adhesive such as Stampin’ Seal + or Tear & Tape
a wine bottle (you will need this as you are making the cover)
You can find the detailed instructions for this project here. The directions are long but I’ve included a lot of photos to help you out. Be sure to contact me if you have any questions on making this Scored Wine Bottle Cover.
In this post I have Week 1 and Week 2 of my 12 Weeks of Christmas. I apologize for the delay in sharing these with you. I hope you enjoy them.
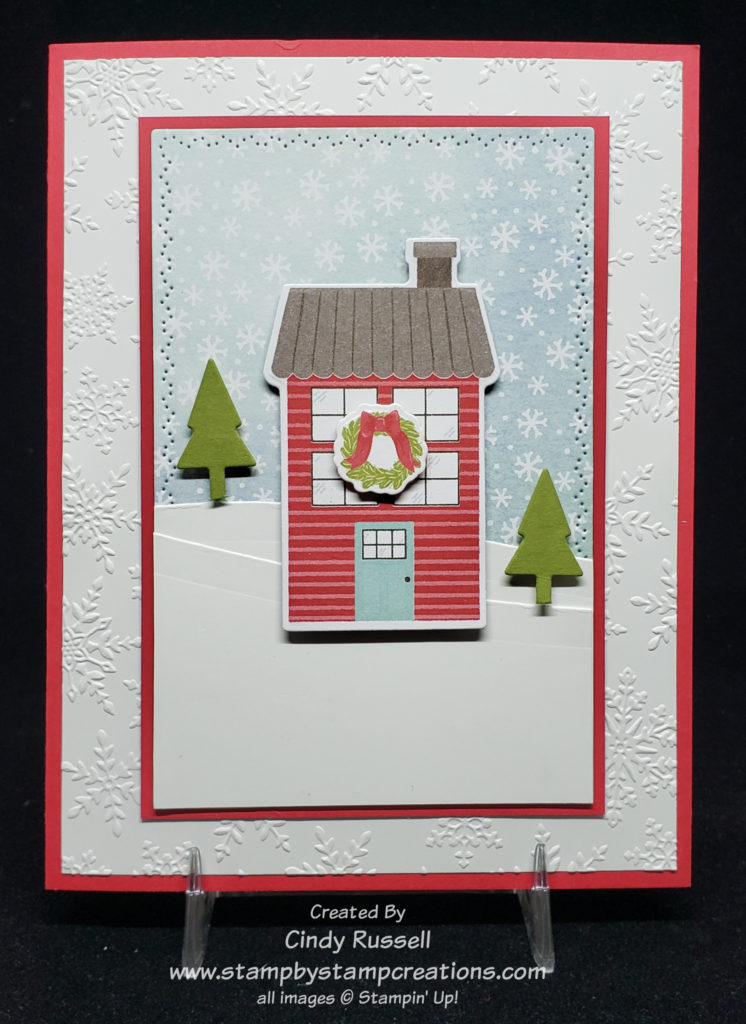
The 12 Weeks of Christmas – Week 1
The 12 Weeks of Christmas Week 1 is all about Designer Series Paper. You can find the directions for this project as well as all dimensions and items used here.
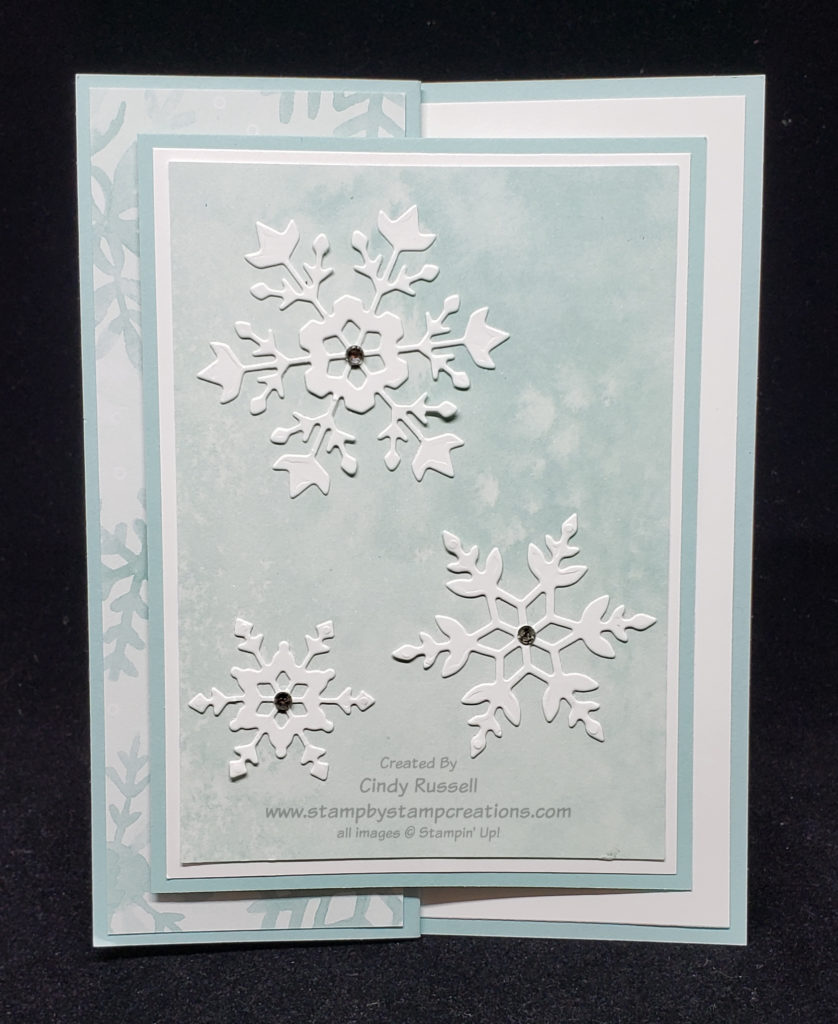
The Twelve Weeks of Christmas – Week 2
The Twelve Weeks of Christmas Week 2 is all about snowflakes and is made with the Snowflake Splendor Suite. This is a fun fold card. View the directions, dimensions and products used on this card here.
I hope you’re enjoying my 12 weeks of Christmas and I promise to stay up to date from now on. Have a great day! Take care and Happy Stamping!
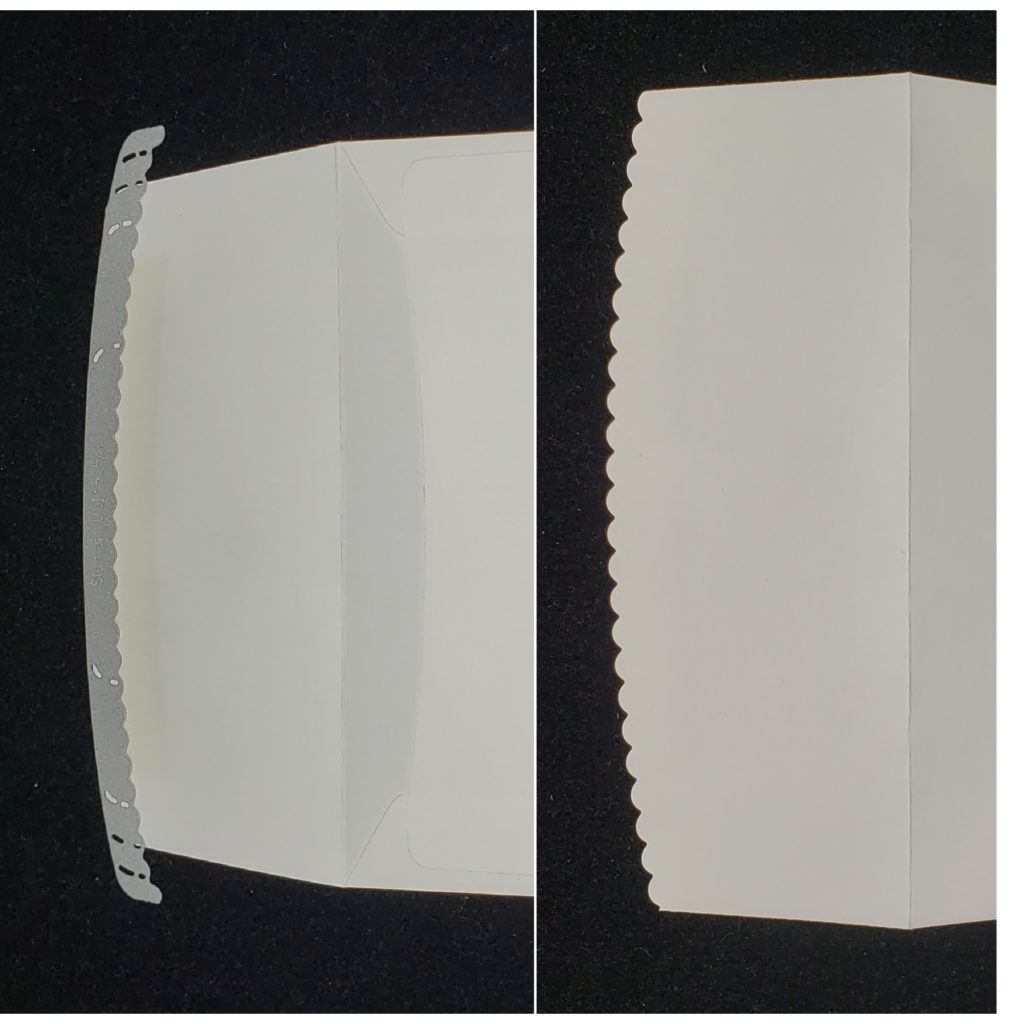
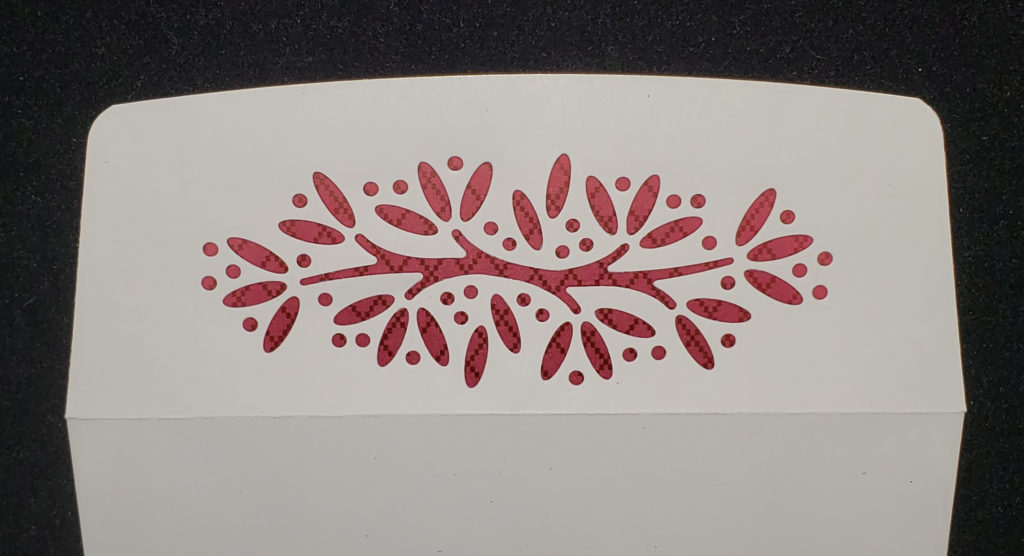
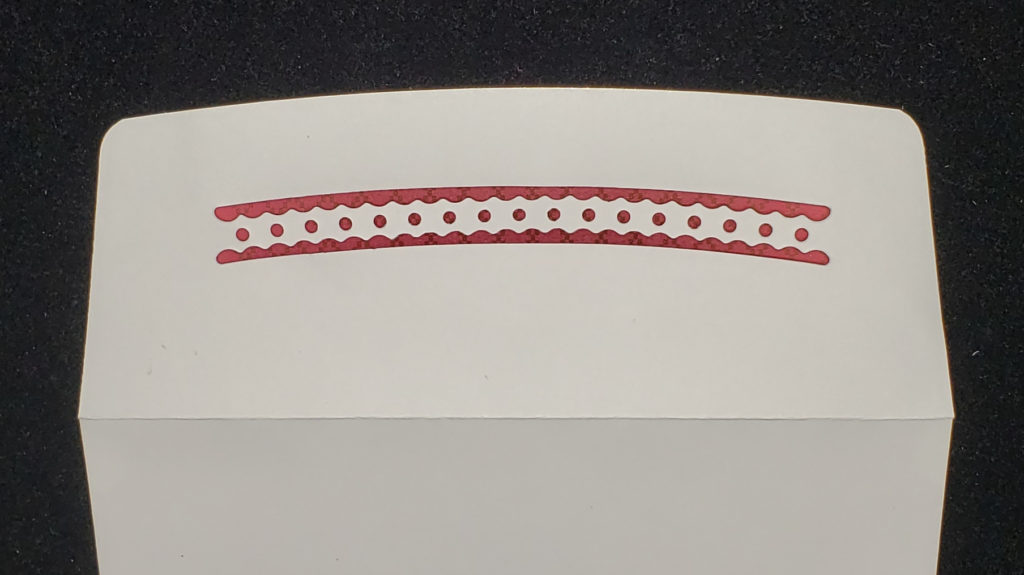
A couple of days ago I introduced you to the concept of No Naked Envelopes using the Envelopes Dies from Stampin’ Up!’s August-December Mini Catalog. In that post I shared the envelope liners with you. Today I want to share with you the other things you can do to your envelopes with these dies. They all will decorate the flap of your envelopes.
The first way you can decorate your flap is to simply scallop the edge of the flap. The die itself makes it easy to line up the die properly. There are little notches in the die itself that you can line up with the edges of the envelope.
There are also three other dies that will put a decoration in the flap. Check out the designs in the photos below. Which one is your favorite?
The Envelope Dies give you so many ways to help you stay away from naked envelopes. Choose your favorite and start creating! Have a great day! Take care and Happy Stamping!
If you’re looking for great projects for the holidays you’ve come to the right place! My Twelve Weeks of Christmas will bring you a project every Wednesday. I know, you’re thinking “What happened to Week 1 and Week 2?”. You didn’t miss them. I’ve created the projects but was a little delayed in posting them. Check back on Friday for Week 1 and Week 2.
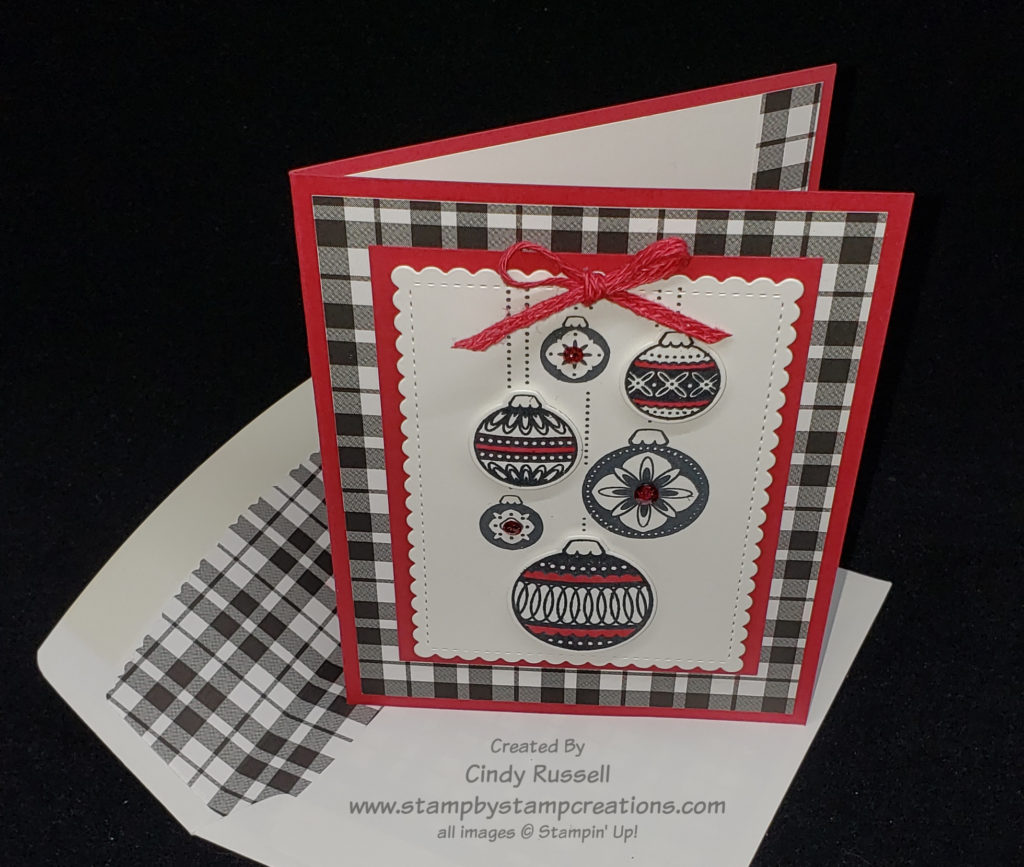
Now, let’s get back to Week 3! I love plaid and I can’t pass up a red and black color combination. I saw a similar card online and knew I wanted to make it may own and this was it. In my first attempt, all of the ornaments were simply stamped on the Whisper White cardstock. On this, my second attempt, I popped up three of the ornaments with Stampin’ Dimensionals. It’s amazing what a difference it made to the look of the card. If I was going to take this card up one more level I would heat emboss the stamped ornaments with Clear Embossing Powder.
The die-cut scalloped rectangle gives the card a bit of class but if you don’t have the Stitched So Sweetly Dies you could easily just use a cut piece of Whisper White cardstock.
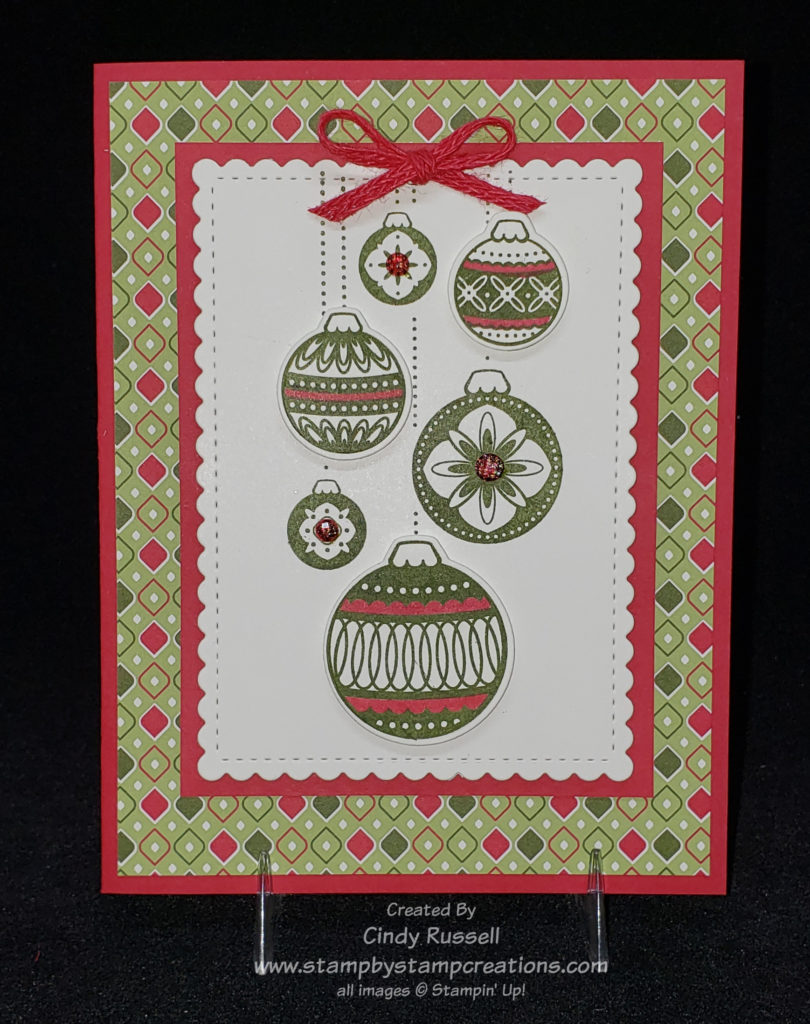
This card is really easy to recreate in any color combination just by choosing a different piece of designer series paper. Just choose your colors from the designer paper and go! Below you can see how this card looks in traditional Christmas colors.
Ornamental Envelopes in Christmas Colors
In the above card I used the Heartwarming Hugs Designer Series Paper. This is the exact same card as above with only two changes: designer paper and ink color. So easy!
One of my favorite parts of the original project is the matching envelope liner. The envelope liner is what actually sold me on the Ornamental Envelopes Bundle! An envelope liner finishes off the project perfectly. Remember yesterday’s motto….”No Naked Envelopes”!
You can find the directions for this fun project here. Don’t forget to check back tomorrow for more tips on the Envelopes Dies and on Friday for Weeks 1 and 2 of the Twelve Weeks of Christmas!
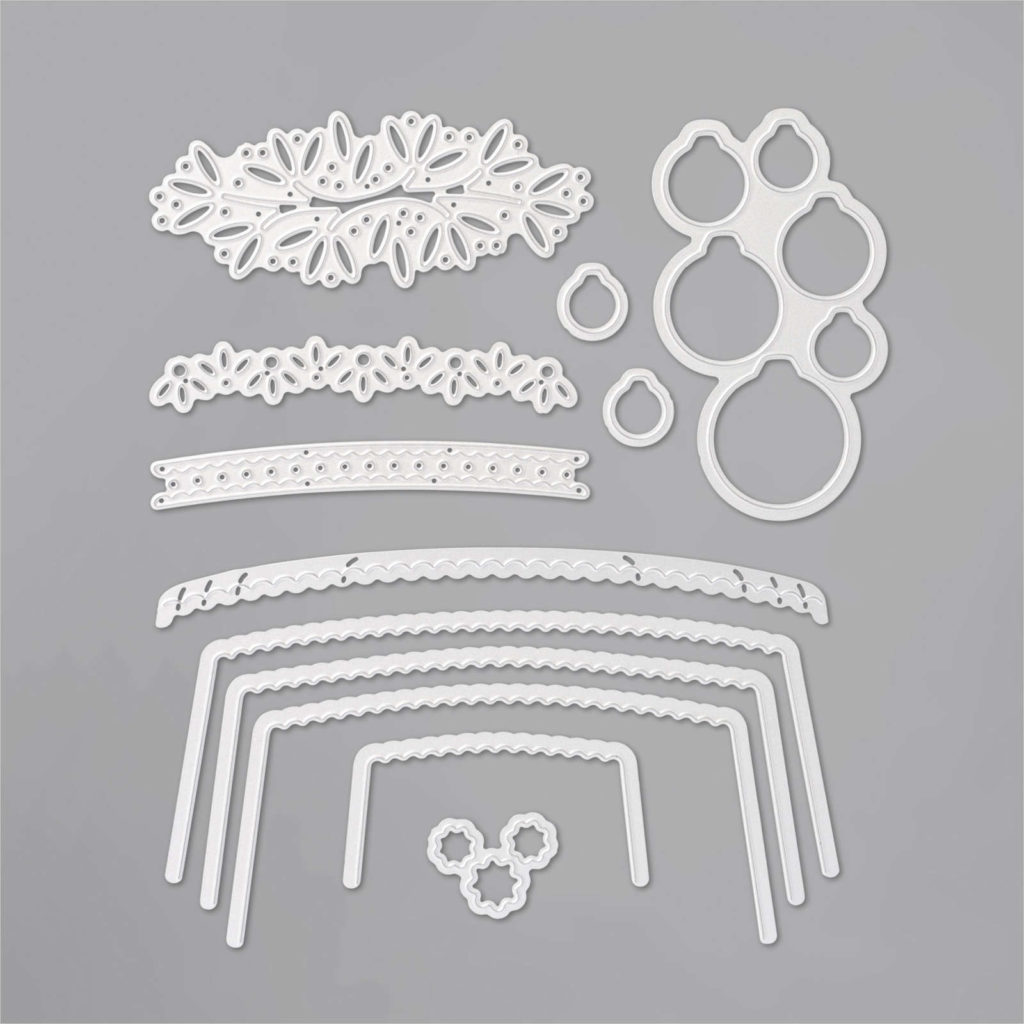
No Naked Envelopes! Why would you want a naked envelope when you can decorate it with stamps, ink and of course designer paper? If you’ve gone to all of the trouble to create a gorgeous card you may as well create a fancy envelope to go with it!
It makes sense to use the same stamps and inks that you used on your cards on your envelope but how do you fancy up your envelope with designer paper? Think envelope liner. We’ve all received those fancy cards with the foil-lined envelope. So how do you do that yourself? Try Stampin’ Up!’s Envelope Dies.
Stampin’ Up!’s Envelopes Dies
Oh, my gosh! There are 12 dies in this die set. You can easily make envelope liners for four different size envelopes! That’s not all. There are other decorative dies for your envelopes as well as dies that coordinate with the Ornamental Envelopes Stamp set.
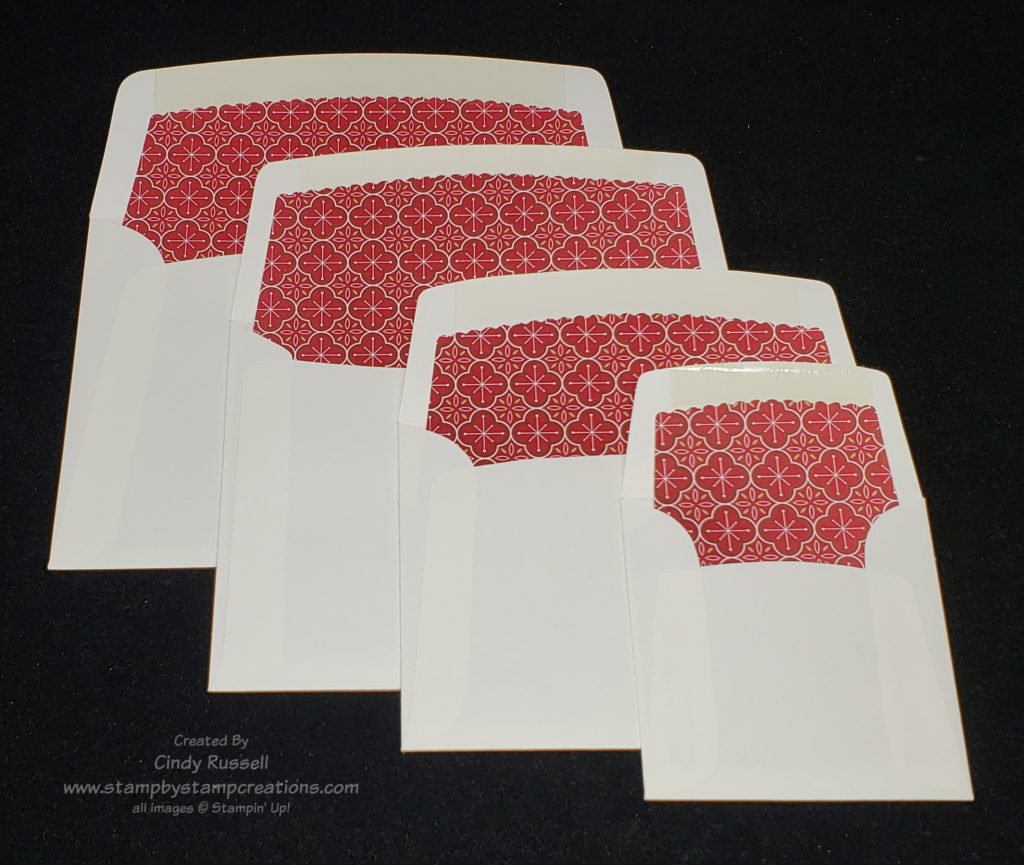
Envelope Liners in 4 different sizes
Envelope liners really can make your envelope special. As you can see in the above photo, the dies for the liners only cut the top portion. How do you figure out what size piece of designer paper to use?
The first thing you need to decide is whether or not you want the liner to cover the entire inside of the envelope. At a minimum you want your designer paper to be about an inch below the lowest portion of the back of the envelope. You also need to decide how wide you want your liner to be. You can have the width of the liner just slightly narrower than the width of the envelope or you can make the liner the width of the die. Below you can see a little chart to help you decide what size liner you want.
Envelope Size
Maximum Liner Size
Minimum Liner SIze
Small
3-1/8” x 3-1/8”
3” x 4”
2 ½” x 2 ½”
Medium (Notecard)
5-1/16”x 3-5/8”
5” x 4-7/8”
4 ¾” x 2-5/8”
Regular (A2)
5 ¾” x 4 3/8”
5-5/8” x 6”
5 ¼” x 3 ¼”
Large
6 ½” x 4 ½”
6-3/8” x 6-1/8”
5-7/8” x 3-1/8”
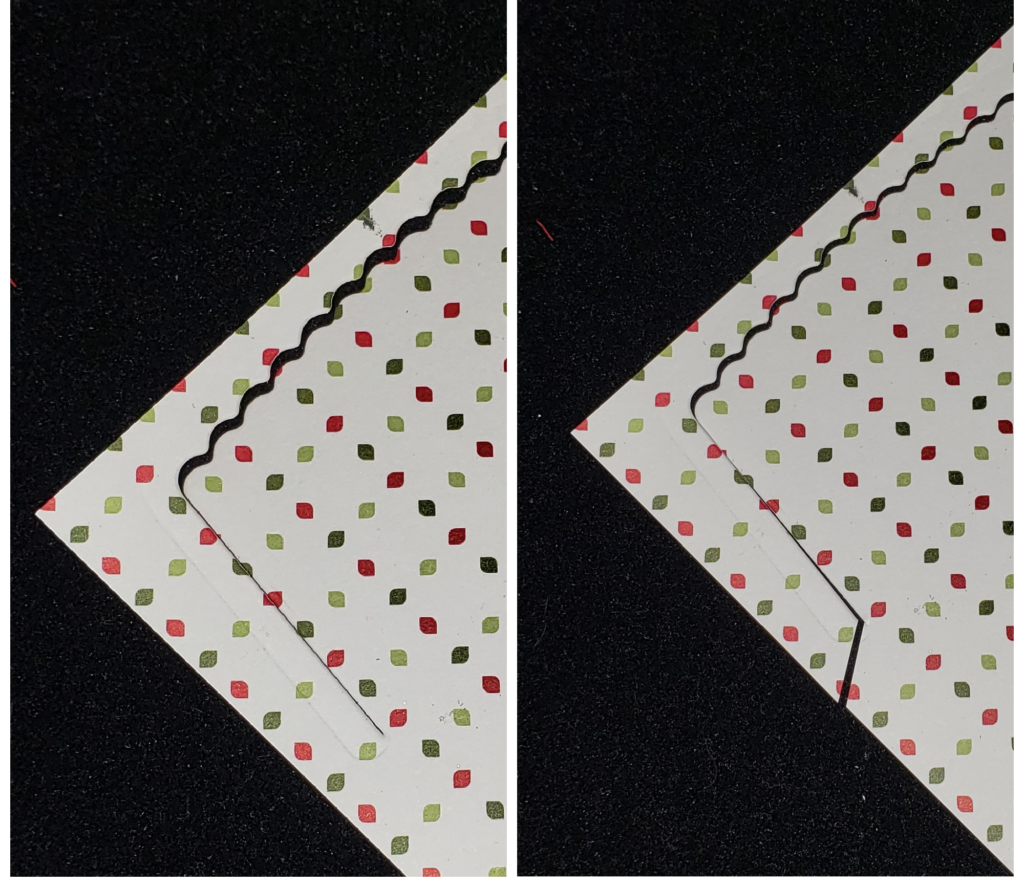
To make sure that I have my die centered, I’ve marked the center of my die and I lightly mark the center of the top edge of the paper with a pencil.
If you are using my dimensions for the maximum liner size you will want to note that you will have to do a little trimming with your scissors after you die cut the liner. I just make a small angle cut to where the die ends.
Envelope Liner TIps
Once you’ve die cut your envelope liner you want to slip it into the envelope to make sure it fits as you want it to. Leaving your liner in the envelope, only place adhesive on the flap of the envelope in the area under the envelope glue and the fold of the flap. Line up the scalloped edge of the liner with the lower edge of the envelope glue on the flap and center the liner with the sides of the envelope.
Now you need to make a crease in the liner where the fold of the envelope flap is. One method of doing this is to carefully fold the flap of the envelope down to a closed position and crease well. The second way would be to line of the fold of the envelope in the cutting/scoring track of your Stampin’ Trimmer and score carefully then fold along score line. Both methods work well. If you are using the Stampin’ Trimmer method just be sure to use the scoring blade, not the cutting blade. Ha!
Creating envelope liners isn’t the only thing the Envelopes Dies does. Check back on Thursday for some other fun ideas that you can do with these dies. Remember….No Naked Envelopes!
Stampin’ Up! is having a stamp sale and it starts tomorrow! Woo Hoo! Wednesday, September 23rd you are going to want to go shopping! There are over 50 stamp sets from the Annual Catalog that will be 15% off!
Get that shopping list made. You can see all of the stamps that will be on sale here. Starting at 12 am MT on Wednesday you can head on over to my online store and shop away!
This type of sale doesn’t happen often so don’t miss out! The sale ends at 11:59 pm tomorrow! Happy Shopping!
Well….someone apparently forgot to actually publish this blog post yesterday…..so even thought it’s Tuesday, here you go. Sorry about that!
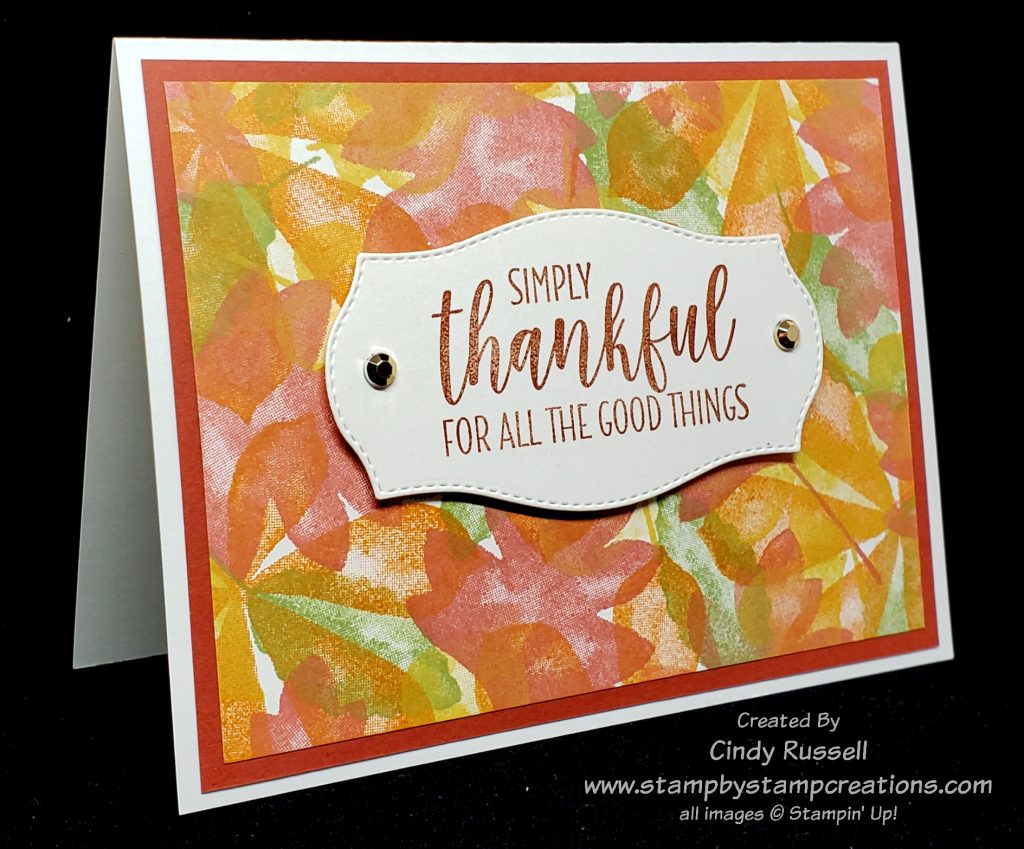
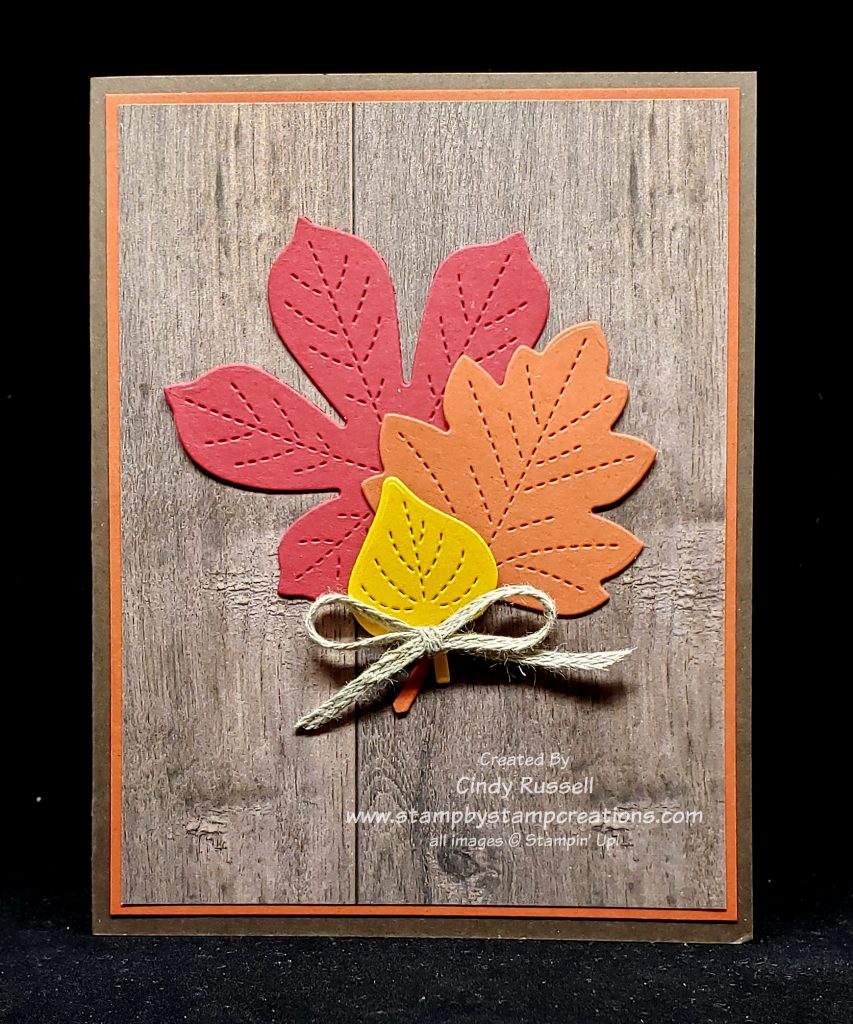
Stamped Love of Leaves
I do love fall and colored leaves. This card was made with the Love of Leaves stamp set (which coordinates with the fabulous Stitched Leaves Dies!). Instead of using the stamped leaves as the focal point of my card I used them as the background. I used four of the five leaves from the stamp set and chose four colors of ink. The inks I used were Pumpkin Pie, Terracotta Tile, Bumblebee and Pear Pizzazz. I tried using the Old Olive ink but it was just a little dark.
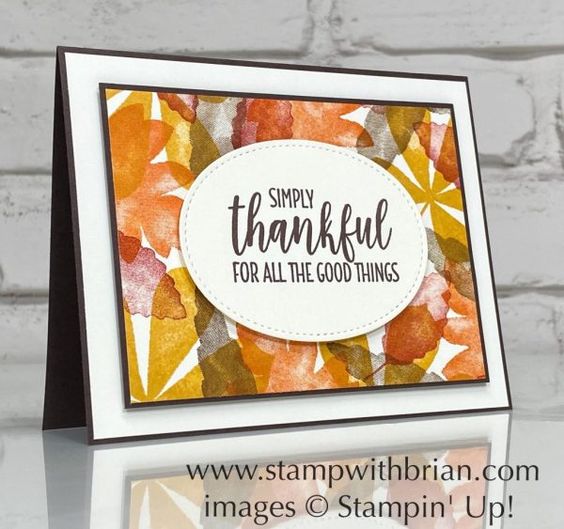
It’s Make It Mine Monday so that means that my inspiration came from someone else. This week I CASEd Brian King. I love Brian’s clean and simple style.
Love of Leaves – Brian King
As you can see, I kept fairly close to Brian’s original design. You may know that I have trouble with random stamping but I think I did okay with this card. The nice thing was that I could stamp over the other images and it didn’t matter. The sentiment for the card came from the Country Home stamp set which can be found in the Annual Catalog (page 89). I used one of the dies from the Tasteful Labels die set. This set of dies is great as it has 10 dies of different shapes and sizes. I love versatility!
Have you tried any Make It Mine projects? I challenge you to find a card that you like and make it your own. I’d love to see what you come up with. Have a great day! Take care and Happy Stamping!
As soon as September hits I’m ready for the leaves to change color. Of course, it’s in the upper 90’s still here in Colorado. Yikes! I can still dream of those days later this month though when the leaves finally do change color.
Make it Mine Monday: Love of Leaves
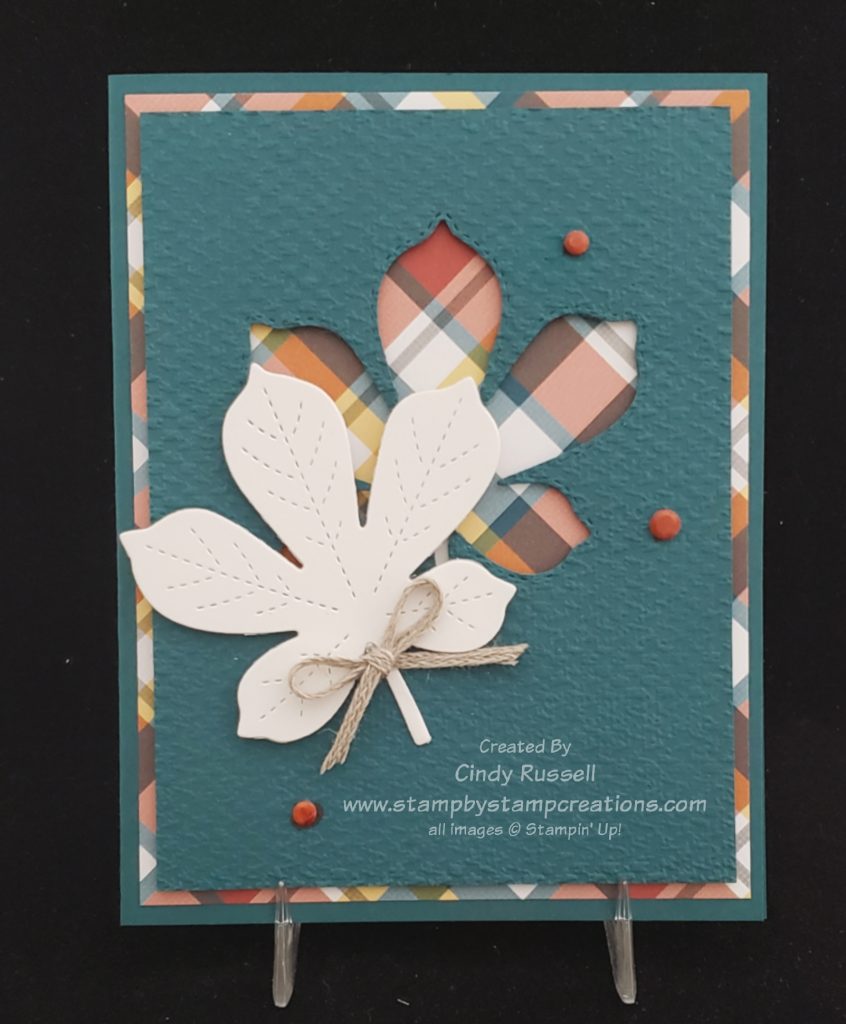
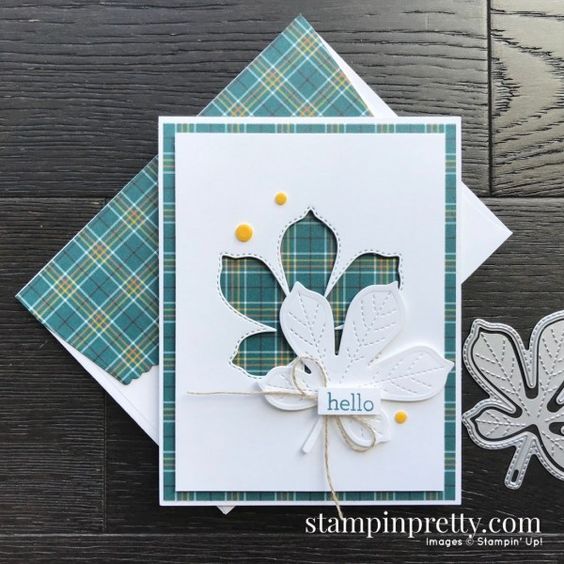
Have you seen any of my Make It Mine Monday posts? This is when I share a card that I’ve copied from someone else and put my own twist on it. The card above is the one I created. It was one of the cards that I created to possibly be used in my Stitched Leaves Card Class (To Go!). It didn’t make the cut. If you click on the link you can find out all about my newest Card Class (To Go!) and see the other projects I made using the Stitched Leaves Dies.
Love of Leaves.stampinpretty
Above you can see the card that I got my inspiration from. Ok….I basically copied it. I tried making my card using the Pretty Peacock leaf that I die cut but I just didn’t like the look so I die cut a white leaf. I also had white decorative dots on the card but again, I didn’t like the way they looked so I took my Dark Cajun Craze Stampin’ Blend Marker and colored them. I love that you can do that!
Now that I’m scrutinizing my card as I’m writing this post I think I should have at least tried to see how coloring my Braided Linen Trim with the Dark Cajun Craze Stampin’ Blend Marker would have looked. I bet it would have looked really nice. Hmmm….
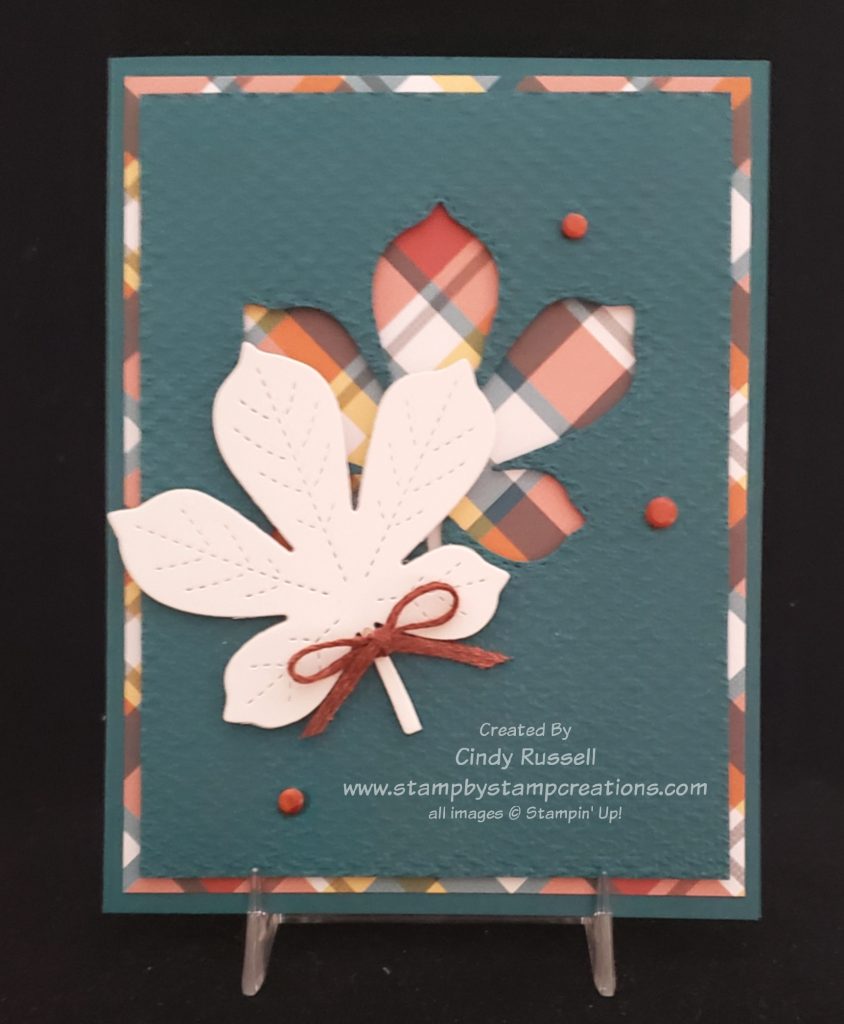
Make It Mine Monday: Love of Leaves Take 2
Here are my words of wisdom for the day…..don’t be afraid to second guess yourself. Once I started wondering about the colored Braided Linen Trim I had to get up and and try it. Below you can see how the card just “came together” once I added the colored trim. I liked the card before but now it’s “complete”. The natural colored trim on my original card just looked washed out. Thanks for giving me the idea to color it. 😀
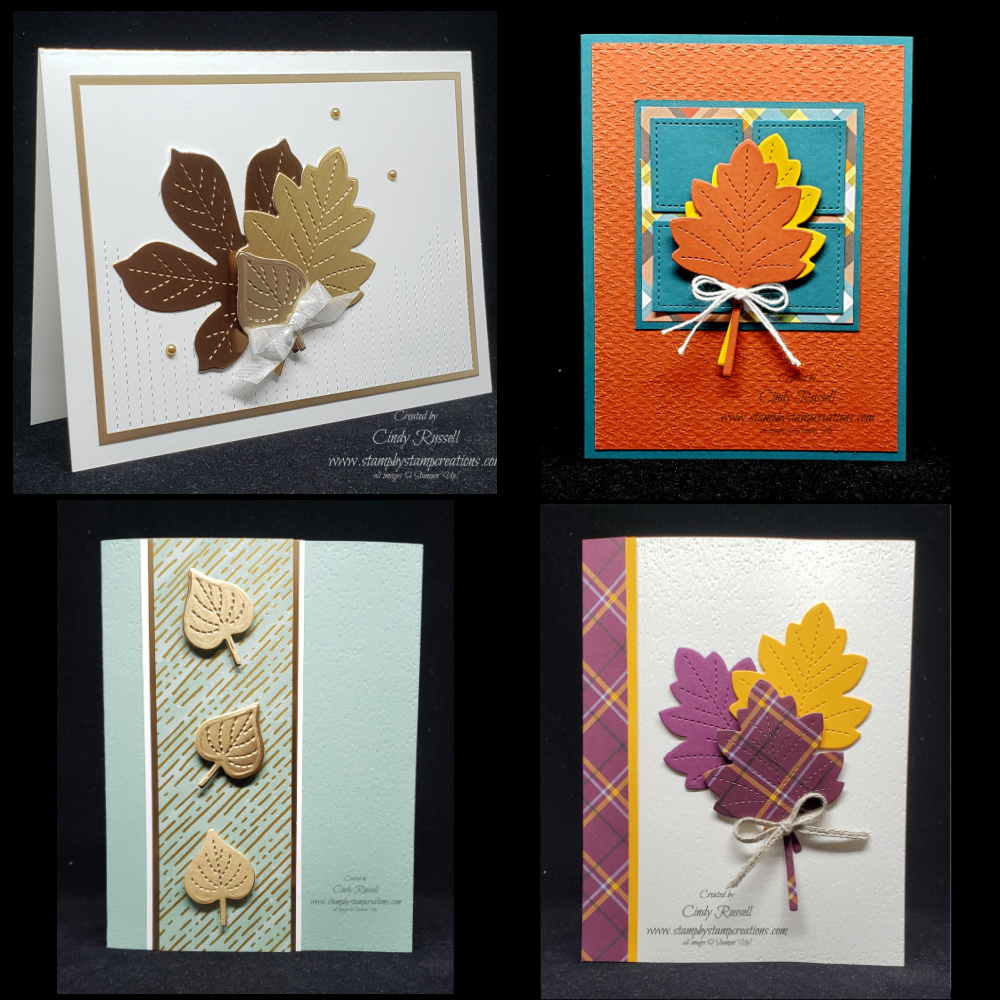
The days can still get pretty warm here in Colorado but the nights are wonderful and they feel like fall! Last night in got down into the lower 50’s! Great sleeping weather for sure! Fall is my favorite season and I’ve been having a blast creating cards with the Stitched Leaves Dies.
Stitched Leaves Card
I’ve been having so much fun because I’ve been creating a new Card Class (To Go!)! The Stitched Leaves Card Class (To Go!) is here and I think you’re going to love it! Check out the details below.
Stitched Leaves Card Class (To Go!)
Stitched Leaves Card Class (To Go!) $20
4 cards
No stamping involved.
You will receive everything you need to make the cards except for adhesive, scissors and bonefolder.
All pieces for the cards will be cut, scored, die-cut and embossed for you.
You will receive step-by-step instructions with photos.
Supplies you will want to have on hand to complete the cards:
Stampin’ Dimensionals Mini Glue Dots
The cost for the Stitched Leaves Card Class (To Go!) is $20. The deadline to register for this class is Thursday, September 10th. Kits will be ready for pickup/delivery/mailing no later than September 17th (mailing fee is extra).
To purchase your class please email me and let me know that you’d like to purchase the Stitched Leaves Card Class (To Go!). I will also need to know how you’d you prefer to pay and if you need your kit mailed. I can accept payment through Paypal, Venmo or cash/check. If there is interest, I will schedule a Zoom class where we can make our cards together.
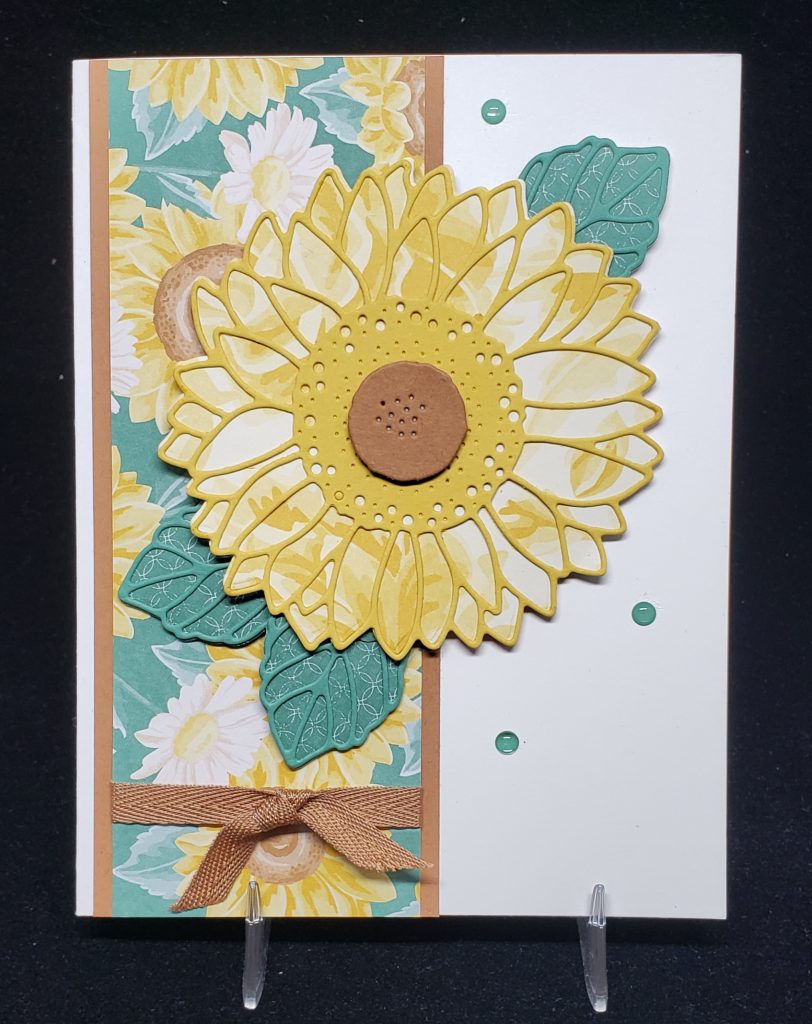
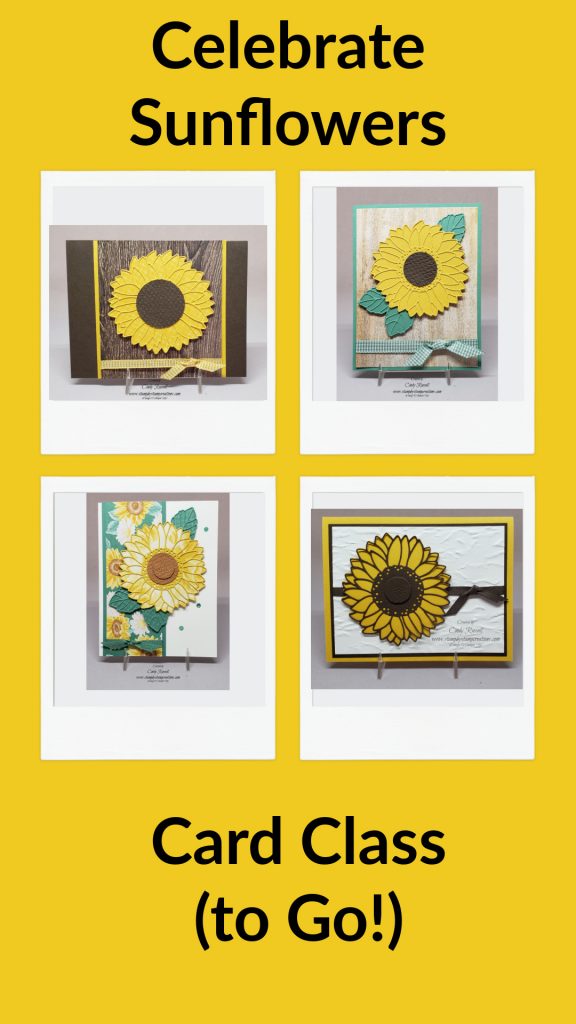
Creating a project (of any sort) is a process. Let’s face it, you don’t always get it right the first time. I know this for a fact. It happened to me while I was designing cards for my Sunflower Card Class (To Go!). Check out the card below…
Sunflower card….first attempt
This card is very nice and I’m sure someone would be pleased to receive it (if I ever remembered to send out a card…). The flower coordinates with the designer paper as does the ribbon and the card stock. It just wasn’t quite what I had envisioned in my mind.
The next step was to figure out what I could change on the card. Hmmm….. I liked the idea of using the designer paper as the base of both the flower and the leaves so that wasn’t it. Looking at the flower itself though, I figured out that I didn’t like the center of it. I felt that the center was too small. Ok…that was the first thing I could change in the next step of my creative process.
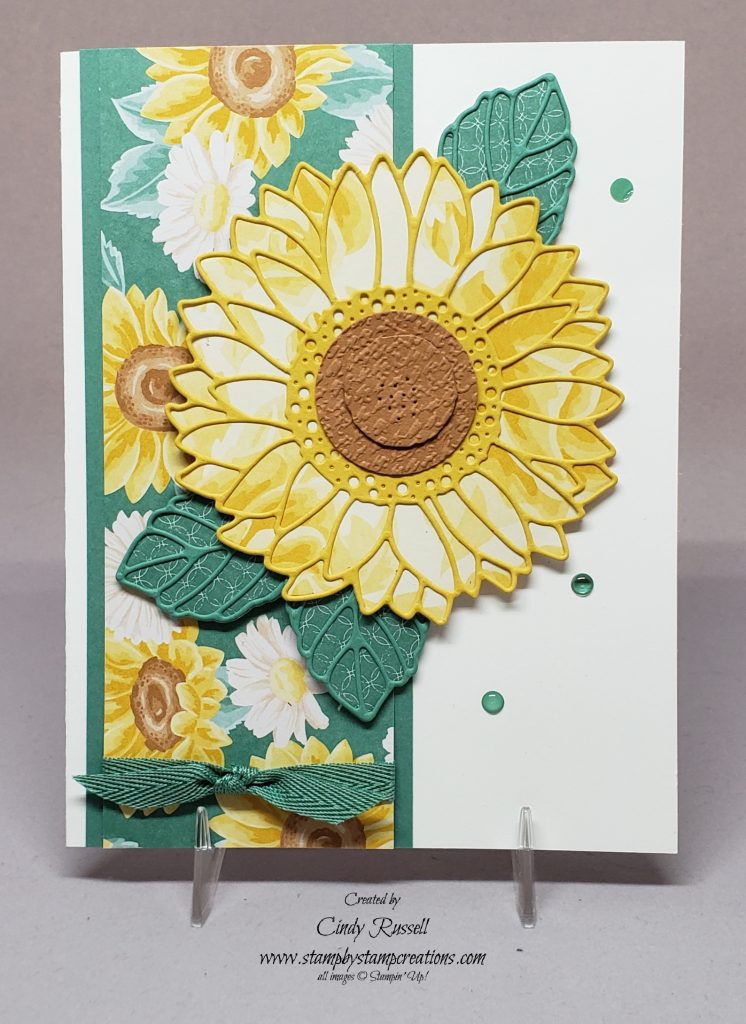
What else could I change though? Cinnamon Cider is a pretty brown and Stampin’ Up! definitely needed a lighter brown in their color spectrum but I just wasn’t feeling it on this card. That was the second thing I could change. The Cinnamon Cider had to go and I needed to come up with something to replace it with. Just Jade was definitely the answer.
Sunflower card…second attempt
I think those few small changes took my card from nice to really nice. Adding texture and another layer to center of the card really helped and changing the Cinnamon Cider cardstock and ribbon to Just Jade took the card to the next level.
Don’t be afraid to make that first attempt in the creative process. If it’s not quite what you were envisioning try, try again. Have a great day. Take care and Happy Stamping!
P.S. Today is the last day to purchase my Sunflower Card Class (To Go!). Don’t miss out on making some fun cards. No stamping involved!
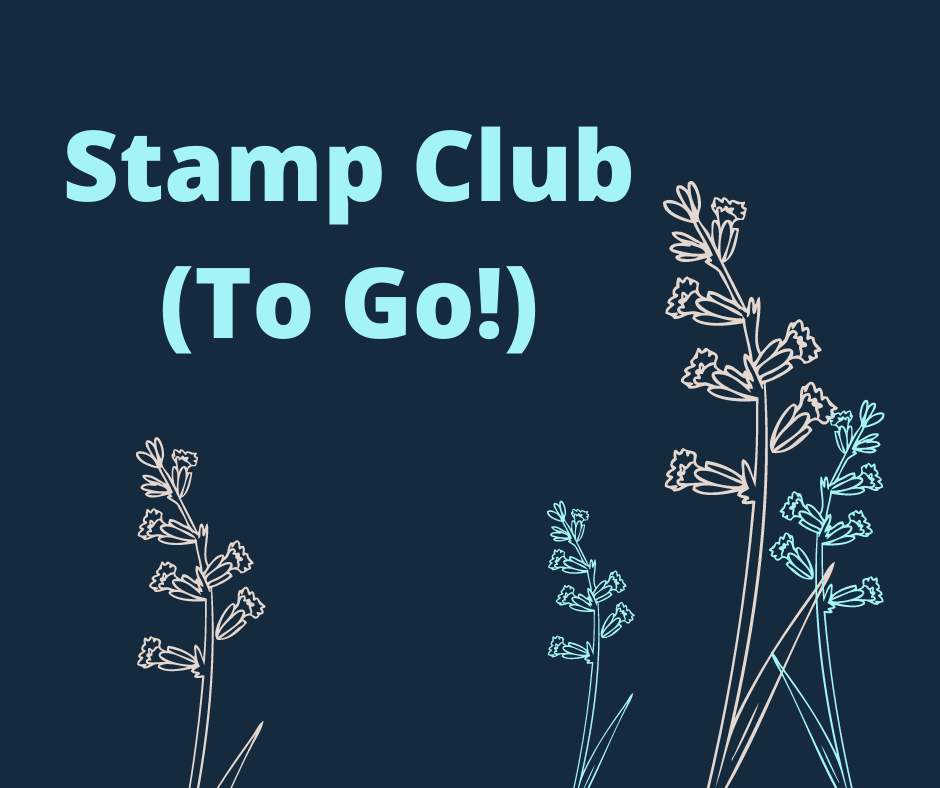
Today I am introducing another virtual experience for you crafters! With this pandemic and social distancing I’ve had to step outside my comfort zone to start bringing new crafting experiences to you. It started with Simple Card Kits To Go. Then I added the Card Class (To Go!). My Sassy Stampers & Friends group is offering Stamp Camp (To Go!) and now I am offering Stamp Club (To Go!).
What is Stamp Club (To Go!)? Simply, Stamp Club (To Go!) is like attending one of my in-person classes and getting the class for free with an order! The best part is that you get a few more perks in Stamp Club than you would have with an in-person class with purchase!
Here are some of the highlights of Stamp Club (To Go!)
Stamp Club (To Go!) is a 6 month commitment by you to purchase $25 or more in Stampin’ Up! Merchandise each month.
During one of the six month’s you will be chosen as the “hostess” and receive $15 in Stampin’ Rewards (free product).
During your hostess month you will also receive 20% off of your entire purchase.
Each month I will design 3 exclusive projects with instructions for Stamp Club (To Go!) members. All three projects will be made using one stamp set/bundle. I will mail you out all of the pieces and parts you need to make these 3 projects. You will need to supply your own stamps and ink to complete the projects (which you may choose to purchase on your order that month).
Each month we will do a Zoom meeting or I will do a Facebook Live showing how to make the projects and we can make them together.
As a thank you for signing up for Stamp Club (To Go!) you get to choose any color of Stampin’ Up! ink pad that you’d like.
(**New Perk!) As a Stamp Club member, each month you will get to purchase one of my Card Classes (To Go!) for only $16!
Each month will run the same. Here is a general outline of the month for Stamp Club:
The 4th of the month is the deadline date for new members to sign up for Stamp Club.
On the 5th of the month I will let Club members know what stamp set/bundle I will be using on the projects that month in case you’d like to add it to your monthly order. I will also give you the Hostess Code to use on your online orders to make sure they get credited to Stamp Club. If you live close enough to me for porch pick-up or delivery, I can place your order for you but I would need payment before placing the order.
Stamp Club (To Go!) orders must be completed by the 14th of the month.
On the 15th of the month I will start mailing out/delivering the project kits to members so that you will have them before our virtual meeting at the end of the month.
Some time near the end of the month (I have quite figured out a set time/date for this) we will have our Zoom meeting to make our cards. This will be recorded so if you can’t join us you can still see how the cards were made.
There is no limit on the number of people that can participate in Stamp Club (To Go!) and you can join anytime. Invite a friend!
Stamp Club (To Go!) will start in September. If you sign up to begin Stamp Club (To Go!) in this first month you will also receive a FREE ink refill to go with the ink pad that you choose!
I’m pretty excited about this new (To Go!) offering for you. I hope you are too. Please contact me with any questions you may have on Stamp Club (To Go!). Have a great day! Take care and Happy Stamping!
My Sunflower Card Class (To Go!) is my newest Card Class (To Go!) and it’s all about the fun Sunflower! This Card Class (To Go!) will be made using products from the Flowers For Every Season Suite found on pages 10-13 in Stampin’ Up!’s Annual Catalog. I have designed 3 beautiful cards for you to make plus a Bonus Card that I’ve shared previously.
Sunflower Card Class (To Go!)
3 detailed cards + 1 bonus card.
No stamping involved.
You will receive everything you need to make the cards except for adhesive, scissors and bonefolder.
All pieces for the cards will be cut, scored, die-cut and embossed for you.
You will receive step-by-step instructions with photos via e-mail.
Supplies you will want to have on hand to complete the cards:
Stampin’ Dimensionals
Mini Glue Dots
The cost for the Sunflower Card Class (To Go!) is $20. The deadline to register for this class is Monday, August 24th. Kits will be ready for pickup/delivery/mailing no later than August 31st (mailing fee is extra).
To register, please email me and let me know that you’d like to purchase the Sunflower Card Class (To Go!). I will also need to know how you’d you prefer to pay. I can accept payment through Paypal, Venmo or cash/check(if local). If there is interest, I will schedule a Zoom class where we can make our cards together.
I’m excited about my Sunflower Card Class (To Go!). I hope you are too! Have a great day! Take care and Happy Stamping.
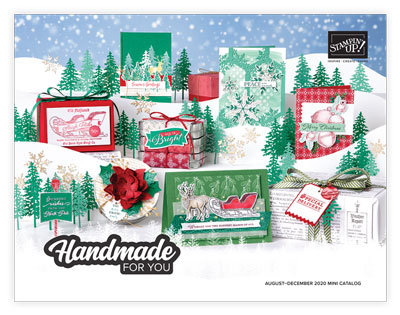
Stampin’ Up!’s August-December 2020 (Holiday) Mini Catalog
Stampin’ Up!’s new August-December 2020 (Holiday) Mini Catalog is here! Woo Hoo! This catalog is filled with fabulous new products that you will definitely want to check out! You can view the catalog here or just click on the photo of the catalog on the right.
One of the great things about this catalog is that it is available a whole month earlier than usual! We now have an extra month to create all of our holiday projects! Can I hear another Woo Hoo?! 😀
This catalog covers all of the major holidays coming up. Halloween, Thanksgiving and Christmas. Of course Fall is covered and there are a few Valentine things. Plenty of fun to choose from!
When you head to my online store to purchase all of these fun products you will notice that there is a whole new look and feel to it. It should be much easier to navigate and use. If you’ve shopped in my online store before you will have to enter your user name and password instead of depending on your browser as it’s a whole new site. Please check out the top bar of the website to see that it is showing that you are shopping with me. I’d much appreciate it.
Be sure to let me know if you have any questions on the new Mini Catalog or the new Online Store. I’m here to help. Have a great day! Take care and Happy Stamping!
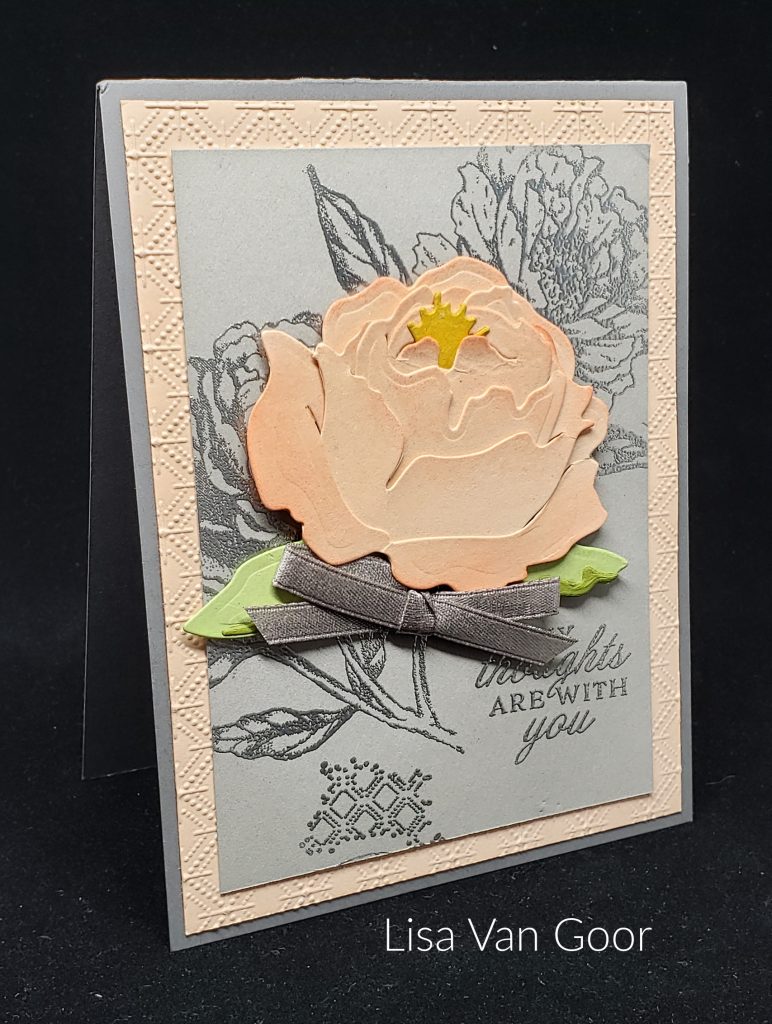
I told myself that I didn’t need any more flower stamp sets or bundles. Then I started seeing absolutely gorgeous cards made with the Prized Peony Bundle and all my will power went out the window. I had to get the Prized Peony Bundle….actually, I purchased the entire Peony Garden Suite. BEAUTIFUL!
Yesterday I shared a gorgeous birthday card with my mailing list that was made using this suite of products. If you aren’t on my mailing list I’m sorry you missed it. You really should sign up to be on my mailing list because the projects I share with my mailing list I don’t share anywhere else. Just fill out the box at the top of the left column here on my blog to sign up for exclusive projects and tips.
Peony Garden Lisa Van Goor
The card above was made by fellow demonstrator Lisa Van Goor. Lisa made this card for a swap that I host. All of the participants designed a card and then made one for all of the other participants. Participating in a swap is a great way to get project ideas!
This 3D die-cut flower is so easy to put together! There are 4 pieces of the actual flower and you just slip them into each other. Amazing! On Lisa’s card you can see how she brushed a little extra color on the cardstock to give the pieces a little dimension. You can also place Stampin’ Dimensionals between some of the layers to really make the flower pop.
So pretty! I am really glad I purchased this suite of products. You should too! The entire suite is gorgeous. You can see all of the products included in the suite here.
I have some new, gorgeous Simple Card Classes To Go for you! New designs and new papers. Check out the classes below and email me with the items you’d like to order. We need to get back to stamping!
The deadline to order these kits is Monday, July 20th.
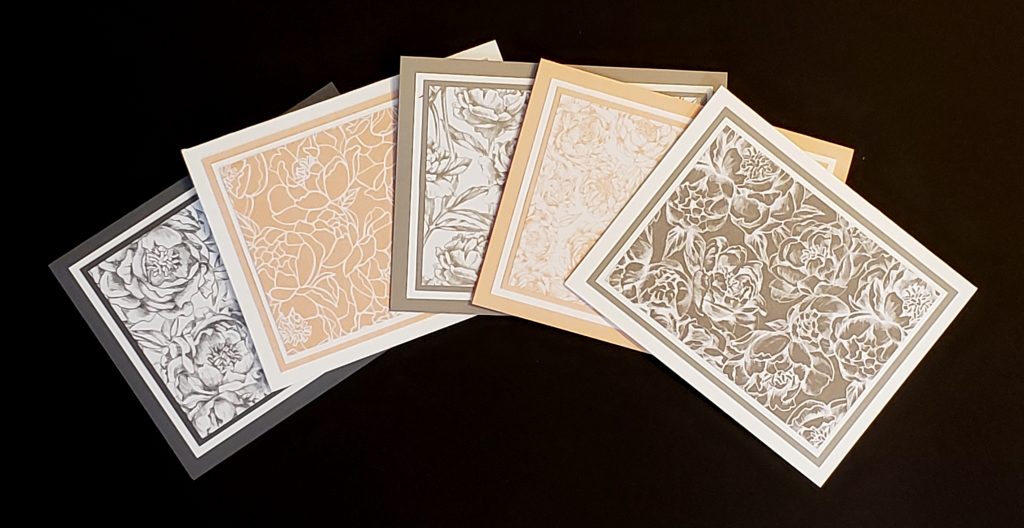
Peony Garden #1 Simple Card Class To Go
The Peony Garden designer paper is so lovely in these shades of pink and grey. In Peony GardenDesign #1 you will get all of the cut papers to make 5 cards for a cost of $10.
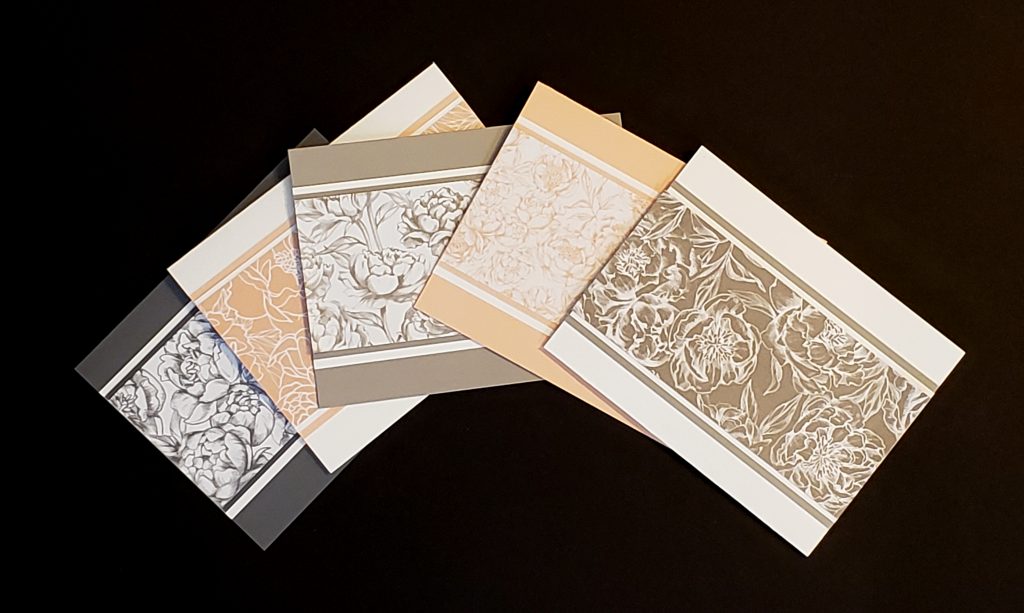
Peony Garden #2 Simple Card Class To Go
Peony Garden – Design #2. 5 cards for $10
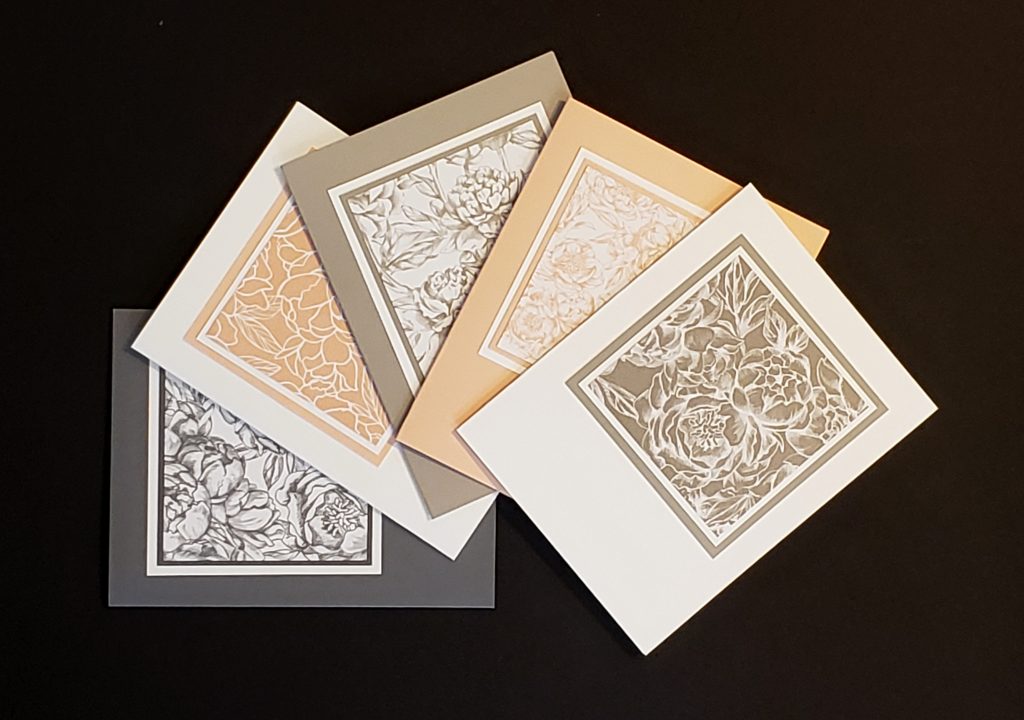
Peony Gardern #3 Simple Card Class To Go
Peony Garden – Design #3. 5 cards for $10
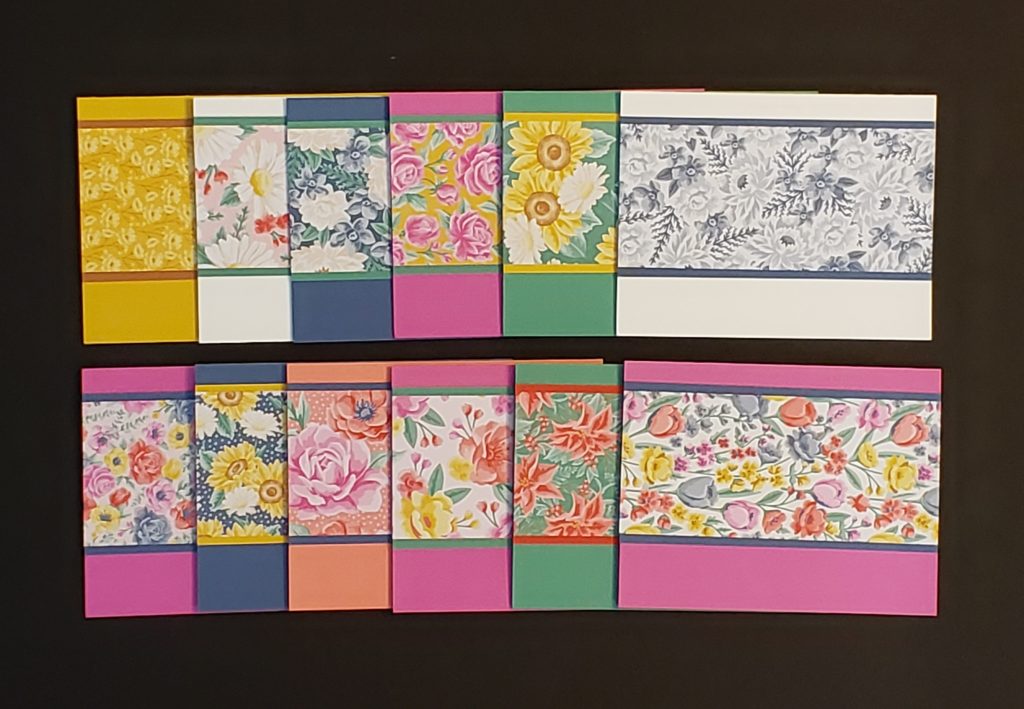
Flowers for Every Season #1 Simple Card Class To Go
Flowers for Every Season #1 Simple Card Class To Go. 12 cards for $20
Flowers for Every Season #2 Simple Card Class To Go
Flowers for Every Season #2 Simple Card Class To Go. 12 cards for $20
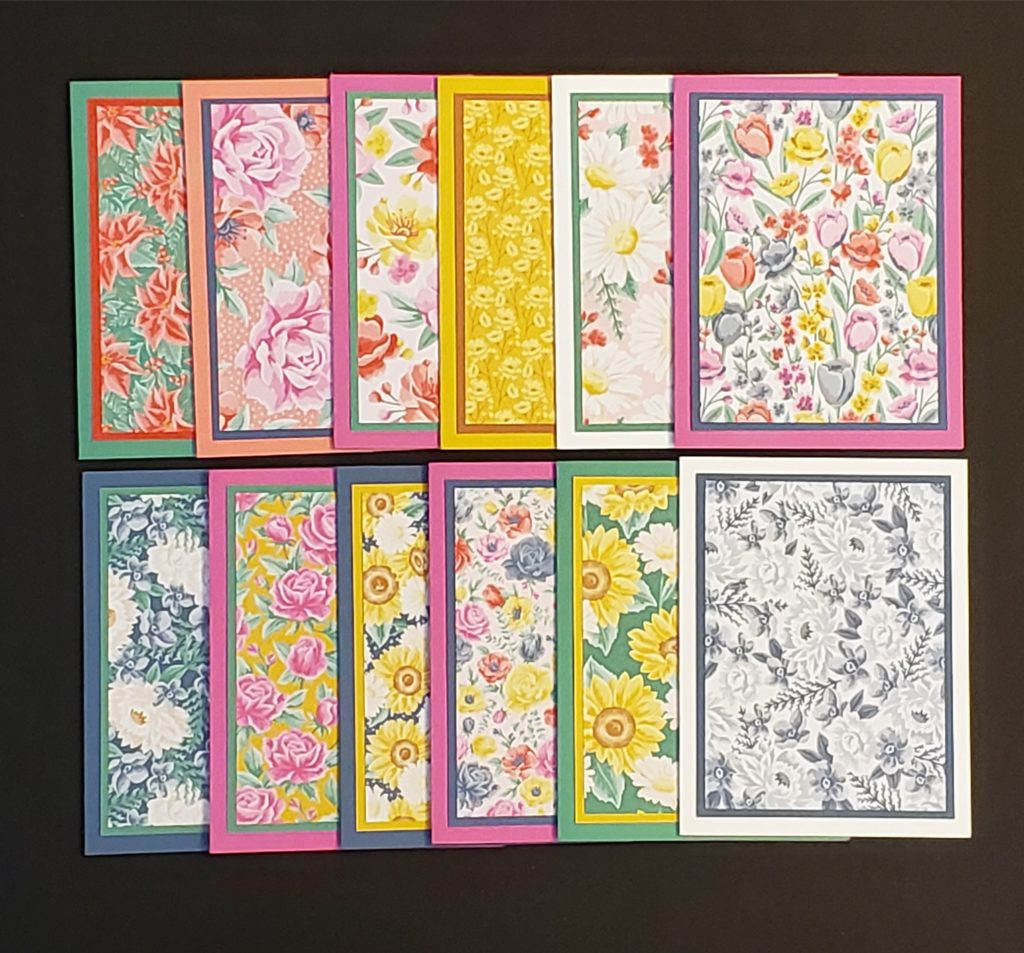
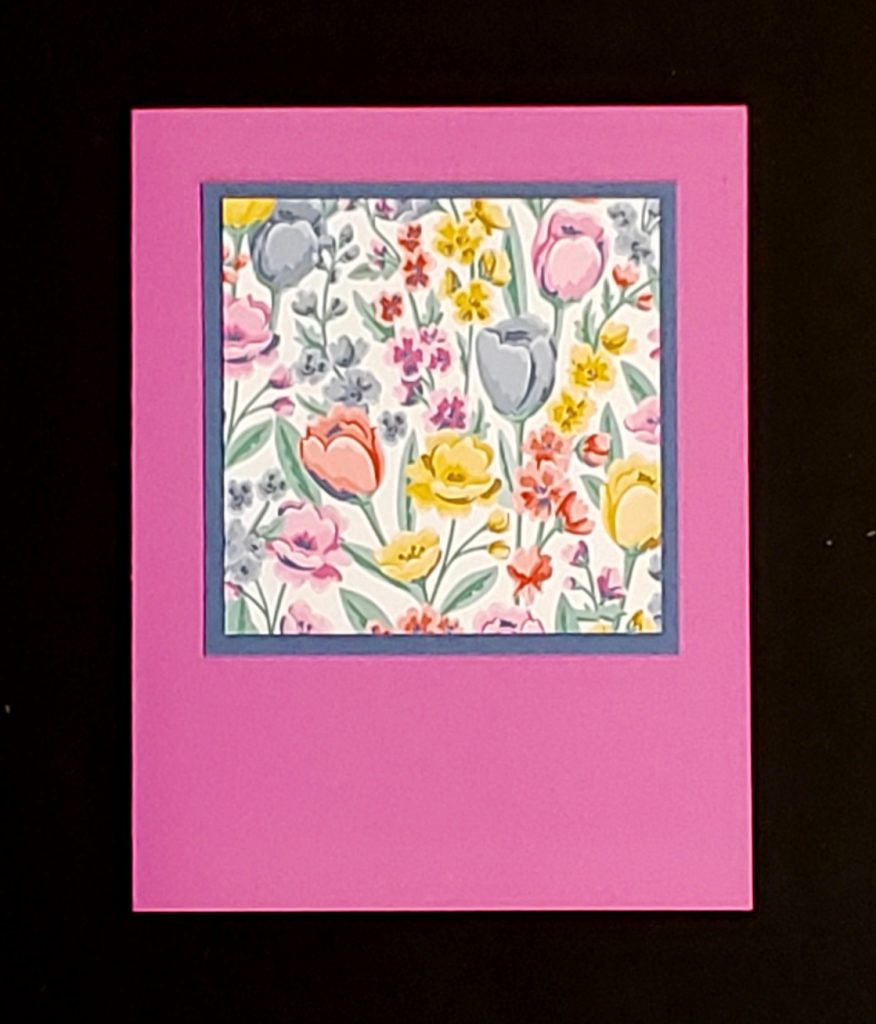
Flowers for Every Season #2 Simple Card Class To Go
Flowers For Every Season – Design #312 Cards for $20 When you order this design you will receive all of the different patterns/colors of cards as shown above.
If you would like to order any of these kits please contact me at cindy@stampbystampcreations.com.