Card Sketch: Simple Butterfly

Happy July!  It’s Card Sketch day today!  It is also designer paper month since Stampin’ Up! is having a great sale on select packages of their designer paper.  You can check that sale out here.  Since this month is all about designer paper I wanted to share a sketch with you that I used designer paper on.

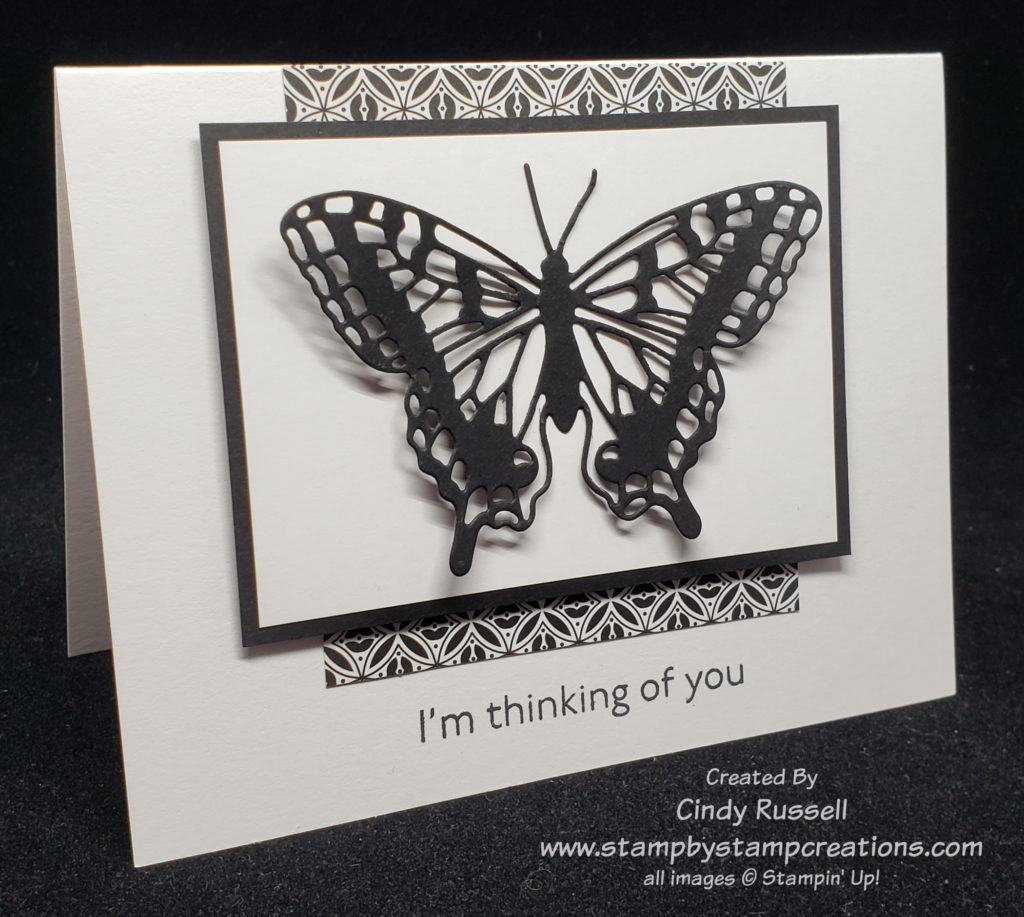
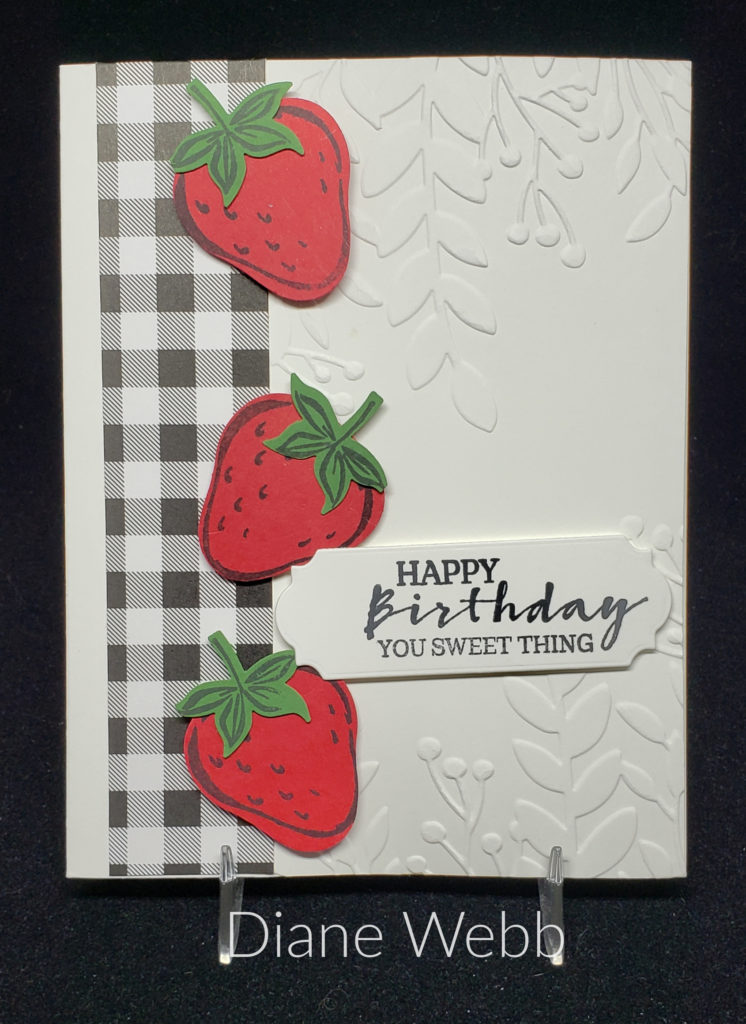
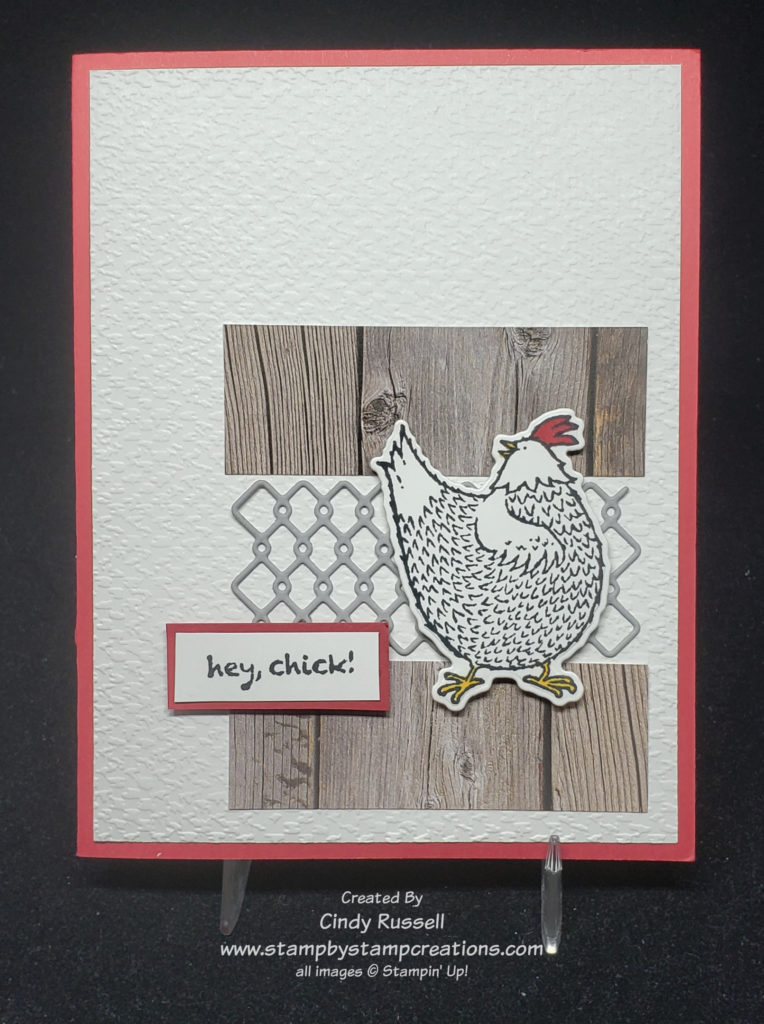
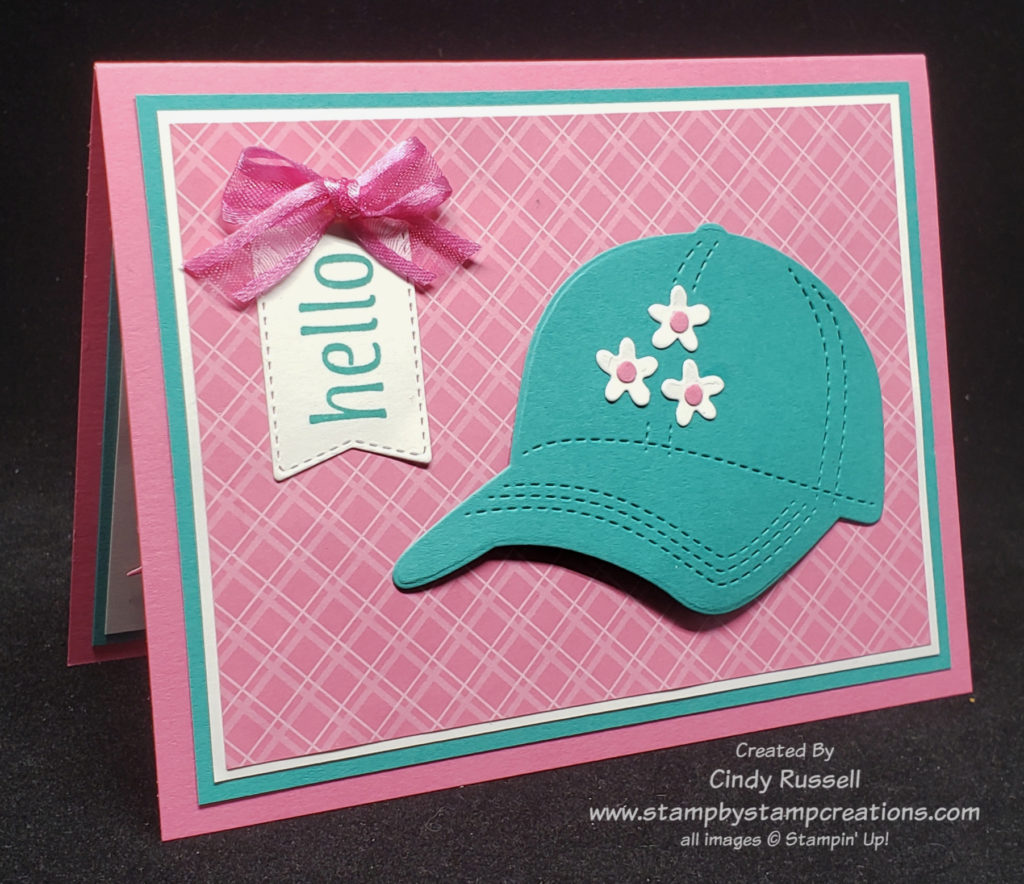
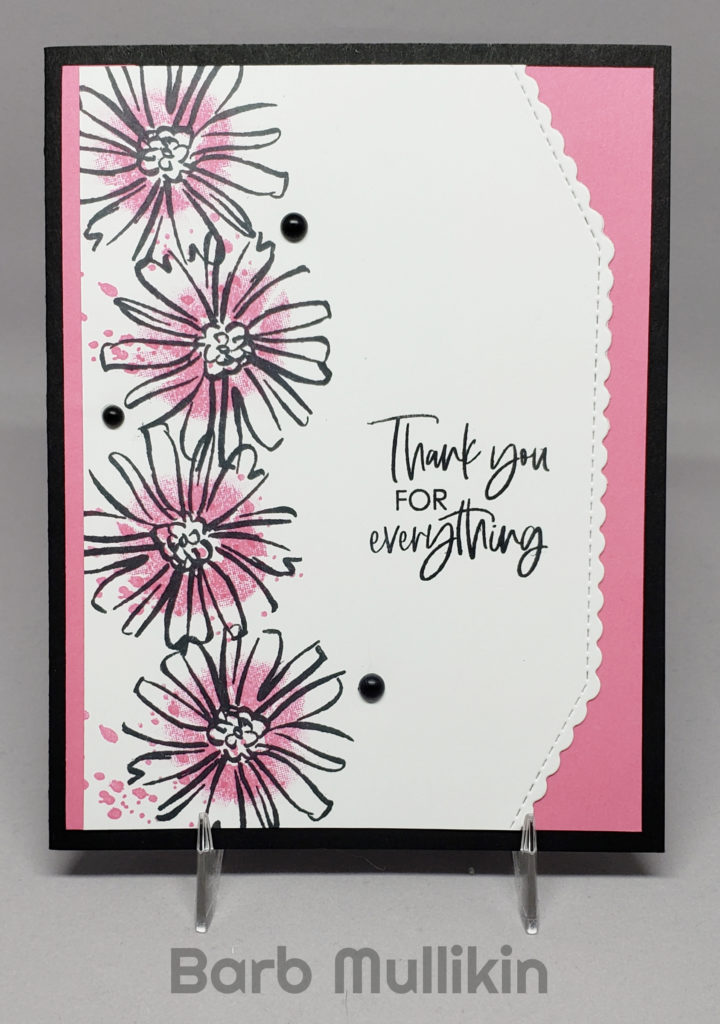
This card is one of those that is simple, yet elegant.  Doesn’t the designer paper just make the butterfly pop?  This sheet of designer paper is from the host only package called Pattern Party.  One side of each sheet is a fun and bright pattern and the other side of each sheet is a black and white pattern.  So fun!  Let me know if you’re interested in learning how you can earn this paper.

The butterfly is die-cut using the Brilliant Wings dies. The sentiment is from the Art Gallery stamp set.

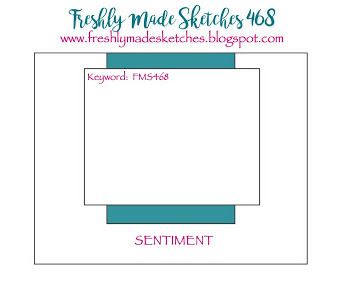
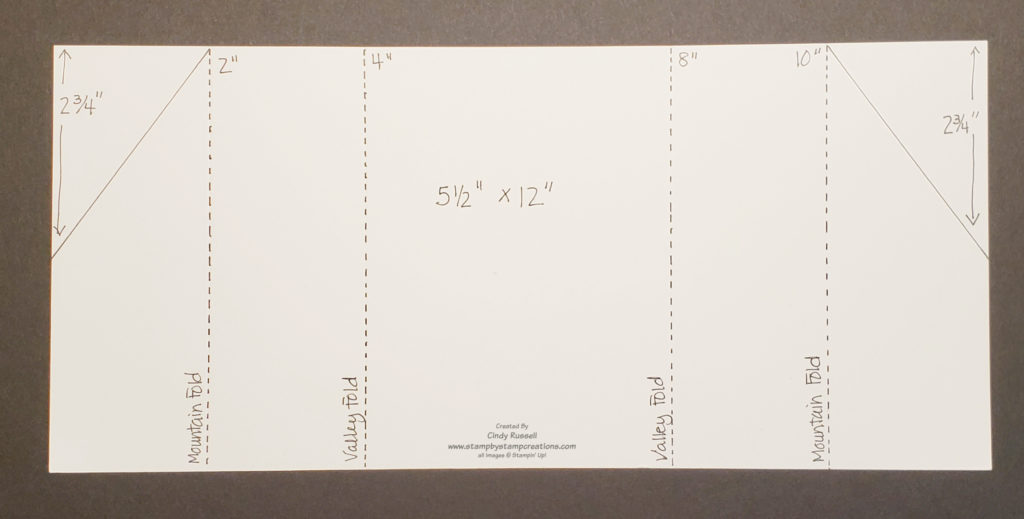
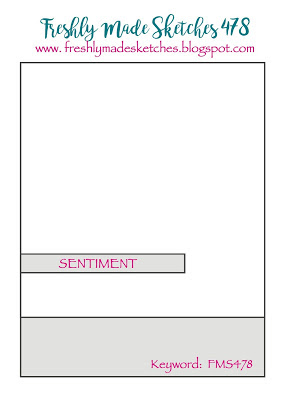
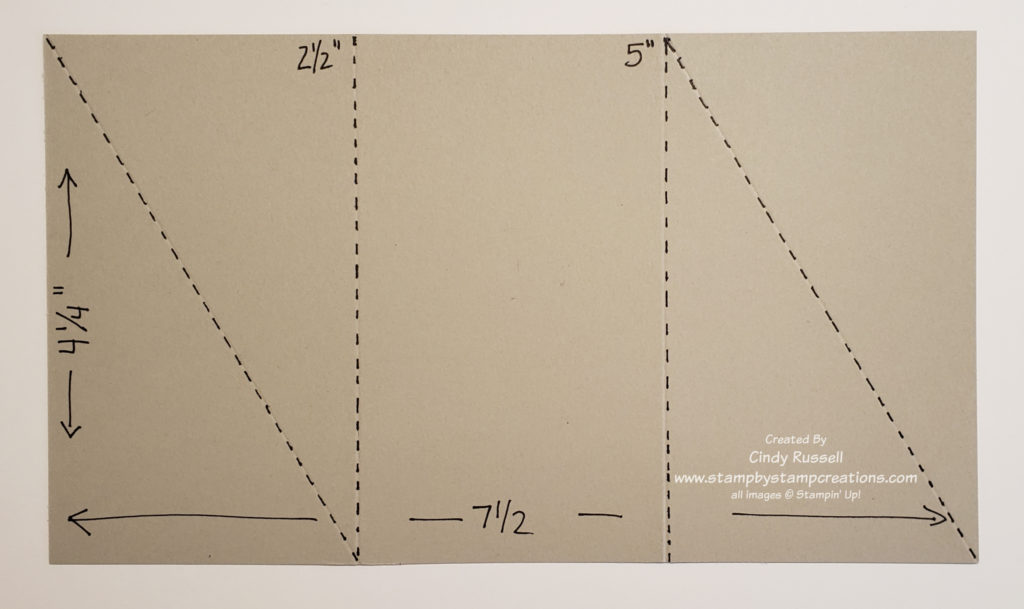
Here is the sketch that I used for this card.  I did pretty good this time, didn’t I?  I didn’t add too many extra layers.  Ha!

Have you tried any of the sketches I’ve shared yet?  Aren’t they fun to work with?  I hope you’re enjoying these sketch challenges as much as I am!  Have a great day!  Take care and Happy Stamping!

Make It Mine: Sweet Strawberry

Summer is officially here and that means it’s strawberry season!  Not only do we get to eat these tasty berries in summer but we need to get out our Sweet Strawberry stamp set and make some strawberry cards!

I received this card in a swap and liked the simplicity of it as well as the color combination.  You can’t go wrong with black and white with a pop of color.

I was browsing through the catalog and on page 43 I found the Sweet Strawberry stamp set. What made me giggle was one of the card samples that I saw. Let’s just say that Diane likes to “Make It Mine” too. I know where she got her inspiration. 🙂

Sweet Strawberry

As you can see by comparing the photos I kept pretty close to the original. I did add a layer behind the designer paper and I arranged the strawberries differently. My sentiment was a bit smaller and I added the red rhinestones.

This was a fun and easy card to make. We’re making it my first post-Covid in-person card class tomorrow. Having an in-person card class is a really big step for me. For some reason, even though I’ve been fully vaccinated since April, I’m still a little skittish about everything Covid. One step at a time, right?

Be sure to check out page 43 in Stampin’ Up!’s Annual Catalog so you can compare the three cards. Similar…yet diferent.

Have a great day! Take care and Happy Stamping!

Fun Fold: Diamond Gatefold Card

Artistically Inked Diamond Gatefold Card

This card definitely looks like a WOW but is actually quite easy to make.  Four score lines and two cuts.  Once you have those done your card base is ready.  Add a focal point and some cardstock to the inside of the card to write your message and your card is done!  I used the Artistically Inked stamp set and the Expressions in Ink designer series paper. Aren’t they gorgeous?

Before I get into the basics of making this fun fold I want to share a little tip. In my opinion, when I stamped the flower with the Pale Papaya ink it was a little too bright. The flowers in the designer paper seemed a little darker in color and I wanted my die-cut flower and my paper to match better. What I did was I first inked up the flower in Crumb Cake ink and then I stamped off on my scrap paper 2-3 times leaving just a bit of the Crumb Cake ink on the stamp. After stamping the flower on my cardstock I cleaned off the stamp, inked it in the Pale Papaya ink and stamped directly on top of the Crumb Cake flower. It turned out exactly how I wanted!

Now on to the basics for creating this fun fold! You can find a complete tutorial for this fun fold here.  Below you will find some tips on making the card.

Template for Diamond Gatefold Card

Above you can see the basic template for your card.  Start with a 5 ½” x 12” piece of designer paper.  The key here is to make sure both sides of the cardstock coordinate well together.  Only one side of your designer paper can be directional.  This would be things like trees or flowers with a stem that might not look good upside down.  If you do use a directional pattern on one of the sides of your paper you want to make sure this is the side that is on the “inside” of the card.  When scoring and cutting your paper you want this side facing up.

Once you’ve decided which side of the designer paper should be on the inside of your card place this side up on your Simply Scored tool and score at 2”, 4”, 8” and 10”.  The next step is to trim off the corners according to the template.  Make sure you know which corner was cut from which side.  Take the corner you cut from the left side, flip it over and adhere it to the lower left corner of the paper.  Repeat with the right side.  Now decorate your card!

Diamond Gatefold Card Open

Have a great day! Take care and Happy Stamping!

Pretty Perennials Card Sketch

It’s Card Sketch Day! I can’t begin to tell you how much fun I’m having with these. I spent a whole day last weekend playing with them.

These card sketches are great because they get me searching all the stamp sets on my shelf to find the right one to use with the sketch I’m working with.

The Freshly Made Sketches website that I’m getting my sketches from runs a contest each week with that week’s sketch. Then the next week they publish the winning card along with the others that were submitted. This gives you a lot of inspiration on where to start.

Pretty Perennials

Here is the card I came up with for this sketch. The words are from the Pretty Perennials stamp set which is retiring on June 30th. The designer paper is from the Pattern Party paper set which is a host only pack.

I did change up the sketch a bit by changing the orientation of the card as well as adding layers and an extra focal point (happy) to my card.

Once again I want to encourage you to give card sketches a try. They are fun and a little addicting. Ha!

Have a great day! Take care and Happy Stamping!

Make It Mine: Hey Chick

Hey Chick

Before I get into the details of todays card(s) I want to remind you that June 30th is the very last day that you can order the Hey Chick stamp set, the Chick Dies or the bundle that includes both items. Don’t miss out on these fun items!

But back to our originally scheduled post….

As I was searching for a card made with the Hey Chick Bundle I came across this card. I really liked the unique layout and thought I’d give it a try.

Hey Chick

It’s kind of funny, but the thing I really liked about the original card is the first thing I changed on mine. On the original, I liked that everything in the background was the same color. Since I couldn’t decide what color I would use I just switched everything up.

I made my chicken wire die out of Smoky Slate cardstock and used a wood pattern from the In Good Taste Designer Paper on my card. Of course, I added a layer too.

Even though I left my chicken white it still pops against the background since I embossed it with the Tasteful Texture Embossing Folder.

How would you have made the original card yours? Leave me a comment and let me know!

Have a great day! Take care and Happy Stamping! Don’t forget to grab the Hey Chick Bundle before it’s gone!

Card Sketch: Hey Birthday Chick

It’s time for this week’s card sketch. I know this is only the second one I’ve done but it’s kind of fun. It can definitely be a challenge too. The sketch looks simple enough but then I need to figure out which of my supplies to use.

The first thing I did after deciding on this sketch was to find a stamp/die that would fill most of the white space on the sketch. After browsing my shelf of stamps I chose Hey Birthday Chick with the adorable chicken being lifted in the air by a balloon.

As you can see, I added a couple of layers to the card. My sentiment is a bit lower as I didn’t want to cover up the adorable chicken. Other than that I kept pretty close to the card sketch. I used a blending brush to lightly add Bermuda Bay ink for the sky.

Have you tried working with card sketches yet? Give this one a try and then either post your photo in the comments below or email me (cindy@stampbystampcreations.com) a photo of your card. I’d love to see what you come up with!

Have a great day! Take care and Happy Stamping!

Make It Mine: Hats Off!

When I first saw the Hats Off stamp set in Stampin’ Up!’s new annual catalog I thought it would be a great masculine stamp set. Of course, girls wear baseball caps too, right?

I came across this bright and cheerful card by Lisa Cummings and knew I wanted to recreate it. I had also come across a couple of hat cards that had flowers on them so that’s what I wanted to incorporate on my card along with color combination.

Before I share my version of Lisa’s card with you I want to share a little tip I learned. To give your ball cap a little dimension, use your bone folder to give it a little ben like you do with curling ribbon. Then, when you adhere the cap to the card (or other project) place some dimensionals in the center of the cap. That’s all I used on my card to adhere the cap.

Feminine Hats Off Card

Here’s my card. It looks a little more washed out than Lisa’s but we both used Polished Pink on our card. I used Bermuda Bay but I think Lisa may have used Coastal Cabana.

After completion, this card was one of those that just tickles your fancy because it turned out cuter than you imagined. 🙂

You can see be the shadow under the brim of my ball cap how I curved it a little. I think it really adds to the card.

The little flowers on my card are from the Pierced Blooms dies (one of my favorites that makes me sad it’s retiring). The “hello” is from the Artistically Inked stamp set and the pennant die is from the Tasteful Lables dies.

I love the new 3/8″ Open Weave Ribbon that comes in the new in-colors. It’s got a little stiffness to it that makes it easy to make the perfect bow, even small ones.

Here’s a photo of the inside of my card. I had to share it with you so you could see the smaller little ball cap die. It’s about 1 1/4″ x 7/8″. So cute!

Be sure to check out the Hats Off bundle. I think you’re going to like it!

Have a great day! Take care and Happy Stamping!

Father’s Day Polo Shirt Easel Card

Hello! I’m back from the MN Homeland where I helped put on a bridal shower for my niece. This photo is my mom, my sisters and myself. The shower was lovely and it was great to see family again. We haven’t seen them since last October.

I apologize for not getting any posts ready for you while I was gone. I hope you didn’t miss me too much! Ha! This week will be a little mixed up because I just had to share this Fun Fold with you today so that you could maybe duplicate this week for Father’s Day.

Polo Shirt Easel Card

We’re always looking for masculine cards, right? Today you hit the jackpot. This fun card can be used for any occasion. I originally saw it online and knew I had to try making it myself. The card I saw was actually larger so I had to adjust the measurement so that the card would fit into Stampin’ Up!’s regular size envelope.

The card isn’t too difficult to make and you can add a pocket on the back for a gift card! That’s what I’ll be doing for my dad’s Father’s Day card.

To see exactly how I made this card please view the video below.

If you like written instructions I’ve got you covered you can view the pdf with step by step instructions and photos here.

I hope you liked the video. My videos are a little rough but I think I’ve covered everything. If you like this project please leave a comment below. If you liked the video I’d appreciate it if you could head on over to my YouTube channel and subscribe. Thanks!

Have a great day! Take care and Happy Stamping!

Card Sketch & Challenge!

It’s a new month so I think it’s time to try something new.  We’re going to move on from Tools of the Trade to Card Sketches!

What is a Card Sketch?  It’s exactly what the name says.  It’s a sketch of a design you can use as the basis for your card.  Many of us have a difficult time making decisions.  (Yep!  That’s me!).  A card sketch gives you the design starting point for your card.  From there you choose the stamp set, colors and embellishments you want to add to the card.

You can come up with your own card sketches but I’ve found this fabulous site called Freshly Made Sketches that has almost 500 sketches on it and they keep adding to it! Be sure to check it out sometime! I will be sharing one of their sketches every week along with the card I make using it.

When using a card sketch you can keep your project as close to the sketch as you want.  As you can see on my card, I kept the basic elements of the shape in the upper left corner with the diagonal strips behind it.  But I added to that.  I (naturally) added a couple of layers and I also added a sentiment on the front of my card.

Working with card sketches should be pretty fun.  I don’t think I’ve worked with them much.  Here’s my challenge for you.  My challenge for you is to make a card using this sketch and send it to me.  I really would like to see what you do with the sketch.  Then, I would like to share your creations on my blog and possibly my Facebook Page (with your permission of course).  You can email your card to me at cindy@stampbystampcreations.com or add it to the comments for this post. Will you join the challenge and play along?  I hope so!

Have a great day!  Take care and Happy Stamping.  Don’t forget to join the challenge!  I can’t wait to see your projects!

Make It Mine Monday: Pink & Black

Of course Barb Mullikin’s card caught my eye! It’s probably my favorite color combination. Of course, black does go well with a lot of colors. It makes the other color pop!

I really like the simplicity of this card. Barb gave this card a little extra something-something by using this fun scalloped border from the Basic Borders dies. I’m sure I’ve mentioned this before but this die set is one of my favorites in Stampin’ Up!’s new Annual Catalog. It’s so versatile with six different border dies to choose from!

Did you notice how Barb made the flowers pop by adding just a hint of color? What a fun technique!

I liked Barb’s card so much I decided not to stray too far from the orignal. Naturally I added another layer. Could there be a Make It Mine card where I didn’t? Ha!

I embossed the Polished Pink background with the Tasteful Textile 3D Embossing Folder which just happens to be my go-to for a hint of texture. I also added a little color to the centers of my flowers with Pale Papaya.

You’re probably wondering how Barb and I added that little bit of color to our flowers. Sponge Dauber! That little sponge tool was perfect for both making a little circle of pink around the center of the flowers and for dabbing a spot of color in the middle of the flower.

You can’t go wrong with a pink and black card (unless you really don’t like the color pink!). Have a great Memorial Day! Take care and Happy Stamping!

Fun Fold: Twisted Gate Fold Card

Twisted Gate Fold Card

Today’s Fun Fold is the Twisted Gate Fold or Diagonal Gate Fold card.  This unique fold is a lot easier to make than it looks.  I would almost call it the Twisted Double-Flap Gate Fold because like the regular Double-Flap Gate Fold card that I showed you a few weeks ago, you fold the front panels back on themselves. In this fun fold though you fold the front panels back on the diagonal.

I just had to use the Hey Chick stamp set again before it is gone for good. It’s only available until June 30th or until supplies last and that goes for the fabulous coordinating dies. If you love them as much as I do be sure to get them while you can!

Here is the template for the base of the card. The dimensions are 7 1/2″ x 4 1/4″. Score along the long side at 2 1/2″ and 5″. Then score diagonally as shown on the template.

These are the two decorative pieces of designer paper. They both measure 4″ x 2 1/4 and are cut on the diagonal but one is cut from the upper left to the lower right and the other is cut from the upper right to the lower left.

The four triangles are labeled for you in this photo and the photo below shows where to adhere them on the card. I found it was easier to figure out where to place them while I had the card closed. I’ve labeled the pieces here so you can see where I placed them on the card below.

Honestly, figuring out where to put these four decorative pieces was the hardest part of making the card. When you are adhering your focal point to the front of the card you need to make sure you only adhere it to the L1 piece or you won’t be able to open the card.

I’ve attached a couple more photos of the card below so you can see it both fully open and partially open. It really is a fun fold and it will fit into a regular-sized envelope.

Have a great day! Take care and Happy Stamping

Make It Mine: Hand-Penned

I will admit (again…?) that the Hand-Penned Suite in Stampin’ Up!’s in new annual catalog is one of my favorites!  I can’t seem to get enough of it!  I really love the designer paper.  You will see a lot of it in my projects.

The card that inspired me today was made by Julie Sperman.  Thank you Julie!  Pale Papaya isn’t my favorite color but it looks so nice with Misty Moonlight!  Julie used the Penned Flower Dies as well as the Tailor Made Tags Dies. These tag dies are becoming another favorite of mine! (Honestly, there aren’t too many Stampin’ Up! products that I don’t like!) She also used the Genial Gems on her card that coordinate perfectly with the Hand-Penned Designer Paper.  Coordination!  Love it!

I liked Julie’s card so much I was having trouble figuring out how to change it! How do you alter something so lovely?

I started with the card base itself.  On her card, Julie layered a piece of Pale Papaya on a Pale Papaya card base.  To change it up I decide to go with a Misty Moonlight card base.  Even after telling you to check your die sets for nice border dies I left off the scallop border on my card and used a larger piece of the designer paper since it’s so pretty!  The tags on both of our cards are pretty similar but I threaded my ribbon differently and used my gems as the centers for the flowers.

Have you tried any Make It Mine projects?  You should!  It’s pretty fun.  Go ahead and give it a try!

Have a great day! Take care and Happy Stamping!

Fun Fold: Envelope Flap Gate Fold

Envelope Flap Gate Fold Card

Last week I shared with the Graduation Cap & Gown Gate Fold Card and this week’s card is very similar.  Today I want to share with you the Envelope Flap Gatefold Card.  So fun and not too difficult. I used the Ice Cream Corner Suite of products on my card. 

Before I go into detail, I want to mention that if you like these products many of them will be retiring starting on June 1st so you may want to snap them up now before they’re gone.  The only items from the suite that are in the new 2021-2022 Annual Catalog are the Sweet Ice Cream stamp set and the Ice Cream Cone Builder Punch.

This card was fun to make and I do want to thank Debbie Crowley for her wonderful tutorial on this fun fold.  I was going to describe in detail how to make this card here on my blog but decided it was easier to write up my own tutorial with photos. Be sure to check it out for all of the dimensions and instructions on how to make the card.

Below you can see a few more photos of the card.  Can you see how similar it is to the graduation card I made last week.  The main differences is that the gate fold portion of this card is adhered to a base.  I also added ribbon to help keep the card closed.

Isn’t this a fun card? I hope you like it. There are so many different types of gate fold cards. I may have to see if I can find another one for next week’s post! Have a great day. Take care and Happy Stamping!

Make It Mine: Party Puffins!

The Party Puffins stamp set was another one of those stamp sets that I didn’t think I needed. Once again, I was wrong. Sheesh! You try to be good and then someone posts a really cute card and you want to copy it.

I was looking at this adorable stamp set sitting on my shelf and knew that I wanted to use it for today’s post. So I hit the internet looking for a fun sample. Caroline’s card here was the one that caught my eye. Isn’t it cute?

If you’re looking at this fun paper and trying to figure out where it is in the catalog I’m going to give you a hint….it’s on page 171 and is a hostess only choice. Honestly, it might be worth it to host a gathering (or place a large order) just so that you can choose the Pattern Party 12 x 12 Designer Series Paper. It will only cost $18 of your hostess rewards and you get 48 sheets of 12″ x 12″ paper! One side is fun and colorful and the other side is black and white. Too fun!

Party Puffins Birthday Card

But let’s get back to the card. Of course the first thing I had to switch up on Caroline’s card was to add a few layers. Red always looks good with black and white so I added a red layer on both the front and the inside of the card.

I would have been remiss if I hadn’t included the little fishies with bows on my card. They’re actually one of my favorite parts of the stamp set! Ha!

Party Puffins Birthday Card – inside

The other thing I changed was that I just used one sentiment and put it on the inside of the card.

I was tickled with how cute this fun little card turned out and I can’t wait to make more of them! You’ll definitely see me sharing more cards using this adorable stamp set!

Have a great day! Take care and Happy Stamping!

Make It Mine: 2 For 1

I saw this card on Pinterest and liked the simplicity of it.  It was the perfect card to showcase the gorgeous new Soft Succulent In-Color as well as the fun silhouette dies from the Meadow dies. (These dies can be bundled with the Quite Meadow stamp set).

The first thing I thought of after admiring this card was “2 for 1”!  I’m not sure if Carol die cut the floral image from the green or if she die cut it from the white and the green we see is from the background layer.  It doesn’t really matter because I saw it both ways and figured I could make two cards with one die-cut image! So that’s what I did!

Here are the two cards that I made from Carol’s inspiration. As you can see, I die cut the floral silhouette from Basic White cardstock to make the focal point for both cards.

On the white card I used the die-cut space of white cardstock as the focal point and on the Soft Succulent card I used the die-cut image.

From there I simply added layers and coordinating ribbon to finish off my cards. As I was creating these cards I kept thinking to myself that they needed something else….maybe an embossed or stamped background or something but then I decided that the simplicity of the cards made them work. Sometimes it’s good to remember that less is more.

The Meadows dies are gorgeous. There are 6 floral/greenery silhouette images along with 2 butterflies, 2 labels and some small leaves. I can’t wait to begin my next project using these dies and the coordinating Quite Meadow stamp set!

Have a great day! Take care and Happy Stamping!