Simple Treat Holder

Treat.simple.0319
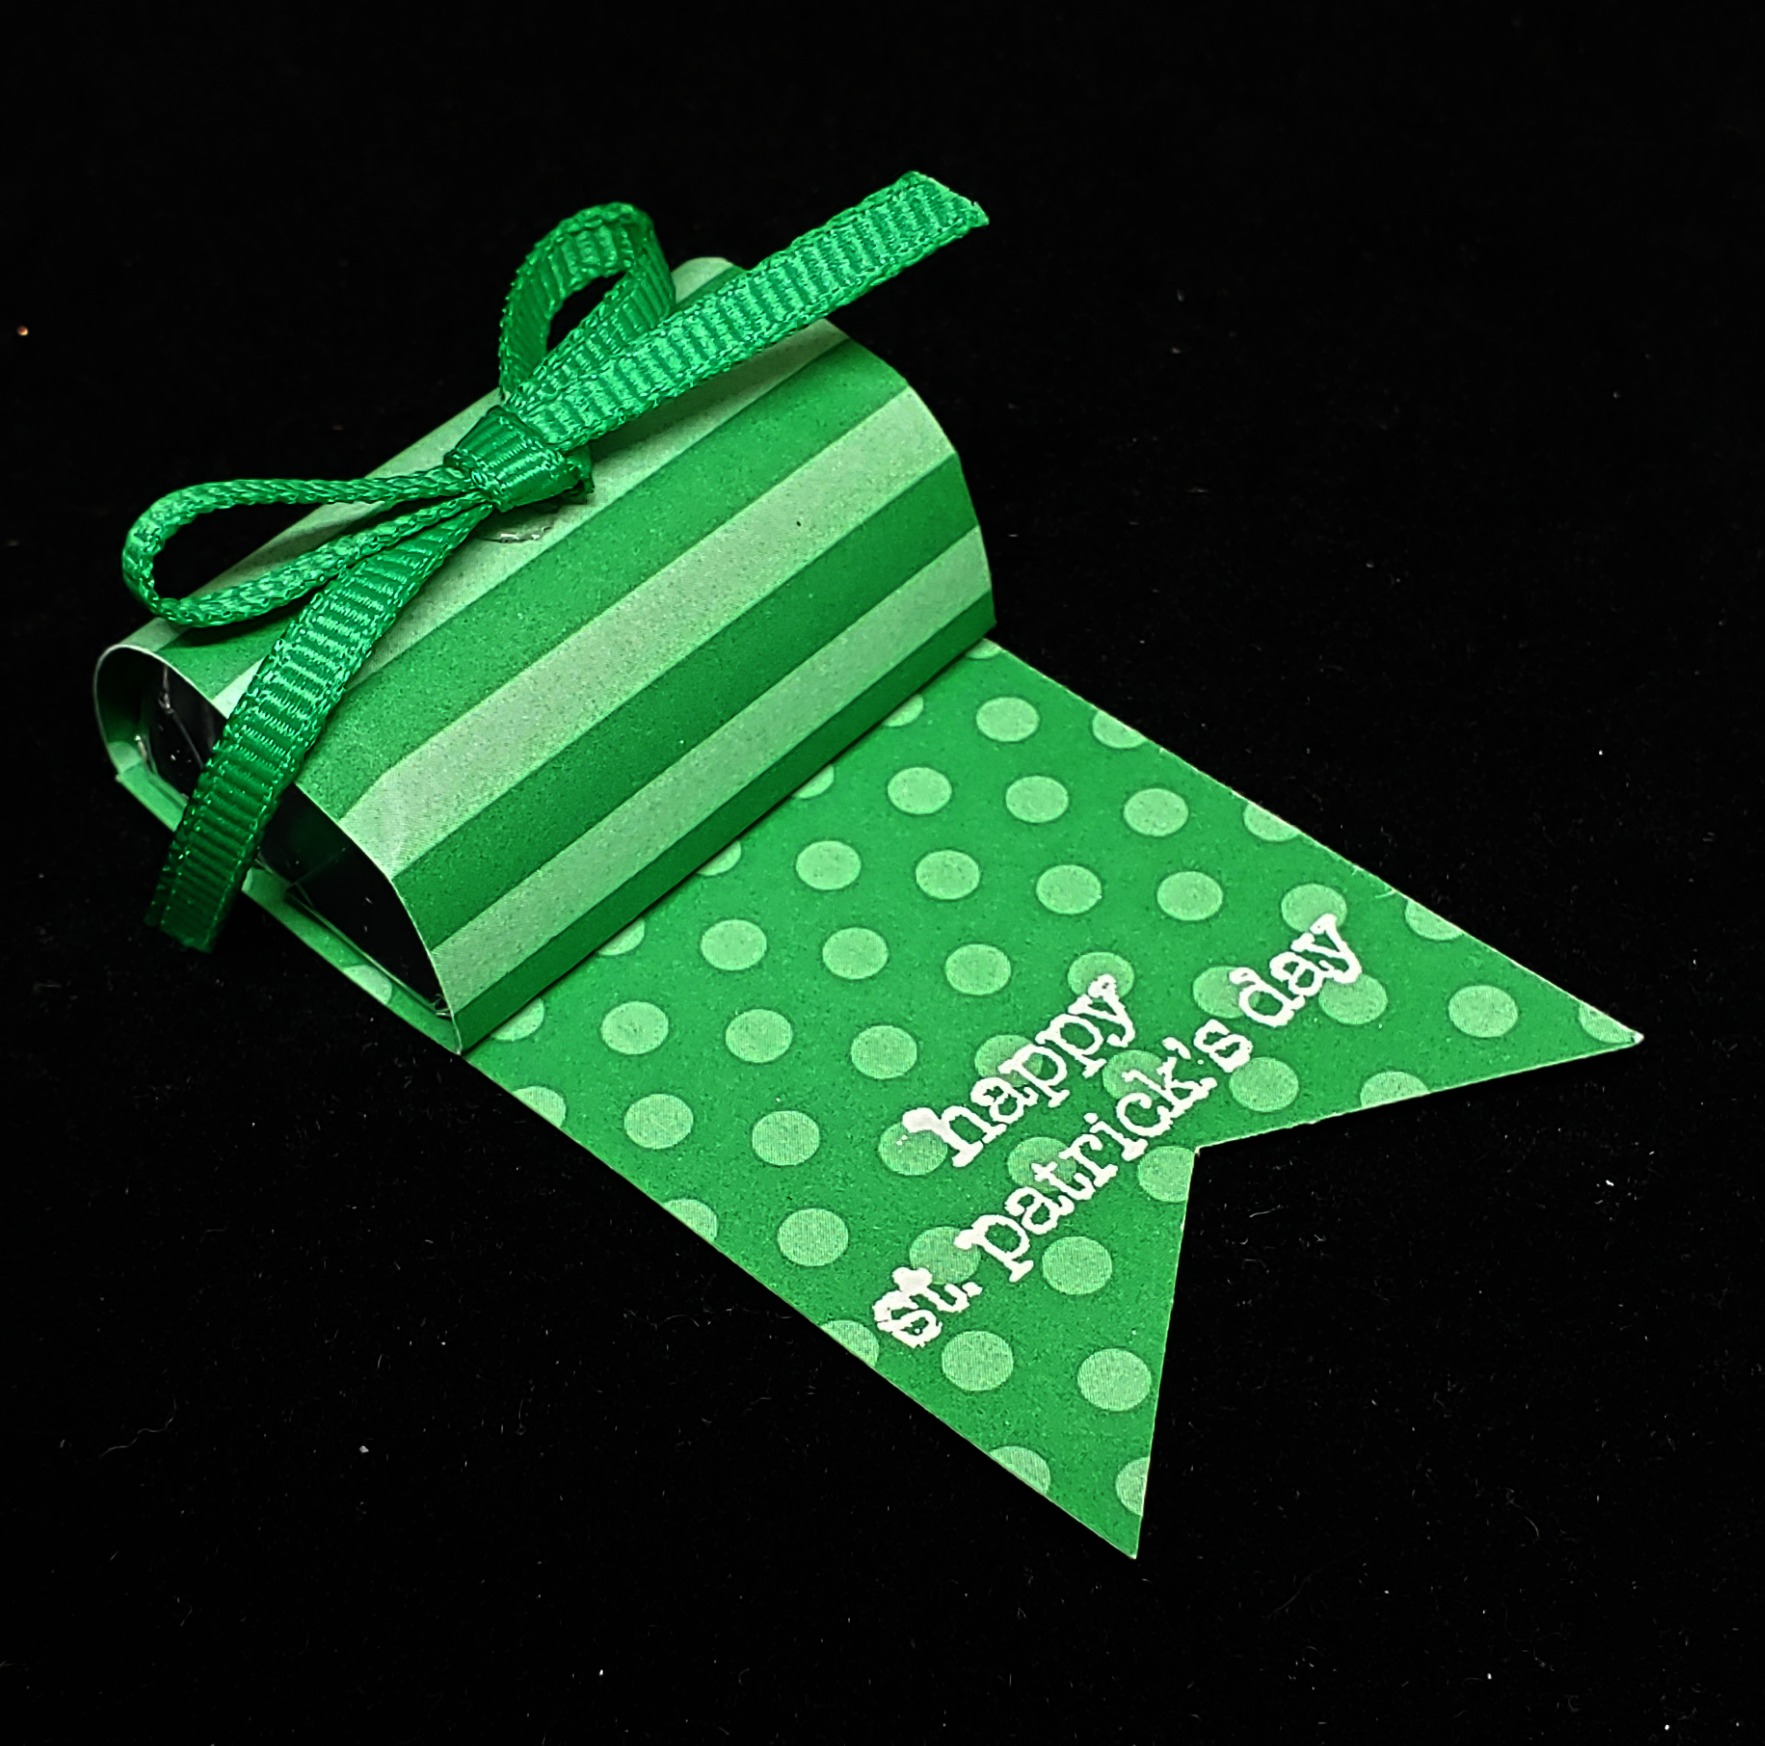
Are you looking for a quick and easy treat holder for your St. Patrick’s Day party, Easter, graduation or any other occasion?  Here is a quick and easy treat holder for you.  My friend Jan made these for our Stamp Camp guest back in January.

Start with a 1 1/2″ x 6″ piece of designer series paper.

Punch one end of the strip of designer paper with the Banner Triple Punch (#138292 $23).

With the side of the paper you want covering Treat.simple.3.0319
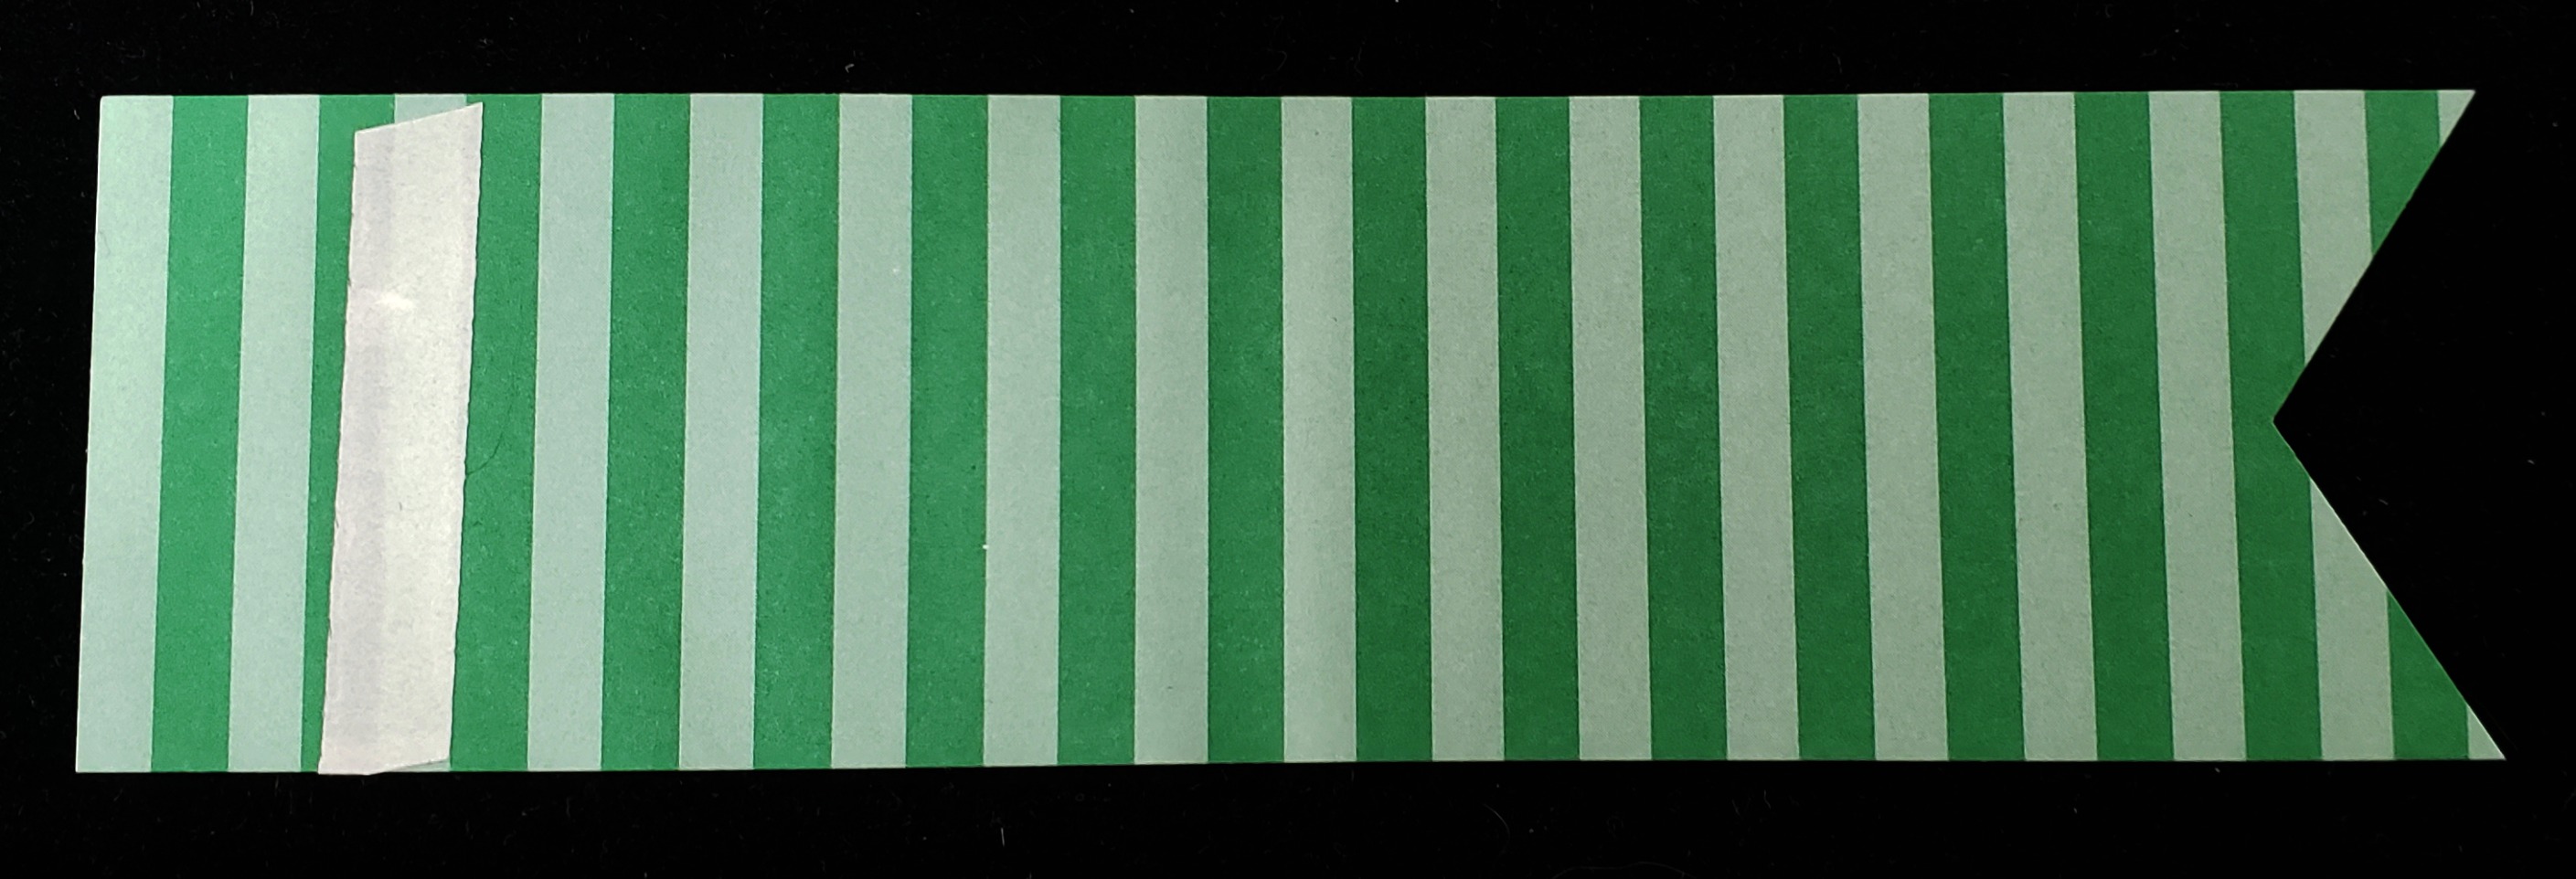
the Hersey Nugget facing up, place a piece of Tear & Tape about 1/2″ – 3/4″ from the straight end.  Turn the paper over.

With the side of the paper that you want Treat.simple.2.0319
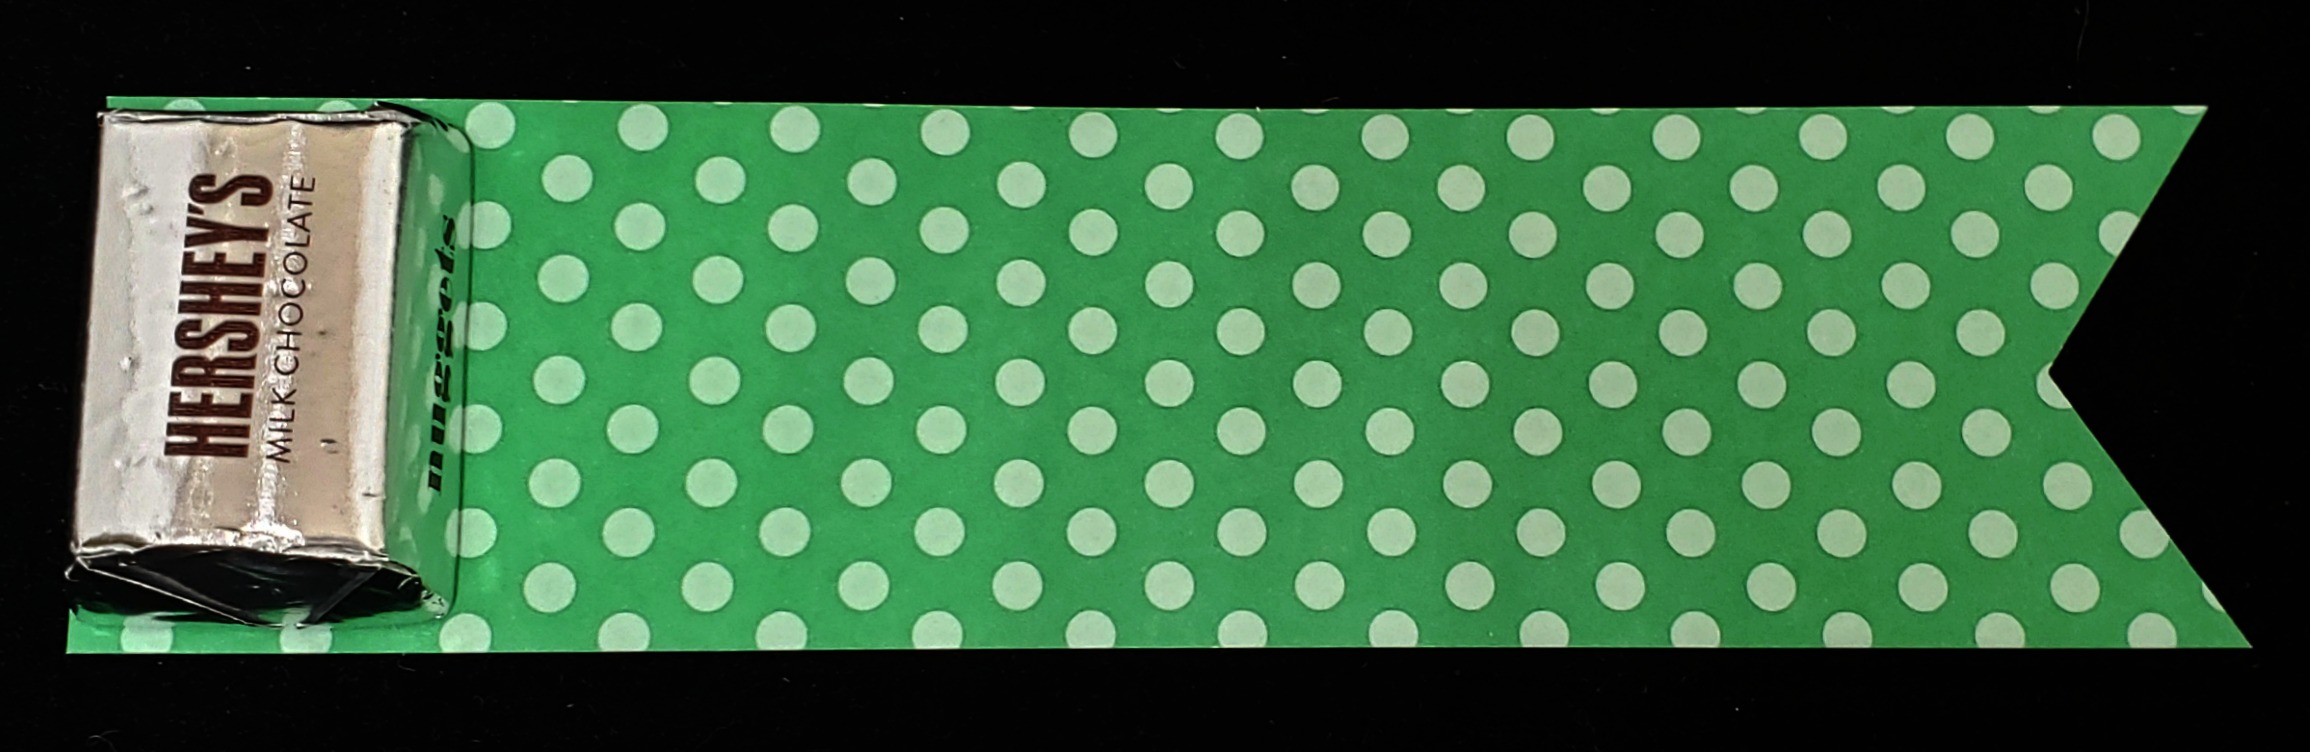
showing on the flap facing up, place your Hershey Nugget on the straight end.  Roll the paper and candy once so that the Hershey Nugget is upside down.  Remove the backing from the Tear & Tape and roll the paper and candy one more time so that the Hershey Nugget is right side up again.

If desired, heat emboss a sentiment on the pennant flap as pictured above.  Jan used the retired stamp set, Teeny Tiny Wishes for her “Happy St. Patrick’s Day”.  There is a “Have a Lucky Day” sentiment in the new Itty Bitty Greetings (W-#146664 $48 C-#146667 $36).

Tie a bow with coordinating ribbon and attach to the top of the Hershey Nugget with a Mini Glue Dot.

That’s it!  Quite easy!

Have a great day!  Take care and Happy Stamping!

Tea Time Framelits

Tea Time Framelits.NancySpring is just around the corner, right????  Well, this card makes me think of spring with the floral designer paper and the soft colors.  It’s time for Spring Tea!

Nancy used the Tea Time Framelits which just happen to be a Level 1 Sale-a-bration choice.  Guess what?  They COORDINATE perfectly with the Tea Together stamp set in the Occasions Catalog!  You know how I LOVE coordination!

Nancy designed this card for our Shoebox Swap and was challenged to use two embossing folders.  She used the Petal Burst folder on the Flirty Flamingo background piece and the brand new Lace Dynamic Textured Impressions Embossing Folder for the the tea pot.  Isn’t the tea pot cute embossed?

This Lace Embossing Folder is gorgeous and I’ve so many fabulous cards made using it.  It works perfectly as a background on a card or even as the focal point on this card.

This card would be great for any occaion.  Birthday, get well, thinking of you….all sorts of cards.  I love designs that are versatile like this.  Thank you Nancy for sharing!

Have a great day!  Take care and Happy Stamping!

Wonderful Romance & Vellum

Wonderful RomanceThe Wonderful Romance stamp set and the coordinating Floral Romance Specialty Designer Series Paper are GORGEOUS!  Yes, there are framelits that coordinate with the stamp set too!

I love this stamp set but I originally shied away from it because I get a little nervous about coloring….especially when there is a lot of it.  I’d rather stamp and move on.  I really need to work on changing my attitude though because Stampin’ Up! has so many gorgeous line-art images!

Floral RomanceAt my group’s recent Shoebox Swap three different people chose this stamp set for their card.  And yes, a couple of those we had to color.  Glenda chose use a sheet of the gorgeous Floral Romance Specialty Designer Series Paper on her card.  Two of the patterns in this pack of paper are vellum.  These vellum patterns are the two large sheets at the top of the image.  GORGEOUS!  Glenda used the one on the left.  Love it!

Glenda also used the new Rectangle Stitched Framelits.  She made the two frames with them as well as the piece that’s inside the Wonderful Romance.Glendagreen frame.

This card is so sweet.  All the cards Glenda designs are sweet.  That’s her style.  The floral image is heat embossed with White Embossing powder and cut out with one of the dies.  Then we went over the inside of the embossed image with Wink of Stella.  How can you go wrong with a little sparkle?  🙂

“Wishes” seems to pop out at you because it was die cut twice from Whisper White cardstock and once from the gorgeous vellum and then layered together.  I need to remember to try that sometime on my cards.

I hope you like Glenda’s card.  Have a “sweet” day.  Take care and Happy Stamping!

The BEST Stamping Deal Ever!

Do you know what the best deal Stampin’ Up! ever offers is?  You should because it’s happening NOW!  Actually, the best deal Stampin’ Up! offers happens anytime…it’s just a bit sweeter during Sale-a-bration.  Have you figured out what I’m talking about yet?  It’s the Demonstrator Starter Kit!

The Demonstrator Starter Kit is a great deal any time of the year…you get to choose $125 of merchandise for only $99!  That’s $26 of FREE product!  Then you get a 20% discount on all future purchases! Wow!

01_03_19_JOIN_DBWS_SAB_US

As I mentioned earlier, purchasing the Demonstrator Starter Kit during Sale-a-bration is even better!  For the $99 purchase you get to choose $175 of products!  Oh, my!  That’s an extra $50 of product if you sign up to become a demonstrator before March 31st for a total of $76 in FREE product!  Woo Hoo!

Ask me how you can get a 20%–25% discount on all Stampin’ Up! products. Sharing your love of papercrafting as a demonstrator is a great way to support your hobby! Plus you can earn additional income based on your sales and recruiting–just how much extra income is up to you. It’s your business so you get to set your schedule and put in as much (or as little) time as you’d like. Stampin’ Up! provides plenty of support through online training resources, a quarterly magazine, biannual events, and a demonstrator-only online community with thousands of project ideas!

Find out some of the reasons I love being a Stampin’ Up! Demonstrator here.  Or if you’re ready to take the plunge and join my team of SASsy Stampers you can sign up here.  I would really LOVE to have you all join my team….we’re a really fun bunch!

Have a great day!  Take care and Happy Stamping!

Sale-a-bration Coordination!

You all know how much love Stampin’ Up! and COORDINATION.  Well starting today Stampin’ Up! is bring out Sale-a-bration Coordination!  During the month of March you can purchase 6 different products that COORDINATE perfectly with some of the Sale-a-bration offerings.  Woo Hoo!

SABCoordCollage

Four sets of framelits, one punch and one stamp set.  The first set of framelits coordinates with the Hello Cupcake stamp set.  The second set of framelits coordinates with the Lasting Lily stamp set.  The third set of framelits coordinates with the Painted Seasons stamp set and the final set of framelits coordinates with the So Hoppy Together stamp set.  I LOVE the frogs!  The Story Label Punch will work great with many stamp sets, Sale-a-bration or otherwise and the More Than Words stamp set will work with all sorts of images.

You can check out this flyer to see the item numbers and prices for these different products.  I am SO excited!  I can’t wait to play with all of these items!

Don’t forget….there’s only 1 month left of Sale-a-bration.  Get those orders placed and don’t forget to add your Sale-a-bration Coordination items!  COORDINATION!  WOO HOO!

*** I had to alter this post before it posted!  I just found out that Stampin’ Up! has added 8 current products to your Sale-a-bration 2019 choices!  You can check them out here.  I LOVE Sale-a-bration!

Have a great day!  Take care and Happy Stamping!

Amazing Life Fun Fold

Last night’s card class was Fun Folds.  It was a small class but we had a good time.  I love Fun Folds.  They’re so…..FUN!  Ha!  It’s fun to change things up with a different type of card.

Amazing Life.Tammie.CollageTammie made this fun but easy card for our Shoebox Swap last Saturday.  She used the Amazing Life stamp set that we received at Stampin’ Up!’s On Stage event last November.  I have to admit I haven’t used mine yet but after making this lovely card I’m definitely going to have to get it out!  This is actually a very versatile stamp set with a variety of sentiments in it in various sizes.  There are a variety of images too including a small cake, the small flower that’s Tammie used on her card and even a four-leaf clover!

The little flowers on both the inside and the outside of the card are colored with Stampin’ Blends.  You could even color the “happy” and the label on the card front too.

To make this fun fold you start with a regular vertical card, score the front at 2 3/4″ and fold the right edge back to the center fold.  Tammie added a piece of the gorgeous Floral Romance Specialty Designer Paper to the folded over piece before attaching the focal point.  Easy and lovely.   I’m pretty sure this card will work perfectly for my next Card Buffet class!  🙂

Have a great day!  Take care and Happy Stamping!

Let It Ride

Let It RideHave you checked out the Let It Ride stamp set in the Occasions Catalog?  The horse images are lovely and the font used on the sentiments is beautiful.

I don’t really have a thing for horses like some people do but the more I see of this stamp set and the projects created with it the more I think I might need it.  I do like the sentiments.  This stamp set will probably be in my craft room before the end of May….  🙂

Not one, but two people use this stamp set on their cards for our Shoebox Swap on Let it Ride.KeriSaturday.  Today I’m sharing Keri’s card….or at least my take on it.  I did take a little creative license with her card.  Keri challenged herself to use two different embossing folders on her card.  On the card itself she used the new Dot to Dot Embossing Folder and although it’s hard to see from the picture, she used my favorite, the Subtle Embossing Folder on the sentiment label.

I should have taken a picture of Keri’s original card.  It was a horizontal card instead of the vertical that I used.  She also had the horse off to the right side of the card like I do and the sentiment overlapping it off to the left.  She had added a piece of ribbon on hers too.  I love the black and white.  This color combination is always so striking.  A lovely card.  Thank you Keri!

Have a great day!  Take care and Happy Stamping!

Painted Seasons Paper

Painted Seasons.tenaOn Saturday we all had a good time at our Shoebox Swap.  Most of us tried to challenge ourselves in some way when designing our cards.  Tena used the new Sale-a-bration paper, Painted Seasons, on her card and went with the challenge of using colors together that she normally wouldn’t use.  She was able to take the colors right from the gorgeous designer paper.

The Painted Seasons Designer Series Paper is a Level 2 Sale-a-bration item.  You can only get it in a bundle with the coordinating stamp set.  In the paper pack you get 3 sheets each of four different two-sided designs.  One side of the paper is nature themed while the other side is a graphic design.  Very lovely paper.

The Painted Seasons stamp set is lovely too.  It includes 7 stamps that COORDINATE perfectly with the paper.  Speaking of COORDINATION…..did you know that during the month of March you can purchase a set of framelits the die cut the images from the Painted Seasons stamp set?  How great is that?  A definite must have!

Starting on Friday, March 1st, Sale-a-bration Coordination begins!  Stampin’ Up! is coming out with four sets of framelits that coordinate with four of the Sale-a-bration stamp sets as well as a punch (which you can see that Tena used on her card) and a stamp set!  These special products are only available in March and end on March 31st when Sale-a-bration ends. How fun is that?!

Have a great day!  Take care and Happy Stamping!

Vibrant Vases: The Challenge!

Last week I mentioned that my group of fellow demonstrators was getting together on Saturday for a Shoebox Swap.  At a swap we each design a card and bring all the pieces and parts for the other demos to make our project.  We had a theme this time of “Challenge Yourself”.  Our hostess, Janet, threw out some basic challenges we could try or we could come up with our own type of challenge.  I chose to challenge myself.

Vibrant Vases.0219My card my look fairly easy but I really did challenge myself in a number of different ways:

Use a stamp set I’ve never used.  I’m afraid I had a lot of choices for this part of my challenge.  I have a number of stamp sets on my shelf that I haven’t had a chance to play with yet.  I decided to go with the Vibrant Vases stamp set.  I wanted to keep the card fairly easy if possible.

Use a color I’ve rarely/never used.   I have to admit that Soft Sea Foam is not one of my favorite colors and I have not used it often or much at all.  My challenge then was to use it on my card.  It was easy to use the color on the background of the vase but I knew I needed it to be a major part of the card so I used it as the background for the focal point.  Since I had to use a color a didn’t really care for I figured I could use my favorite embossing folder (Subtle) with it.  Ha!  🙂

Try a layout I’m not real comfortable with.  As you can see, the focal point of my card is off to the left.  This was definitely out of my comfort zone.  I like things even and centered.  I liked this layout on the card that I showed you on Thursday and thought I should give it a try myself!

It was actually pretty fun challenging myself.  I need to do that a little more often.  Do you ever challenge yourself?  You should give it a try sometime!  Have a great day!  Take care and Happy Stamping!

Bright Abstract Impressions

Abstract Impressions.swapIt’s a dreary sort of day and we may get some snow later so I was thinking that we definitely need a bright and cheerful card today!

This swap card I received from Amy Combs definitely fits the bill!  What a great color combination!  Gorgeous Grape and Granny Apple Green.   Once again I can appreciate how people can put colors together that I don’t think of!  Doesn’t this card just make you smile?!

Amy used a stamp set that was new to the 2018-2019 Annual Catalog called Abstract Impressions.  It has some fun floral images as well as some some nice sentiments.

For the background Amy used the Swirls & Curls Textured Impressions Embossing Folder (#147923 $7.50) which carried over from the 2018 Holiday Catalog.  You can see a full list of all the items that carried over from the Holiday Catalog here.

I hope this card makes you smile and think Spring!  Have a great day!  Take care and Happy Stamping!

Petal Promenade Designer Paper

Petal Promenade DPHave you checked out the Petal Promenade Designer Series Paper in the Annual Catalog?  It is stunning!  There are photographed floral images on one side of the paper with marbled/textured designs on the other side. GORGEOUS!

I suppose part of the reason I like this paper so much is that a lot of the images are PINK!  Ha!

Today’s card is another swap card I received.  This card is from Tracy Filter.  Lovely.  The card is perfect for an anniversary or even a Petal Promenade swapwedding with a different sentiment.

The stitched heart outlines from the Be Mine Stitched Framelits in the Occasions Catalog work perfectly with this beautiful paper.  I will definitely have to try this combination on a project.

I also like the design of Tracy’s card.  I like the way she has the focal point to the left of the card front.  Knowing me, I would have centered the image.  I need to learn to think outside the box.  How about you?  Do you find yourself in the same rut when designing your projects?  I’m going to try harder to change things up.  As I mentioned yesterday I need to design a card for Saturday.  This will be the perfect time to try something new.  I’ve already challenged myself to use Soft Sea Foam on my card.  I don’t think I’ve ever used that color.  Can you believe it?  Now I just need to figure out the rest of the card!  Ha!

Have a great day!  Take care and Happy Stamping!


Hello Cupcake and Gingham Gala Paper

Hello Cupcake swapWoo Hoo!  The Gingham Gala Designer Series Paper is back in stock!  There’s just something about gingham that makes me smile.  Pair gingham with a cupcake and look out!  🙂

This is another card I received in the swap I participated in.  This card is made by Sandy Carlson.  Isn’t it sweet?  Not only did Sandy pair gingham paper and a cupcake she also paired the colors Balmy Blue and Lemon Lime Twist.  I love when someone uses a color combination that I never dreamed of using.  I do really need to work on that.  I’m always gravitating towards the same colors and color combinations.

I actually need to put on my designer thinking cap.  My demonstrator friends and I are getting together on Saturday for a Shoebox Swap and I haven’t even begun to think of a card.  I’ve got a few more days, right?  😀

Sandy cut out the cupcake and the wrapper by hand.  Lot’s of work for more than a few cards.   Had Sandy waited a few months to make this card she would have been able to die-cut these pieces.  Yep.  That’s right.  The Call Me Cupcake Framelits will be available in March for one month only.  Although, as a demonstrator Sandy could have purchased them this month.  I do have my Call Me Cupcake Framelits but I haven’t had a chance to play with them yet.  Soon….very soon.

Well, I need to finish my paper work and start designing a card for Saturday.  Have a great day.  Take care and Happy Stamping!


Bloom By Bloom and Masking

During 2018 I participated in a swap.  Every month we had to design a card and mail 13 of them  to the organizer of the swap.  It was a great way to get new ideas.  Unfortunately it was quite time-consuming.  I did love to get the cards though.  There were some great ideas!

Bloom by Bloom SwapIn December most of the swap cards I received used items that were coming in the new 2019 Occasions Catalog.  Today’s card is one of those swaps.  This card was designed by Brenda Cardinal, the organizer of the swap.

I love Brenda’s card because it is so clean and bright.  From the picture it looks like Brenda stamped the flowers on the large piece of cardstock and then stamped the sentiment on a small piece of white cardstock, layered it on the red and adhered it over the flowers.  This is NOT what she did.  She used the Masking Technique.  (It’s Technique Tuesday….of course I wanted to share a technique!)

Brenda actually masked the large piece of Whisper White cardstock before stamping the flowers.  She probably took a strip of computer paper (about 1″) and using removable adhesive adhered it to the Whisper White cardstock.  She then stamped the flowers making sure to overlap onto the Whisper White carstock.  Once she was done stamping the flowers she removed the computer paper and stamped here sentiment in the open white space.  To finish off the card she then cut two 1/8″ strips of the red cardstock and adhered them to the edges of the masked area.

Simply beautiful!  I can’t wait to recreate this card sometime!  Besides the bright, fun colors Brenda used I think I like the way she finished off the masked area with the skinny strips of cardstock.

Here are the products that Brenda used on the card (to the best of my knowledge…)

Stamp Sets:  Boom by Bloom (#148820 $17)    Incredible Like You (#148708 $17)

Ink Pads:  Lovely Lipstick (#147140 $7.50), Daffodil Delight (#147094 $7.50),                                  Balmy Blue (#147105 $7.50) and Night of Navy (#147110 $7.50)

Cardstock:  Whisper White (#100730 $9.75) and Lovely Lipstick (#146970 $8.50)

Have a great day!  Take care and Happy Stamping!

Back From Breckenridge

We love going to our time share in Breckenridge.  We’re usually get the same week every year….right after the Super Bowl.  🙂

breck1.0219Since her daughter moved here to Colorado my cousin Sally and her husband Joe have joined us for the weekend of our stay.  Sally and Joe are my son Kyle’s godparents so he came up for the day on Saturday. (Kyle is the tall one in the back).

When we’re in Breckenridge we ski (I haven’t for a few years…), shop, hit the wine bar in town and dine out.  Sally and I enjoy just relaxing in the condo watching HGTV.  I actually watched HGTV all week.  It was great.  I love the shows and I don’t watch them at breck2.0219home so it’s fun to binge on them in Breck.

After my cousin left the guys from the neighborhood came up to ski with my husband Mark.  It’s always a fun time.  If you’ve never been to Breckenridge you should try to get there.  It’s a fun little town and there is stuff to do all year long.

Now it’s back to reality and no HGTV.  Time to get things done around here!  Have a great day!  Take care and Happy Stamping!

breck3.0219

CASEing and the Meant To Be Bundle

Meant to BeLast but not least….the final card from my group’s Winter Stamp Camp.  Tammie’s lovely card is made with the Meant To Be Bundle and all of those fun hearts!

Simple, yet elegant.  The only stamping on the entire card is the little sentiment.  Die cut hearts, a little bit of ribbon, some layers and you have a lovely card.

Do you know what CASE means in the stamping world?  It means Copy And Share Everything.  We as stampers love to look at each other’s cards.  When we CASE or copy someone’s card it’s not that we’re too lazy to come up with our own idea….we just love the card someone else made.  Many times, as Tammie did here, we just CASE or copy the layout/design of the card.

Create-a-valentine-using-Stampin-Up-Be-Mine-Stitched-Framelits-Dies-Meant-to-Be-Stamp-Created-by-Mary-Fish-StampinUp-768x768Tammie CASEd a card made my fellow demonstrator Mary Fish.  You can see how Tammie used the same basic elements and a similar design on her card yet it’s her own.  That is what I like to do when I get inspired by someone else’s card.  I start with their card and then make it my own.

Do you get inspired by other stamper’s projects?  I know I do.  When I post someone else’s project on my blog or Facebook page or if I CASE someone’s project I like to give them the credit.  It’s almost a form of flattery to have your project CASEd.

I hope you’ve enjoyed all of the Stamp Camp projects I’ve shared.  I’m heading up to the mountains for a week later today so next week’s posts may be a little sporadic.  I’ll definitely be back in full force on Monday the 18th.  Have a great day.  Take care and Happy Stamping!