We all should really work smarter, not harder in whatever we do. Life is too short to do otherwise. Why “reinvent the wheel” when you can just change things up a little. In today’s blog post I want to show you how I made 5 similar, yet different cards with one design.
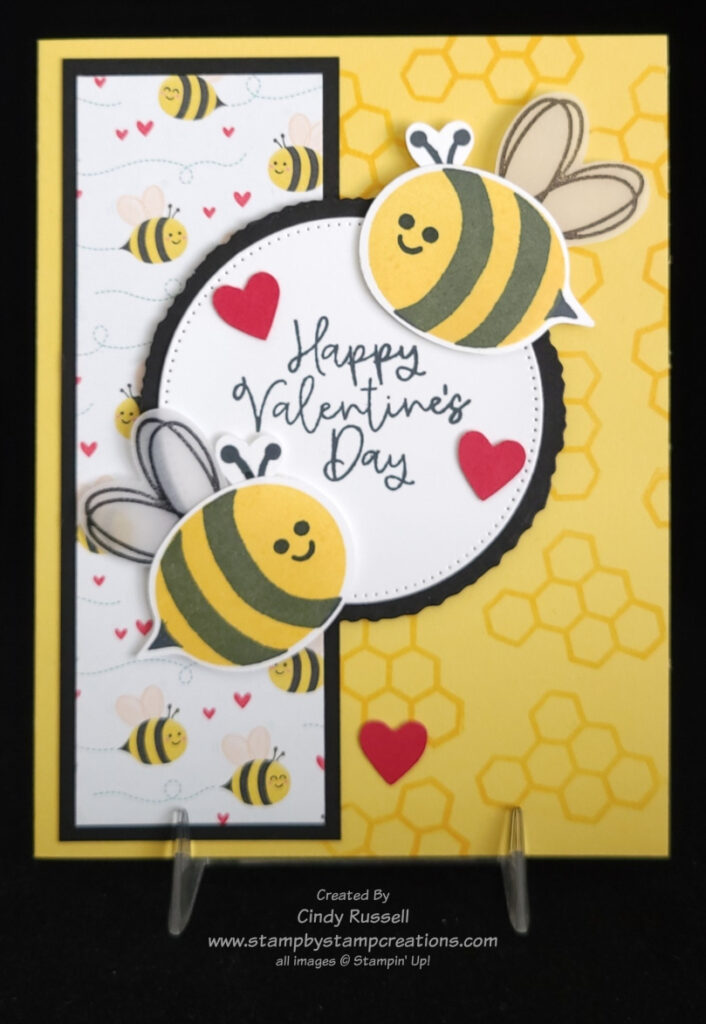
This is the card I started with. It’s one we’re making in class this week. (Actually, I got the idea from a friend, but we won’t go into that. 😊) It’s an easy Valentine card made using the Bee My Valentine Bundle and the coordinating Bee Mine Designer Series Paper. Such fun products! These little bees are adorable!
In the second photo, you can see all five of the cards I made. Once I got started, I could barely stop. I wanted to see how many different designs I could come up with. Alas, life got in the way, and I had to move on to other things that needed to get done.
The two cards in the first column look the same, but if you look closely, you can see that the bottom one is a gate fold card that opens in the middle. The two cards in the middle column are similar. They look alike, but the bottom one is a gate fold card.
I have five cards from one main design. I’ve worked smarter, not harder! What a great idea! I need to do this more often! How about you? Have a great day! Take care and Happy Stamping!
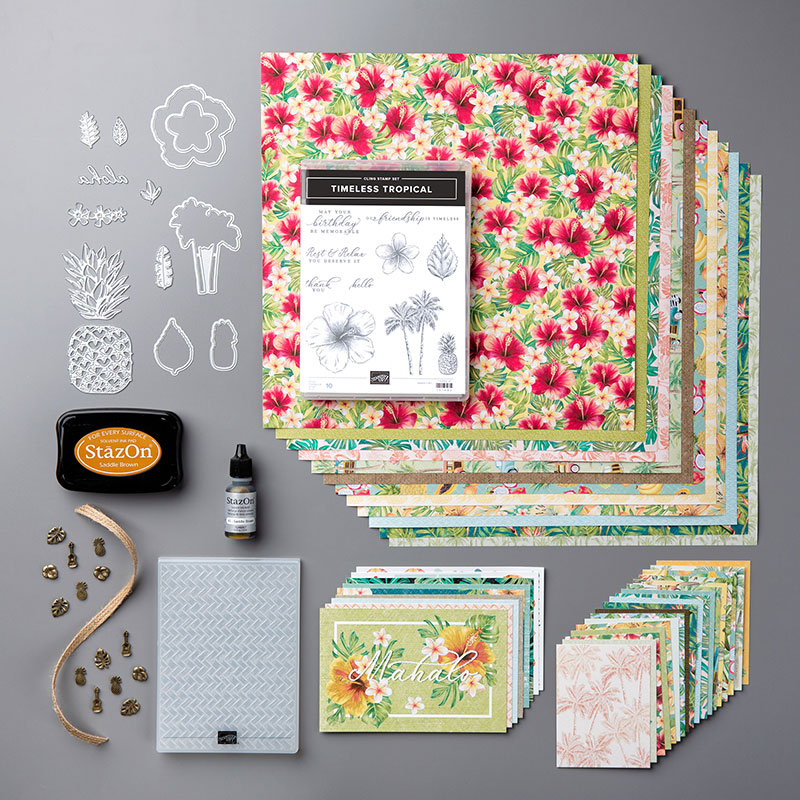
No, I’m not in Hawaii nor am I going to Hawaii in the near future….I just made a card that made me wish that I was in Hawaii! Ha! The Tropical Oasis Suite will definitely make you think of a tropical vacation.
Tropical Oasis Suite
Oh, my! Check out all of the goodies in this bundle! Stamp set, dies, designer series paper, trinkets, braided trim, embossing folder, new ink and Memories and More cards! Wow! You will love these products! They all coordinate and make you think tropics!
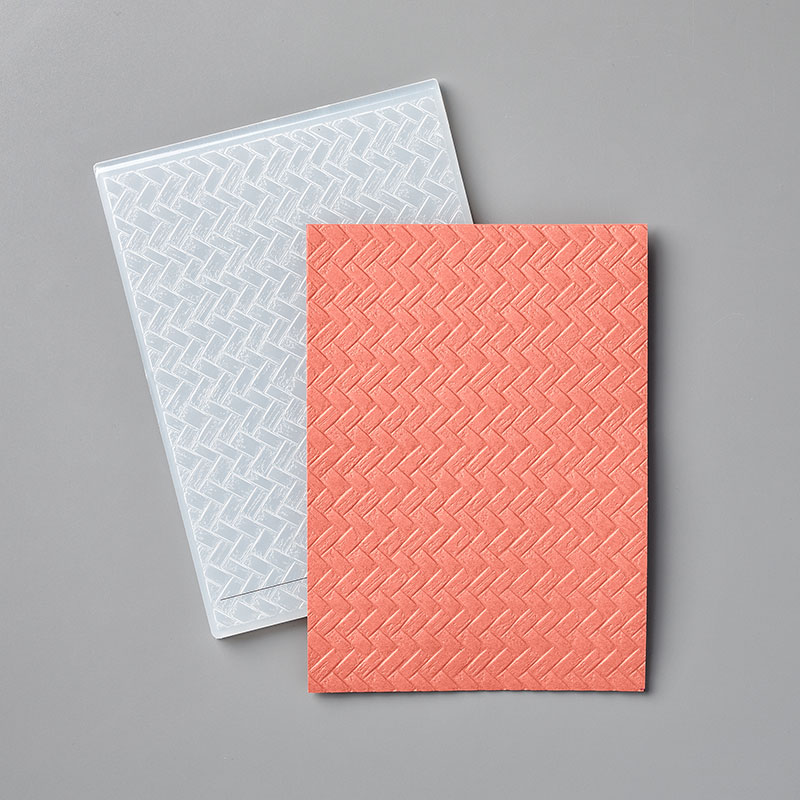
I think my favorite product in the suite (at this point, anyway…) is the embossing folder. It’s called Coastal Weave. Check it out:
Coastal Weave Embossing Folder
Now, I can’t tell you all about this fabulous suite of products without sharing a project with you! This was my first project made with this suite and I only used the stamp set, dies and of course the embossing folder from the suite on it. It kind of makes you want to head on over to a tropical island and walk on the beach.
Timeless Tropical Project
I must have a thing about trees. If I see a stamp set with a tree I really want it. These palm trees are what called to me when I first saw this stamp set….them and the gorgeous flowers.
To make the sandy beach I took a strip of Crumb Cake cardstock and tore one of the long edges. Then I took a Stampin’ Sponge and lightly dabbed on some Soft Suede ink. It’s hard to tell from the picture but I also did a little sponging on the sun to add a little depth to it. The trees are stamped in the Soft Suede ink and then colored with a Dark Old Olive Stampin’ Blend Marker and a Light Soft Suede Stampin’ Blend Marker.
Ah….Tuesday’s Tip! You don’t just have to use Memento Tuxedo Black ink to stamp your images before coloring them with your Stampin’ Blend Markers. You can use any Stampin’ Up! ink pad! All of the Stampin’ Up! colored ink pads are water-based just like the Memento Tuxedo Black ink pad is!
If you haven’t heard this before, the reason you need to use a water-based ink pad is because the Stampin’ Blend Markers are alcohol-based. You want to use the opposite type of ink pad. If you used a StazOn ink pad which is alcohol-based with your Stampin’ Blends your images would smear since both the ink pad and the markers are alcohol-based. The same goes when you’re water-coloring your stamped images: you want to use an alcohol-based ink pad so when you watercolor the ink won’t bleed.
Dimensions: Crumb Cake card base: 5 1/2″ x 8 1/2″ scored at 4 1/4″, 3 1/2″ x 1 1/2″ Soft Suede: 5″ x 3 3/4″, scrap Pool Party: 4 3/4″ x 3 1/2″ Whisper White: 5 1/4″ x 4″, 2 3/4″x 3 3/4″ So Saffron: scrap
I hope you have a warm and tropical kind of day! Take care and Happy Stamping!
During 2018 I participated in a swap. Every month we had to design a card and mail 13 of them to the organizer of the swap. It was a great way to get new ideas. Unfortunately it was quite time-consuming. I did love to get the cards though. There were some great ideas!
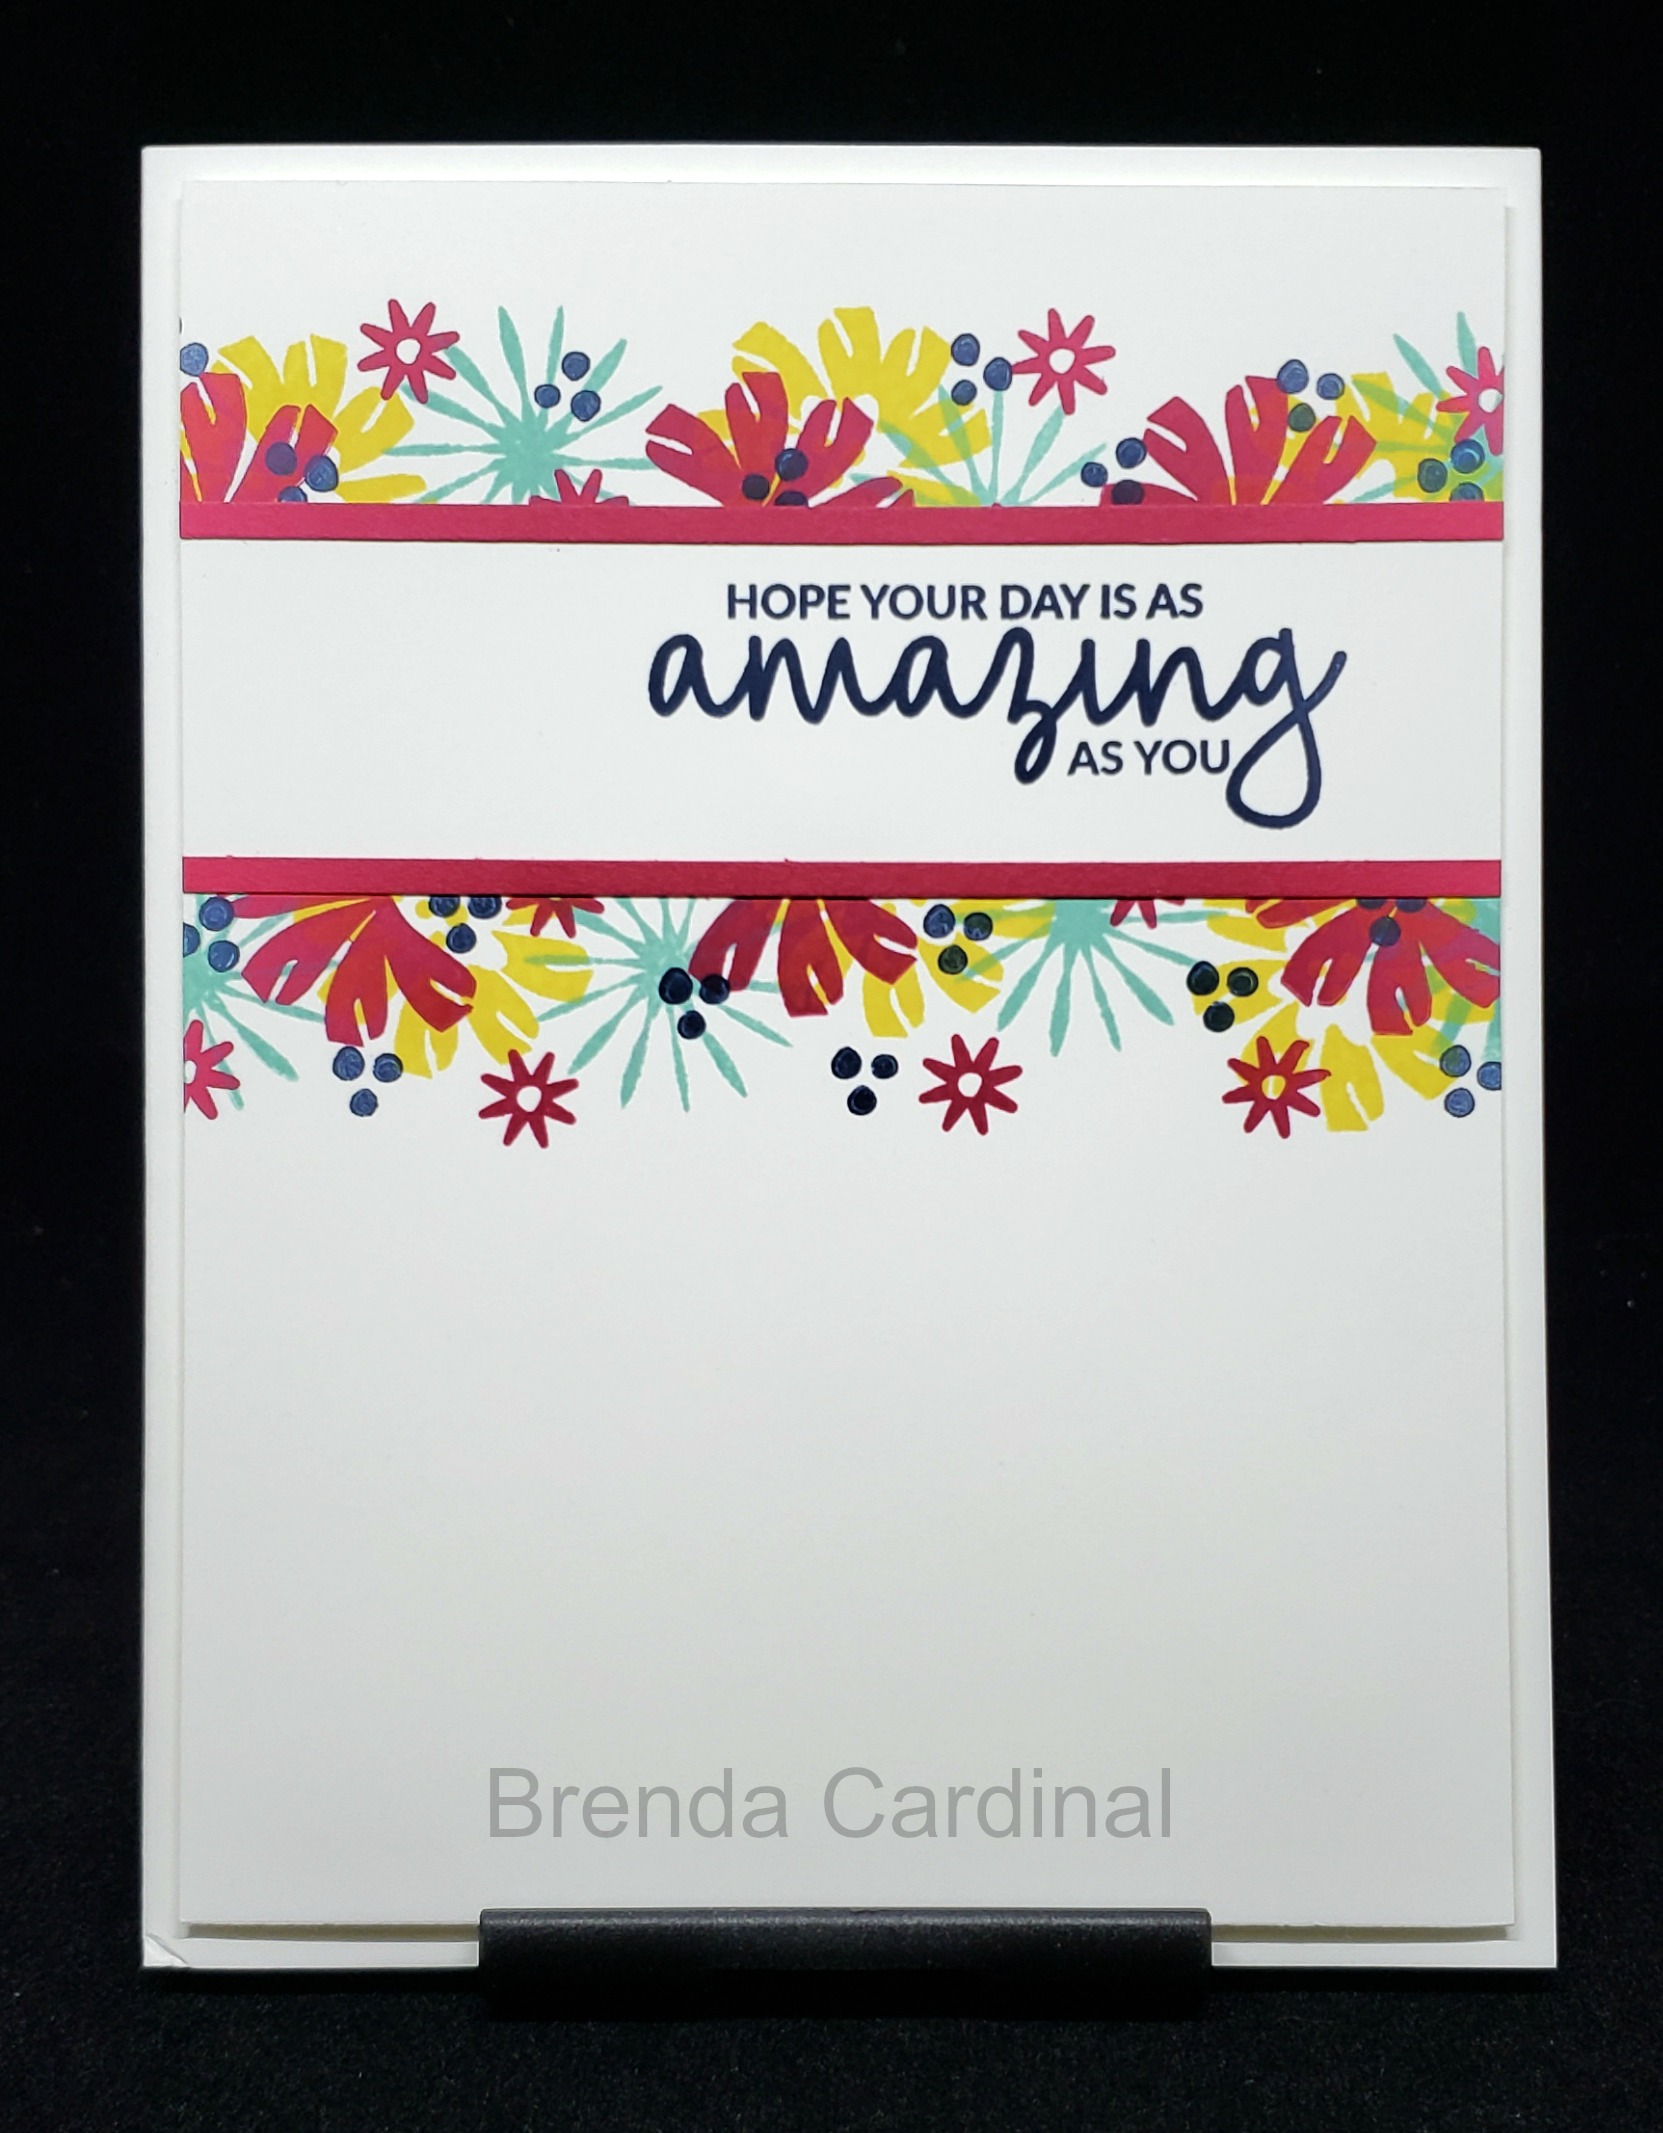
In December most of the swap cards I received used items that were coming in the new 2019 Occasions Catalog. Today’s card is one of those swaps. This card was designed by Brenda Cardinal, the organizer of the swap.
I love Brenda’s card because it is so clean and bright. From the picture it looks like Brenda stamped the flowers on the large piece of cardstock and then stamped the sentiment on a small piece of white cardstock, layered it on the red and adhered it over the flowers. This is NOT what she did. She used the Masking Technique. (It’s Technique Tuesday….of course I wanted to share a technique!)
Brenda actually masked the large piece of Whisper White cardstock before stamping the flowers. She probably took a strip of computer paper (about 1″) and using removable adhesive adhered it to the Whisper White cardstock. She then stamped the flowers making sure to overlap onto the Whisper White carstock. Once she was done stamping the flowers she removed the computer paper and stamped here sentiment in the open white space. To finish off the card she then cut two 1/8″ strips of the red cardstock and adhered them to the edges of the masked area.
Simply beautiful! I can’t wait to recreate this card sometime! Besides the bright, fun colors Brenda used I think I like the way she finished off the masked area with the skinny strips of cardstock.
Here are the products that Brenda used on the card (to the best of my knowledge…)
Stamp Sets: Boom by Bloom (#148820 $17) Incredible Like You (#148708 $17)
Ink Pads: Lovely Lipstick (#147140 $7.50), Daffodil Delight (#147094 $7.50), Balmy Blue (#147105 $7.50) and Night of Navy (#147110 $7.50)
Cardstock: Whisper White (#100730 $9.75) and Lovely Lipstick (#146970 $8.50)
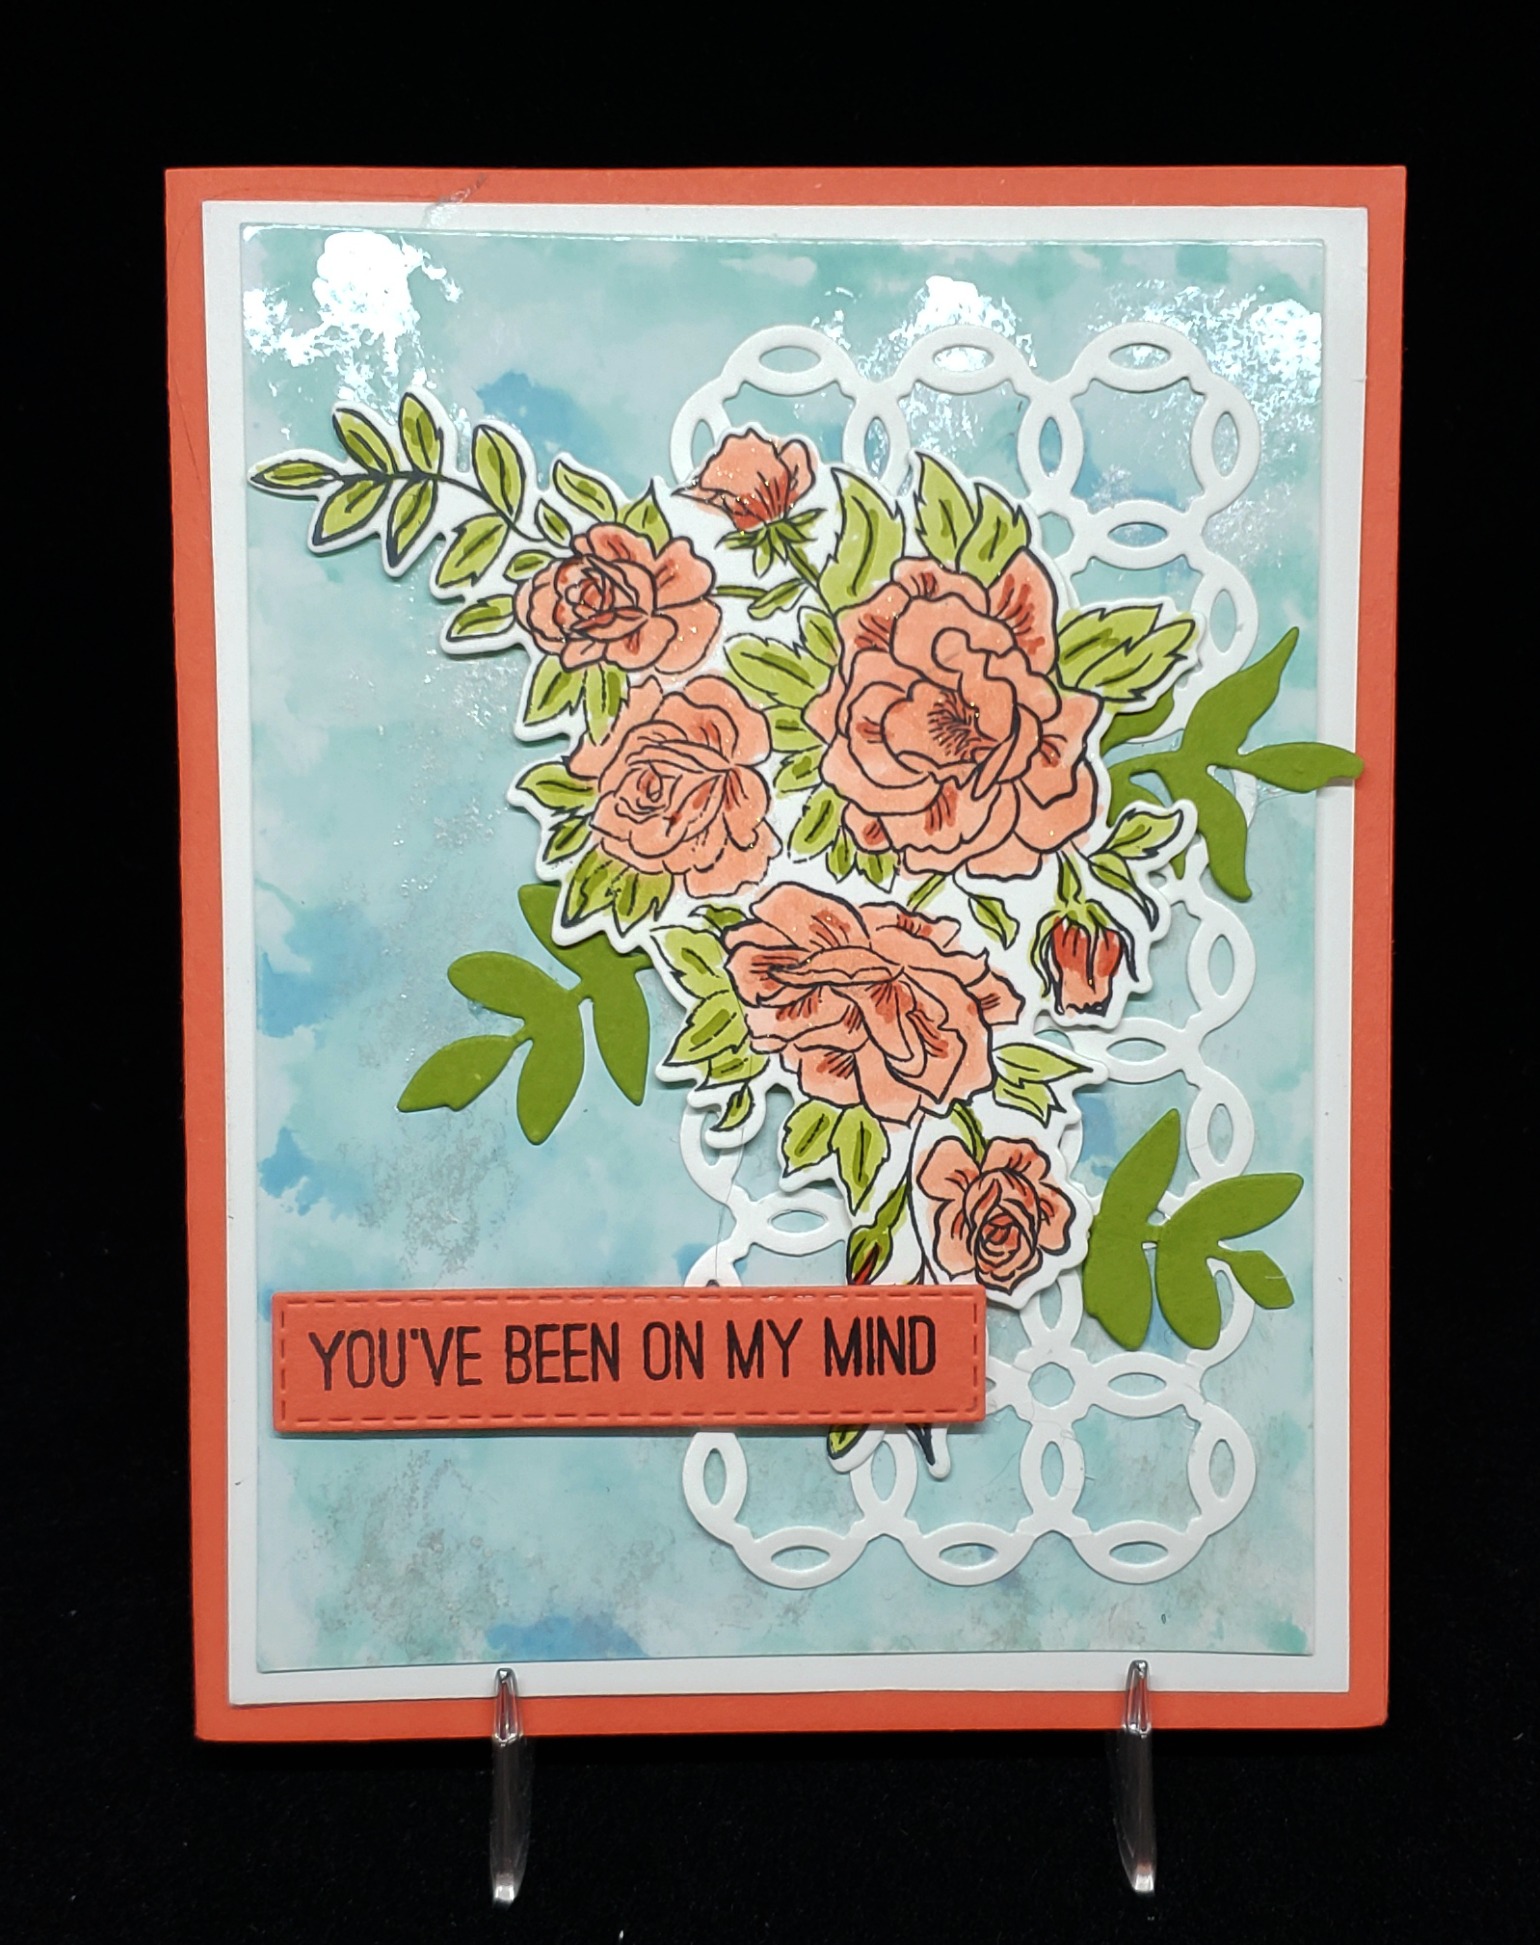
I’ve shared almost all of the projects from Stamp Camp. Haven’t they been great? Today’s project was designed by Laura C. Laura combined the beautiful Climbing Roses Bundle with the Polished Stone Technique on the background.
The Polished Stone Technique is an oldie but goodie. For this technique you need Glossy White cardstock, cotton balls, rubbing alcohol, ink refills and if desired, shimmer paint. To make your background you dampen the cotton ball thoroughly with alcohol. Add 2-3 drops of each of the colored ink refills you have chosen (only choose a few or the background will look muddy) . Dip a toothpick in the shimmer paint and dab on the cotton ball. Pounce the cotton ball all over the Glossy White paper. The alcohol will spread the ink and shimmer. Use a dry cotton ball to remove excess ink for a softer look. Let dry. You can get some amazing looking backgrounds with this technique. I think the background can look just as amazing without the shimmer paint. It all depends on how much shimmer you want on your card.
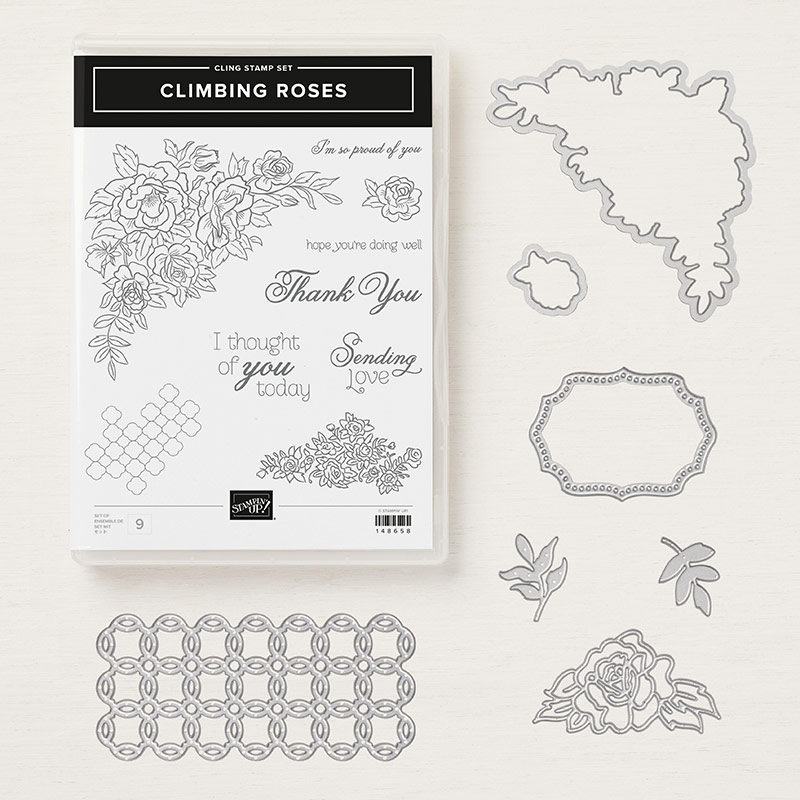
Isn’t this a lovely card? The trellis die really adds to the card doesn’t it? There are some really nice dies in the Rose Trellis Thinlits set and some great sentiments in the Climbing Roses stamp set. Definitely a must have…..I should probably put it on my next order…. 😮
Of course I didn’t think I needed the Velvet Paper that you can find in the Snowflake Showcase. Sure, you can use it to make pretty snowflakes but what else can you use it for? A person can make only so many projects with snowflakes on them even during the winter….and how can you use this gorgeous paper with the Happiness Surrounds stamp set in the showcase if you’re not making snowflakes?
Well, have I got a tip for you on Tip of the Day Thursday!
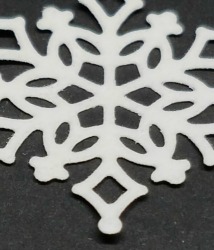
First of all, the paper is soft and fuzzy. Naturally you can’t see it in the photos but it is. I tried to get a close-up picture where you could see the fuzzy but I’m not sure it turned out all that well. My apologies.
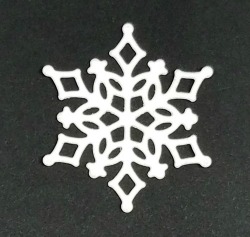
The velvet paper does make gorgeous snowflakes but did you know that you can add color to it? Yep! You can make your white velvet paper ANY color you want and quite easily too!
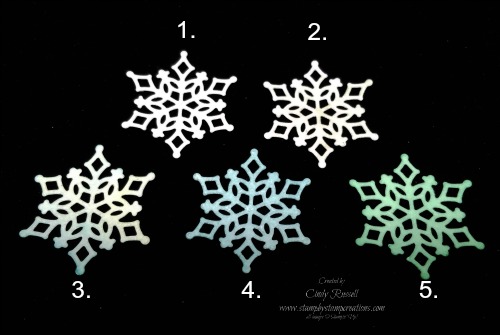
Here is a photo of 5 different snowflakes and as in real life, no 2 are alike.
This is the original, unaltered velvet snowflake.
Hard to tell from the photo but this is a sparkly snowflake. I simply took my Wink of Stella Glitter Brush and lightly brushed it over my die cut velvet snowflake. It adds just the perfect touch of sparkle to the snowflake.
I colored this snowflake with my Aquapainter and Balmy Blue ink. I picked up a little bit of ink from the lid of my ink pad and brushed it over the snowflake. What I like about this method is that the color doesn’t go on evenly. The thing to remember is that it dries a lot lighter than when it goes on.
This snowflake is colored with a sponge brayer. I inked up my brayer and rolled it over the die-cut snowflake. With this method it’s easy to get just the right amount of color that you want.
This last snowflake is colored with a Stampin’ Blend Marker! Yep. Just use the brush tip of your marker and you can change the color of your snowflake. Easy-Peasy! (I used the Light Pool Party Stampin’ Blends Marker because they don’t make a Balmy Blue one.)
What do you think of today’s tip(s)? I was pretty excited when I discovered that you could change the color of the Velvet Paper. And of course this means that you can use any type of die on any type of project! Amazing! 🙂
Have a great day! Take care and Happy Stamping!
OH! Don’t forget that today is THE DAY that you can start ordering the Snowflake Showcase!
So…it’s actually Wednesday today. I had this post all ready to go for yesterday and managed to not actually schedule it to post. Sheesh! Well, now you can enjoy Technique Tuesday on Wednesday! 🙂
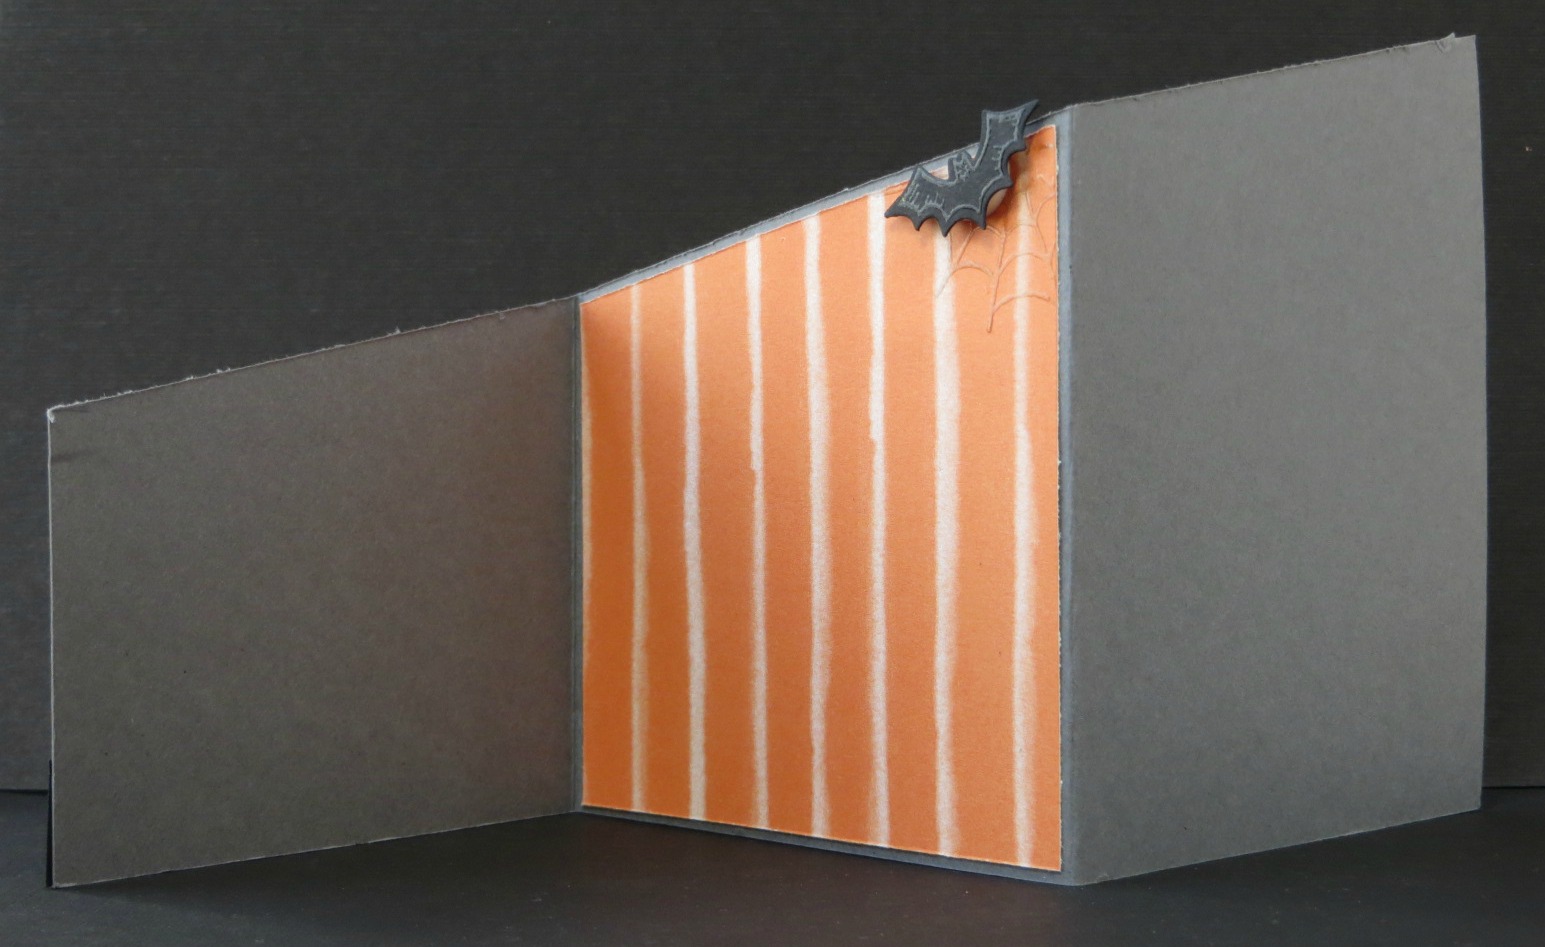
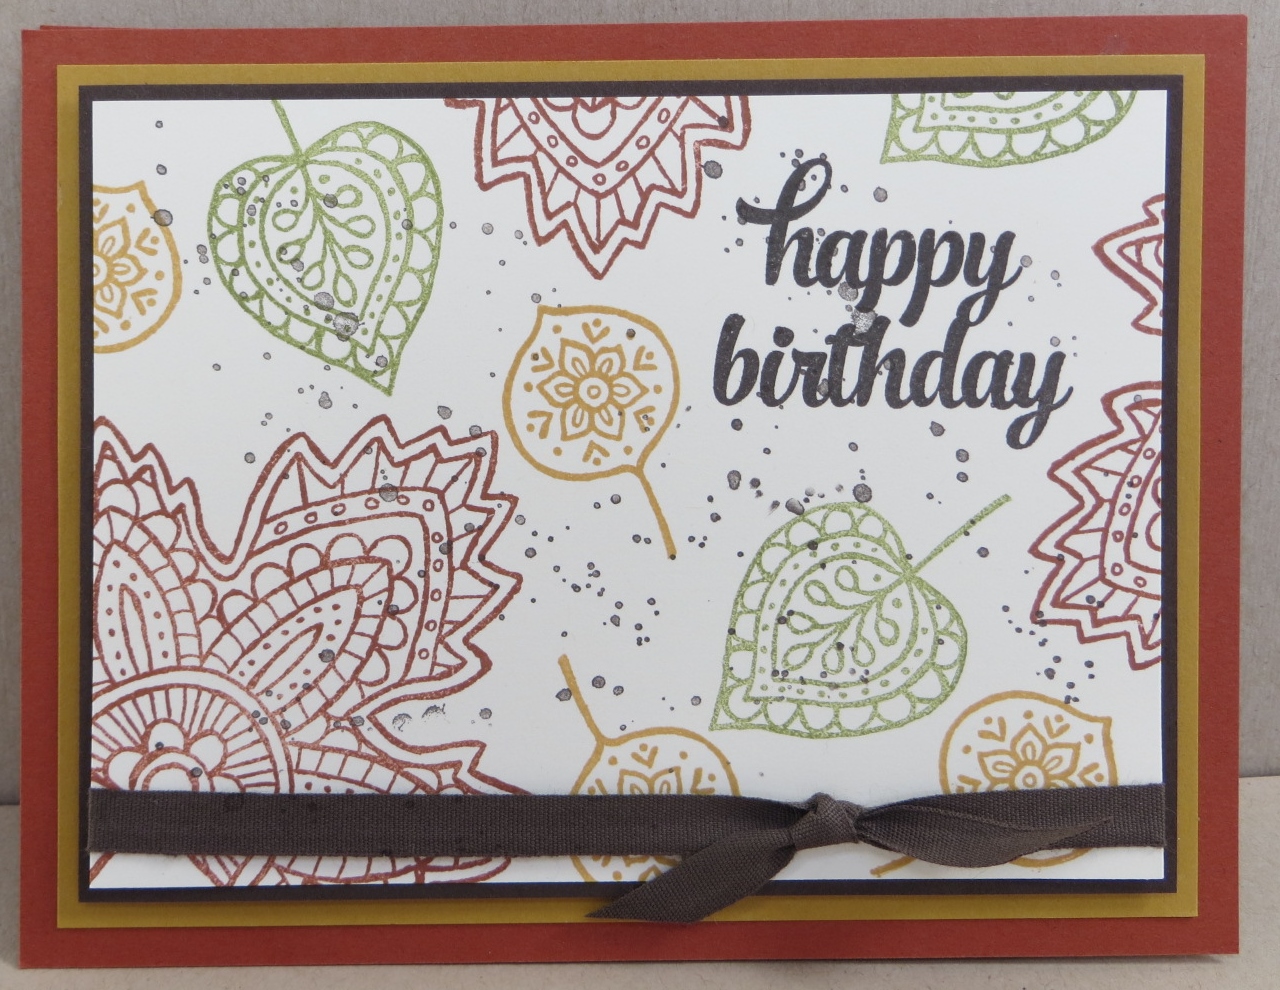
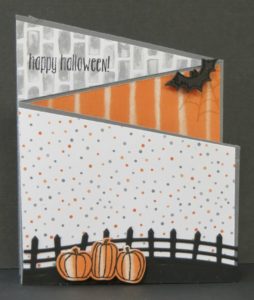
Isn’t this card fun? I received in a swap. Thank you Jennifer Pukah!
This card is so cute and so easy to make! You do need to start with a 12″ x 12″ piece of card stock. Cut it to 5″ x 12″. Mark one short end at 2 1/2″. Now draw a line from the corner of the 5″ end down to the mark you just made. Trim along line to make the angle of the card.
Score card stock at 4″ and 8″. Make a valley fold at the 4″ mark and a mountain fold at the 8″ mark. Your Z-fold card is done! Now you just need to decorate!
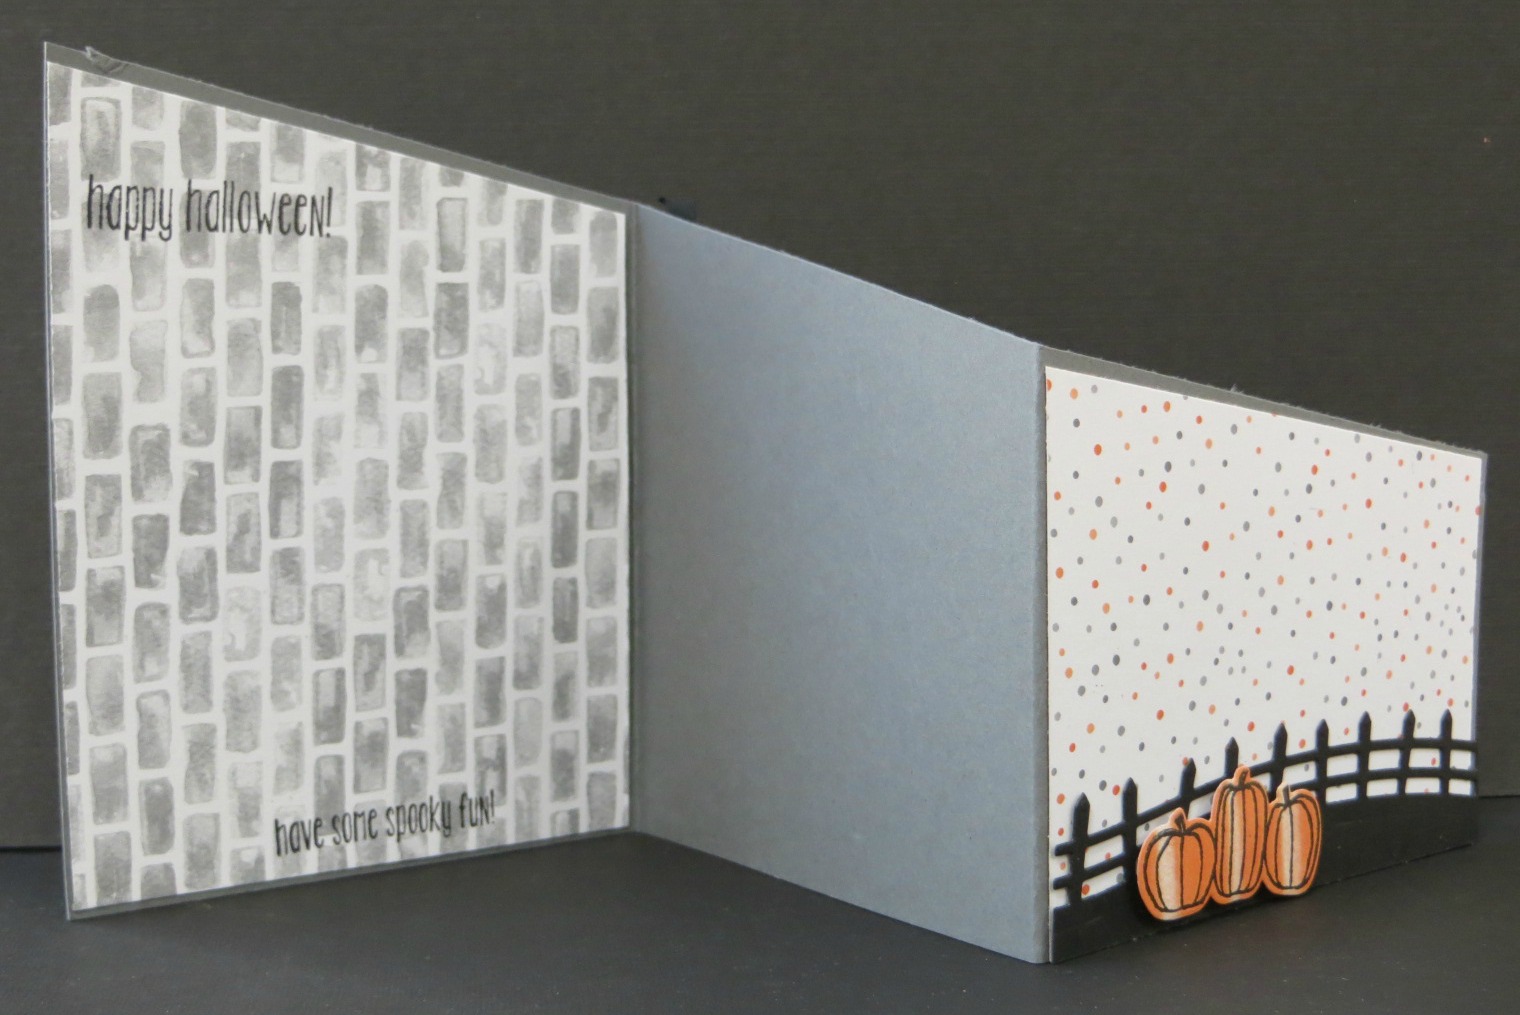
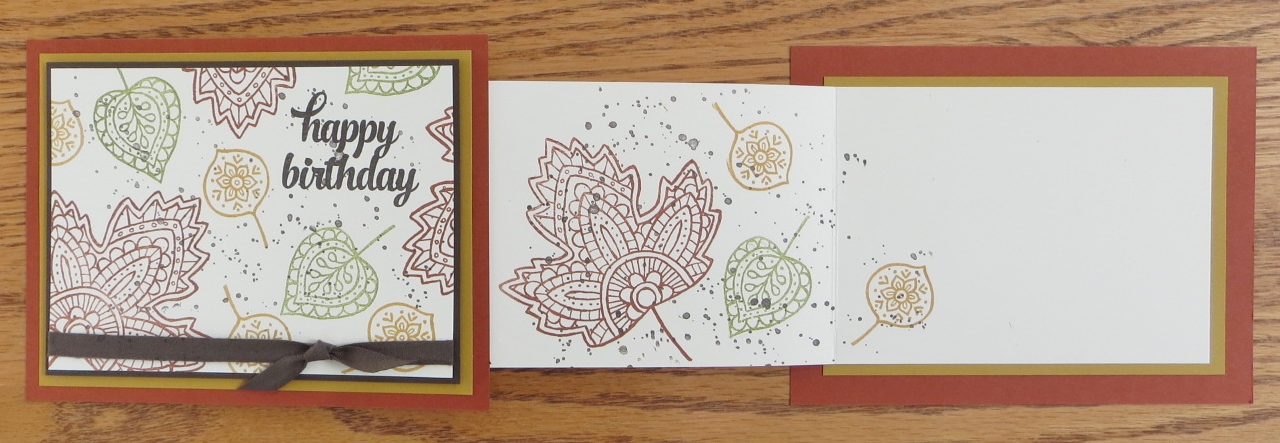
Notice in the other pictures I’ve included that on one side of the card you decorate the first and third panels and on the opposite side you decorate the middle panel.
I’m definitely going to have to design my own Z-fold card. They’re so fun!
Have you checked out the Halloween Night Designer Series Paper yet? There are so many cute patterns I can’t even choose which one is my favorite. How about you?
Have a wonderful day! Take care and Happy Stamping!
Have you fallen in love with the Thoughtful Branches stamp set and the coordinating Beautiful Branches Thinlits yet? I know I mentioned this during my Thoughtful Branches Week of posts but I LOVE these products! They are SO gorgeous and versatile.
There’s only ONE week left to purchase these fabulous products! Don’t miss out!!!!!! Purchase yours TODAY!
I think these three trees are my favorite image. Do you remember the first card I showed you made with this bundle? Well, I tried to recreate it and just couldn’t do it justice so I took the basic idea and ran with it. This is what I came up with. I know…it’s not even close to the original….what can I say…
I do love how the sky turned out. I first stamped the trees on watercolor paper with Basic Black Archival Ink. Then I took my Aqua Painter and “washed” water over the whole piece of paper. After I did that I added Dapper Denim ink to the paper with my Aqua Painter. The “wash” of water helps your inks spread and that’s how I got the fun look of the sky. Isn’t that a neat technique? And to make it even more lovely I added a layer of glimmer with my Clear Wink of Stella Glitter Brush!
Don’t forget….only ONE Week left to order this fabulous bundle! Shop now so you don’t miss out! Have a great day! Take care and Happy Stamping!
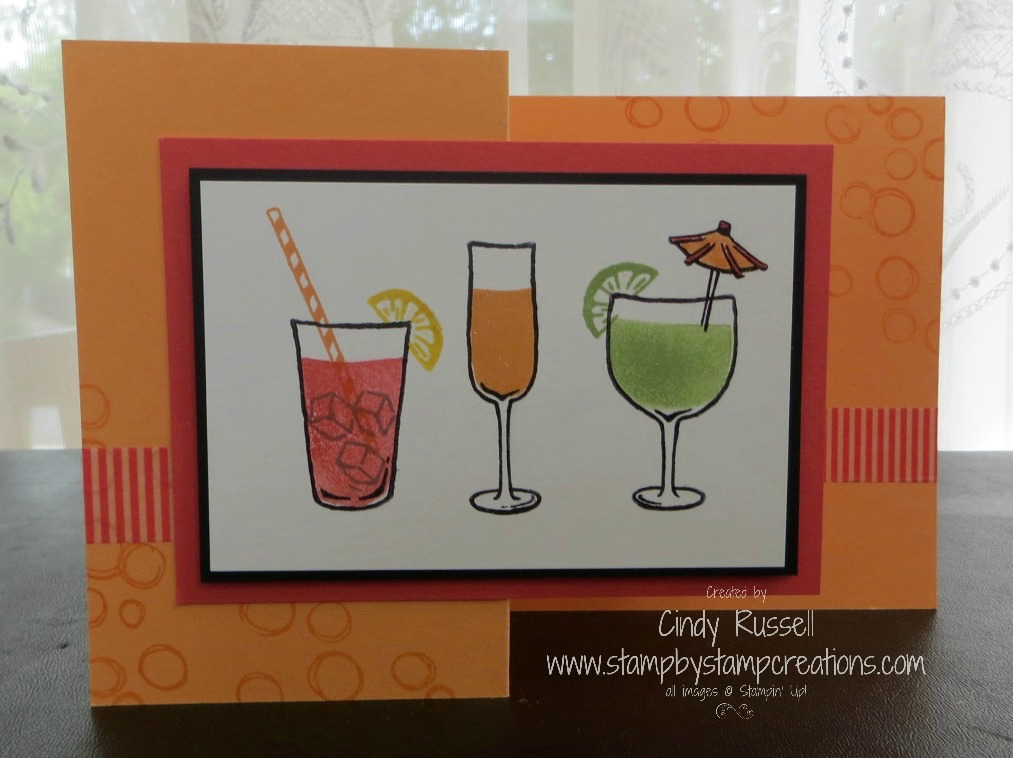
It’s Happy Hour! OK…maybe it’s a little early as I’m writing this but as the saying goes “It’s 5 o’clock somewhere”! I’ve had the fun Mixed Drinks stamp set for a while and decided it was finally time to open it up. Of course once I did I needed to figure out what to make with it. There are a lot of cute ideas out there on the internet but I decided to go with a fun fold…a Z card!
Once again I got the basic idea for the card from someone else out there and changed up just a little thing or two. Really, why reinvent the wheel? Thank you Claudia from Germany!
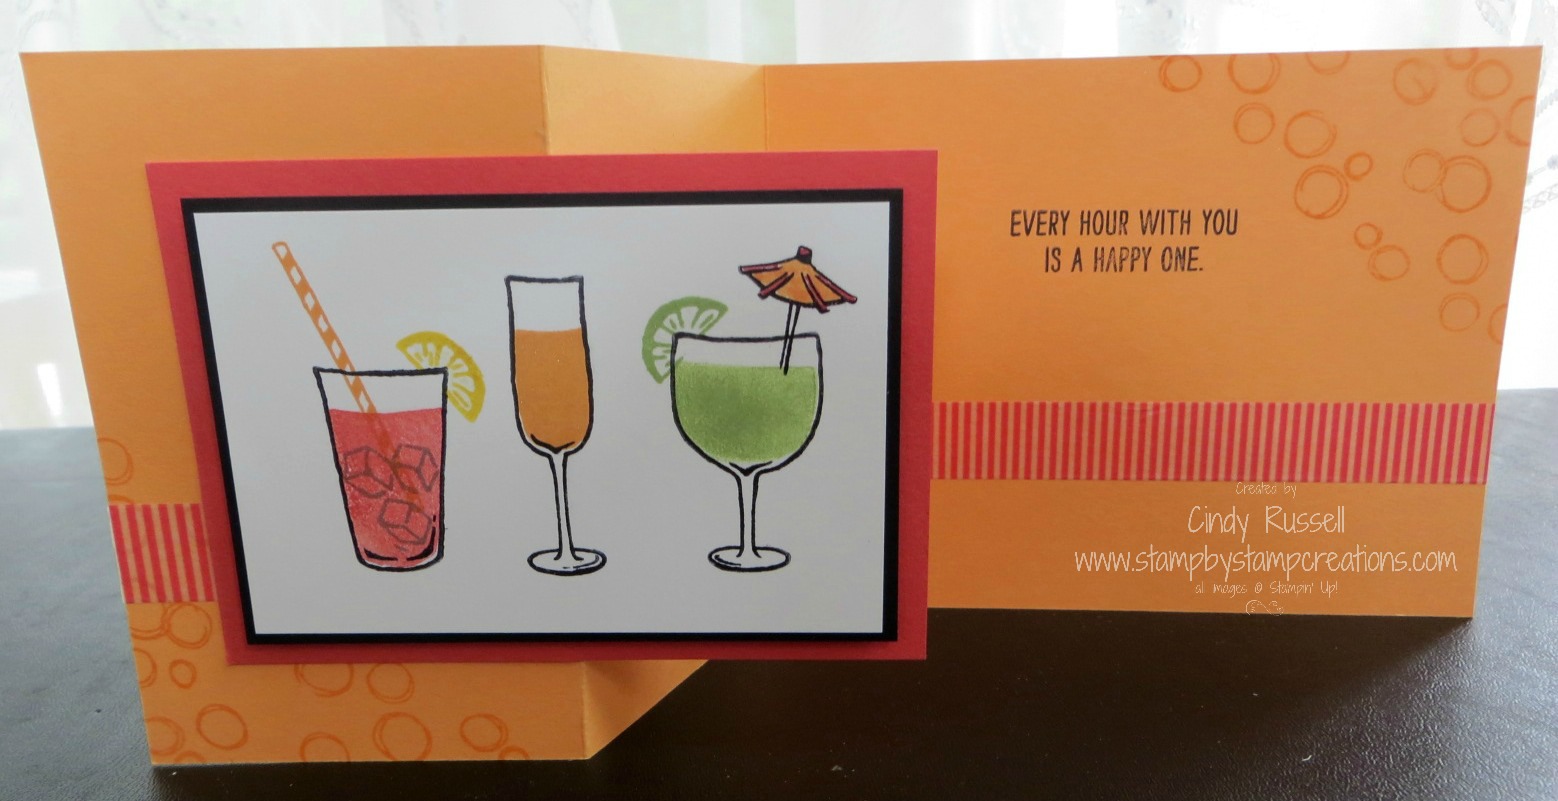
A Z-fold card is pretty simple. Start with a piece of card stock 4 1/4″ x 11. Score at 5 1/2″ and then at 2 3/4″. You’ll fold the card in half at the 5 1/2″ mark and then you flip back the top of the front piece at the 2 3/4″ mark. When you add the focal point to the front of the card just be sure to only adhere it the 2 3/4″ section or you won’t be able to open your card. Ha! You also want to be sure to stamp your sentiment in the area that will be hidden by your front focal point when the card is closed. Those are the only little tricks that you need to know to make a Z-fold card.
I’d love to see examples of Z-fold cards that you create. Send me a photo! I’d love to see what you come up with! Have a great day! Take care and Happy Stamping!
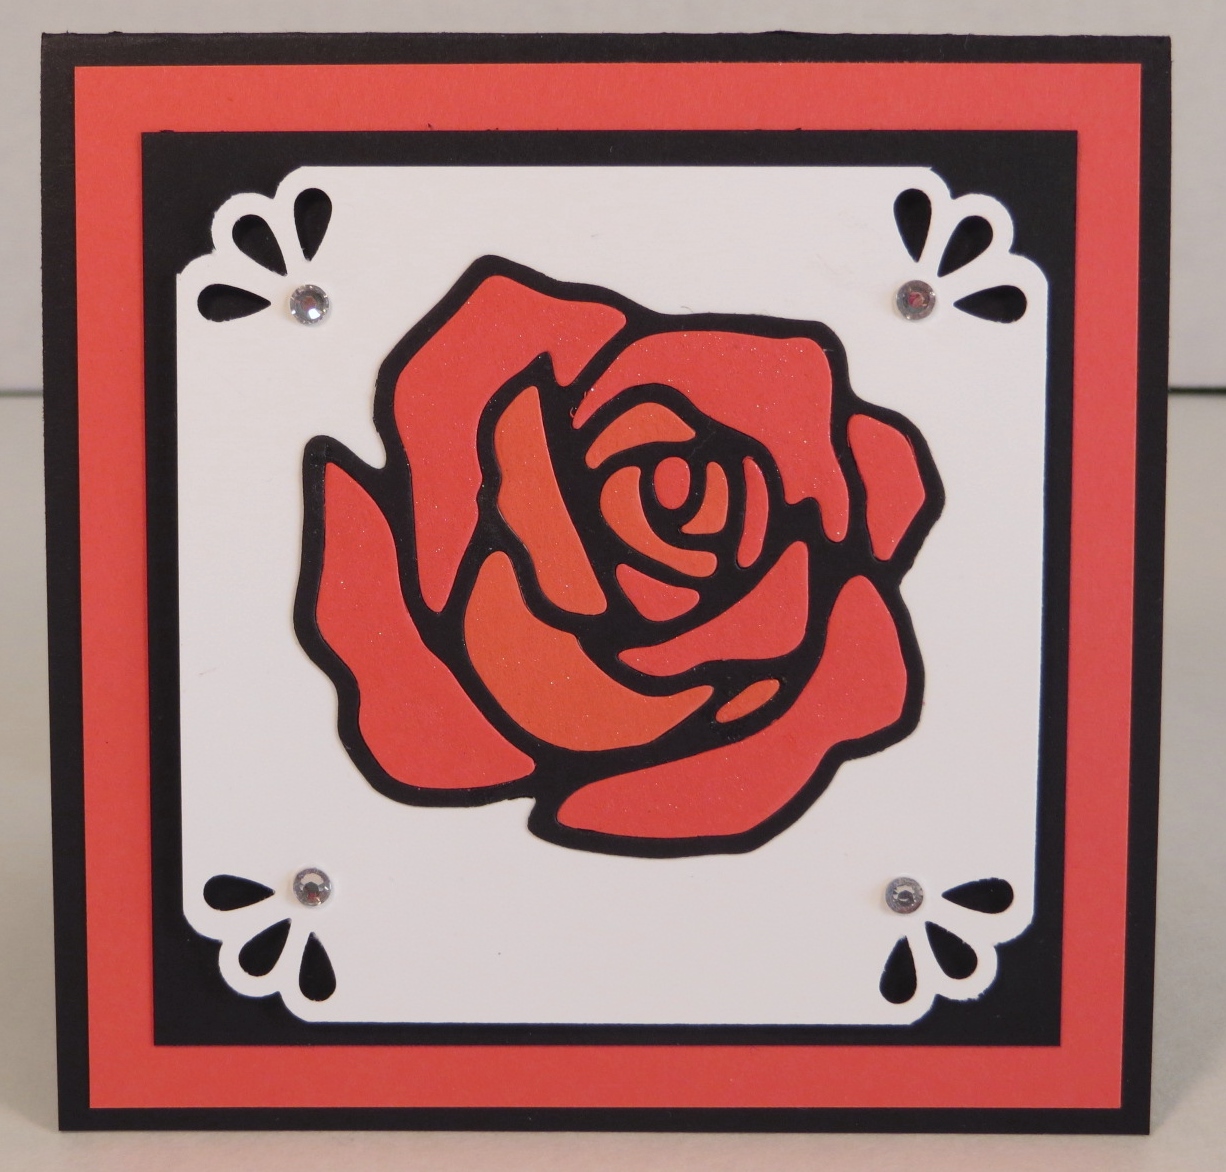
It’s the second day of sun! Woo Hoo! The snow is gone and Spring is finally here (for now…)! It’s time to celebrate with another flower card!
Not only do I have a flower card for you today but I also have a new technique and a little trick to make it easier for you. I’m not sure of the official name (if there is one) for this little technique but I’ve heard it called the Puzzle Technique so that’s what I’m calling it. 🙂
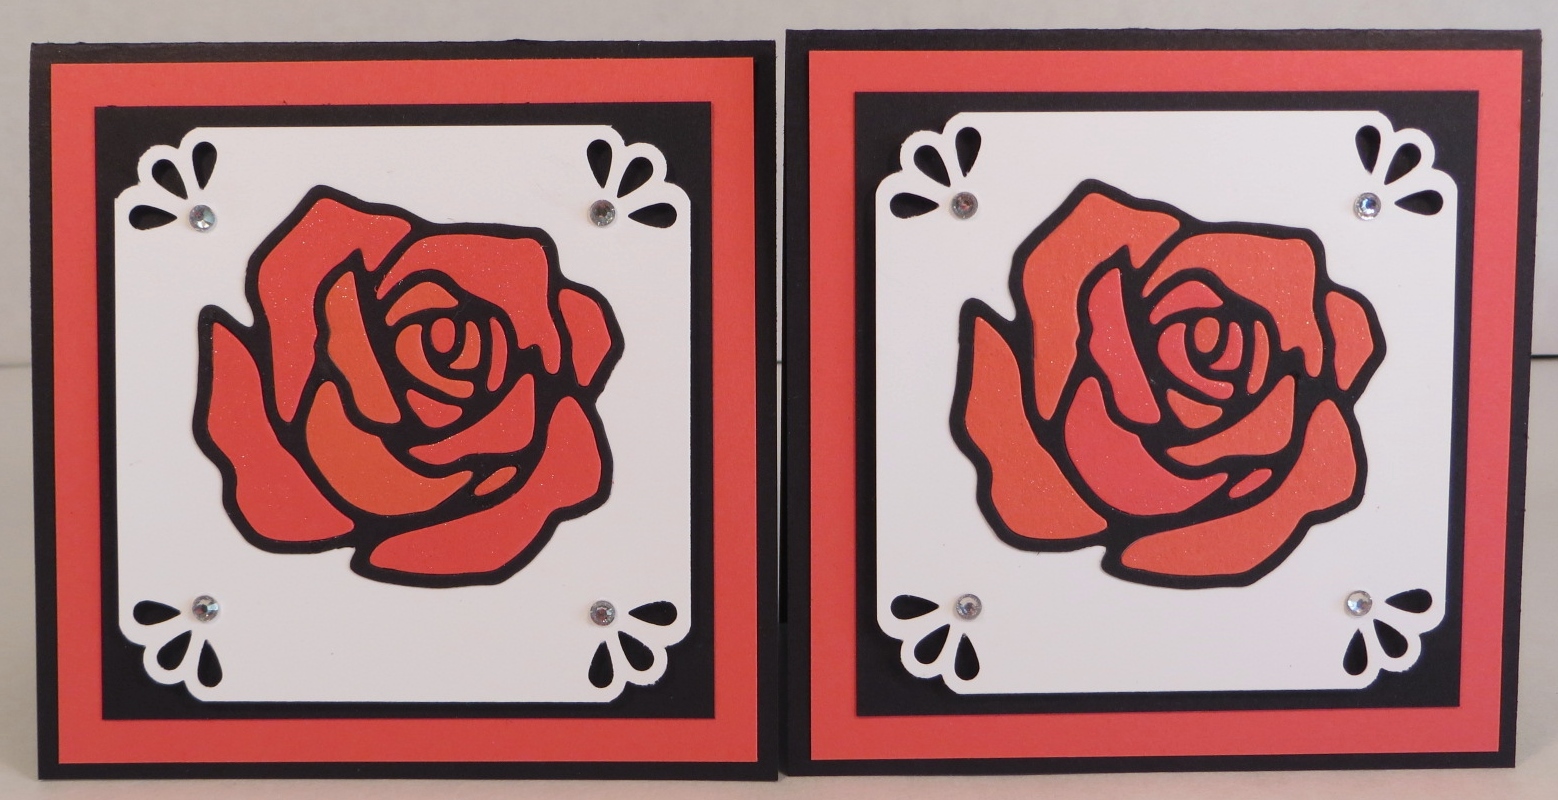
If you look closely at the rose you can see that there are two different colors of petals. (Yes….you need to look CLOSELY!) I used Watermelon Wonder and Calypso Coral for my rose. The first thing I did was die cut the rose from Basic Black card stock to get my outline. Then I die cut the rose two more times from the Watermelon Wonder and the Calypso Coral and placed some pieces of each color in the black outline. But wait….this is where the tip comes in…….
When making your “sandwich” on your Big Shot you want to place your card stock on a piece (the sticky side) of Glad Press ‘n Seal wrap (found at your local grocery store). Now layer as usual and run through the Big Shot. This little trick has (most of) your little pieces sticking to the Press ‘n Seal wrap in the shape of the flower. This makes it much easier to know which piece goes where when you place them in the Basic Black outline flower.
Once you have your colored roses die cut it’s time to place the pieces in the black outline. Here’s where things get totally random. Yes, I know….I don’t do random well but I think I did ok on this flower. Actually, the great thing about this technique is that you have enough pieces for 2 flowers!
This technique is really quite fun but you need a little patience and a pair of tweezers comes in handy for those little bitty pieces as does the Fine-Tip Glue Pen. I would definitely give this technique a try sometime.
Oh…..if you like the designs on the corners of the Whisper White card stock you might want to run to my store and grab a Curvy Corner Trio Punch before they’re gone. I’m so sad that this punch is retiring and won’t be in the new catalog on June 1st. 🙁
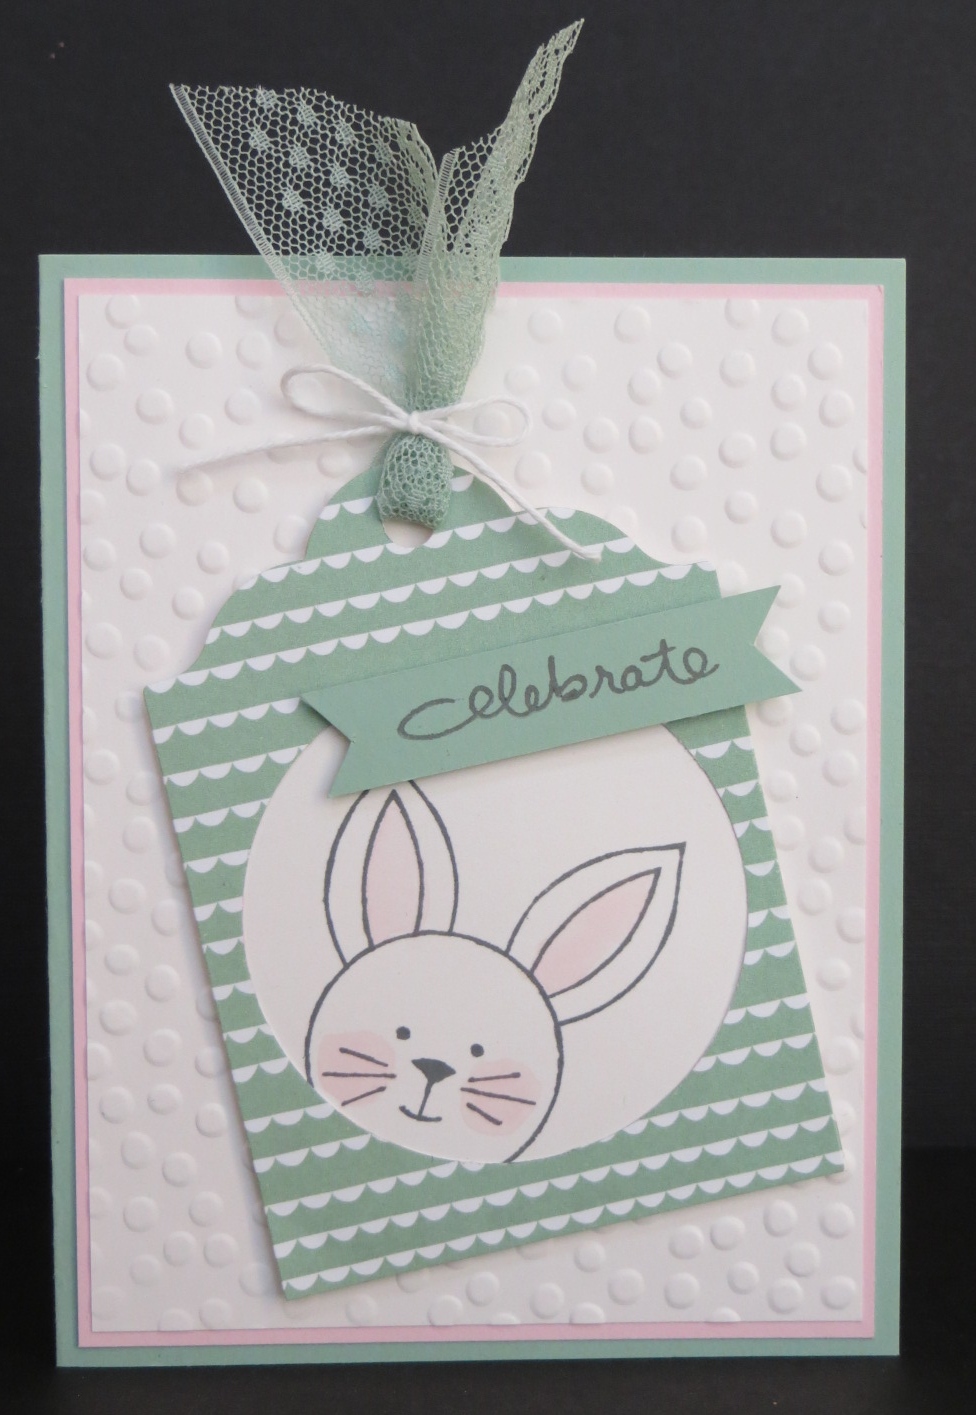
You can never have enough bunnies….did I really say that? OK…you can never have enough bunnies on cards, or stuffed bunnies for little kids but the real ones….yes, you can have enough. In the spring and summer we can have way too many in our yard and they’re not afraid of us. They just sit there and look at you with those cute little faces eating our grass. Good thing I don’t have a garden!
I like bunnies on cards. How about this adorable little fellow peeking out at you? He’s from the Friends & Flowers stamp set. I actually cased the tag portion of this card right from the Occasions Catalog. I love it when someone else does the work for me! Ha!
If you’re wondering how to stamp the ears behind the head it’s a simple technique called masking. I first stamped the little bunny face on my card stock. Then I punched a 1 1/4″ circle from a sticky note and placed it right over the bunny face. The next step is to stamp your ears. The bottom portion of the ear stamps on to the sticky note so when you remove the sticky note you only see the top portion of the ears. Ta da! It’s magic and one of the easiest techniques you’ll find in stamping. It works great when you want to stamp leaves peeking out from behind a flower and things like that. Give it a try!
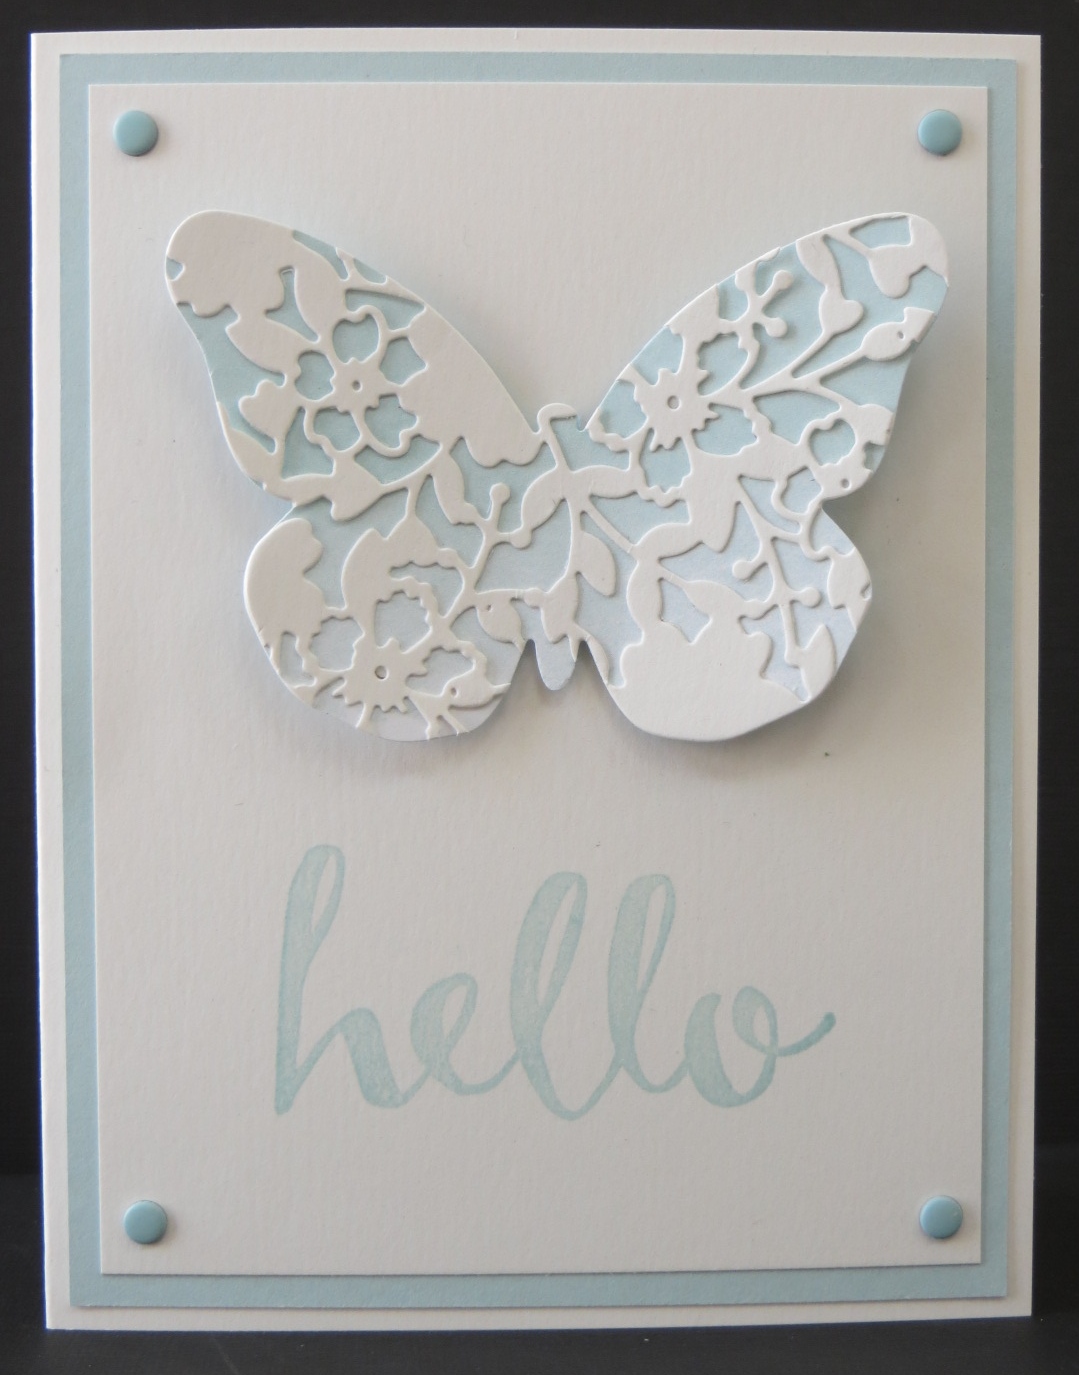
Hello! That’s your greeting this morning as well as the name of the stamp set I used on the card. Speaking of the card….isn’t it gorgeous?
Yesterday I showed you a card using one of the Sale-a-bration items that won’t be around after February 15th. Well, today’s card actually showcases the other two items that will not be around after February 15th. The Hello stamp set and the beautiful Perfectly Artistic Designer Series Paper.
Yep. This designer paper was one of those things I didn’t really think I needed when I first saw the Sale-a-bration brochure. I was wrong. It’s really pretty and there is so much you can do with it! One side of each sheet is marbled and the other side is more of a water color look. I used the water color side for this card.
Don’t you love the butterfly? I bet you’re wondering how I did that….It’s pretty simple really. What you need is your Bloomin’ Heart Thinlit. I die cut it with the Shimmery White card stock. Once you have it die cut you adhere it to your piece of Perfectly Artistic Designer Series Paper (with your fine-tip glue pen). Once the glue is dry you run it through the Big Shot again with the Bold Butterfly Framelit and ta da! you have your lacy butterfly! So pretty!
Have you noticed recently that I’ve been using a lot of candy dots? They just seem to finish off a card perfectly! I love starting to use some of the fabulous accessories that I’ve been hoarding! Ha!
A few weeks ago I did a workshop. I wanted the gals to be able to make 2 easy cards that had a WOW factor to them. This fun Z-fold card was one of the cards I came up with.
From the outside it looks like your basic easy card. Just stamp a sentiment and some leaves on the card, add some ribbon and layers and your done.
However….open it up…..and you have fun and unique card! I was so excited when I found directions for this card on Pinterest. On my card the long Very Vanilla piece on the inside that you make your “Z” with is 3 1/4″ x 11″. You then score it 4 1/4″ and 9″. You can probably make the width of the piece whatever you’d like but 3 1/4″ is the width the directions I found used so I went with that and had plenty of room for my various layers. (Have you noticed that I love layers!)
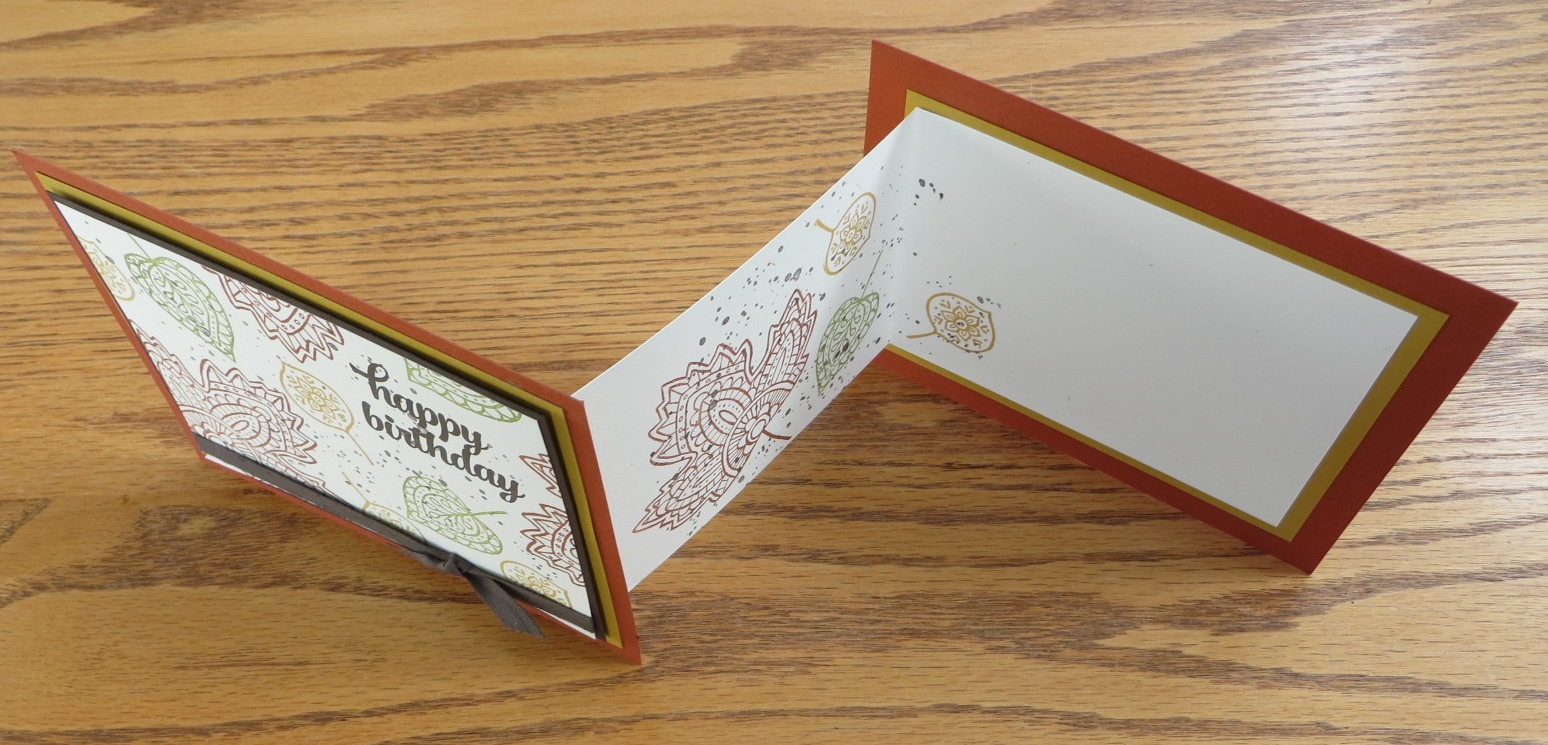
Here’s another picture of the card where you can see the “Z”. The key to making this card is to first attach the “Z” to the back piece of card stock. Then make your “Z”, place adhesive on the section that will attach to the front piece of the card. Then line up the front piece over the back piece, press down so that the “Z” adheres to the back of the front piece and your card is complete!
Be sure to let me know if you’d like more detailed instructions. I’d be happy to share.
I can’t wait to try this type of card in class some time. Maybe in my December All-Occasion class! 🙂
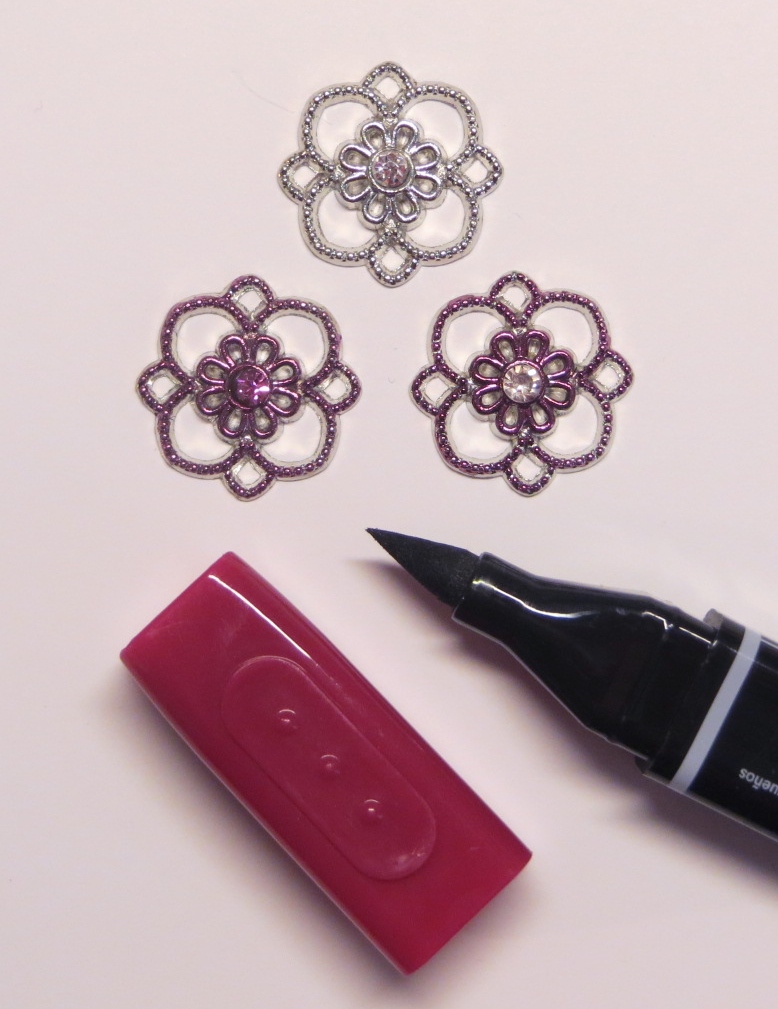
It’s Technique Tuesday! Look at what I learned at Leadership! I knew you could color the rhinestones and pearls with the Blendabilities Markers but I didn’t realize that you could color whole embellishments and the metal portion too! Wow!
I was pretty impressed to learn that I could take the brush tip of my Blendabilities Marker (I used the dark Melon Mambo shade) and color on my Something Borrowed Embellishment. On the first colored embellishment I colored the whole thing . In the second one I colored everything but the center rhinestone. This is SO cool! Now I’m going to have to design a card around these colored embellishments! Well….I design cards around the ribbon I have, I can certainly design around a colored embellishment! Ha!
You can color almost anything with a Blendabilities Marker. Show me what you can color! I’d love to see it!
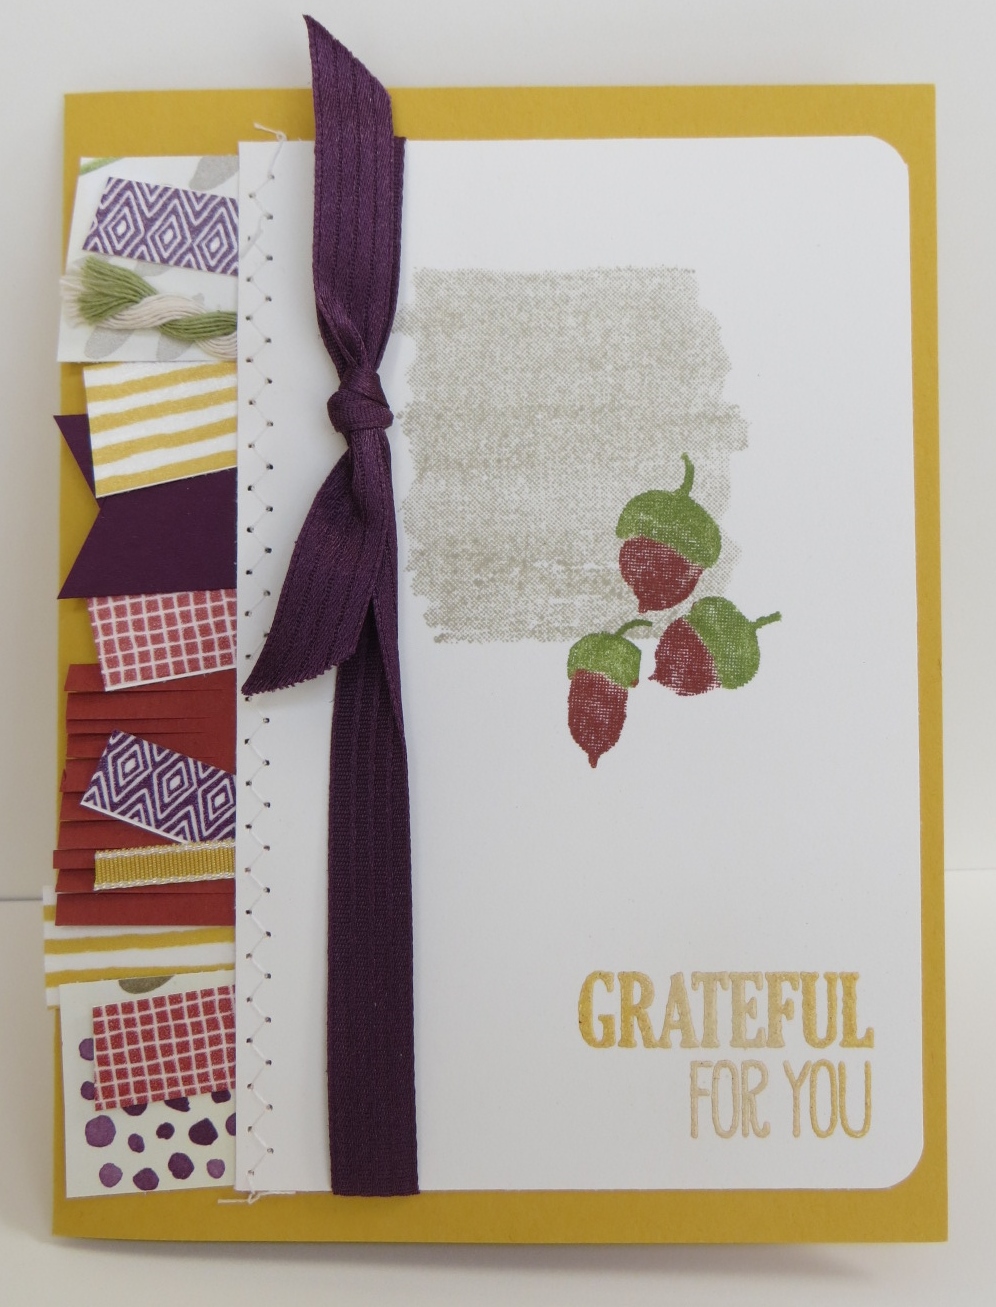
More acorns! Acorns always remind me of Minnesota. We had lots of oak trees and lots of acorns back in the Homeland.
Another fun swap card with acorns. Thanks Julie! These little acorns are from the For All Things stamp set which of course COORDINATES with the Color Me Autumn designer paper. I love all the little banners on this card! Some of the banners are made from the Color Me Autumn designer paper pack, some are plain card stock, some are ribbon and some are pieces of the Color Me Autumn Washi Tape stuck on card stock. How fun is that?!
It’s a little hard to see in the picture but Julie sewed a row of zig-zags on the edge of the card stock making it look like that’s what is holding the banners on. Too cute! I’d love to try this little technique but my sewing machine isn’t working and I’m in the market for a new one. Unfortunately the one I kind of like the best costs a bit more than I had anticipated spending. Hmmm….what to do? Should I bite the bullet and get the really nice one or find something a little more in my price range? What would you do? Leave a comment and let me know! I could use all the help I can get…..I’m not good at making decisions! Ha!
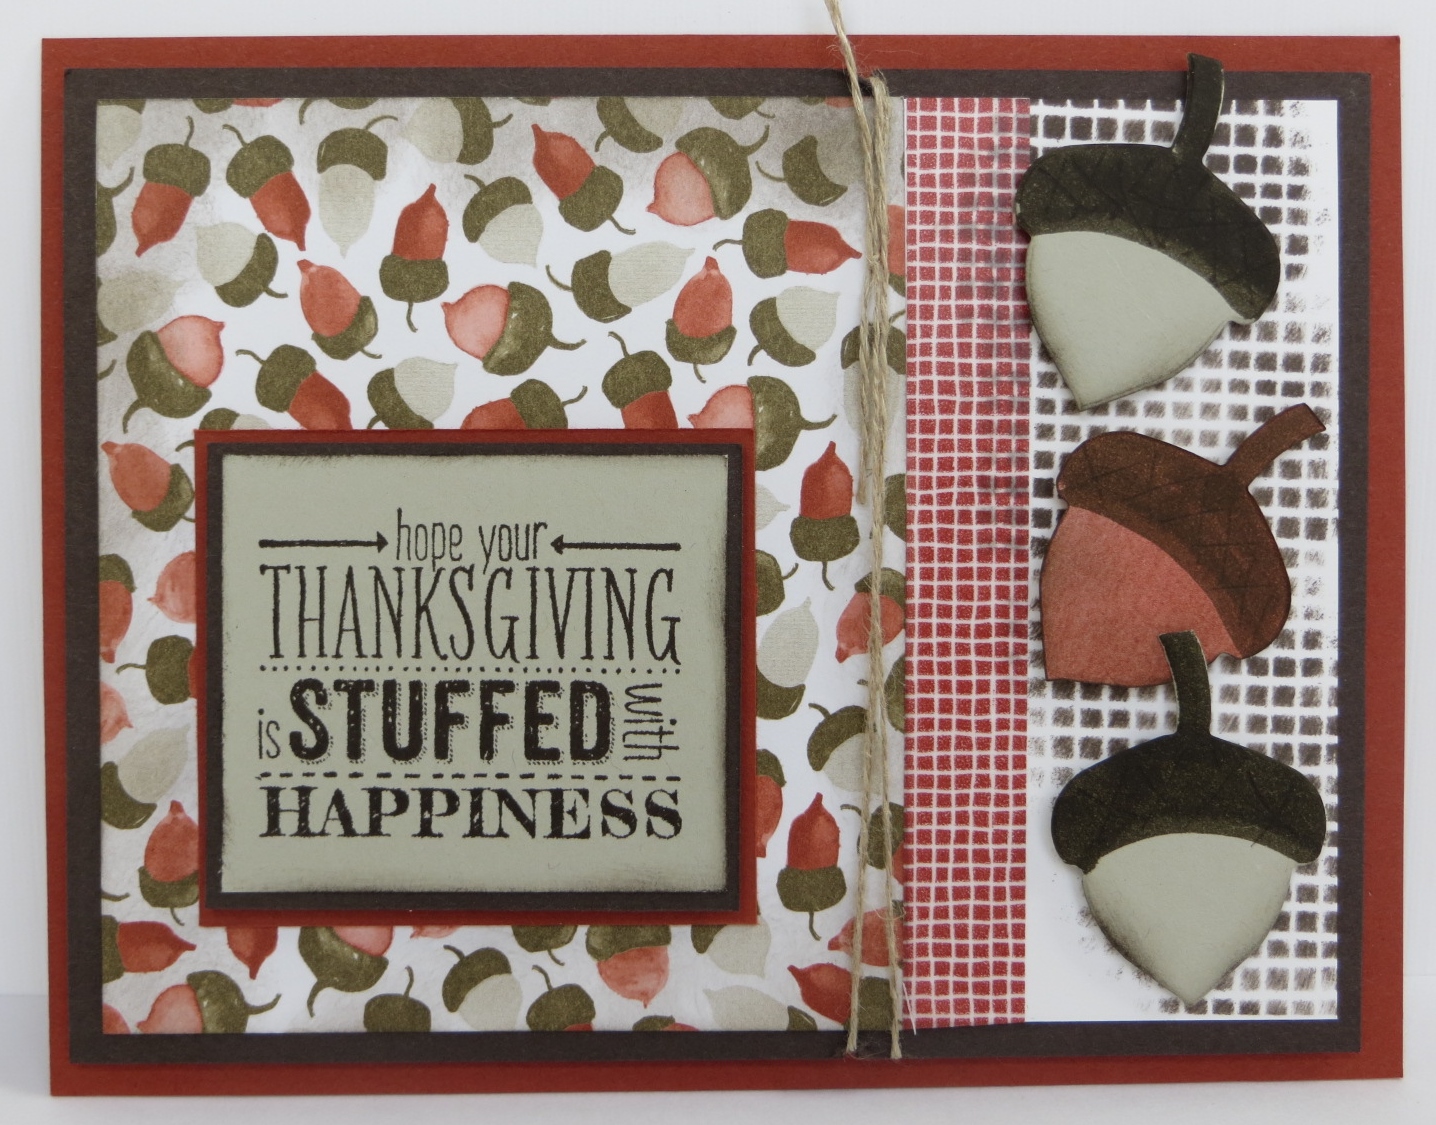
Here’s a fun card for Thanksgiving! Thanks Janet! This is another card from the swap I organized.
The fun sentiment is from the Mingle All the Way stamp set. It just makes me smile! How about you? Don’t you love all the acorns? The acorn designer paper is from the Color Me Autumn pack. The larger acorns are die-cut using the Autumn Accents Bigz die and the Big Shot.
Now you’re wondering how Janet did the design behind the acorns didn’t you? Oh…you didn’t notice it? Well, look again. Isn’t it fun? We learned this little technique at Convention and it’s become one of Janet’s favorites. I haven’t tried it yet but I really need to. What did she use to make that fun grid pattern? Well, you may have some of it in your house down in the workshop but if not, you can get it at any hardware store….it’s drywall tape! Yep! Drywall tape! Too fun! Just lay it on your paper and sponge some ink over it! Easy and fun!
Are you going to run to the hardware store and get some so you can use it on your projects? If you do be sure to send me a picture of your project to cindy@stampbystampcreations.com. I’d love to see them!


 So…it’s actually Wednesday today. I had this post all ready to go for yesterday and managed to not actually schedule it to post. Sheesh! Well, now you can enjoy Technique Tuesday on Wednesday! 🙂