Magnetic Picture Frame

022We made this fun and easy project at my Mini Stamp Camp earlier in the month.  It’s a magnetic board.

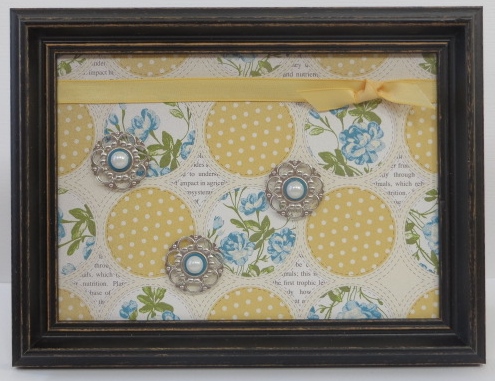
To make one of these easy projects you need a 5″ x 7″ picture frame, a 5 ” x 7″ piece of aluminum flashing, a 5 ” x 7″ piece of designer paper and two pieces of ribbon, 8″ and 4″.

Adhere the long ribbon to the designer paper and then layer the paper, the flashing, the glass from the picture from (behind the flashing) and the back of the picture frame.  Wrap the short piece of ribbon around the first and tie.  That’s it.  The frame is done!

021Now you need the magnets!  These are simple too.  You need a designer brad, a small circle of card stock ,a large pearl and some small magnets!  I used the circle punch from the Itty Bitty Punch Pack to punch out my circles and they fit perfectly!

The great thing about this project is that you can change the look simply by changing the designer paper!  How fun is that?!

Have a great day!  Take care and Happy Stamping!


Tip of the Day: Storing Card Stock

025Once again it’s time for your tip of the day!  Today I want to share with you how I store my card stock.

It’s very similar to the way I store my scraps except I have a separate file folder for each color.  I start with a plastic bin that has grooves on the sides for hanging files.  I have a separate hanging file for each color with a labeled file folder in it.  Like my scraps I organize by color.  Blues, greens, reds, pinks, etc.

That’s it!  A pretty simple and straight-forward method of storing my paper.  I keep all my bins in the closet in my craft room.  The bin with full sheets of card stock is on the floor and the scrap bin is on a shelf since it’s a little lighter.

How do you store your paper?  Leave me a comment and let me know!

Have a great day!  Take care and Happy Stamping!

Bye Bye Button Buddies

006Another one bites the dust….no more Button Buddies after June 3rd.  🙁  It’s such a cute set even if you don’t use actual buttons!

We made this card in our “Out With The Old” class which is why I only used one button on the card instead of three!  Since these buttons are retiring too I didn’t want all of the other colors of buttons left over.  Sometimes you just need to plan ahead! 😉

Button Buddies is retiring, the buttons are retiring and so is the Distressed Dots background stamp.  This card definitely showcased retiring items!  At least the awesome Teeny Tiny Wishes stamp set is sticking around!  🙂

Have a great day!  Take care and Happy Stamping!

Congratulations Margot!

303“My Girl” is graduated from CU – Denver yesterday.    Congratulations Margot!  (Margot will be my daughter-in-law at the end of October.)  This card is for her!

I used the Designer Type Photopolymer Stamp Set on this card as well as the stamp set Pure Gumption.  The date and pennants are from Designer Type and the cap and sentiment are from Pure Gumption.  When you see the pennants in the stamp set they’re in a straight line.  It’s so cool that you can actually bend them when you put them on your clear block.  It was SO easy to put the little numbers in each pennant using the photopolymer stamps.  You can see exactly where the center is.  Give ’em a try!

Once again I used my favorite Scallop Dot Ribbon (which is retiring 🙁 ) , this time in Basic Black.  I added a little Silver Glimmer Paper to the card and a dot of Silver Dazzling just for a little pizzazz!

Congratulation Margot!  You did it!

Have a great day!  Take care and Happy Stamping!


Simple Saturday: Simply Stars

001There’s a lot of “S” going on in that title isn’t there?  Let’s add “sneak” to that since this card also shows you a sneak peek!  I used the brand new Simply Stars stamp set on this little card.  I like that…Simply Stars for Simple Saturday!  Kind of fun!

I’m kind of getting into this Simple Saturday thing.  It’s fun trying to come up with a simple card.  I know I’ve mentioned this before but I do love the little notecards for making simple cards.  It makes it a lot easier to not use layers.  After I made this card with the congratulations on it I got to thinking that this would be a good thank you card too.  With the star and these colors wouldn’t it be a great card to send to someone in the military?  Next weekend is Memorial Day.  What a perfect way to say thank you for your service!

Have a great day!  Take care and Happy Stamping!

Word Play Birthday

003Here’s a bright and fun birthday card for you!  I knew I had to CASE this one when I saw it.  It’s so FUN!

The stamp set is from the Word Play stamp set that is retiring in just a few weeks.  The other items that I used on this card that are retiring are the Tangerine Tango Scallop Dot Ribbon (I am really going to miss this ribbon!) and the Color Spritzer Tool.  I think I’ll miss the Spritzer just because it gives such a neat look to the cards but I have to admit that it’s sometimes a little hard to use.  The secret is having a good, juicy marker and getting it lined up in the tool just right!

I love all of the bright colored pennants on the card.  They are what make it so fun! You could really have a lot of fun with this card design.  Not only would it be good for birthdays but you could do it up in school colors for a graduation card and put “congratulations” on it.  Hmmm….I like that idea…maybe I’ll have to try it this afternoon!  😀

Have a great day!  Take care and Happy Stamping!

Sneak Peek: Really Good Greetings

012Today I have a sneak peek from the new catalog for you.  I made this at a Shoebox Swap last week.  These events are great because you get to make cards that you didn’t have to design (and they’re free!)!  😀  Join my team of SASsy Stampers and you can come to them too!

The stamp set is called Really Good Greetings.  There are six sayings in the stamp set.  My favorite is the one that says “finally a day that really is all about you!”.  Although it should probably say “about me!”  That’s the running joke when we go to convention and other events….everything is all about me!  Ha!  😀

The designer paper used on this card is definitely going to be my favorite from the new catalog.  It’s called Gingham Garden and it’s gorgeous!  This card shows three of patterns.

I bet you can’t wait for the new catalog!  Don’t worry!  It’s coming soon!

Have a great day!  Take care and Happy Stamping!

Tip of the Day: Storing Paper Scraps

021 020I’ve been working on organizing….putting all of my new colors of ink pads and paper away.  So much fun!  Since I had to clean everything out and it’s Tip of the Day Tuesday, I thought I’d share with you how I store my paper scraps.  We all have them…some more than others…but what do you do with them?

I start with an expandable pocket folder.  I’ve sorted my card stock by color.  Then I have 2-3 colors of card stock in each folder.  I put a full sheet of each color in the folder and then I will place the scraps in front of the full sheet that has the color’s name written on it.  I also took a long piece of clear packing tape and put it over the name of the card stock and the top edge to protect it a bit.  I have all my folders of scraps in a plastic file bin.

This method works well for me.  When I want a certain color scrap I just got to the correct folder and find the size I need.  What do you think of my method?  How do you store your scraps?  Leave a comment and let me know!

Have a great day!  Take care and Happy Stamping!

Black and White Best of Birthdays

002Happy Monday!  Today I have a lovely black and white card for you.  I used the Best of Birthdays stamp set.  It’s so fun looking forward to a brand new stamp set each month!  What’s your favorite “Best of” stamp set so far?  Birthdays, Love, Flowers, Butterflies or Brides and Babies?  I’m not sure which one is my favorite yet.  It is fun seeing the old stamps that come back though.

I don’t remember which original stamp set this floral image is from.  Do you?  It would really be pretty water colored but that seems like a lot of work doesn’t it?  Maybe I’m just lazy.  I will have to try it though.  The black and white is elegant but colored this image would be beautiful!

Have a great day!  Take care and Happy Stamping!

Happy Mother’s Day! It’s Raining Flowers!

Happy Mother’s Day013 to all you mothers and all of you who have or who have had a mother!  (That should cover pretty much everyone, don’t you think?)  I didn’t have an actual Mother’s Day card to post so I thought I’d give you a sneak peek of one of the cards we’ll be making this week for our “Out With The Old” class.  Besides, since it is Mother’s Day I figured I could post a card using my favorite color….Melon Mambo!  😀

I used the stamp set Raining Flowers which is retiring in just a few weeks.  I also used the retiring Big Shot Two Tags Die.  I didn’t use either of these items a lot but I know I’ll miss the die (or not…since I probably won’t get rid of it!).  The ribbon is the Melon Mambo Striped Organdy Ribbon from the Spring Catalog which also will only be around for a few more weeks.  Are you making your list of all the retired items you need to buy?  I’m still working on mine!  Don’t forget, May 31st is the last day to get these things!

Have a great day!  Take care and Happy Stamping!


Simple Saturday: Another Label Love

004Another Saturday, another simple card!  Don’t you love it?  Designer paper sure comes in handy when making a simple card.

I used my favorite new Designer Paper, Gingham Garden, on this card.  You’ll find this gorgeous paper in the new catalog coming on May 31st.  I cut a panel of designer paper, mounted it on my favorite color, Melon Mambo and popped the whole thing up on a Daffodil Delight card.

The little sentiment label is from the new stamp set Label Love which you’ll also be able to check out in the new catalog!  I bet you can’t wait!  The only sad thing about this card is that the Melon Mambo Scallop Dot Ribbon won’t be in the new catalog.  🙁  I may have to stock up!

Have a great day!  Take care and Happy Stamping!

Soda Pop Top Wrist Watch

299Well, I looked to my fellow talented demonstrators for this card.  Once again I never would have thought of this trick on my own…

Turn a flattened Soda Pop Top into a wrist watch!  Not only do you punch out the watch face and glue it into the flattened Soda Pop Top but then you fill it with Crystal Effects to make it shiny like a watch crystal!  Who thinks of these things?!  I really need to start thinking outside the box a little more!  😀

The watch is from the “Dapper Dad” stamp set in the Spring Catalog and the sentiment is from the “Happy Hour” stamp set.

Have a great day!  Take care and Happy Stamping!

Clockworks: A Masculine Card

297I first used this stamp set at Stampin’ Up!’s Regional event last fall here in Denver.  My first thought was:  “This stamp set will be great for my masculine card class!”.  It’s so hard to come up with masculine cards but we always need them!

This stamp set is perfect for making a collage and that’s just what I did!  I first stamped the pocket watch, masked it and then stamped the backgrounds.  The watch face is stamped separately and punched out. Of course I needed to use my trusty Stamp-a-ma-jig to stamp the hands on the watch face.  A pretty basic card but it works great for guys!

Have a great day!  Take care and Happy Stamping!

Blue Ribbon Graduation

296Graduations are just around the corner.  Do you have your graduation cards made?

We made this card in our Guys and Grads class last week.  I did use the colors for our local high school since one of the neighbors is graduating this year but the great thing about this “Blue Ribbon” stamp set is that you can exchange the “congrats grad” for three other sayings.  It’s very versatile!

How many graduations do you have to make cards for this year?

Have a great day!  Take care and Happy Stamping!

Tip of the Day Tuesday: Toothpaste!

photo (5)It’s time for a new feature at Stamp by Stamp Creations!  Like MDS Monday, I can’t guarantee that I’ll have a tip for you every week but if I do, look for it on Tuesdays.

I am SO excited share this fun tip with you because it really works!  Last week in class we were using the Designer Type Photopolymer Stamp Set with these itty bitty numbers and Black StazOn ink.  My itty bitty clear block was practically black by the end of class because people were pressing down on the ink pad just a little too hard with those itty bitty stamps.  What was I to do?

So, we got talking at the end of class about how I could try and get those little things clean.  We were using StazOn ink which is suppose to….stay on!  It’s permanent right?  We tried a few different suggestions but nothing was working….UNTIL Teresa suggested that I try toothpaste.  Not just any toothpaste….it had to be Crest tooth PASTE, not gel.  Well, low and behold….it worked!  Magic!  It took a little elbow grease along with the toothpaste but it worked!

I only had a little travel size tube on hand so I need to go and put a full size tube on my grocery list!  How about you?!