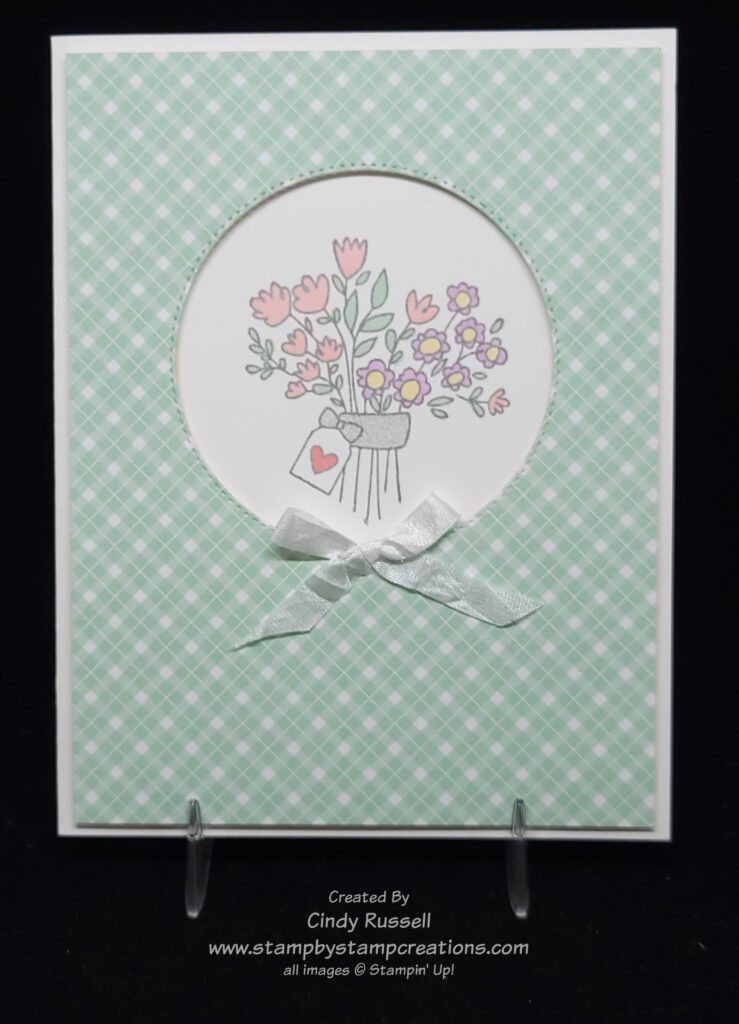
A soft and sweet card for Day 8 of my 40 Cards in 40 Days challenge. This card was made using Stampin’ Up!’s Speedy Recovery stamp set. This is the perfect get well stamp set. I wanted to use soft colors on my card so I stamped the image with Smoky Slate and then colored it in with my Stampin’ Blend Markers. The band and bow around the flowers are stamped with the bouquet.
The designer paper I used on my card is from the Country Gingham 6” x 6” Designer Paper pack. The color of gingham on my card is Mint Macaron which is what I used to color in the leaves. The designer paper layer of the card is popped up with Stampin’ Dimensionals. The White Crinkled Seam Binding bow finishes off the card. Soft and sweet.
Happy first day of March! March is a big birthday month in the Russell family so it’s only fitting that I share a birthday card with you today. This is Day 7 of 40 Cards in 40 Days. Today I’m using the Best Day stamp set from Stampin’ Up!’s January – April 2023 Mini Catalog.
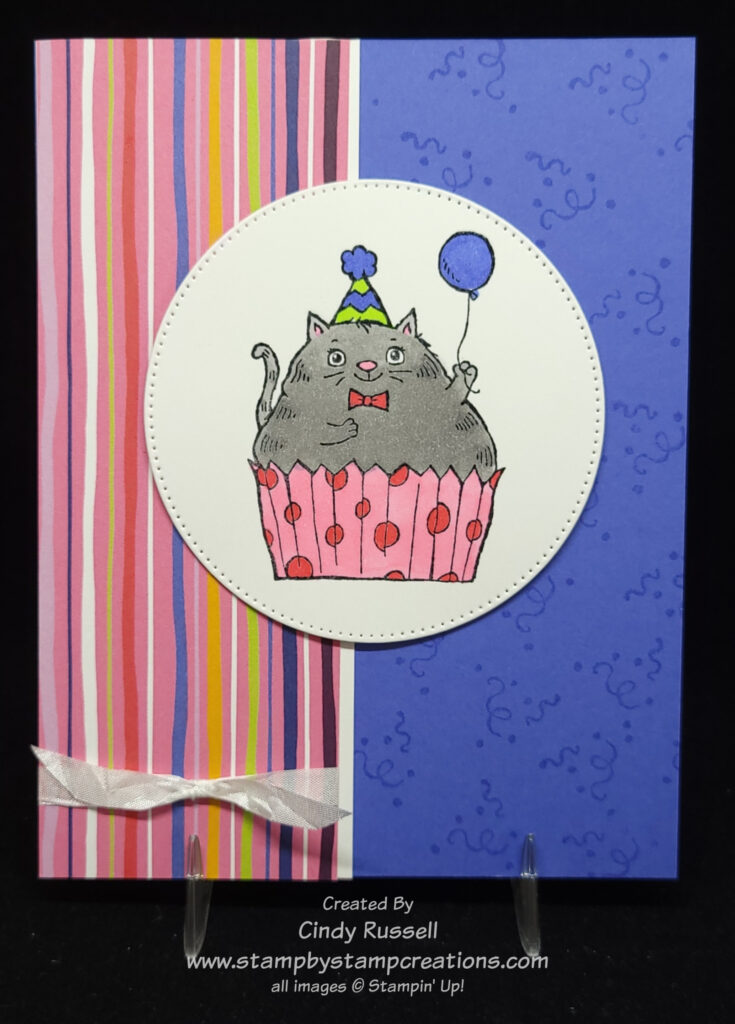
I fell in love with this chubby little cupcake cat when I saw it. TSC! Too Stinkin’ Cute! The designer paper is the Design A Dream Designer Paper. This paper is a hostess item found on page 179 of Stampin’ Up!’s January – April Mini Catalog. It can only be purchased with Stampin’ Rewards. Contact me if you’d like more information on this.
While planning my card, I chose the designer paper first. This made it easier to figure out what colors to use on the cupcake cat. 😊 You may not have noticed, but the layout for this card is the same as the layout I used on Day 2 of challenge. I changed up the shape of the focal point and added ribbon and a little stamping on the card front.
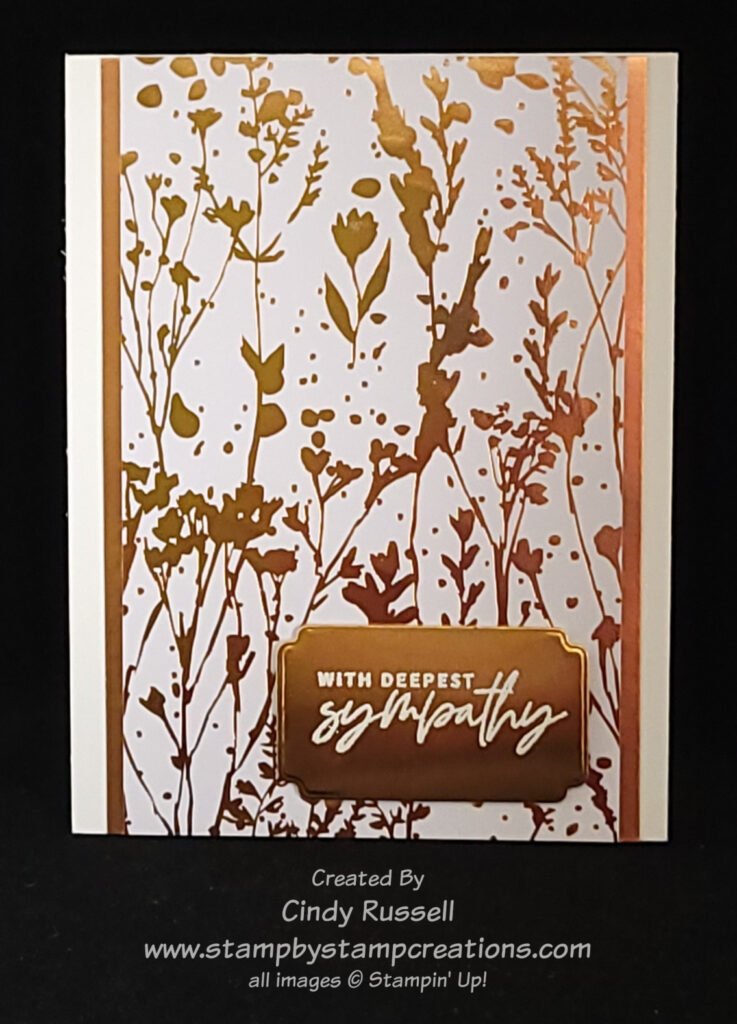
Wow! This Naturally Gilded Specialty Designer Series Paper that I used on this card for Day 6 of my 40 Cards in 40 Days is gorgeous! As you can see, I made the paper the focal point of the card. The package of paper comes with 6 sheets of specialty paper. 2 sheets with a copper design on a white background like I used here, 2 sheets with a silver design on a white background and 2 sheets with a gold design on vanilla background.
I can’t share a link to the paper in my online store because it’s not there yet. This paper is part of Stampin’ Up!’s Online Exclusives that start tomorrow. As a demonstrator I was able to order it a head of time. I can’t wait to see what else Stampin’ Up! has in store for us with their Online Exclusives!
The label and sentiment that I used on the card are from the Something Fancy Bundle that can be found in Stampin’ Up!’s January – April Mini Catalog.
I hope you’re enjoy my 40 Cards in 40 Days. If you are, please leave a comment on my blog or Facebook page. Have a great day! Take care and Happy Stamping!
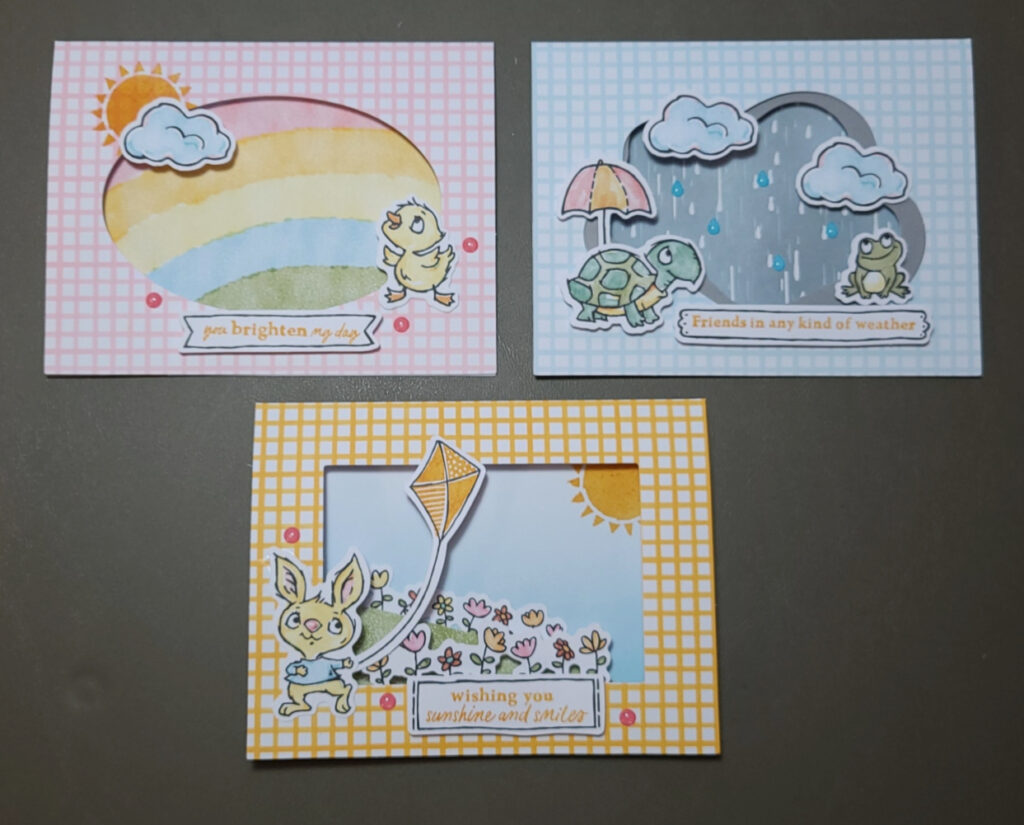
It’s Day 5 in my 40 Cards in 40 Days Challenge and I have a treat for you. Three cards in one day! I made today’s cards from February’s Paper Pumpkin Kit, Sunshine and Smiles! For these cards I tried to follow the directions and make the cards as the kit suggested. Me, follow directions? I will admit that it was a bit difficult but I did it. 😊
Aren’t these critters adorable? If you’re wishing that you had purchased the kit, I have a suggestion for you. Check out the Rain or Shine Suite of products in Stampin’ Up!’s January – April Mini Catalog. You’ll find some of these same critters and images! I don’t have this suite (yet?), but I wish I did so I could make some alternative cards with the items in my Paper Pumpkin kit. Oh, well. I’ll just have to get creative.
It’s hard to tell from the photo above, but all three cards have a window in the front. Check out the photo here. This is the inside of the yellow/mango checked card.
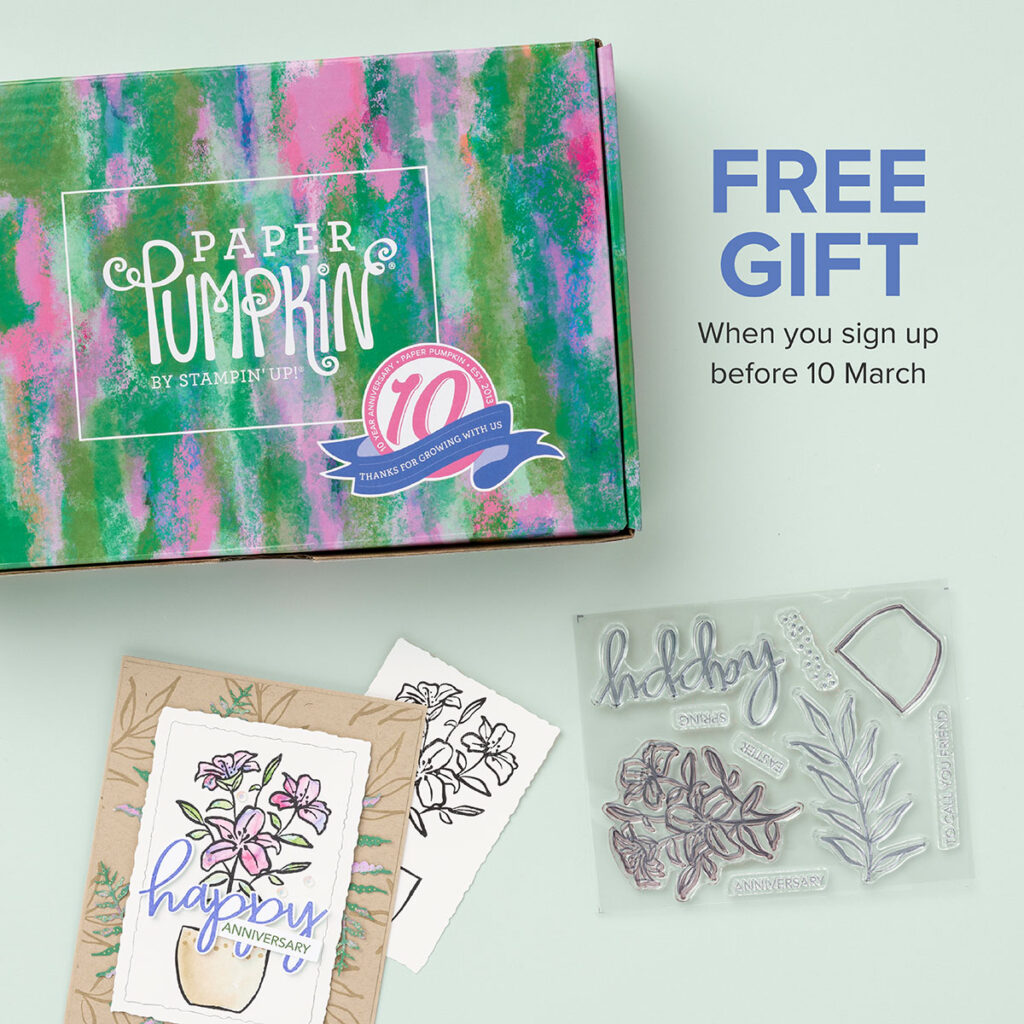
Did you know that March will be Paper Pumpkin’s 10th Anniversary? Wow! That’s a lot of kits! For their anniversary, Paper Pumpkin is including a FREE gift in the kit. They are including a second stamp set that will coordinate with the stamp set in the kit or stand on it’s own. 😊
Have you ever tried a Paper Pumpkin subscription? If not, you should. If you have in the past, and weren’t satisfied with them, give them another try. The kits just keep getting better and better! I had fun making these three cards and I’m looking forward to changing them up a little. Check out the Paper Pumpkin page in my online store. If you do decide to purchase the month-to-month subscription, you can sign up here.
I hope you enjoyed these Paper Pumpkin cards for Day 5. Have a great day. Take care and Happy Stamping!
Stampin’ Up!’s Dainty Delight stamp set has such sweet images. It was the perfect choice for Day 4 of my 40 Cards in 40 Days Challenge. Not only is it Day 4 of my challenge but it’s Saturday. What’s better on Saturday than a simple card?
Today’s card is one we made in classes this past week. This simple card only uses stamps, ink and paper….ok…and one little bow. 😊 To give the card a little dimension and not be so boring, I used designer paper to stamp my image on and for the blue layer. I did try the card using cardstock instead of the designer paper but it was way to boring. The subtle patterns of the designer paper give the card just enough “wow” to make it interesting. Both of the designer paper patterns that I used are from the Dainty Flowers Designer Paper pack which was a Sale-a-bration item. I say “was” because it sold out a few weeks ago. This card would be pretty with any subtle patterns and color combinations.
Simple Saturday with stamps, ink and paper. I really need to try that more often! Have a great day! Take care and Happy Stamping!
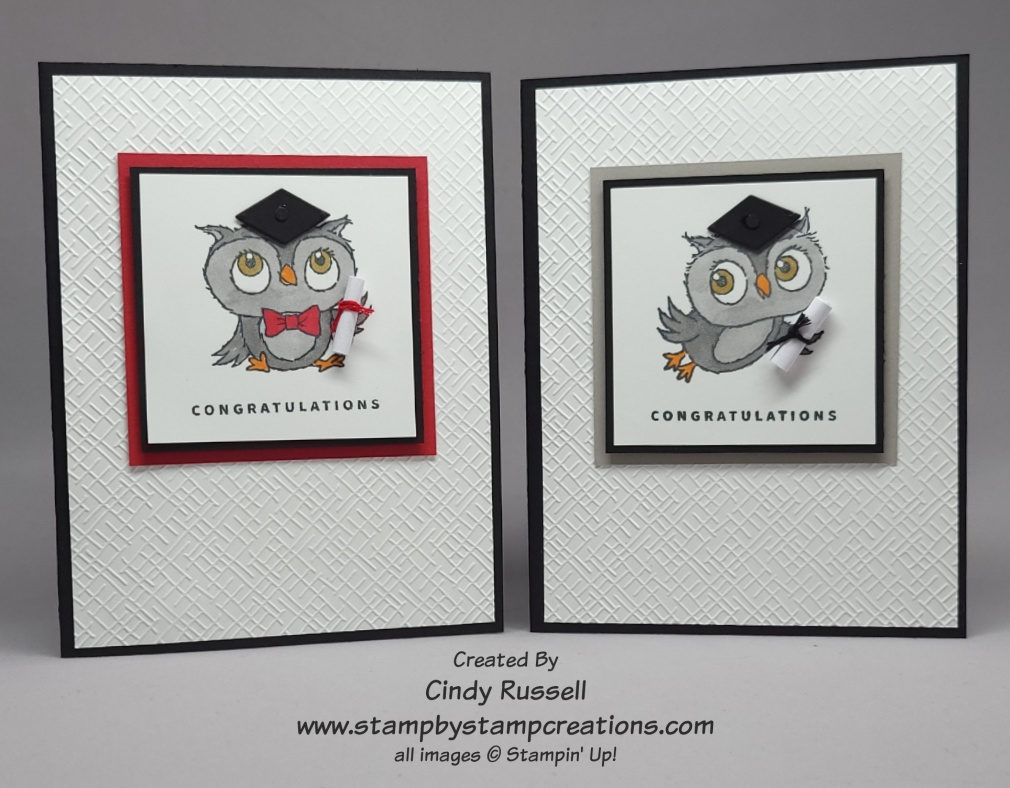
The third day of my 40 Cards in 40 days features Stampin’ Up!’s Adorable Owls stamp set. These owls are so stinkin’ cute! Today you get a two-for-one because I couldn’t decide which owl to use on my card. 😊
Adorable Owls is a Sale-a-bration item which means you can choose it for FREE with a $50 purchase! Sweet! If you like these little owls as much as I do, don’t wait! Sale-a-bration ends on Tuesday, February 28th and that is the last day you will see these cuties.
I came up with the idea for these cards after working with the stamp set and then seeing a graduation sentiment in the Sentimental Park stamp set (which I didn’t use on the card). Both of these owls have a little wing sticking out which can “hold” something in so I thought a little diploma would look adorable. The diplomas are simple a piece of computer paper cut 1 ¾” x ¾”, rolled up, and tied with a piece of baker’s twine (black) or embroidery floss (red). They are attached to the card with Mini Glue Dots. The “congratulations” stamp is from the Something Fancy stamp set. You can purchase this stamp set in a bundle with the Something Fancy Dies. The die set has tags and labels that fit the sentiments perfectly .
Once I had the diplomas on the owls I felt that they needed a graduation cap so I had to do some thinking. Aha! I remembered that the Beautiful Shapes Dies had many different shaped dies and wouldn’t you know, it had the perfect shape and sized die that I needed! It’s hard to see in the photos but there is a small 1/8” circle attached to the top of the caps.
You may have noticed that I used my new favorite embossing folder on the background of both cards. It’s one of three in the Basics 3D Embossing Folders pack which will be part of Stampin’ Up!’s Online Exclusives starting on March 1st.
I hope you enjoyed these fun graduation cards. Please leave a comment and let me know what you think of them. Have a great day! Take care and Happy Stamping!
It’s Day 2 of 40 Cards in 40 Days and I’m sharing a card made with the Beautifully Happy stamp set! It’s gorgeous! Not only is it beautiful, it’s easy to work with. You can “color” this large floral stamped image with stamps! This stamp set is one of Stampin’ Up!’s DistInktive stamp sets which means the stamp creates different opacities (shading) with a single stamped image. So realistic looking!
The Beautifully Happy stamp set is a Sale-a-bration item that you can choose for free with an order of $100. Sale-a-bration is almost over so don’t miss out on this gorgeous stamp set! The last day of Sale-a-bration is February 28th.
I paired this stamp set with the equally gorgeous Fancy Flora Designer Paper from Stampin’ Up!’s January – April Mini Catalog. The colors of cardstock used on the card are Fresh Freesia, which retires at the end of April, and Orchid Oasis. Soft Succulent was used for the stamped leaves. I inked up the stamp and then stamped it off on scrap paper before stamping it over the image. This gave is a softer look. Full strength was a little too dark. Some Adhesive-Backed Milky Dots finished off the card.
This card definitely says Spring and is the perfect choice for Day 2 of my challenge as the temperature is rather cold here in Colorado. I’d love for you to leave a comment. Stay warm! Have a great day! Take care and Happy Stamping!
It’s Day 1 of 40 Cards in 40 Days 2023! During the 40 days of Lent I have challenged myself to make 40 cards! (I probably should send some of them too…) Do you want to take the challenge with me? Let’s do it! 40 cards is a lot. If you want to cut that down you could make 1 card a week during the six weeks of Lent and that would only 6 cards. Quite doable. No matter how many you choose to make let’s just create some cards and send some cards!
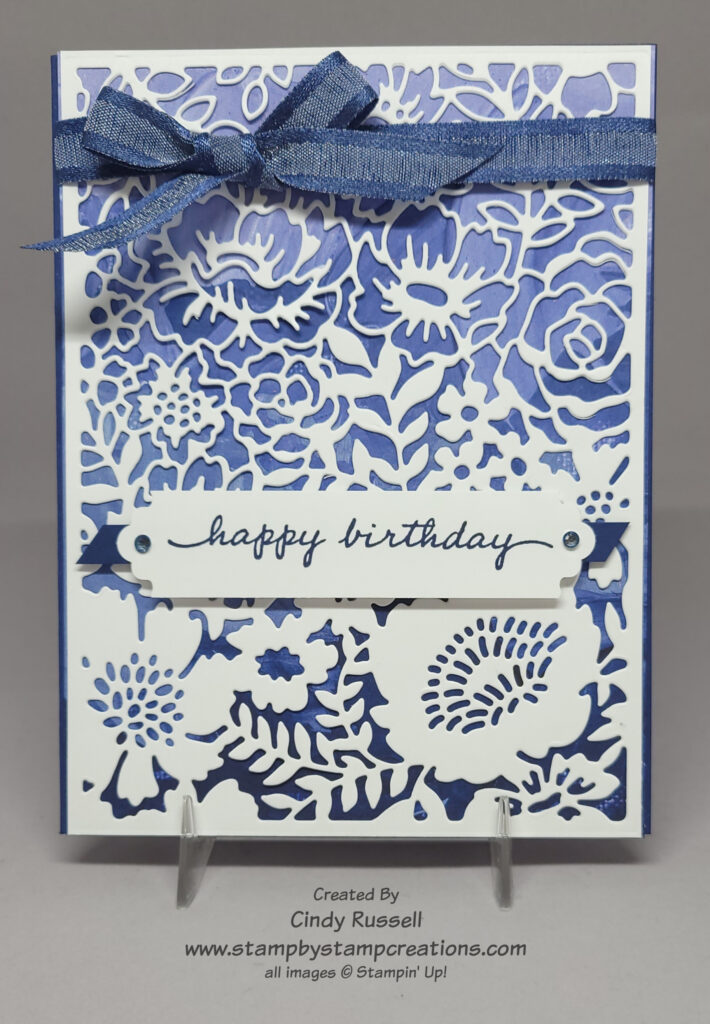
The large die-cut piece is my favorite die from the die set. It’s an odd shape. It isn’t perfectly sized to fit on a 5 ½” x 4 ¼” card front. I trmimmed about 1/8” from each side so that the “frame” around the the die-cut flowers would be even and so it would fit the card front better. The “normal” size card in Europe is slightly different than those here in the United States so the die fits U.S. cards top to bottom and in Europe it fits side to side. I thought that fact was quite interesting.
This die looks beautiful over any type of ombre coloring. Ombre means “having a pattern in which colors or tones fade into one another”. This piece of designer paper from the Fancy Flora package works perfectly. Once I trimmed down the die-cut cardstock I cut the designer paper the same size and adhered them together with liquid glue. I then added the ribbon before adhere the designer paper/die-cut image to the front of the card. And yes, I tied an actual bow on my card. 😊 Most of you know that it’s not something I do a lot.
To make my sentiment (from the Happiness Abounds stamp set) pop, I added a strip of Night of Navy cardstock behind it. I also colored a couple of Rhinestone Basic Jewels with my Night of Navy Stampin’ Blends Marker to add to the label.
This card was easy to make as the only thing stamped was the sentiment. Leave a comment and let me know what you think about today’s card. Have a great day! Take care and Happy Stamping!
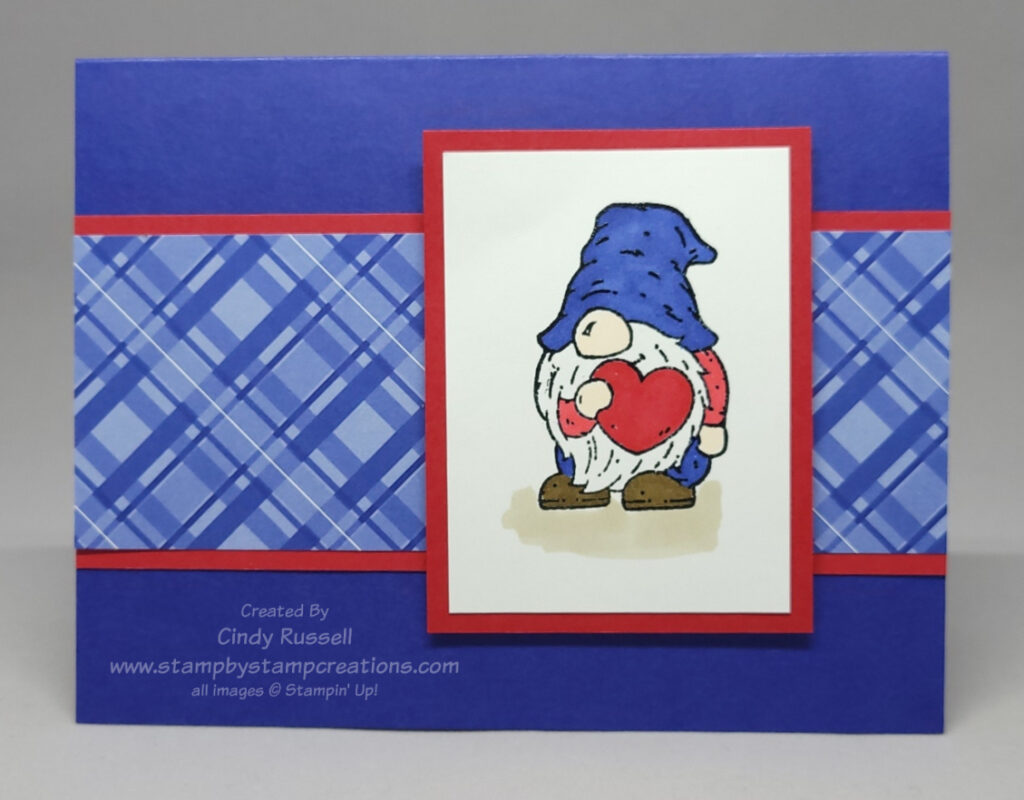
I have a thing for gnomes. They’re just so dang cute! Since it’s already February, I need to be sharing valentines with you so here is a cute gnome valentine just for you!
The Friendly Gnome stamp set is pretty darn cute. Not only does it include three adorable gnomes, it also has some fun sentiments for love, birthday and spring!
Guess what? This gnome stamp set coordinates with the Gnome Dies that were featured in the July – December 2022 Mini Catalog and that are still available online! Ah, coordination! 🙂
This card was easy to make. The hardest part was choosing the colors for the gnome! The colors I used were Starry Sky and Real Red for both the paper and the Stampin’ Blend markers. The designer paper is from the 2022-2024 In-Color package.
I heat embossed the stamped gnome with clear embossing powder after stamping the image. I do this often because sometimes the lighter colors of Stampin’ Blend Markers bleed a bit when the image is just stamped with the Memento Black ink. This also makes it a little easier to color in the lines if you’re coloring challenged like me. Ha!
This is a cute valentine to send to just about anyone. I think I might send it to my dad. Who would you send it to? Leave a comment and let me know!
It’s valentine-making time and I couldn’t resist sharing these gorgeous cards with you!
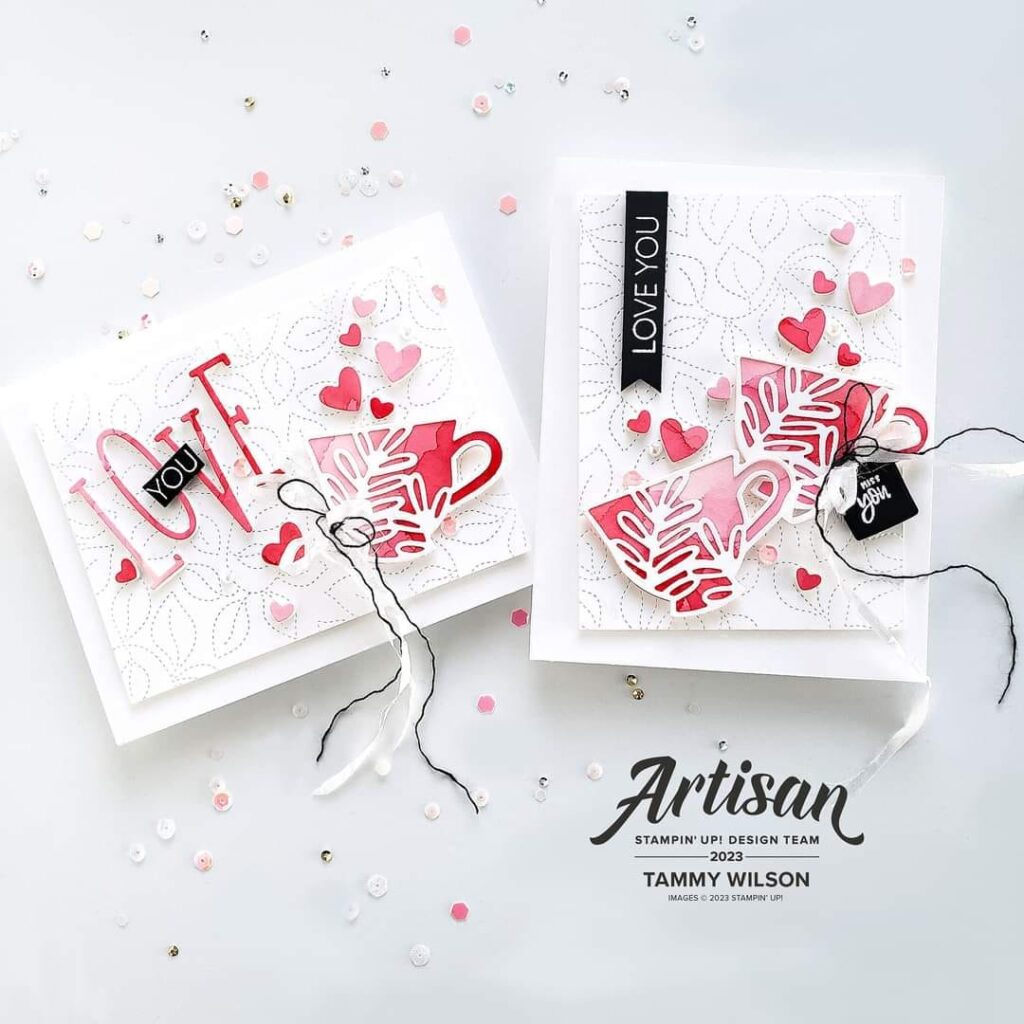
Each year, Stampin’ Up! has an Artisan Design Team made up of demonstrators from around the world who have applied. These are talented demonstrators!
These lovely and unique cards are made by Tammy Wilson. All of the pink/red images on her card die-cut watercolor paper which she colored with ink refills. So clever! The hearts and cups are die-cut using the Teacup Dies from the Annual Catalog and the alphabet letters are die-cut using the new Alphabet a la Mode dies from the January – April Mini Catalog. The leafy background is die cut with theStitched Greenery die.
These cards aren’t really my style but I sure do love them. I may have to try making them myself. I love how something so different from your own tastes can inspire you to step outside your own little box. 🙂
A Carrot Valentine? Really? Yep! I couldn’t resist! A few weeks ago I shared a card with you made with the Sale-a-bration stamp set Thanks A Bunch. After looking at it for a while, and noticing that there was a “love you” stamp included in the set, I knew I needed to make a carrot valentine. 🙂
I could have come up with a new card design, but why go to all of that work when I already had a design that works? You might think that’s being lazy but I like to think of it as working smarter. Ha!
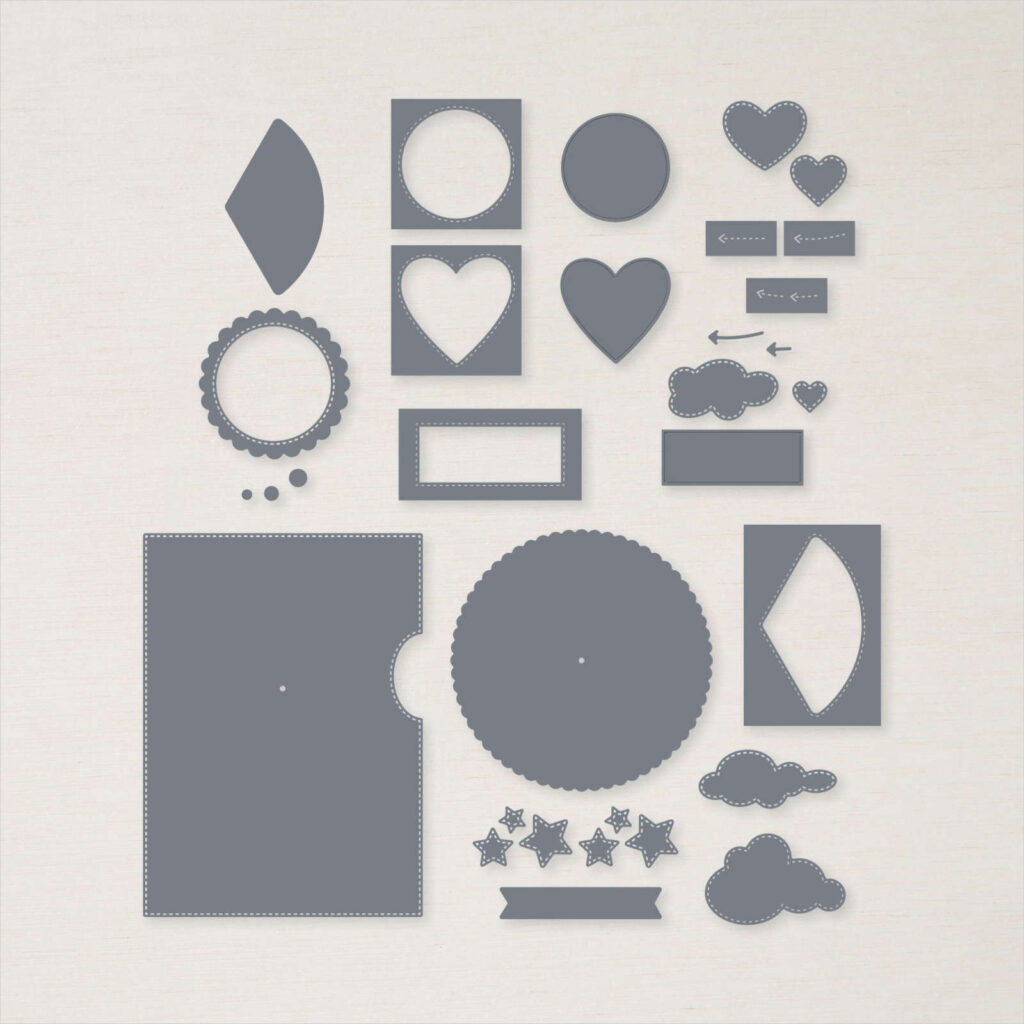
Give It A Whirl Dies
The Give It A Whirl die set had the perfect size heart die for my project. As you can see, I used it on both the inside of the card and the front. Don’t be afraid to search your stash for the right tool if you have a vision of what you want your project to look like.
I hope you like my green and orange valentine. 🙂 I wonder who I should send it to? Ha!
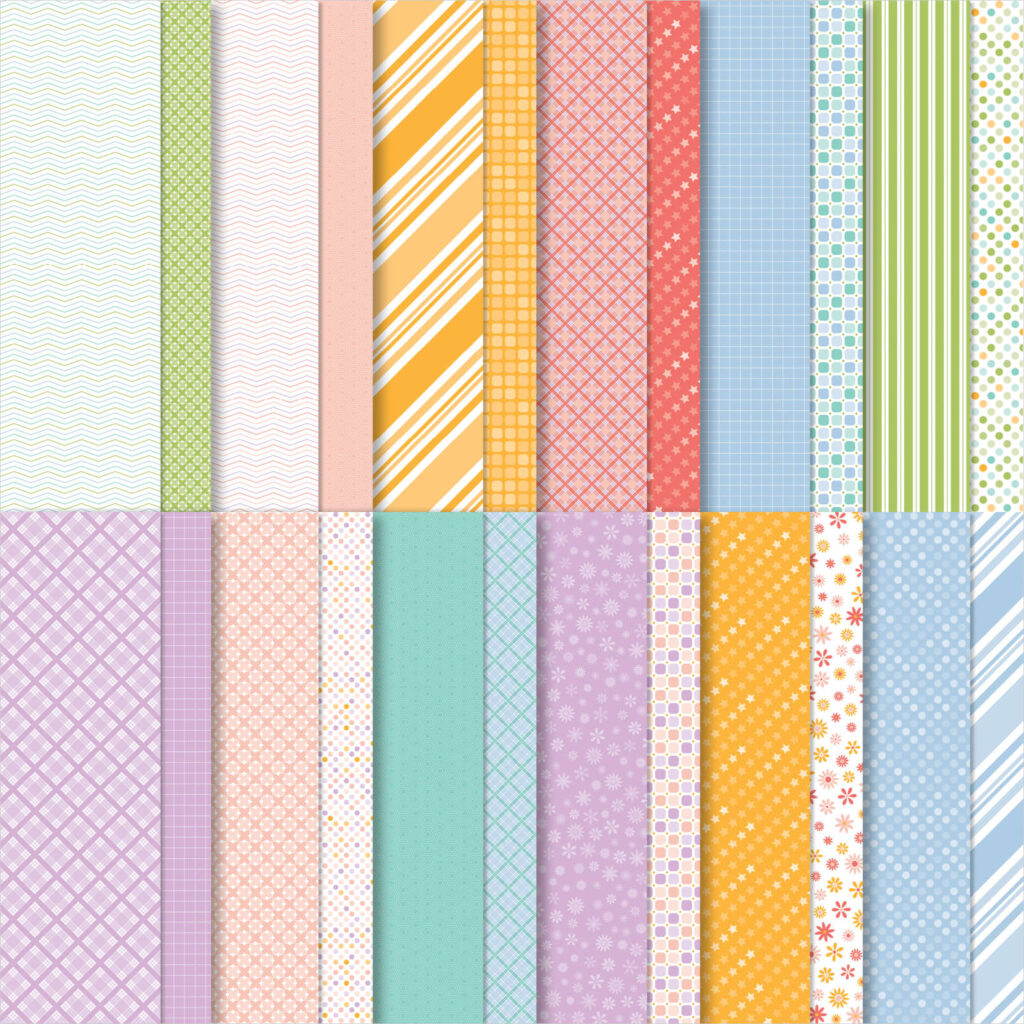
This is our last Sale-a-bration celebration! The final Sale-a-bration item is the Dandy Designs Designer Series Paper. This designer paper is fun! You get 48 sheets of paper. 4 each of 12 double-sided designs! That’s a lot of paper! The fun colors included in this pack of paper are Balmy Blue, Calypso Coral, Coastal Cabana, Fresh Freesia, Granny Apple Green, Mango Melody and Petal Pink!
Check out all of the fun designs! These patterns and colors are perfect for Spring or any time!
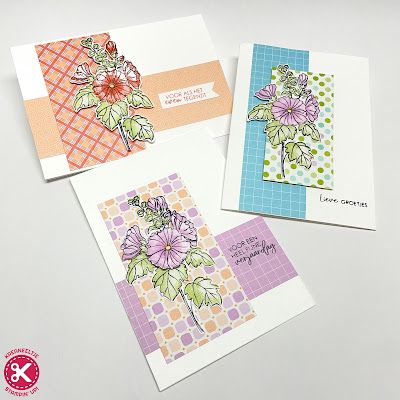
Here you can see how well the patterns coordinate together. These cards were made by a fellow demonstrator and also showcase yesterday’s Sale-a-bration item, Beautifully Happy.
You’ll enjoy working with this package of paper and think of all the projects you can make with it! Have a great day. Take care and Happy Stamping!
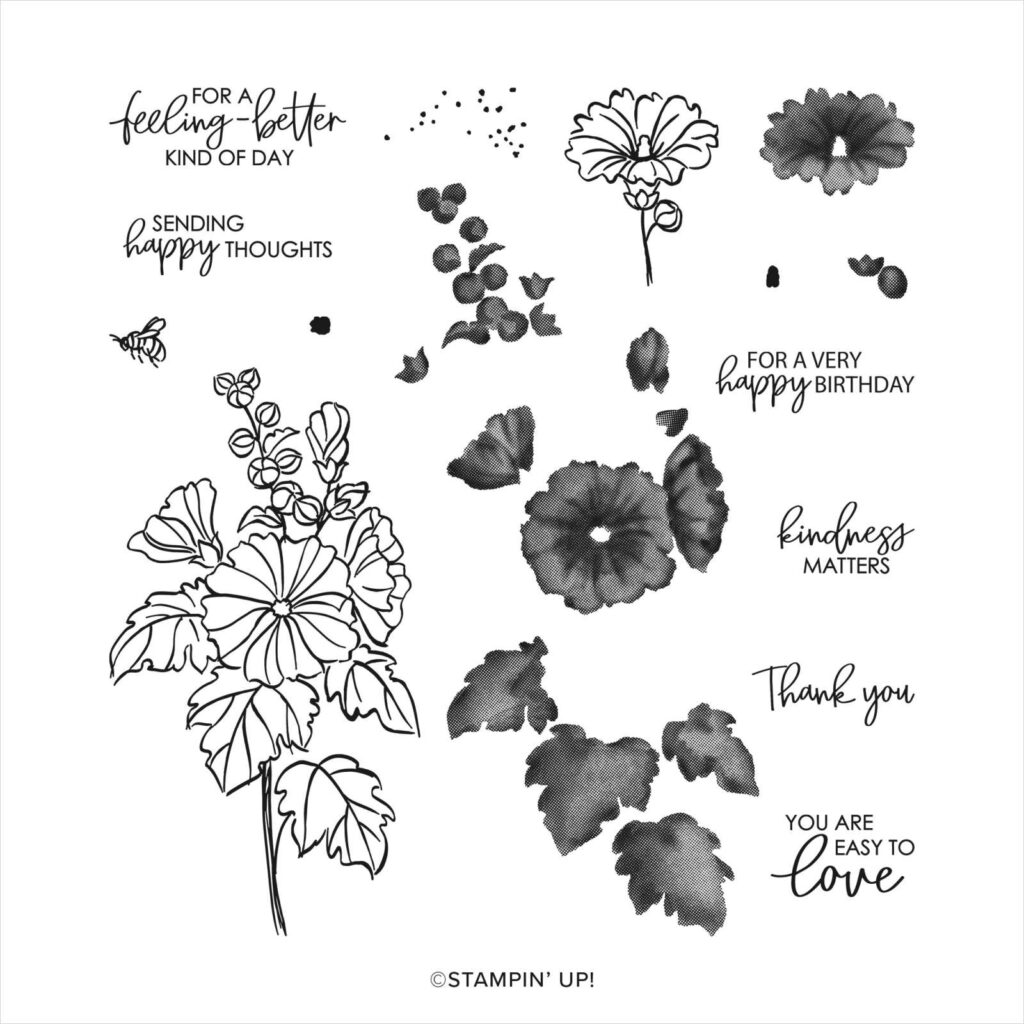
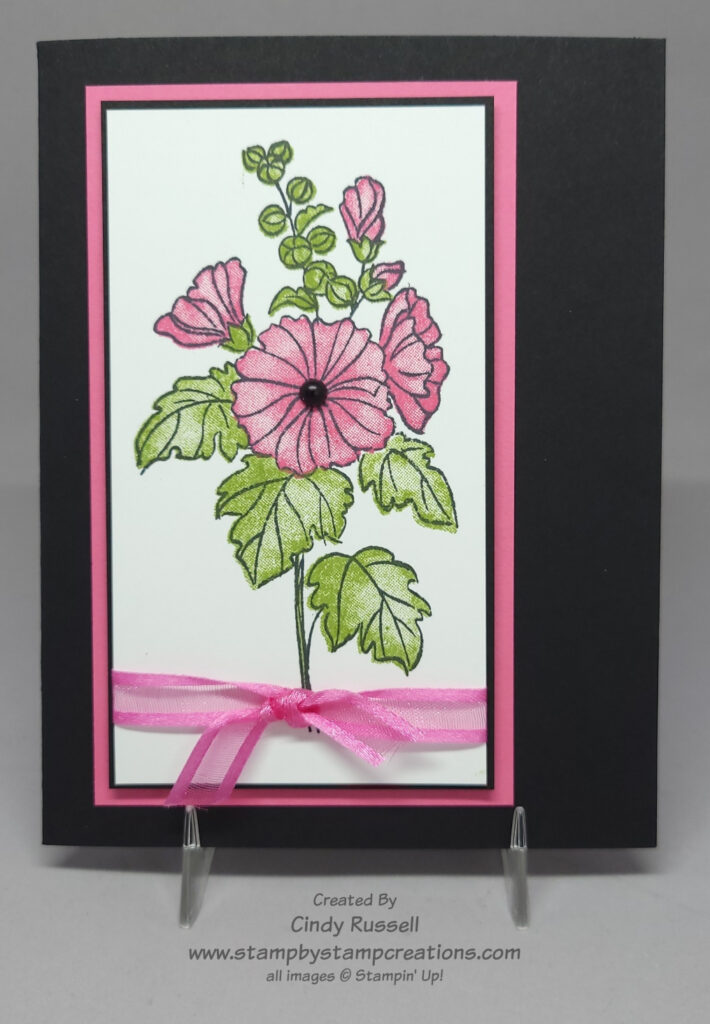
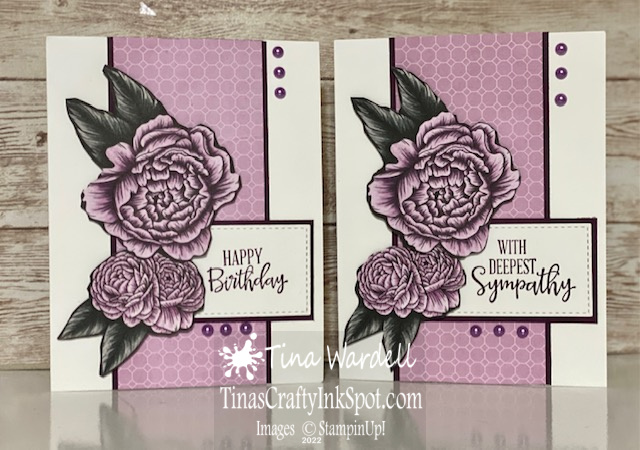
Let’s celebrate Stampin’ Up!’s Beautifully Happy Sale-a-bration stamp set. This stamp set is two-step stamping which means there is one stamp for the outlined image and another stamp (or more) to fill in the image. I had no problem lining up the solid images within the outline. So easy to work with! The hardest part of working with this stamp set was figuring out what colors to use. Ha! This stamp set also has 6 sentiments in a lovely font.
In this card that I made you can see how well the solid stamps lined up in the outline. Another thing I like about this stamp set is that the there are sentiments for both the inside and the outside of the card that go together.
You’ll definitely want to put this stamp set on your Sale-a-bration wish list. Have a great day! Take care and Happy Stamping!
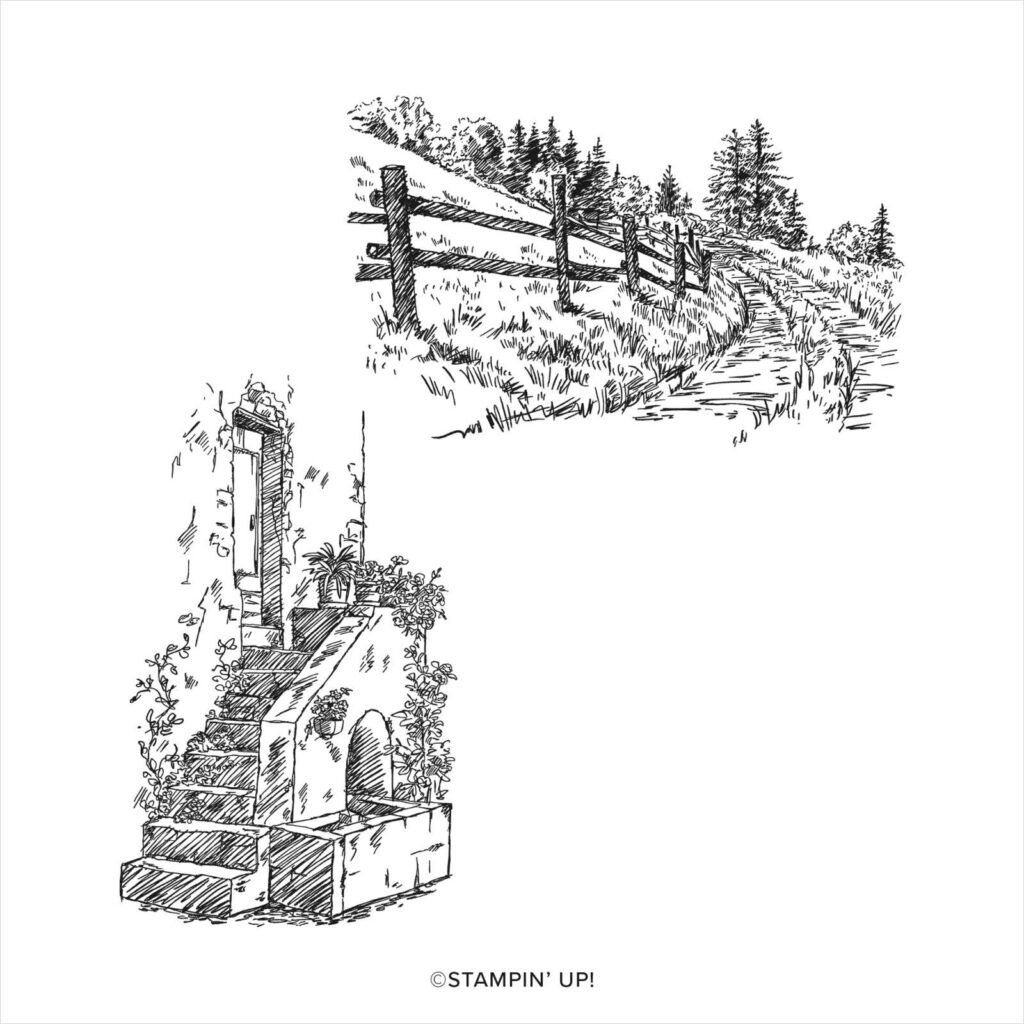
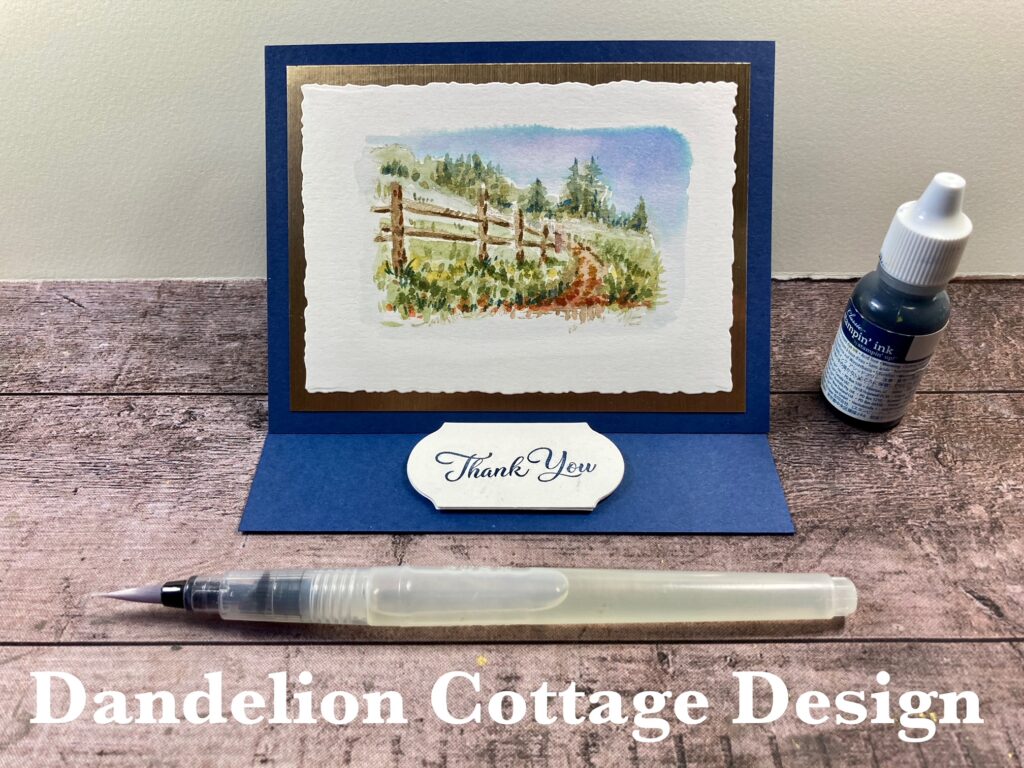
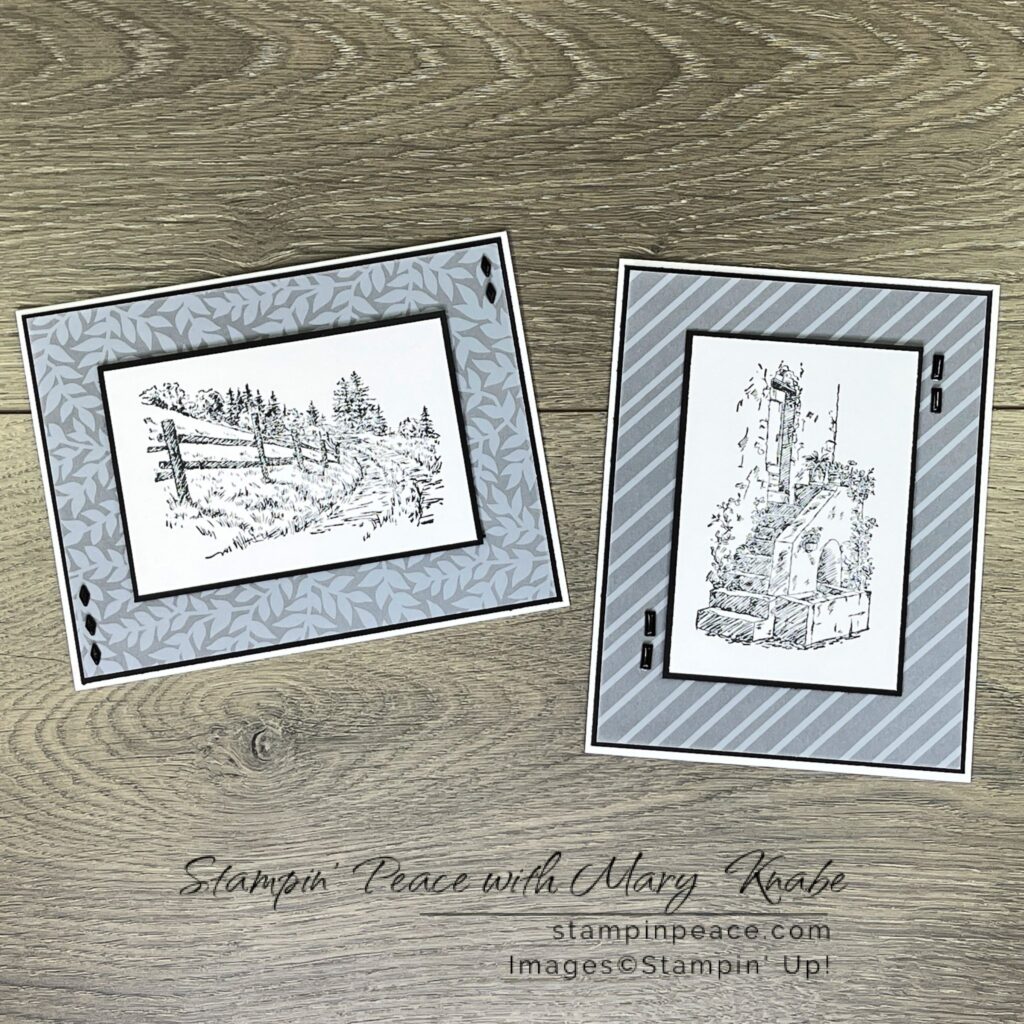
The Sale-a-bration stamp set In The Country is a lovely line art/sketched stamp set. There are two lovely images in the stamp set. They can be stamped and left as is or they can be colored…a little or a lot. The choice is yours.
Check out the first card here. This stamped image was water colored in detail. Gorgeous! I don’t quite have the patience (or talent) for this type of coloring.
The second card I’m sharing with you is more my speed. The image is stamped and not colored at all. The designer paper background makes the image pop.
Whether you decide to color the images or not, the In The Country stamp set is a good Sale-a-bration choice.
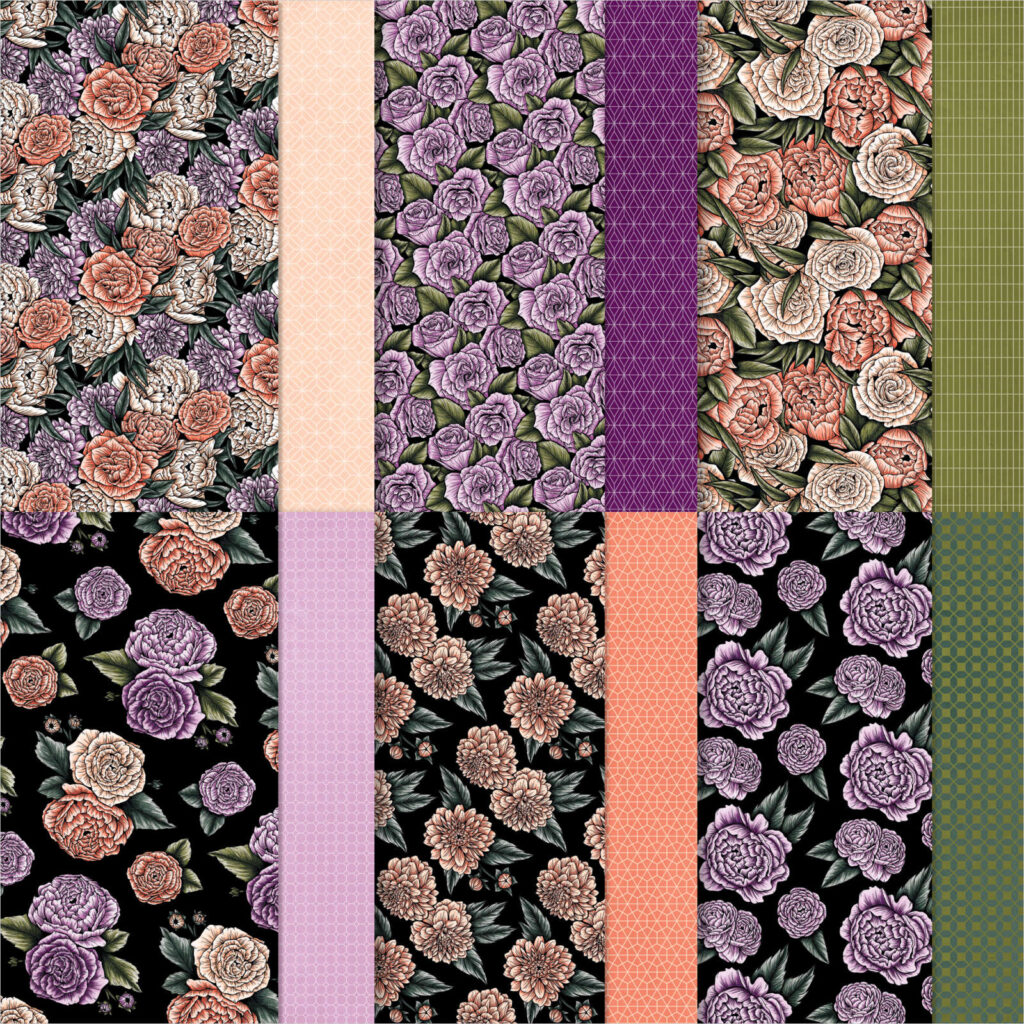
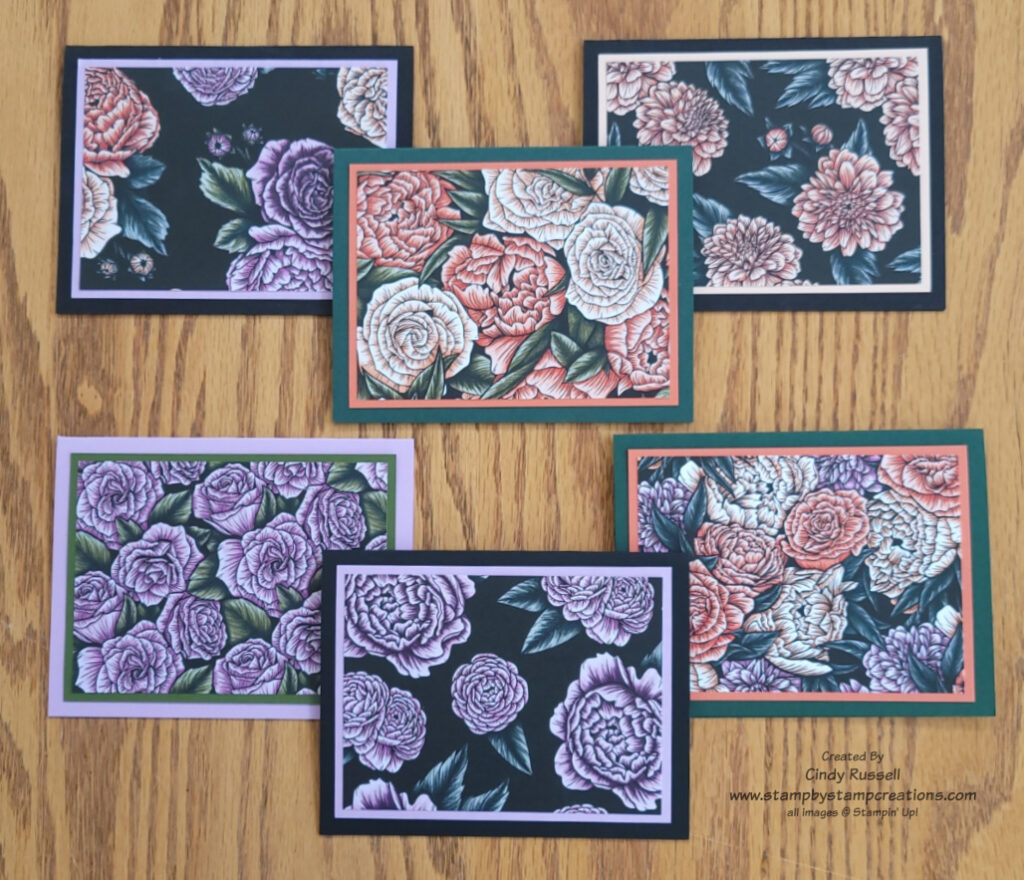
The Favoring Flowers Designer Series Paper is yet another choice during Sale-a-bration 2023. This designer paper is lovely. One side of each sheet is a floral pattern and the other side is a patterned design. The patterned sides of the paper coordinate with the first sides which I love, especially when working on 3D projects.
All six of the floral designs are beautiful. They work perfectly for simple cards. Here you can see all six of the designs made into cards. As you can see, the designer papers make the cards. Nothing else is needed unless you want to add a sentiment.
The Favoring Flowers Designer Series Paper coordinates with the Fragrant Flowers Bundle (stamps and dies). I’m not sure if any of the dies cut out any of the flowers on the papers, but the stamped images are quite similar to the flowers on the paper. You can also fussy-cut the flowers from the designer paper which is what a fellow demonstrator did on the last two cards.
This designer paper is lovely and I would definitely put it on your Sale-a-bration wish list, whether or not you have the coordinating Fragrant Flowers Bundle.