Lighthearted Leaves Thank You

IMG_6962
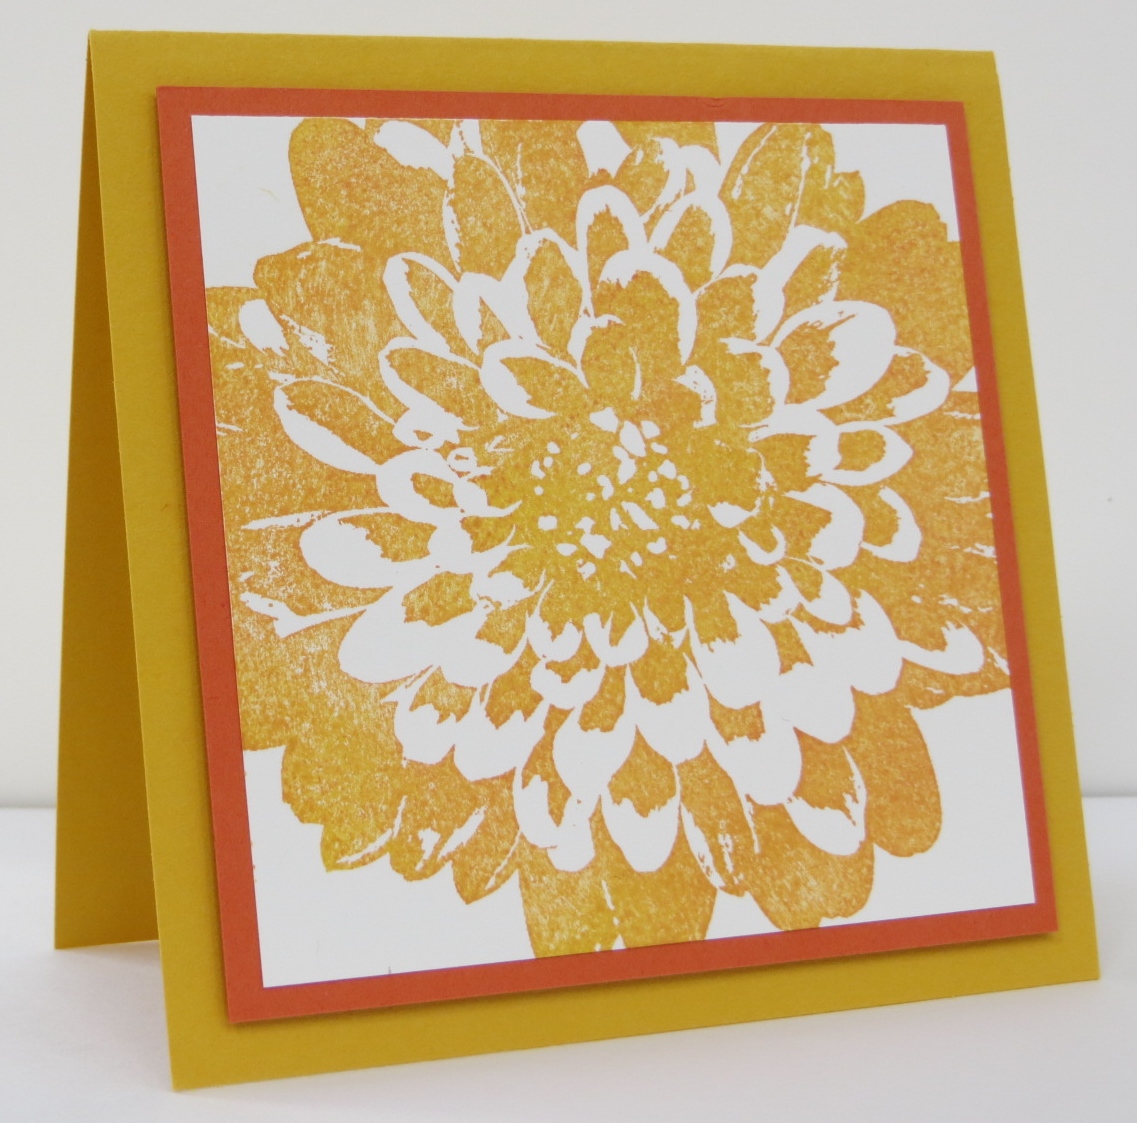
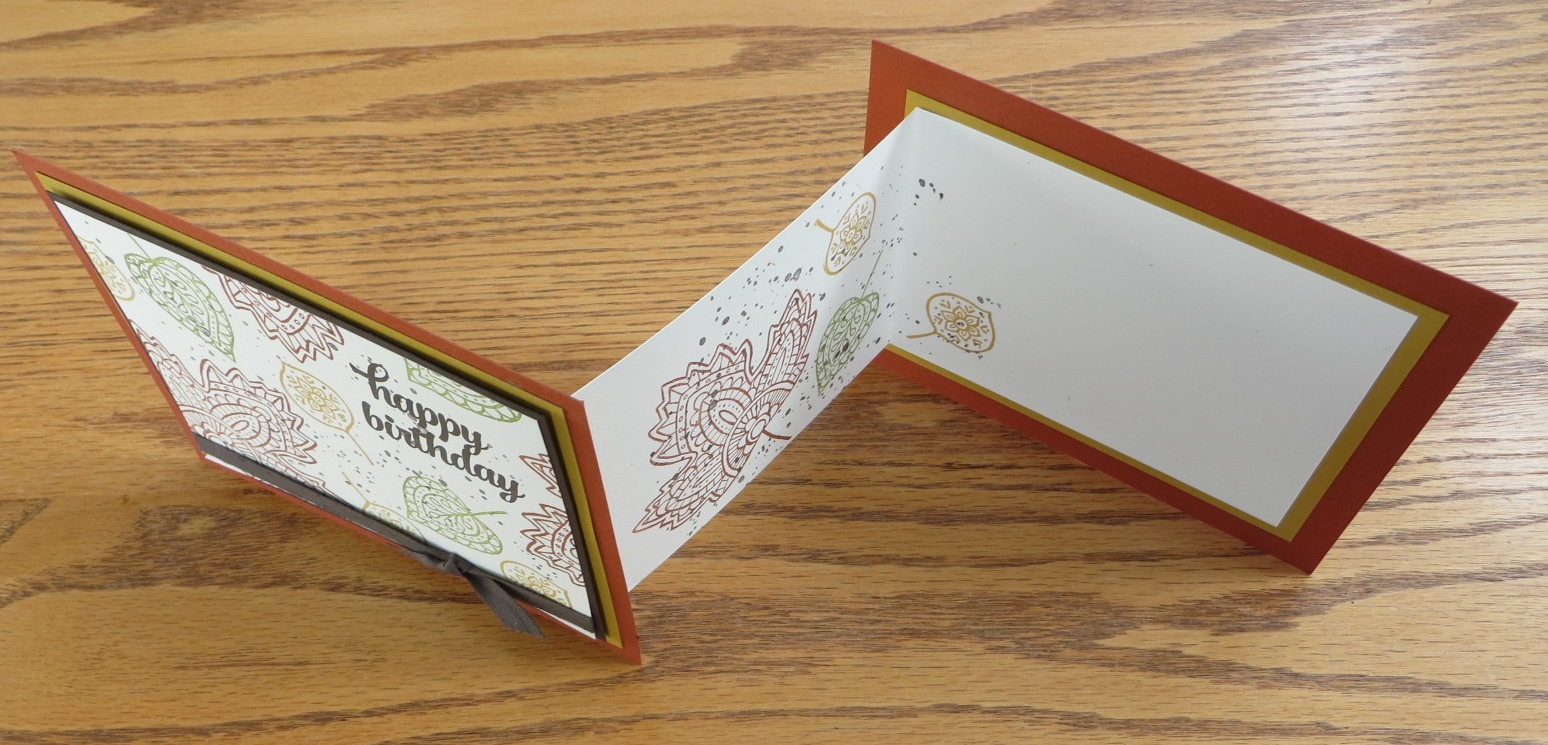
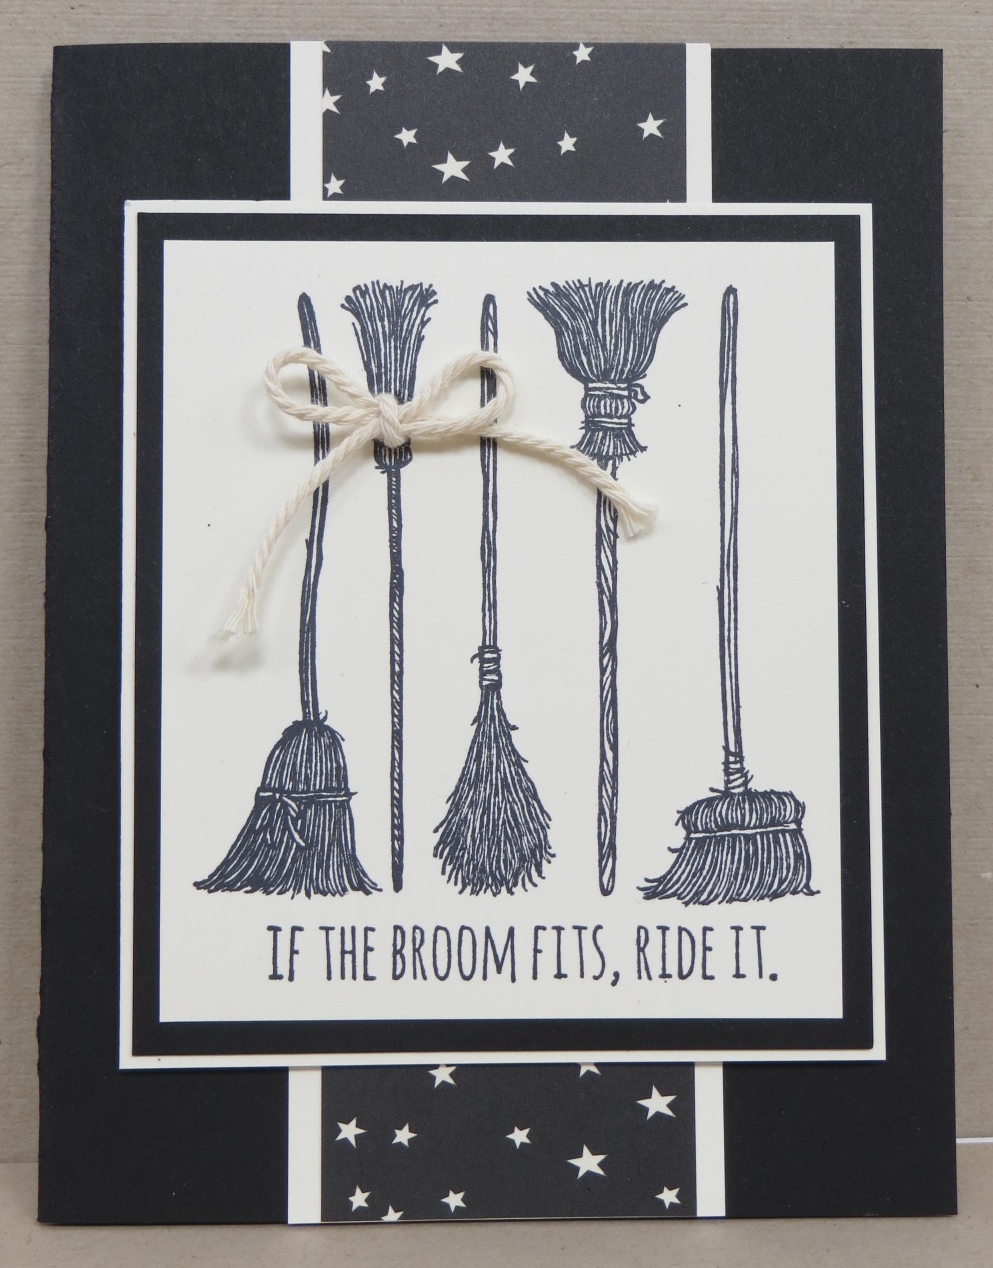
Thank you!  Thank you!  Thank you!  Yep….another thank you card.  A person can’t ever have enough of these.  I like to put a little 3″ x 3″ thank you card in with all of my orders when I sort them.  If someone has an order sent directly to them I try (try being the operative word here) to send them a full size thank you card.  Today’s card is one that I sent out recently to people who ordered online or had their order shipped directly to themselves.

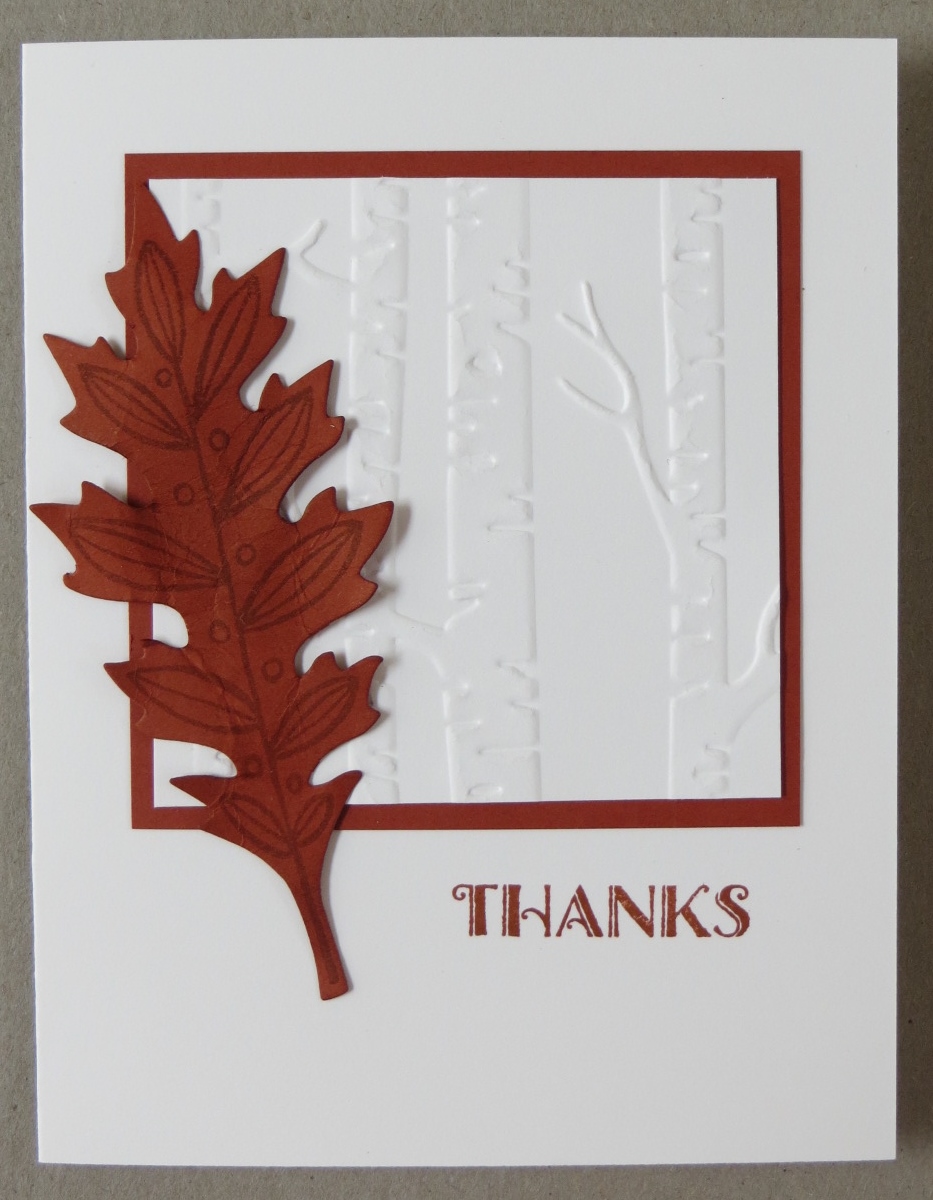
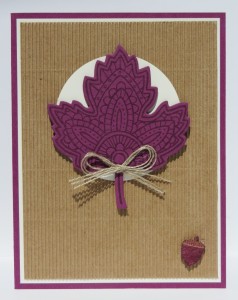
I used one of my favorite new embossing folders on this card as well as one of my favorite new stamp sets.  Who doesn’t love the Woodland Embossing Folder?  I have seen some gorgeous things done with this folder.  Maybe if I can find a little time to sit down to play I’ll make some samples to share with you!  🙂

Another thing I love (yes, I love lots of things…) is that the Lighthearted Leaves and Vintage Leaves stamp sets BOTH coordinate with the Leaflits Framelits!  It’s nice to get double the use out of a set of framelits!  Woo Hoo!

The “thanks” on this card is actually from one of the sentiments in the Lighthearted Leaves stamp set.  I just used my trusty Cajun Craze marker to color only that word and then I stamped in on the front of the card.  Versatility my friend, versatility!

Have a great day!  Take care and Happy Stamping!

Built for Free Using: My Stampin Blog

Lighthearted Leaves: Z-Fold

IMG_6975A few weeks ago I did a workshop.  I wanted the gals to be able to make 2 easy cards that had a WOW factor to them.  This fun Z-fold card was one of the cards I came up with.

From the outside it looks like your basic easy card.  Just stamp a sentiment and some leaves on the card, add some ribbon and layers and your done.

However….open it up…..and you have fun and IMG_6990unique card!  I was so excited when I found directions for this card on Pinterest.  On my card the long Very Vanilla piece on the inside that you make your “Z” with is 3 1/4″ x 11″.  You then score it 4 1/4″ and 9″.  You can probably make the width of the piece whatever you’d like but 3 1/4″ is the width the directions I found used so I went with that and had plenty of room for my various layers.  (Have you noticed that I love layers!)

IMG_6992Here’s another picture of the card where you can see the “Z”.  The key to making this card is to first attach the “Z” to the back piece of card stock.  Then make your “Z”, place adhesive on the section that will attach to the front piece of the card.  Then line up the front piece over the back piece, press down so that the “Z” adheres to the back of the front piece and your card is complete!

Be sure to let me know if you’d like more detailed instructions.  I’d be happy to share.

I can’t wait to try this type of card in class some time.  Maybe in my December All-Occasion class! 🙂

Have a great day!  Take care and Happy Stamping!

Built for Free Using: My Stampin Blog

More Weekly Deals!

One of the first things I do on Tuesday mornings is check out Stampin’ Up!’s weekly email.  I love to see what’s going on in the SU world and what’s coming up.  I also like to see what the new Weekly Deals are.  Who doesn’t love a deal?  There may be something that I “need”.  🙂

Last week’s stamp sale was a huge success for Stampin’ Up!  They sold tons of stamps and none of them went on back-order!  Ha!  Yes, they’ve been having some trouble with back-orders….lots of back-orders but hey….it happens.  You just have to go with the flow.  I got all worried and panicked because I had a class scheduled for today and tomorrow using the Shaker Card Kits and the silly things are on back order.  Well, guess what?  I rescheduled the class.  What a concept!  Sometimes I get stressed out for nothing.  I’m really trying to work on that.  That being said, I sure hope those kits ship this week!  😉

If you “need” any of the items from this week’s deals or anything else just go to my “store“.  Or you can click on one of the items below and it will take you right there too.

Have a great day!  Take care and Happy Stamping!

Built for Free Using: My Stampin Blog

Wicked

IMG_6852I’ve got to stop taking all of these breaks!  You’d think I was busy or something….sheesh!  I know that I’m not busier than anyone else but I seem to have a difficult time staying on task.   Does anyone else have this problem?

I had classes last week and then I had to plan for my next class so I could order the supplies so that they’d get here in time.  I keep telling myself that I’m going to plan ahead more but it doesn’t seem to happen.  OK.  Enough whining!

My friend Jan designed this card and I absolutely love it.  Isn’t it fun?  I especially like “wicked” across the bottom of the card.  Ohhh…..speaking of wicked….on Friday evening I got to see Idina Menzel in If/Then!  Wow!  Absolutely fabulous!!!!  She’s amazing…as was the rest of the cast.  Yesterday was the final day of the show here in Denver but if the show comes to your city you definitely want to go.  Incredible!

Alright….back to the card….

My favorite parts are probably the glittery witch’s hat and the spider web doily (and the “wicked”).  I actually had to purchase the Project Life Seasonal Snapshot 2015 just for the “wicked”.  Ok…I do like the rest of the stamp set too….

Part of the reason I like the card so much is that it is totally different from anything I’d design.  That’s why I like participating in swaps where I trade my cards for other people’s.  New ideas and fun new methods.

In a few weeks Jan and I are heading to Dallas for a Stampin’ Up! event.  We’ll get a sneak peek at the upcoming Occasions Catalog.  I can’t wait!  We’re going a few days early to hang out in Dallas.  We’re not sure what we’re going to do so if you have any ideas for us to do while we’re there let me know.

Have a great day!  Take care and Happy Stamping!


Howl-o-Ween Treat Bag

IMG_6834One more fun Halloween project!  This treat bag turned out pretty darn cute if I do say so myself.  These Petite Café Gift Bags are cute themselves but add the adorable owl and….oh, my!  🙂

Confession….this was the first time I used my Hearts & Stars Decorative Masks.  I have them sitting on my shelf, I just don’t think to use them.  They’re very easy to use though.  Just place them on your project, ink up a Sponge Dauber and daub away!

Did you check out the second photo?  I actually did a little something to the back of the bag.  I guess I could have sponged some more stars on the back too but I just didn’t want to get carried away.  Ha!

IMG_6835I usually don’t end up using a lot of the 3D projects I create.  (OK….let’s be honest….I don’t actually even send many cards even though I love to create them!)  I do want to let you know though that I did use this one.  I had a little workshop on Friday and I filled this adorable treat bag with Halloween candy and gave it to the hostess.  That was quite a big step for me…using something I had on hand.  I’m usually trying to figure out a hostess gift at the last minute.

Don’t forget about the BIG SALE!  15% off all stamps!  It only lasts a week….don’t miss out!  Shop now!

Built for Free Using: My Stampin Blog

Howl-o-ween Treat Pillow Box

IMG_6842I only bought one Halloween stamp set and one Halloween stamp.   The stamp was the fun If the Broom Fits (see this post).  The stamp set was the adorable Howl-o-ween Treat.  One of the reasons I really like this stamp set besides the the adorable images is that there is a COORDINATING framelit set:  Boo to You!  Woo Hoo!  How can you go wrong with a cute stamp set and coordinating framelits?

I wanted to use some more of the cute Happy Haunting Halloween designer paper.  The ghosts pattern I used yesterday and these little spider webs pattern are probably my favorite from the pack.

Have you tried the Square Pillow Box Thinlits Die yet?  It’s SO easy to use!  You just die cut two of the pattern, adhere the sides together and fold in the tops!  Done!  Then you just decorate it in whatever way you’d like!  Easy peasy!

The hardest part of these little pillow boxes is figuring out what to put in them!  Ha!

Have a wonderful day!  Take care and Happy Stamping!

Don’t forget that ALL Stampin’ Up! stamps are 15% off this week and this week only!  Shop now!

Built for Free Using: My Stampin Blog

It’s a SALE!!!

stampsale.1015Woo Hoo!  Today’s the day!  Stampin’ Up! stamps are on SALE!  15% off!  Did I say Woo Hoo yet?  I’m SO excited!!!  Are you?

ALL Stamps are on sale except for Hostess stamp sets, rotary stamps and bundles.

Have you made your wish list yet?  Get busy as this sale is good only through Friday, October 23rd.

I’m having a Mystery Hostess Workshop this week and you can be part of it just by placing an order.  Place your order in my online store and on the check out page you can enter the Hostess Code ZW6EKPTG.  Your name will be in the running for hostess!  For the Mystery Hostess Workshop, all orders must be placed no later than Thursday, October 22nd at 9 pm (MT).  I will draw names for the hostess that evening and contact her on Friday morning for her hostess choices.

Don’t miss out!  Get shopping!  🙂

Halloween Among the Branches

IMG_6965What is Halloween without a spider web, a spooky spider and ghosts?!   This card has them all along with glittery paper!

I used many fabulous new products on this card.  The only things not new are the Pumpkin Pie card stock and ink!  Oh…and the Very Vanilla card stock.

Don’t you love the Spider Web Doily.  It is so fun!  Unfortunately the Spider Web Doilies are also very popular and are on back-order.  🙁  You can still order them but you won’t have them for Halloween.  There’s always next year’s projects though.  Right?  I also love the Black Glimmer Paper.  Oooo!  It goes so well with the Happy Haunting Designer Paper….Of course it does!  Stampin’ Up! loves coordination almost as much as I do!

I do have a story about this card though.  Naturally I got the idea for this card from Pinterest.  (Love that site!)  When I went to make my sample to see if it was “class worthy” I couldn’t figure out how they punched/die cut out the “spooky” circle.  I checked all my circle punches and every single circle framelit in the set and none of them fit.  I finally cut the darn thing out by hand!  I know….fussy cutting!  Yikes!

After I got the card together and had moved on to other things I thought to check the catalog to see if I was missing something.  Sure enough….did you know that Stampin’ Up! has a 2″ Circle Punch?  It’s not even new this year and I didn’t have it!  I have almost every tool in the darn catalog!  How had I missed that one?  Luckily I still had to order all of the supplies for my Halloween class so that 2″ Circle Punch was the first item on the order form.  Sheesh!  I guess I need to start going through the new catalog with a fine tooth comb so I don’t miss anything else!

I just happened to have the catalog open to the punch page while I was writing this and noticed that there’s a 1 1/2″ Circle Punch with the word “NEW” by it.   Hmmm……I better add it to my next order…

Have a great day!  Take care and Happy Stamping!

Built for Free Using: My Stampin Blog

Halloween Treat Bag

What is the candy that no matter what time of year it is you think….Halloween!  Yep!  Candy Corn!halloween candy corn  There are so many fun craft projects with candy corn.  Don’t you love these wine bottles?  I may have to give them a try…..

At convention one of the presentersIMG_6195 showed us this adorable treat bag made with the Sketched Dots Tag a Bag Gift Bag.  Don’t you love it?  I have to admit that I was going to try to recreate it but I had a problem when I inked the bag.  It didn’t seem to dry very fast, even when I used the heat tool.  I knew I couldn’t use that technique in my Halloween class so I came up with my own little treat bag.  I do think I’ll have to try this one from convention again.  It’s so stinkin’ cute!

So finally, here’s the project I came up with.  I call it a treat bag card.  Instead of inking the treat bag directly I just kept the bag plain and designed a card to go in it!  Much easier to replicate in class.


IMG_6855

IMG_6858


Instead of inking the bag I just inked a piece of card stock.  Now I had a cute candy corn card to put in my bag and I still had room for treats!  🙂

I thought of putting one of the cute spider web doilies on the front under the “trick or treat” but I wanted to make sure you could see the candy corn.

Have a great day!  Take care and Happy Stamping!

Built for Free Using: My Stampin Blog

If the Broom Fits Halloween

IMG_6849Halloween is a little over two weeks away!  Yikes!  I guess I better start showing you my Halloween projects!

I may as well start with the first Halloween stamp that caught my eye in the Holiday Catalog.  I saw this and just knew I had to have it!  It’s so appropriate!  Ha!

It’s so stinkin’ cute!  Of course the saying is my favorite part!  🙂

This was a very easy card.  Layers, a little designer paper (the fun Happy Haunting paper) and of course some ribbon (baker’s twine).  Oh, don’t forget the dimensionals!

Do you have a favorite Halloween stamp set from the Holiday Catalog?  Which one?  Leave a comment and let me know!

Have a great day!  Take care and Happy Stamping!

Built for Free Using: My Stampin Blog

Fall Sheltering Tree

IMG_6813Here I go again with the corrugated paper!  Have I told you how much I like it?  Ha!  🙂

I came up with this card designing for my “fall class” that was held last month.  It’s definitely a “Cindy card”.  Layers, ribbon and now of course the corrugated paper!  The kraft corrugated paper works so perfectly for fall cards (or hadn’t you noticed by some of my latest posts!).  🙂

I love fall.  It’s my favorite season.  This year it’s been kind of weird though.  I’m pretty sure the temperature in CO isn’t suppose to be in the mid 80’s at the end of September/beginning of October.  Sheesh!  I want to have to wear my jeans and sweatshirts, not my flip-flops!  I know.  There are plenty of people who love summer and the warm weather but I’m just not one of them.  What about you?  What’s your favorite season?  Leave me a comment and let me know!

Have a great day!  Take care and Happy Stamping!

Built for Free Using: My Stampin Blog

Thankful Forest Friends

IMG_6823Isn’t this bear adorable?  If you like him you need to check out his little buddies fox and hare in the Thankful Forest Friends stamp set.   Stinkin’ cute!

Did you notice that I used my favorite corrugated paper on this card?  It just adds so much to the card.  I really miss Stampin’ Up!’s textured card stock.  Even though the texture was subtle it added a little something-something to the card.  But now they have corrugated card stock!  Woo Hoo!  I wish they had it in ALL the colors!  🙂

I did have to “fancy cut” the bear since there aren’t any framelits for this stamp set.  I tell you…a girl gets spoiled….!

Have a great day!  Take care and Happy Stamping!


Built for Free Using: My Stampin Blog

Lighthearted Leaves Swap

IMG_6771It was a busy weekend with family.  My cousin and her husband drove out here to CO from Chicago.  Their daughter has been living with us for a few months after moving to Denver.  She finally got into her new apartment and we all moved her belongings into the new place on Friday.  We’ve had a busy weekend of visiting, sight-seeing and having a good time.  Now it’s time to get back to reality.  🙂

I designed this card for a swap I participated in.  I do have to admit that I was pretty pleased with the results.  This is actually the first card I used my new favorite on…corrugated paper!  I tell you….I can’t get enough of it!  Love that stuff!  Since the corrugated paper pack comes with both kraft and white and I’ve only been using the kraft I’m going to have to design something with the white.  I’m thinking the white will be perfect for a Christmas card!  Don’t you?  The card is really quite simple but I think it’s rather striking.  Isn’t the little acorn from the Into the Woods Elements cute?  To color it I simply took my Sponge Dauber and rubbed the ink directly on it.  If you try that sometime be sure to rub off the excess with a tissue or you’ll have the ink all over you.

Have a great day!  Take care and Happy Stamping!

Built for Free Using: My Stampin Blog

Definitely Dahlia for Fall

IMG_6830I always think of my mom and her dad when I see a Dahlia.  I’m sure I’ve mentioned this before but they were both avid Dahlia growers.  My mom still grows them.  My grandpa used to enter his at the Minnesota State Fair and win medals.  In our first house in Minnesota I had a little garden and grew some.  It was fun to carry on the tradition.   We weren’t in our next two houses long enough to even think about a garden and our yard here in Colorado is so small a garden would take up the whole thing!   Well, maybe not the whole thing.  Actually, the back yard does get sun most of the day….maybe I should think about growing some dahlias next summer…..  🙂

I think I came up with this card when I was coming up with ideas for my “fall” class last month.  I like it, but it didn’t make the cut.  It’s hard to tell but I kind of did a little bit of the Rock ‘n Roll technique on the flower.  I first inked up the flower in the Crushed Curry and then I barely rolled the edges in the Tangerine Tango.  Actually, you can hardly tell there’s any orange in the flower at all…just a hint.  It’s one of those cards that definitely has a little more pizzazz in person.

Did you notice that I it’s my favorite size card?  Yep…4 1/4″ x 4 1/4″.   I made this card a while ago….I think it’s time to start creating again….  🙂

Have a great day!  Take care and Happy Stamping!


Built for Free Using: My Stampin Blog

More Weekly Deals!

If you’re like me, you love a deal!  Do you ever check out Stampin’ Up!’s Weekly Deals or the Clearance Rack?  Do you know that you can check them both out on my website?  Both can be found at the top of the left-hand section.

Below you can find this week’s Weekly Deals.  Hmmm….what should I order?  I think I’ll definitely get some of the Old Olive Baker’s Twine.  It will be perfect  for those Christmas projects!  What are you going to order?

I just checked out the Clearance Rack.  Wow!  There’s a lot of stuff on there.  Do you remember the Halloween Wreath from last year?  Well, they have the kit for it in the Clearance Rack now for only $10.79 (item #135866).  They were pretty darn cute.  There’s still plenty of time to order yours and get it ready for the big day!

Have a great day!  Take care and Happy Stamping!

Built for Free Using: My Stampin Blog