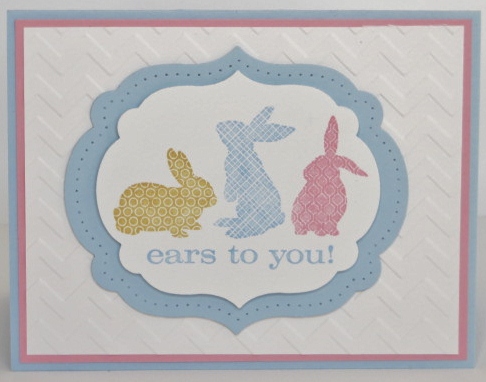
Hearts A Flutter Banners

Itty Bitties.0113
Stamp Set: Itty Bitties
Card Stock: Pool Party, Primrose Petals, Very Vanilla
Specialty Paper: More Amore Designer Paper, Pool Party and Primrose Petals Core’dinations Card Stock
Ink: Pool Party
Accessories: Pool Party Seam Binding, Stampin’ Dimensionals, Mini Glue Dots, Designer Builder Brads, Basic Pearls
Tools: Big Shot, Hearts A Flutter Framelits, Itty Bitty Punch Pack, Bitty Butterfly Punch

I want you to know that I didn’t actually use the Hearts A Flutter stamp set on this card (although I could have)!  I just used the wonderful coordinating Hearts A Flutter Framelits for the banners!  No Hearts A Flutter stamps on this card! I do have hearts though.  They’re from the fun new set “Itty Bitties”.  Have you checked it out on page 25 of the Spring Catalog?  You get 56 images in this stamp set!  These adorable little images (which you have a hard time seeing on my card) fit perfectly in the gorgeous new Designer Builder Brads!  I LOVE these designer brads!  (OK….I know what you’re thinking….I LOVE everything!…but that’s why I’m a demonstrator….I can “justify” getting everything that I LOVE! :D)

Back to the Itty Bitties Stamp Set….after you stamp the cute little images just punch them out with the circle punch from the Itty Bitty Punch Pack….it’s the perfect size to fit in the center of the Designer Builder Brads.  Did you notice the other new items used on this card (no, I did not design it…it’s CASEd!)?  They are the Bitty Butterfly Punch (too cute!) and the Pool Party and Primrose Petals Core-dinations card stock.

There’s certainly a lot of fun and exciting products in the new Spring Catalog.  What’s your favorite?

Glizty Snowflake

Card Stock: Night of Navy, Whisper White, Shimmery White, Silver Glimmer Paper
Accessories: Frost White Shimmer Paint, White Organza Ribbon, Rubbing Alcohol, Mini Glue Dots, Stampin’ Dimensionals, Large Basic Pearl Jewels
Tools: Big Shot, Snow Flurry Die, Northern Flurry Embossing Folder

Another card from the Glitz, Glimmer and Glam Christmas Card Class.  Very sparkly!  😀  That was a really fun class!  Sorry you missed it!  🙁 It’s hard to see but the Night of Navy background is embossed with the Northern Flurry Embossing Folder.  Then I spritzed it with a mixture of Frost White Shimmer Paint and rubbing alchohol.  When you make your own mixture like this be sure to use 70% rubbing alcohol.  A higher percentage will mess up your spritzer.  Have you tried the new Stampin’ Spritzers?  They work great!   Once again, I’m not please with this picture.  There’s almost too much shine!  Not in person though….just enough glitz!

Classes went well this week.  Now I just need to plan the one class for December.  Speaking of December…can you believe it will be here in just a few days?  Yikes!  I’m really kind of anxious for December 1st so I can place a pre-order from the new Spring Catalog!  It’s fabulous!  😀  Unfortunately you have to wait until January for yours.  Bummer!  If you’re lucky though and I find time maybe I’ll make a card to share with you using some of the new product.

Have a wonderful day.  Take care and Happy Stamping!

Peaceful Ornament

Thanksgiving is over.  The excitement of my son’s engagement (isn’t) over.  It’s time to start showing you some Christmas cards!  Yes!  I know you’ve been waiting  so let’s get started!

This is my favorite card from the Glitz, Glimmer and Glam class we had about a month ago.  I used a Stampin’ Sponge to sponge the Marina Mist ink on the Whisper White Taffeta Ribbon.  I love being able to make that ribbon whatever color I like!  To make the ornament shimmery I sponged Frost White Shimmer Paint directly onto the stamped ornament.  It’s such a pretty look.  This picture doesn’t do the card justice.

Speaking of Christmas cards I suppose I should consider making some to send out this year…..

Have a great day!  Take care and Happy Stamping!

Open House Evergreen

Good morning!  There’s a little bit of snow on the ground this morning and it made me think of Christmas.  So, when I’m thinking of Christmas, I naturally think of Christmas cards!  Therefore….I have a Christmas card for you today!  😀

We made this card at my Open House way back in August!  It’s a fairly simple card with tons of layers.  I wanted to showcase the new color, Gumball Green, as well as the Core’dinations card stock.

I used the Vintage Wallpaper Embossing Folder on the Gumball Green Core’dinations card stock at my Open House because I didn’t have my new favorite embossing folder, Lacy Brocade.  It looks great with both backgrounds but the Lacy Brocade has a lighter feel to it.  After I embossed the Core’dinations card stock I used the new Stampin’ Up! Sanding Block to distress it.  What a great look!  Just stamp the tree and add some layers and your card is done!  This would make a great and easy card to mass-produce!

Have a great day!  Take care and Happy Stamping!

Fall Flowers

Card Stock: Early Espresso, More Mustard, Very Vanilla
Specialty Paper: Early Espresso Core’dinations Card Stock, Howlstooth & Scaringbone Designer Paper
Accesories: More Mustard Scallop Dot Ribbon, Stampin’ Dimensionals
Tools: Big Shot, Flower Garden Embossing Folder, Sanding Block, Dotted Scallop Ribbon Border Punch

Hello!  I’m catching up on things and hopefully I’ll be able to stay up-to-date on my blog posts!  Sheesh!

Today’s card was one we made a few weeks ago and I  CASEd it from a card we made at a Shoebox Swap with the team.  It’s a pretty simple card.  I really like the new Core’dinations card stock.  It really adds a new dimension to your projects, especially when you use the sanding blocks with it.

Today I need to start cutting card stock for next week’s Christmas Card Stamp-a-Stack.  There’s still some space left.  Let me know if you’d like to join us!

Have a great day!  Take care and Happy Stamping!

Punch Art Pumpkin

Woo Hoo!  The election is OVER!  No more annoying phone calls, no more annoying TV ads, no more annoying junk mail and no more annoying people coming to door telling me to vote for their candidate!  It’s OVER!!!!!  Whew…I sure feel better getting that off my chest!  Congratulations President Obama and I wish you and our country a successful 4 years.

I CASEd this cute card from my upline Tara.  So simple, yet so cute!  😀  The fun part of this card that you can’t really see from the picture is that the Elegant Lines embossed background actually continues on the Water Color Paper!  Before you emboss your large background piece you use your temporary adhesive to adhere the Water Color Paper to it.  Then emboss.  When you’re ready to put your card together just align the embossed images and you have a really neat looking card.  Too cute!  Thanks Tara!

Off to get some things done like cut tons of card stock for next week’s Christmas Card Stamp-a-Stack!  Have a great day!  Take care and Happy Stamping!


Merry Minis Stamp Camp Project

Stamp Sets: Merry Minis, Chock Full of Cheer
Card Stock: Garden Green, Real Red, Whisper White
Ink: Garden Green, Real Red
Accessories: Real Red 1/4″ Stitched Grosgrain Ribbon, Mini Glue Dots, Stampin’ Dimensionals
Tools: Big Shot, Scallop Envelope Die, Window Frame Framelits, Merry Minis Punch Pack, Perfect Polka Dots Embossing Folder, Crop-o-dile

Hello!  Stamp Camp on Saturday went very well.  I think everyone enjoyed themselves and things went quite smoothly.  This is one of the projects I designed for camp.  I need to thank my wonderful friend and downline Cindy for cutting everything for this project.  I never would have gotten it done without her help!

The little box is made from two Scallop Envelopes die cut on the Big Shot.  The little tags are made with one of the Window Frame Framelits.  How did we every make cards and projects without the Big Shot?!

Wouldn’t this little box of tags make a cute hostess gift for all of those holiday parties you’ll be attending soon?  Have a great day!  Take care and Happy Stamping!

Toxic Treats Treat Box

Stamp Set: Toxic Treats
Card Stock: Basic Black, Basic Gray, Pumpkin Pie, Very Vanilla
Ink: Basic Black
Accessories: Stampin’ Dimensionals
Tools: Big Shot, Fancy Favor Die, Labels Collection Framelits

Yes, Halloween is definitely on it’s way and it’s time for more spooky treats.  What better way to present your treats than in this adorable Toxic Treats Treat Box! (Wow!  That’s a mouthful!)  This little box is SO easy to make.   I cut a strip of designer paper and with temporary adhesive attached it to the edge of the Basic Black card stock before running it through the Big Shot with your Fancy Favor Die.  When everything was die cut I removed the designer paper and then re-attached it with a little border BEFORE putting my box together.

If you read the ingredients for my project under the picture you noticed that I used Basic Black ink and Very Vanilla card stock.  Stampin’ Up! has recommended not using this combination because the new formula of Basic Black ink doesn’t seem to dry on Very Vanilla and Whisper White card stock (They’re working on this…).  They recommend using the StazOn Black ink for these papers.  Well, I wasn’t liking the way that my StazOn was covering (yes, I probably could have re-inked the ink pad) so I went with the Basic Black.  The secret is to heat set the ink with your heat tool!  A simple solution to the problem.

You’ll notice that I don’t have any treats in my treat box….well, I don’t think I’m going to buy my candy until 4 pm on October 31st.  I simply don’t have any will power!  Unfortunately, I like to be prepared so we’ll see how long this idea really lasts!

Have a great day!  Take care and Happy Stamping!

Two Tags Treat Holder

Stamp Set: Googly Ghouls
Card Stock: Basic Black, Tangerine Tango, Very Vanilla
Designer Paper: Howlstooth & Scaringbone
Ink: Black StazOn
Markers: Tangerine Tango, Summer Starfruit
Accessories: Basic Black 3/8″ Taffeta Ribbon, Stampin’ Dimensionals
Tools: Big Shot, Two Tags Die, 1 3/4″ Scallop Circle Punch, 1 3/8″ Circle Punch,
1 1/4″ Circle Punch

This week’s class theme was Halloween.  Yes, it’s a bit early but since I’m headed out of town next week and won’t be back until almost the middle of October I wanted to get it in.  You just have to make Halloween stuff!  It’s SO fun!

Here’s one of the fun projects we made this week this.  Isn’t it cute?  It’s pretty easy to make too.  You use the Two Tags Die to cut the little holder.  You fold your card stock in half and place the fold just inside the bottom edge of the tag outline on your die.  If you don’t do it this way you end up with two pieces instead of one folded piece…oops!  Fold down one of the scallops and decorate whatever way you choose.  Place your candy (or one of those skinny drink packets) in the holder and tie your ribbon around it to hold it in.  The ribbon goes under the scallop flap you folded down.  That’s it!  Pretty simple.   OH……don’t forget the googly eyes!  They’re the best part!  😀

Have a great day!  Take care and Happy Stamping!

Wonderfall Leaves

Stamp Set: Wonderfall
Card Stock: More Mustard, Raspberry Ripple, Cajun Craze, Early Espresso Core’dinations
Designer Paper: Orchard Harvest
Accessories: Brushed Bronze Designer Buttons, 1/8″ Early Espresso Taffeta Ribbon, Stampin Dimensionals, Mini Glue Dots
Tools: Big Shot, Autumn Accents Die, Woodgrain Embossing Folder, Dotted Scallop Ribbon Border Punch

Don’t you just love fall.  It’s definitely my favorite season.  Here’s a card made with the Wonderfall Stamp Set and the coordinating Autumn Accents Die.  I have to admit that I’m a bit confused as to why Stampin’ Up! made a die for the leaves instead of framelits.  As it is now when you use these two products together you die cut the leaves first and then you ink up your coordinating stamp and lay the die cut leaf on the ink stamp to get your image.  It’s not too hard to get it lined up right but using a framelit after you’ve stamped the image would have been SO much easier.  I love leaves though so these two items were some of the first items from the fabulous Holiday Catalog that I had to get!

Have you worked with the new Core’dinations Card Stock yet?  It’s really fun.  It’s  got an inner core to it so when you sand it you get this really neat weathered look.  It’s really fun!  I love using it with the Woodgrain Embossing Folder.  You get this fabulous weathered look.  Don’t you love it?!  You should definitely try it sometime!

I had to use that fun new designer paper, Orchard Harvest, on this card again.  It’s just so…well, FUN!  Have a great day!  Take care and Happy Stamping!

Perfectly Preserved

Stamp Set: Perfectly Preserved
Card Stock: Cajun Craze, More Mustard, Lucky Limeade, Very Vanilla
Designer Paper: Orchard Harvest
Accessories: Stampin’ Dimensionals
Tools: Big Shot, Woodgrain Embossing Folder, Perfect Pennants Die, Cannery Set Framelits, Bitty Banners Framelits

Here’s another one of those darn stamp sets that I didn’t have to have when I first saw it.  Then, all of these darn, talented people start making cards with it and I can’t resist it.  What’s with that?  Now I can’t get enough of that cute little jar and all of those pieces of fruit and veggies!

This card is CASEd from the talented Michelle Theriault.  Thanks Michelle!  That little cob of corn is SO darn cute and then when you put it with the adorable paper….YIKES!

Don’t you just love the new Woodgrain Embossing Folder?  It adds so much dimension.  I rubbed Lucky Limeade ink over it to give it even more texture.  Wow!

Have a great day!  Take care and Happy Stamping!

Friendship Preserves

Stamp Set: Friendship Preserves
Card Stock: Raspberry Ripple, Lucky Limeade, Very Vanilla
Designer Paper: Orchard Harvest
Ink: Lucky Limeade
Accessories: Lucky Limeade Ruffled Ribbon
Tools: Window Frames Collection Framelits, Paper Piercing Tools, Festive Paper Piercing pack, Big Shot

Hello!  I know I’m starting to slack on my posts again….sorry about that.  Time just seems to escape me!  We made this card in class this week.  Simple, but fun!  The more I play with the Orchard Harvest Designer paper the more I love all the colors in it.  It’s so fun!

Don’t you just LOVE all the new framelits that Stampin’ Up! is coming out with?  They make cutting out a stamped image SO easy!  At Stampin’ Up!’s regional event here in Denver last weekend we learned such an easy tip to use with these framelits….not sure why I couldn’t have thought of it myself….to keep your framelit centered around your stamped image just stick a post-it sticky note over it!   Wow!  Such an easy trick!  How come I can never think of these things?!

It’s hard to tell in the picture but on the Raspberry Ripple window frame I paper pierced around the edge using the the Festive Paper Piercing Pack.  Another wonderful item from SU!

Have a great day!  Take care and Happy Stamping!

French Foliage Swap

Stamp Set: French Foliage
Card Stock: Early Espresso, Island Indigo, Very Vanilla
Ink: Early Espresso, Island Indigo
Tools: Big Shot, Square Lattice Embossing Folder, Stampin’ Sponge

Hello!  Saturday I attended Stampin’ Up!’s Regional Event in downtown Denver.  It was FABULOUS!  I LOVE Stampin’ Up! events.  I always come home motivated and full of fabulous ideas that I can share with you!

This was my swap card for the event.  Isn’t it pretty?  I love this color combination of Early Espresso and Island Indigo.  The card definitely looks better in person.  Can you see from the picture that the stamped image is embossed with the Big Shot?  I first stamped the leaves and then I rubbed the Island Indigo ink over the stamped image with the Stampin’ Sponge.   Then I ran the card stock through the Big Shot.  This gave a total different look than you would get if you ran the card stock through the Big Shot before rubbing the ink on it.  Give it a try!  It’s pretty easy.

My team had a meeting yesterday to plan our Holiday Stamp Camp.  We have some great projects in store for you.  I hope you can join us on November 3rd if you’re in Denver area!  Have a great day and Happy Stamping!

Moving Forward

Stamp Set: Moving Forward
Card Stock: Whisper White, Real Red, Pacific Point
Markers: Real Red, Pacific Point, Gumball Green
Accessories: Stampin’ Dimensionals, Pacific Point Striped Grosgrain Ribbon
Tools: Big Shot, Scallp Squares Duo Die, Chevron Embossing Folder, Circles #2 Die, Perfect Polka Dots Embossing Folder, 3″ Circle Die, Paper Piercing Essentials Pack, Paper Piercer

This adorable “Moving Forward” stamp set is the Ronald McDonald stamp set this year.  Every year Stampin’ Up! designs a stamp set that supports the Ronald McDonald House Charities.  For each of these stamp sets sold Stampin’ Up! contributes $3 to the charity.  I think this year’s set is exceptionally cute.  It’s another set we received free at convention.  (Yes, we get lots of stuff and convention and it’s so much fun!  Don’t you want to join us next year?  Contact me today to find out how you can easily sign up to be a demonstrator! ….how was that for a blatant plug!)

Isn’t this card cute?  Don’t think I’m the creative one….I CASEd this one.  Why go to all the work when someone else has come up with a fabulous idea?!  I just thank all my sister (and brother) stampers for all their creative work!  I love all the different textures and shapes on this card.  It makes it so FUN!

Don’t forget to add this stamp set to your next order and support Ronald McDonald Charities!  Have a great day!  Take care and Happy Stamping!

Midnight Muse Serene Silhouettes

Stamp Set: Serene Silhouettes
Card Stock: Midnight Muse, Crumb Cake
Ink: Midnight Muse
Accessories: Midnight Muse Satin Ribbon, Stampin’ Dimensionals, Dazzling Details, Mini Glue Dots
Tools: Big Shot, Square Lattice Embossing Folder, Stampin’ Sponge, Apothecary Accents Framelits

This “Serene Silhouettes” stamp set is definitely one of my favorite from the new catalog.  I can’t seem to get enough of it!  We used it again in classes last week.  This card is very basic and simple but striking, if I do say so myself!

After embossing the large Crumb Cake card stock with the Square Lattice Embossing Folder (one of my favorites!) I lightly rubbed Midnight Muse ink over it with a Stampin’ Sponge.  This technique just adds so much to the finished project.  To finish off the card and give it a little zip I added just a drop of Dazzling Details to the base of all large flowers.  It really made them pop.

Have a great day!  Take care and Happy Stamping!