Make It Mine: Hand-Penned

I will admit (again…?) that the Hand-Penned Suite in Stampin’ Up!’s in new annual catalog is one of my favorites!  I can’t seem to get enough of it!  I really love the designer paper.  You will see a lot of it in my projects.

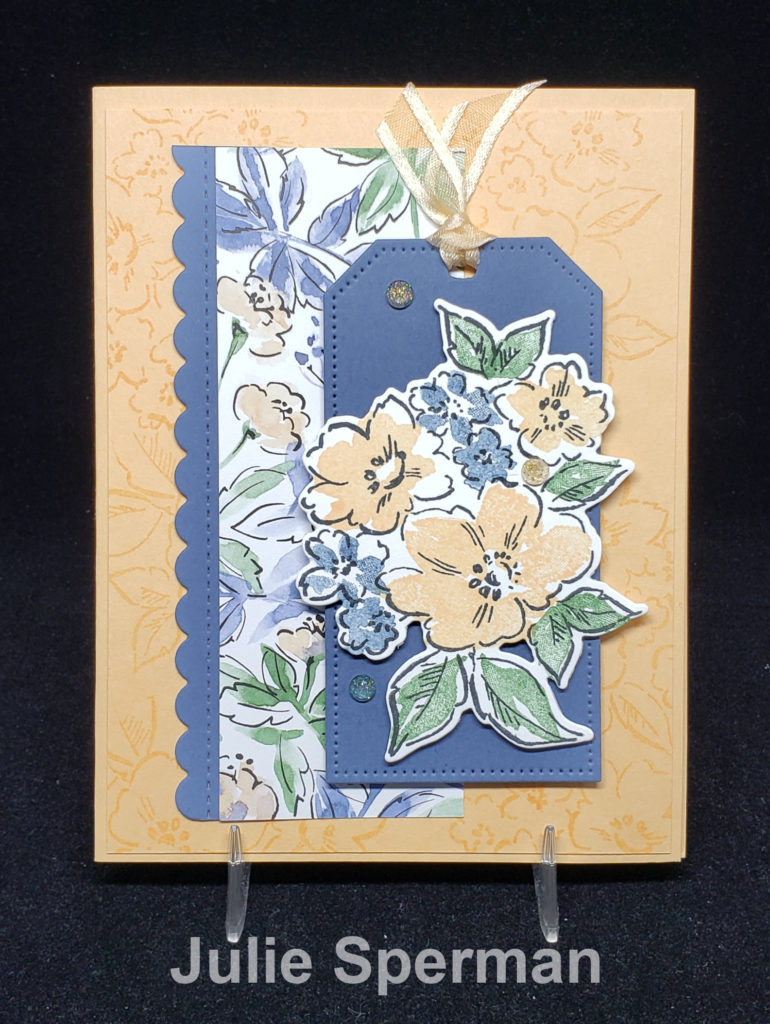
The card that inspired me today was made by Julie Sperman.  Thank you Julie!  Pale Papaya isn’t my favorite color but it looks so nice with Misty Moonlight!  Julie used the Penned Flower Dies as well as the Tailor Made Tags Dies. These tag dies are becoming another favorite of mine! (Honestly, there aren’t too many Stampin’ Up! products that I don’t like!) She also used the Genial Gems on her card that coordinate perfectly with the Hand-Penned Designer Paper.  Coordination!  Love it!

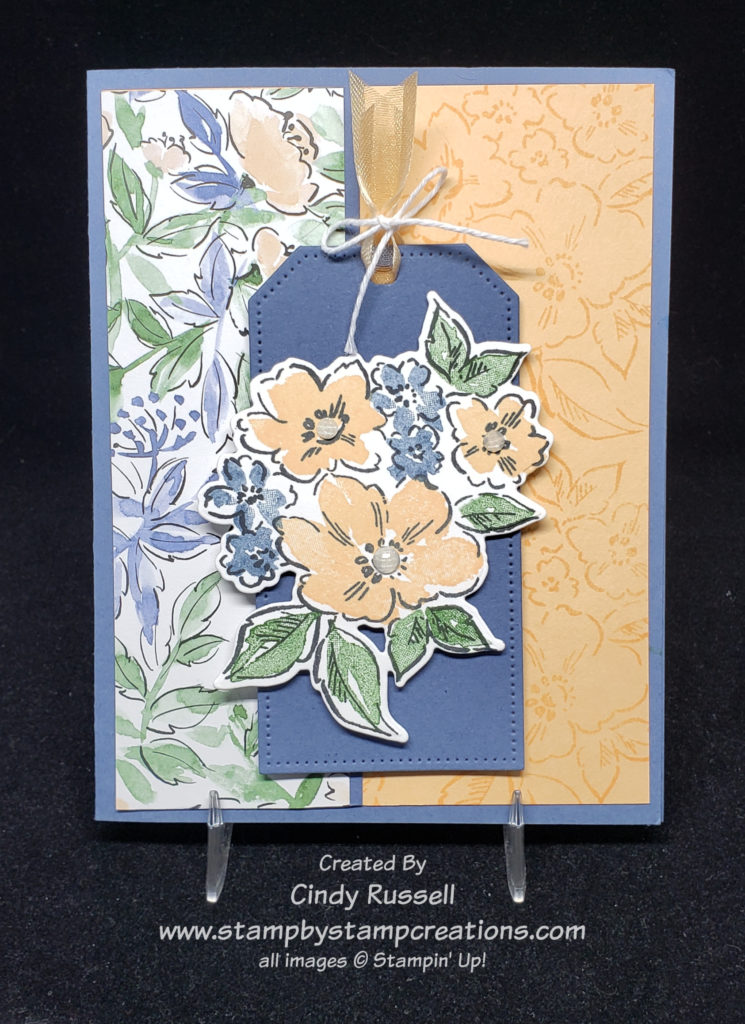
I liked Julie’s card so much I was having trouble figuring out how to change it! How do you alter something so lovely?

I started with the card base itself.  On her card, Julie layered a piece of Pale Papaya on a Pale Papaya card base.  To change it up I decide to go with a Misty Moonlight card base.  Even after telling you to check your die sets for nice border dies I left off the scallop border on my card and used a larger piece of the designer paper since it’s so pretty!  The tags on both of our cards are pretty similar but I threaded my ribbon differently and used my gems as the centers for the flowers.

Have you tried any Make It Mine projects?  You should!  It’s pretty fun.  Go ahead and give it a try!

Have a great day! Take care and Happy Stamping!

Make It Mine: Party Puffins!

The Party Puffins stamp set was another one of those stamp sets that I didn’t think I needed. Once again, I was wrong. Sheesh! You try to be good and then someone posts a really cute card and you want to copy it.

I was looking at this adorable stamp set sitting on my shelf and knew that I wanted to use it for today’s post. So I hit the internet looking for a fun sample. Caroline’s card here was the one that caught my eye. Isn’t it cute?

If you’re looking at this fun paper and trying to figure out where it is in the catalog I’m going to give you a hint….it’s on page 171 and is a hostess only choice. Honestly, it might be worth it to host a gathering (or place a large order) just so that you can choose the Pattern Party 12 x 12 Designer Series Paper. It will only cost $18 of your hostess rewards and you get 48 sheets of 12″ x 12″ paper! One side is fun and colorful and the other side is black and white. Too fun!

Party Puffins Birthday Card

But let’s get back to the card. Of course the first thing I had to switch up on Caroline’s card was to add a few layers. Red always looks good with black and white so I added a red layer on both the front and the inside of the card.

I would have been remiss if I hadn’t included the little fishies with bows on my card. They’re actually one of my favorite parts of the stamp set! Ha!

Party Puffins Birthday Card – inside

The other thing I changed was that I just used one sentiment and put it on the inside of the card.

I was tickled with how cute this fun little card turned out and I can’t wait to make more of them! You’ll definitely see me sharing more cards using this adorable stamp set!

Have a great day! Take care and Happy Stamping!

Fun Fold: Cap & Gown Gatefold

It’s Monday. I know I should be writing a Make It Mine post but I absolutely just HAD to share this fun fold with you today. It’s graduation season and you might be needing to make a card or two.

If you really want to get picky about today’s post you could say that it is a Make it Mine card as well as a fun fold. The original card that I saw online was larger and fit into a Memories & More envelope sized for a 6 1/4″ x 4 1/4″ card (closed). My card that you see here fits in a regular envelope sized for 5 1/2″ x 4 1/4″ card (closed). I had to do a lot of math to figure this out but to be honest, I kind of enjoy that. 🙂

When closed all of the way this card looks a little boring but wait until you open it. You really get the full effect.

When the card is open like it is in the picture to the left you have the cap sitting on the gown. Too fun!

The first thing you have to do to make this fun card is to figure out your colors. When you choose the secondary color for the trim on the collar you need to make sure you have something the same color to make the tassel from. I went to my local craft store and purchased embroidery floss because I couldn’t find the right color in the thousands of skeins I already owned! Sheesh! If you don’t know how to make a tassel don’t worry. I’ve included that in the video below.

Here’s a couple of more pictures of the card so you can see how it looks:

As you can see, the card has a simple gatefold base and then you add the cap. I’ve cut a piece of cardstock slightly smaller than the cap and scored it diagonally. the bottom portion of this piece is adhered to the card base and the top portion is adhered to the cap. Most of the bottom portion is hidden by the white insert.

Dimensions for 3 ½” x 5 ½” Card
Base:  3 ¾” x 7”  score at 1 ¾” from each short side
Cap:  2 ½” x 2 ½”
Smaller Square to attach cap to card:  2 ¼” x 2 ¼”  score diagonally
Collar:  1 ¾” x 1 ¾” cut diagonally
Collar Edging:  2 strips 1/8” x 3”
Card Insert:  3 ¼” x 3 ½”
Cardstock to wrap tassel around:  1 ½” x 2”
Embroidery Floss or Baker’s Twine for tassel:  about 36” or more
Dimensions for 4 ¼” x 6 ¼” Card
Base:  4 1/8” x 8 ½”  score at 2 1/8” from each short side
Cap:  3” x 3”
Smaller Square to attach cap to card:  2 ¾” x 2 ¾”  score diagonally
Collar:  2 1/8” x 2 1/8” cut diagonally
Collar Edging:  2 strips 1/8” x 3 ½”
Card Insert:  4” x 4 7/8”
Cardstock to wrap tassel around:  1 ½” x 2 ¼”
Embroidery Floss or Baker’s Twine for tassel:  about 38” or more

Now that you know how to make these fun cards the question is this….what colors will you make your cards? Leave me a comment and let me know! Have a great day! Take care and Happy Stamping!

Make It Mine Monday: Pretty in Pink

Stampin’ Up!’s Color & Contour Bundle

This past month I participated in two different card swaps.  For each of them I made twenty cards ( a different design for each one), mailed them to the hostess and each she sent me back twenty cards from other demonstrators.  This card was made by own of the hostesses.  Isn’t it lovely?  Michelle made it with the Color & Contour Bundle that you can find in Stampin’ Up!’s  2021-2022 Annual Catalog which comes out TOMORROW!  Woo Hoo! 

Michelle used two of the new In-Colors, Polished Pink and Pale Papaya.  The designer paper is from the Pansy Petal pack (pg. 132, #155807 $11.50). Aren’t the little flowers cute?   They’re from a package call Loose Flower Flower Flourishes (pg. 141, #155808 $7.50).  They come in two different sizes and three different colors, Pale Papaya, Polished Pink and Fresh Freesia.

Color & Contour Bundle Card by Cindy Russell

I really liked Michelle’s card but I knew I wanted to make it mine but where to start? Her card is so pretty and you know how much I love the new Polished Pink color! I like the new Pale Papaya color but I’m not sure how I like it with the Polished Pink.

Changing the two major colors on the card was the first thing I did. I decided to coordinate Polished Pink with the Fresh Freesia. Next I changed the Basic White cardstock to Very Vanilla since I liked how it coordinated better with the designer paper.  Then, of course, I had to add more layers.  You know me and my layers!  I decided to go with Fresh Freesia and Polished Pink instead of the Polished Pink and Pale Papaya.   To finish off my card I switched out the ribbon and added another little flower. 

This card layout is fun because it gives you a chance to show off a little bit of designer paper.  The front of the card base is trimmed by 1”.  Then you add a piece of 1” designer paper to the insert of your card.  Add a focal point that overhangs the trimmed off area and your card is done!

The Color & Contour Bundle is very versatile. The stamp set has a few fun flower images and five different sentiments. The die set has two dies that cut out the floral images from the stamp set and 5 different scalloped rectangle dies and a scalloped border die. Too fun! You can view this bundle on page 98 of the new Annual Catalog.

Have a great day! Take care and Happy Stamping!

Fun Folds: Bellyband Gatefold Card

Last week I introduced you to the Gatefold Card. It was a fun and easy card to make.

Today I want to share the Bellyband Gatefold Card to you. The base of the card is made the same way as you make the basic Gatefold card base. Start with a piece of cardstock that is 5 1/2″ x 8 1/2″. With the long edge at the top of your Simply Scored or Paper Trimmer score 2 1/8″ from each end.

The difference on the two types of cards comes with the focal point. On the original Gatefold Card you design a focal point that you adhere directly to the left side of the card base.

On the Bellyband Gatefold Card you design a Bellyband that holds the card closed. My bellyband is 9 1/2″ x 1″. This gave me enough overlap to adhere the two ends of the bellyband together. 9 1/2″ – 9 3/4″ should be good for a card that’s 4 1/4″ wide. If your card is the same size but in landscape orientation instead of portrait you will need to start with a bellyband that is 12″ long. I didn’t score my bellyband. Instead, I held one end of the band just over the halfway point of the card and then I loosely wrapped it around the card. You don’t want your bellyband too loose or it will fall of the card. Then again, you don’t want it too tight or you won’t get it off of the card. You do want to use a stronger adhesive like liquid glue or Stampin’ Seal + to adhere the ends of your bellyband together.

Once you have the bellyband itself made you just need to add your focal point. I decided to go simple on this card. I stamped the flower and added rhinestones. I was going to adhere the flower focal point square on the card but then it dawned on me that the diamond shape might be just a bit more interesting.

Here is a phot of the inside of the card along with the bellyband. You can see how the bellyband looks when it’s not on the card.

If you like fun fold cards but don’t want to get too carried away the Gatefold Fun Fold Card and the Bellyband Fun Fold Card are great choices. They are both fairly easy to make. The hardest part is figuring out your colors and design!

Have a great day! Take care and Happy Stamping!