Embedded Embossing Technique….With Circles!

Embedded EmbossingYou’ve got to have circles when it’s “What Can You Do With A Circle?” month!  Today I have a fun technique for you and it’s even more fun with CIRCLES!  😀

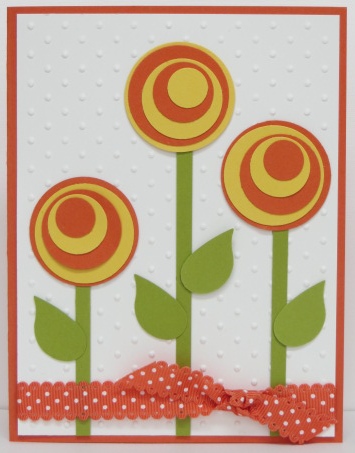
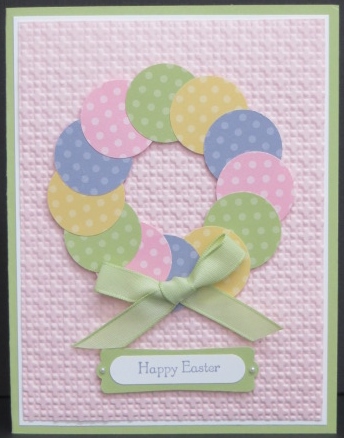
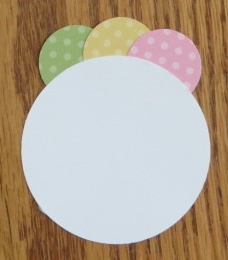
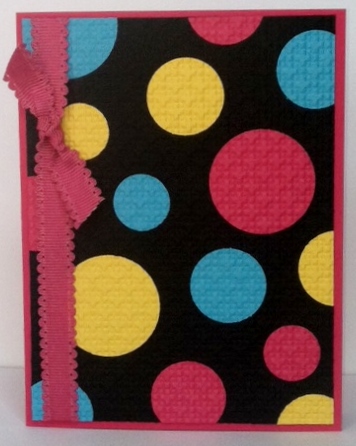
For this card I punched a bunch of circles with my 1-1/4″, 1″ and 3/4″ circle punches and randomly adhered them to a piece of Basic Black card stock.  I then ran the black card stock through the Big Shot with the Square Lattice Embossing Folder.  That’s it!  Throw some ribbon on it and adhere it to a card!  It’s so festive!

One trick I always do when I use this embossing folder (most others) is that I always cut the card stock larger than I want the final piece to be.  This folder, especially, shrinks when you run it through the Big Shot.  Of course it doesn’t shrink evenly.  It shrinks more in one direction than the other!  This way it will always be the exact size that I want!

Have a great day!  Take care and Happy Stamping!

Circle Flowers

circle flowersAren’t these cute?! And they’re circles!  I made this card yesterday and thought it wasn’t bad but the more I look at it the cuter it gets!  Is that possible?  Maybe the all those circles are just doing crazy things to my brain!  Ha!

Such a FUN card and it’s made with…yes…CIRCLES!  I used the 1 3/8″, 1 1/4″, 1″, 3/4″ and the 1/2″ circle punches.  Wouldn’t this be cute in PINKS?!

The flowers were simple to make with all of those punches.  The leaves are actually the wings from the Bird Builder Punch and the stems are strips of paper!  How easy is that?

It’s a perfect card for spring!  Yes, our spring weather is slowly returning to Colorado.  We’re so excited!  60’s for Easter Sunday!  Much nicer than this past weekend!

Have a great day!  Take care and Happy Stamping!


Half Circle Highlight

photo (3)It’s the last week of the month so I need to make sure I give you more circles!  (“What Can You Do With A Circle?” Month!)  Although, today, I only have a half circle for you…

Isn’t this kind of a neat layout?  I’ve seen used on a vertical card too.  I like the way the half circle kind of frames the flowers.

I started with a full card and then cut away half of the front before punching the half circle.  To tie the ribbon, I cut a slit in the fold of the card with my Xacto knife and slipped the ribbon through.  All of the stamping is done on the inside piece of the card.  It’s a pretty easy layout.  I’ll have to try it in class sometime!

Have a great day!  Take care and Happy Stamping!

The Versatile Owl Builder Punch

Easter Chick.0313Can you belive all of the things you can do with that darn Owl Builder Punch?  When I first saw it I thought “How many times am I going to want to make a card with an owl on it?”.  Seriously!  It was cute but once again it was one of those things that I didn’t think I needed.

Now I can’t believe I ever thought that!  I don’t think a holiday goes by where some creative person (not me!) comes up with a new twist for the owl punch.  Today’s card is a case in point.  An Easter chick!  Of course!  Too Stinkin’ Cute!  Some day I’m going to be the really creative person who comes up with these ideas!  😉

Have a great day!  Take care and Happy Stamping!

Fun Fold With A Circle!

Madison Ave Fun Fold.1.0213 Madison Ave Fun Fold.2.0213 Madison Ave Fun Fold.3.0213Wow!  Not only do you get to see a fun new card design but in keeping with “What Can You Do With A Circle?” month…it has a circle!  I know….it’s pretty exciting.  But take a look at this cute card made with the Madison Avenue stamp set from the Sale-a-bration brochure.

Isn’t this a cute design for a card?  Once I saw it online I knew I had to use it.  It’s just so fun and different.  Below you can see the template I used to make the card.

Start with a piece of card stock 4 1/4″ x 11″.  Score at 4 1/4″ and 8 1/2″.  After you have the card stock scored, center your 2 1/2″ Circle Punch on the 8 1/2″ score mark about 3 /8″ from the edge and punch.

Next you want to punch a scallop circle with your 2 3/8″ Scallop Circle Punch.  Now adhere it to the card as shown in the second picture.

That’s it for the tricky parts of the card.  Now, just decorate however you’d like.   Have fun with this card design!

Don’t forget that Sale-a-bration ends in just 10 days!  Don’t miss out on earning your FREE product.  Place that order today!  😀

Have a great day!  Take care and Happy Stamping!photo (8)

More Circles….Just In Time For Easter!

004Well, we’re having another major snow storm today so I needed to think Spring!  Easter is on it’s way with soft, pastel colors just like this card.

Are you wondering how I got my wreath of circles so round?  I knew that if I just started placing circles on the the card it would never work so I came up with a plan!  I punched a large circle (2 1/2″) from a scrap of paper and then put temporary adhesive around the edges.  I then started placing my smaller circles for the wreath around the larger circle.  This way I could move the smaller circles around until they looked right.  When my wreath l007ooked the way I wanted it to I turned it over and placed a small amount of adhesive between the circles where they overlapped to hold it together.  I then removed my large temporary circle and placed the wreath on my card front.

That’s it for today’s installment of “What Can You Do With A Circle?”!  Have a great day, take care and Happy Stamping!  Don’t forget to sign up for my newsletter/e-mail list and LIKE my Facebook page so you don’t miss any great circle tips/ideas!


Paper Daisy Turkey

Stamp Set: Seasonal Sayings
Card Stock: Chocolate Chip, PUmpkin Pie, Very Vanilla, Riding Hood Red
Ink: Chocolate Chip, Daffodil Delight, Pumpkin Pie, Riding Hood Red
Accessories: Paper Daisies, Stampin’ Dimensionals
Tools: Owl Builder Punch, 1/8″ Circle Punch, Stampin’  Sponge

Hello!  Thanksgiving is coming up FAST!  I need to get decorations up so I can enjoy them for awhile.  Today’s card is an adorable card for Thanksgiving.  You gotta love that darn owl punch!  It’s so versatile!  🙂

I used a Stampin’ Sponge to sponge two different colored inks on each daisy.  I used Daffodil Delight and Pumpkin Pie on the small daisy and Pumpkin Pie and Riding Hood Red on the large daisy.  So easy!  The little turkey beak is the heart fromthe same punch!  TSC…too stinkin’ cute!

Only one more card to cut for next week’s Stamp-a-Stack.  Now I need to start planning my class for the week after Thanksgiving.  I would really like to be ahead of the game.  It’s a great aspiration….let’s see if I can get it done!

Have a great day!  Take care and Happy Stamping!

Punch Art Pumpkin

Woo Hoo!  The election is OVER!  No more annoying phone calls, no more annoying TV ads, no more annoying junk mail and no more annoying people coming to door telling me to vote for their candidate!  It’s OVER!!!!!  Whew…I sure feel better getting that off my chest!  Congratulations President Obama and I wish you and our country a successful 4 years.

I CASEd this cute card from my upline Tara.  So simple, yet so cute!  😀  The fun part of this card that you can’t really see from the picture is that the Elegant Lines embossed background actually continues on the Water Color Paper!  Before you emboss your large background piece you use your temporary adhesive to adhere the Water Color Paper to it.  Then emboss.  When you’re ready to put your card together just align the embossed images and you have a really neat looking card.  Too cute!  Thanks Tara!

Off to get some things done like cut tons of card stock for next week’s Christmas Card Stamp-a-Stack!  Have a great day!  Take care and Happy Stamping!


Floral District Circles

Hello!  No, I did not fall off the face of the earth.  I’m in the Minnesota Homeland, just returned from the wilds of Canada where hubby and I spent the long weekend cutting, chopping and stacking wood with his parents.  The weather was horrible but we had a good time.  We got TONS of wood cut for the rest of the fall and winter to heat the cabin.

Now that I’m back to civilization with internet I can finally add a post or two to my blog.  I apologize for falling so far behind.   Thursday night this week I’m doing a mini Stamp-a-Stack class for my sister and some of her friends.  Needless to say, that was what I was doing right before our trip….I had to choose the cards as well as cut the card stock and pack up everything I would possibly need for the class.

Stamp Set: Friendly Phrases
Ink: Rich Razzleberry
Card Stock: Whisper White, Rich Razzleberry
Designer Paper: Floral District
Accessories: Basic Rhinestone Jewels, Stampin’ Dimensionals
Tools: 1 3/4″, 1″ and 3/4″ Circle Punches, Small Heart Punch

Today’s card is one of the cards for the class.  I CASEd it from my upline Tara.  She has such great ideas that are simple.  I still have a hard time coming up with simple but I’m getting better.  The circles are cut from the Floral District Designer Paper pack.  Isn’t this a great idea?  Just punch out circles from beautiful designer paper and layer them on your card!  I LOVE it!  Simplicity at it’s best.  Add a layer of colored card stock,  some rhinestone jewels and a sentiment and you have a beautiful card!  Don’t be surprised if you see this card at a future class!  😀

It’s time to get ready to head to the mall with my mom.  Have a great day!  Take care and Happy Stamping!

Framed Embellished Events

Stamp Set: Embellished Events
Card Stock: Whisper White, Raspberry Ripple
Markers: Raspberry Ripple, Gumball Green
Accessories: Raspberry Ribble Striped Satin Ribbon, Basic Pearls, Stampin’ Dimensionals, Mini Glue Dots
Tools: Big Shot, Square Lattice Embossing Folder, Dotted Scallop Ribbon Border Punch

Hello!  Happy Anniversary to me and my DH.  We’ve been married 31 years!  Yikes!  That’s over half of my life time!  Luckily he’s a keeper.  Today’s card is a lovely one that could be used for an anniversary or any other occasion.

My favorite part of this card is the “frame”.  Here’s another one of those things someone did with a punch that I would never have thought of!  It was SO easy to make this little frame.  You need to start with a 3″ x 3″ square of card stock.  Then you simply center the punch on each side of the square and punch!  The secret is to make sure the punch is centered.  That’s it!  Then of course you need to add the pearls to make it really pop!  What a great idea!  The Dotted Scallop Ribbon Border Punch isn’t just for borders!  😀

Have a great day!  Take care and Happy Stamping!

Punch Art Gold Fish

Stamp Set: Itty Bitty Banners
Card Stock: Gumball Green, Whisper White, Bashful Blue, Crumb Cake , Pumpkin Pie, Marina Mist
Ink: Crumb Cake, Bashful Blue
Accessories: Stampin’ Dimensionals, Mini Glue Dots, 2-Way Glue Pen, White Gel Pen, Gumball Green Striped Satin Ribbon, Window Sheet or Transparency
Tools: Big Shot, Perfect Polka Dots Embossing Folder, 3 1/2″ Circle Die, 3″ Circle Die, #2 Circles Die, Owl Builder Punch, Birde Builder Punch, Cupcake Builder Punch, Bitty Banners Framelits, 1/4″ Circle Punch, Stampin’ Sponges

Is this not the cutest thing you’ve ever seen?  OMG!  I received a little goldfish card similar to this at convention and absolutely fell in love! TSC! Too Stinkin’ Cute!  The title gave away the fact that this adorable little fishy was made from a punch but can you guess which one?  It’s that darn Owl Builder Punch!  Who would have thought you could make so many adorable things from one punch!  I really admire those people who can look at a punch and come up with all of these ideas.  I certainly don’t see them just by looking at a punch!

In case you’re having trouble seeing it, the owl body is the fish body, half of the owl “vest” is the fin and the little heart from the owl punch is the little fish lips!  I have to say it again….TSC!  The fish “bowl” is made by folding a piece of window sheet or a transparency in half and placing it on your 3 1/2″ Circle Die so that the fold in the window sheet is just below the “edge” of your circle part of the die.

Have you come up with some creative ideas for punches or seen some on other websites?  Leave me a comment and tell me about them.  I love new ideas!

Have a great day!  Take care and Happy Stamping!

Papillion Potpourri

Stamp Set: Papillion Potpourri
Card Stock: Whisper White, Calypso Coral, Pool Party, Wisteria Wonder
Ink: Pool Party, Calypso Coral, Wisteria Wonder
Accessories: Whisper White 3/8″ Taffeta Ribbon, Stampin’ Dimensionals, Basic Pearls
Tools: Big Shot, Fancy Fan Embossing Folder, Elegant Butterfly Punch, Apothecary Accents Framelits, Paper Piercing Essentials

Even though the temperature is still in the 90’s and summer isn’t officially over for another month it just seems like it’s coming to a close.  The kids here in Colorado are back to school and Labor Day is next weekend!  Yikes!  Where did the summer go? I thought I should post this summer looking card before I get too carried away with fall, Halloween and Christmas!

We made this card a few classes ago.  It’s quite simple but very pretty.  The label is die cut with the Apothecary Accents Framelits and then paper pierced with the Paper Piercing Essentials Pack.  I just love all of the templates that you get for paper piercing in that one pack.  There are templates for basic shapes, punches and framelits!  Woo Hoo!

Don’t you just love these summery feeling colors?  Perfect for butterflies don’t you think?  I hope you have a great day.  Take care and Happy Stamping!

For The Birds

Stamp Set: For the Birds
Card Stock: Pacific Point, Real Red, Whisper White
Ink: Black StazOn, Pacific Point
Markers: Real Red, Soft Suede, Daffodil Delight
Accessories: Real Red Stitched Grosgrain Ribbon, Basic Pearls,
Stampin’ Dimensionals
Tools: Big Shot, Fancy Fan Embossing Folder, Blender Pen,
Decorative Label Punch

This adorable stamp set was one of the first stamp sets from the new catalog that I knew I just had to have!  It’s so stinkin’ cute!  I made this card for the new catalog swap that I hosted.

Most of the image is colored with markers but I used a Blender Pen and ink pad on the bird.  Don’t you love the new Fancy Fan Embossing Folder?  Too fun!  I like the way my label turned out.  Pretty clever, isn’t it?   I punched out a label from Pacific Point card stock with the Decorative Label Punch.  I then cut the label in half horizontally and attached the pieces to the ends of my Pacific Point card stock.  A simple plan for a new look!

Take care!  Have a great day and Happy Stamping!

P.S.  I would love for you to leave a comment sometime.  I get tons of comments but they’re all spam so it would be fun to get a legitimate one sometime!  😀