Happy Easter!

005Easter Blessings to all!  It’s the last day of our fun “What Can You Do With A Circle?” month so I had to show something with circles, right?  I was in a quandry of what to show you and then I saw it….this cute little Easter bonnet just sitting on the shelf in my craft room.  It has patiently been waiting for it’s debut…and the day has finally arrived!

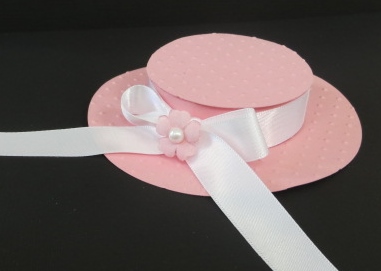
I made this little hat years ago.  You can tell because Stampin’ Up! no longer carries the wide satin ribbon or these little flowers.  The entire hat is made from paper.  The top is a 2 5/8″ Circle and the bottom is 4 1/2″.   I must have used some kind of circle cutting tool for those….it’s been so long I can’t even remember!

This is actually a little treat container.  The top comes off.  There’s a band attached to the top and a band attached to the bottom with the top band being a little larger than the bottom.  I don’t have directions for this but if you’re interested in how to make this I could probably figure it out and make a little tutorial.  Just leave a comment or e-mail me at cindy@stampbystampcreations.com if you’re interested.

Easter Blessings!  Have a great day and Happy Stamping!


More Circle Fun!

001 (2)We’re down to the wire….”What Can You Do With A Circle?” month is almost over.  Have you enjoyed it?  I sure hope so!  It’s been fun putting it all together for you.

I CASEd this card from my upline Tara.  She’s the BEST!  Always willing to help you out.  Isn’t this a fun card?  I used the Delicate Details Lace Tape from the Spring Catalog.  I punched out 1/2″ circles (see, I used circles!) and stuck them to the back side of the lace tape which is sticky on the back.  When I adhered the tape to the card I did use a little bit of adhesive on the back of each colored circle.

Another simple and fun card!  Why don’t you give it a try?  Have a great day!  Take care and Happy Stamping!

Wedding Books…..

photo 1 (2)I had a busy but fun day yesterday.  I got to go with my future daughter-in-law as she tried on wedding dresses.  There are SO man dresses out there!  It was interesting to see that most of them are strapless these days.  Very pretty though.  She looked so beautiful in the dresses.  I think she has things narrowed down but she’s got a few coming in in her size to try on.  Sometimes it’s hard to tell when they’re way to big here or a little snug there.

Anyway….at the last place we were at they had these fun books on display.  Aren’t they neat.  My picture taking needs a little help but the word LOVE is carved into the pages of the first book and I DO is carved into the second book.  I don’t think I’ve seen anything like that before.  Have you?

Well, back to stamping today and cutting for next week’s classes.  I received my “This & That” stuff the other day and I can’t wait to play with it!  Have a great day!  Take care and Happy Stamping!

photo 2 (2)


Embedded Embossing Technique….With Circles!

Embedded EmbossingYou’ve got to have circles when it’s “What Can You Do With A Circle?” month!  Today I have a fun technique for you and it’s even more fun with CIRCLES!  😀

For this card I punched a bunch of circles with my 1-1/4″, 1″ and 3/4″ circle punches and randomly adhered them to a piece of Basic Black card stock.  I then ran the black card stock through the Big Shot with the Square Lattice Embossing Folder.  That’s it!  Throw some ribbon on it and adhere it to a card!  It’s so festive!

One trick I always do when I use this embossing folder (most others) is that I always cut the card stock larger than I want the final piece to be.  This folder, especially, shrinks when you run it through the Big Shot.  Of course it doesn’t shrink evenly.  It shrinks more in one direction than the other!  This way it will always be the exact size that I want!

Have a great day!  Take care and Happy Stamping!

Circle Flowers

circle flowersAren’t these cute?! And they’re circles!  I made this card yesterday and thought it wasn’t bad but the more I look at it the cuter it gets!  Is that possible?  Maybe the all those circles are just doing crazy things to my brain!  Ha!

Such a FUN card and it’s made with…yes…CIRCLES!  I used the 1 3/8″, 1 1/4″, 1″, 3/4″ and the 1/2″ circle punches.  Wouldn’t this be cute in PINKS?!

The flowers were simple to make with all of those punches.  The leaves are actually the wings from the Bird Builder Punch and the stems are strips of paper!  How easy is that?

It’s a perfect card for spring!  Yes, our spring weather is slowly returning to Colorado.  We’re so excited!  60’s for Easter Sunday!  Much nicer than this past weekend!

Have a great day!  Take care and Happy Stamping!


Dropped Circles

009 (2)Spring has sprung but you wouldn’t know it here in Colorado.  We had more snow this past weekend and the past few days have been COLD!  I know, I’m whining….but when the calendar says spring you want to put away all your winter gear and enjoy the warm breeze and sunshine!

This fun technique/template (with circles!) is called Dropped Circles.  I went with the pastels for spring and used the “Spring Sampler” stamp set.  The strips are a little less than 1 1/4″ wide so that you can fit them in a 1 1/4″ Circle Punch to round the bottom edge.  Remember how I showed you how to round corners circle punch in my recent e-mail?  If you missed it and want to know how I did this leave a comment or contact me.  I’d be happy to share!

I did have a little trouble lining up my strips of card stock evenly and having enough room for the punched circles but all in all I think the card turned out pretty cute.  Thanks to LeAnn Greff for the idea!  I’ve seen cards like this where you punch a small image in the strip instead of attaching a circle.  I might have to work on that one to share with you!

Have a great day!  Take care and Happy Stamping!


Half Circle Highlight

photo (3)It’s the last week of the month so I need to make sure I give you more circles!  (“What Can You Do With A Circle?” Month!)  Although, today, I only have a half circle for you…

Isn’t this kind of a neat layout?  I’ve seen used on a vertical card too.  I like the way the half circle kind of frames the flowers.

I started with a full card and then cut away half of the front before punching the half circle.  To tie the ribbon, I cut a slit in the fold of the card with my Xacto knife and slipped the ribbon through.  All of the stamping is done on the inside piece of the card.  It’s a pretty easy layout.  I’ll have to try it in class sometime!

Have a great day!  Take care and Happy Stamping!

Best of Birthdays!

Best of Birthdays.0213It’s a big birthday day.  I know at least 3 people celebrating today and my baby’s birthday (age 20 now) was yesterday!  I felt we were in need of a birthday card for today’s post.

I used the new image from the “Best of Birthdays” stamp set.  It’s a fun image.  Have you used it yet?  How about the doilies from the Spring Catalog?  Have you tried them?  I’ve been working with them a little bit.  They’re not quite my style but it’s fun trying to incorporate them into a card or project.  Did you notice that the doily is actually a circle? 🙂

Well, hopefully our little blizzard will let up soon.  I need to go pick up a pie for birthday celebrations.  My son’s birthday was yesterday, his girlfriend’s birthday was last Saturday and my other son’s fiance’s birthday is this coming Tuesday!   We have plans to go out to dinner tonight so we’re hoping the weather will cooperate.

Have a great day!  Take care and Happy Stamping!

Happy Hour Fun

Happy Hour.0213It’s Happy Hour!  No circles today, just squares.  That’s ok though….the squares contain tropical drinks….yum!  🙂

This is a fun card that I CASEd while making a batch of cards for my cousin.  Don’t the Calyposo Coral and the Island Indigo go perfectly together.  Such a fun and bright combination.  These colors will be gone at the end of May so be sure to get your paper, ink pads, ribbon and ink refills before they’re gone!

Cheers to you!  This drink is on me!  Have a great day.  Take care and Happy Stamping!


Circle Circus

photo (2)What better way to celebrate “What Can You Do With A Circle?” month than with a circle stamp set!  Yes!  Circle Circus is the perfect stamp set for this month!  It’s full of all different size circles that coordinate with Stampin’ Up! punches.  How perfect is that?!

This is a pretty simple card and did you notice that I used my favorite color?  Melon Mambo!  It just makes this card pop!

I highlighted a few of the flowers with one of the flower punches in the Itty Bitty Punch pack and added a rhinestone jewel.  Fun & Simple!  😀  If you like this card, please share it!

Have a great day!  Take care and Happy Stamping!

My Very First Video!

I did it! My very first video!  Woo Hoo!  I hope you enjoy it!  Please leave a comment and let me know what you think.  (I may have the comment settings here on my blog messed up so if you can’t leave a comment, please e-mail at cindy@stampbystampcreations.com)  If you like my video, please share it!

Have a great day!  Take care and Happy Stamping!

The Versatile Owl Builder Punch

Easter Chick.0313Can you belive all of the things you can do with that darn Owl Builder Punch?  When I first saw it I thought “How many times am I going to want to make a card with an owl on it?”.  Seriously!  It was cute but once again it was one of those things that I didn’t think I needed.

Now I can’t believe I ever thought that!  I don’t think a holiday goes by where some creative person (not me!) comes up with a new twist for the owl punch.  Today’s card is a case in point.  An Easter chick!  Of course!  Too Stinkin’ Cute!  Some day I’m going to be the really creative person who comes up with these ideas!  😉

Have a great day!  Take care and Happy Stamping!

Spotlight Technique (with a circle!)

spotlightingToday’s post show’s you the Spotlight Technique and because it’s “What Can You Do With A Circle?” month I’ve spotlighted with a circle!  🙂  You can do this technique with any shape.

Just stamp your image on your card stock in a neutral color.  Now stamp the image again on scrap paper, color it and punch it out.  On my card I also punched out another circle in black to frame my spotlight.  The frame is optional.  I’ll show you a card on Facebook (www.facebook.com/stampbystamp) tomorrow that doesn’t have a frame for the spotlight so be sure to check it out!  🙂

Have a great day!  Take care and Happy Stamping!

Oh, No!

Sale-a-bration SayingDon’t let this be you!  There’s only 1 week left of Sale-a-bration 2013!

Have you placed your order yet to receive your FREE item from the 2013 Sale-a-bration Brochure?

Not sure what Sale-a-bration is?  Contact me TODAY!  You don’t want to miss out!

Share this with your friends!  We don’t want them missing out either!  Have a great day and Happy Stamping!

Highlighted Circles With Reverse Masking

005More circles for the fun “What Can You Do With A Circle Month?”!  There’s probably an official name for this technique but since I’m not sure what it’s called I’m calling it Highlighted Circles.

I first ran the smaller piece of Soft Suede card stock through the Big Shot with the Square Lattice Embossing Folder.  Then I punched the circles with the 1 3/4″ Circle Punch, the 1 3/8″ Circle Punch and the 1″ Circle Punch.

Then I made a template the same size, laid the Soft Suede piece over the template and punched the circles in the same spots on the template.

I then centered the template over the Crumb Cake card stock and stamped my images (I did have to cover some of the circles with a sticky note).  This is called Reverse Masking.

Once the images were all stamped I added the ribbon and adhered the textured Soft Suede card stock to the front of the card with Stampin’ Dimensionals.

A perfect all-occasion card.  I hope you liked it.  Have you signed up for newsletter/e-mail list (sign-up box on the upper left of this page) or LIKED my Facebook page (www.facebook.com/stampbystamp) yet?  You should so you don’t miss any great circle ideas and tips!  😀

Have a great day!  Take care and Happy Stamping!