She Has Returned…..

October 2013 Iphone Photos 046 (2)002
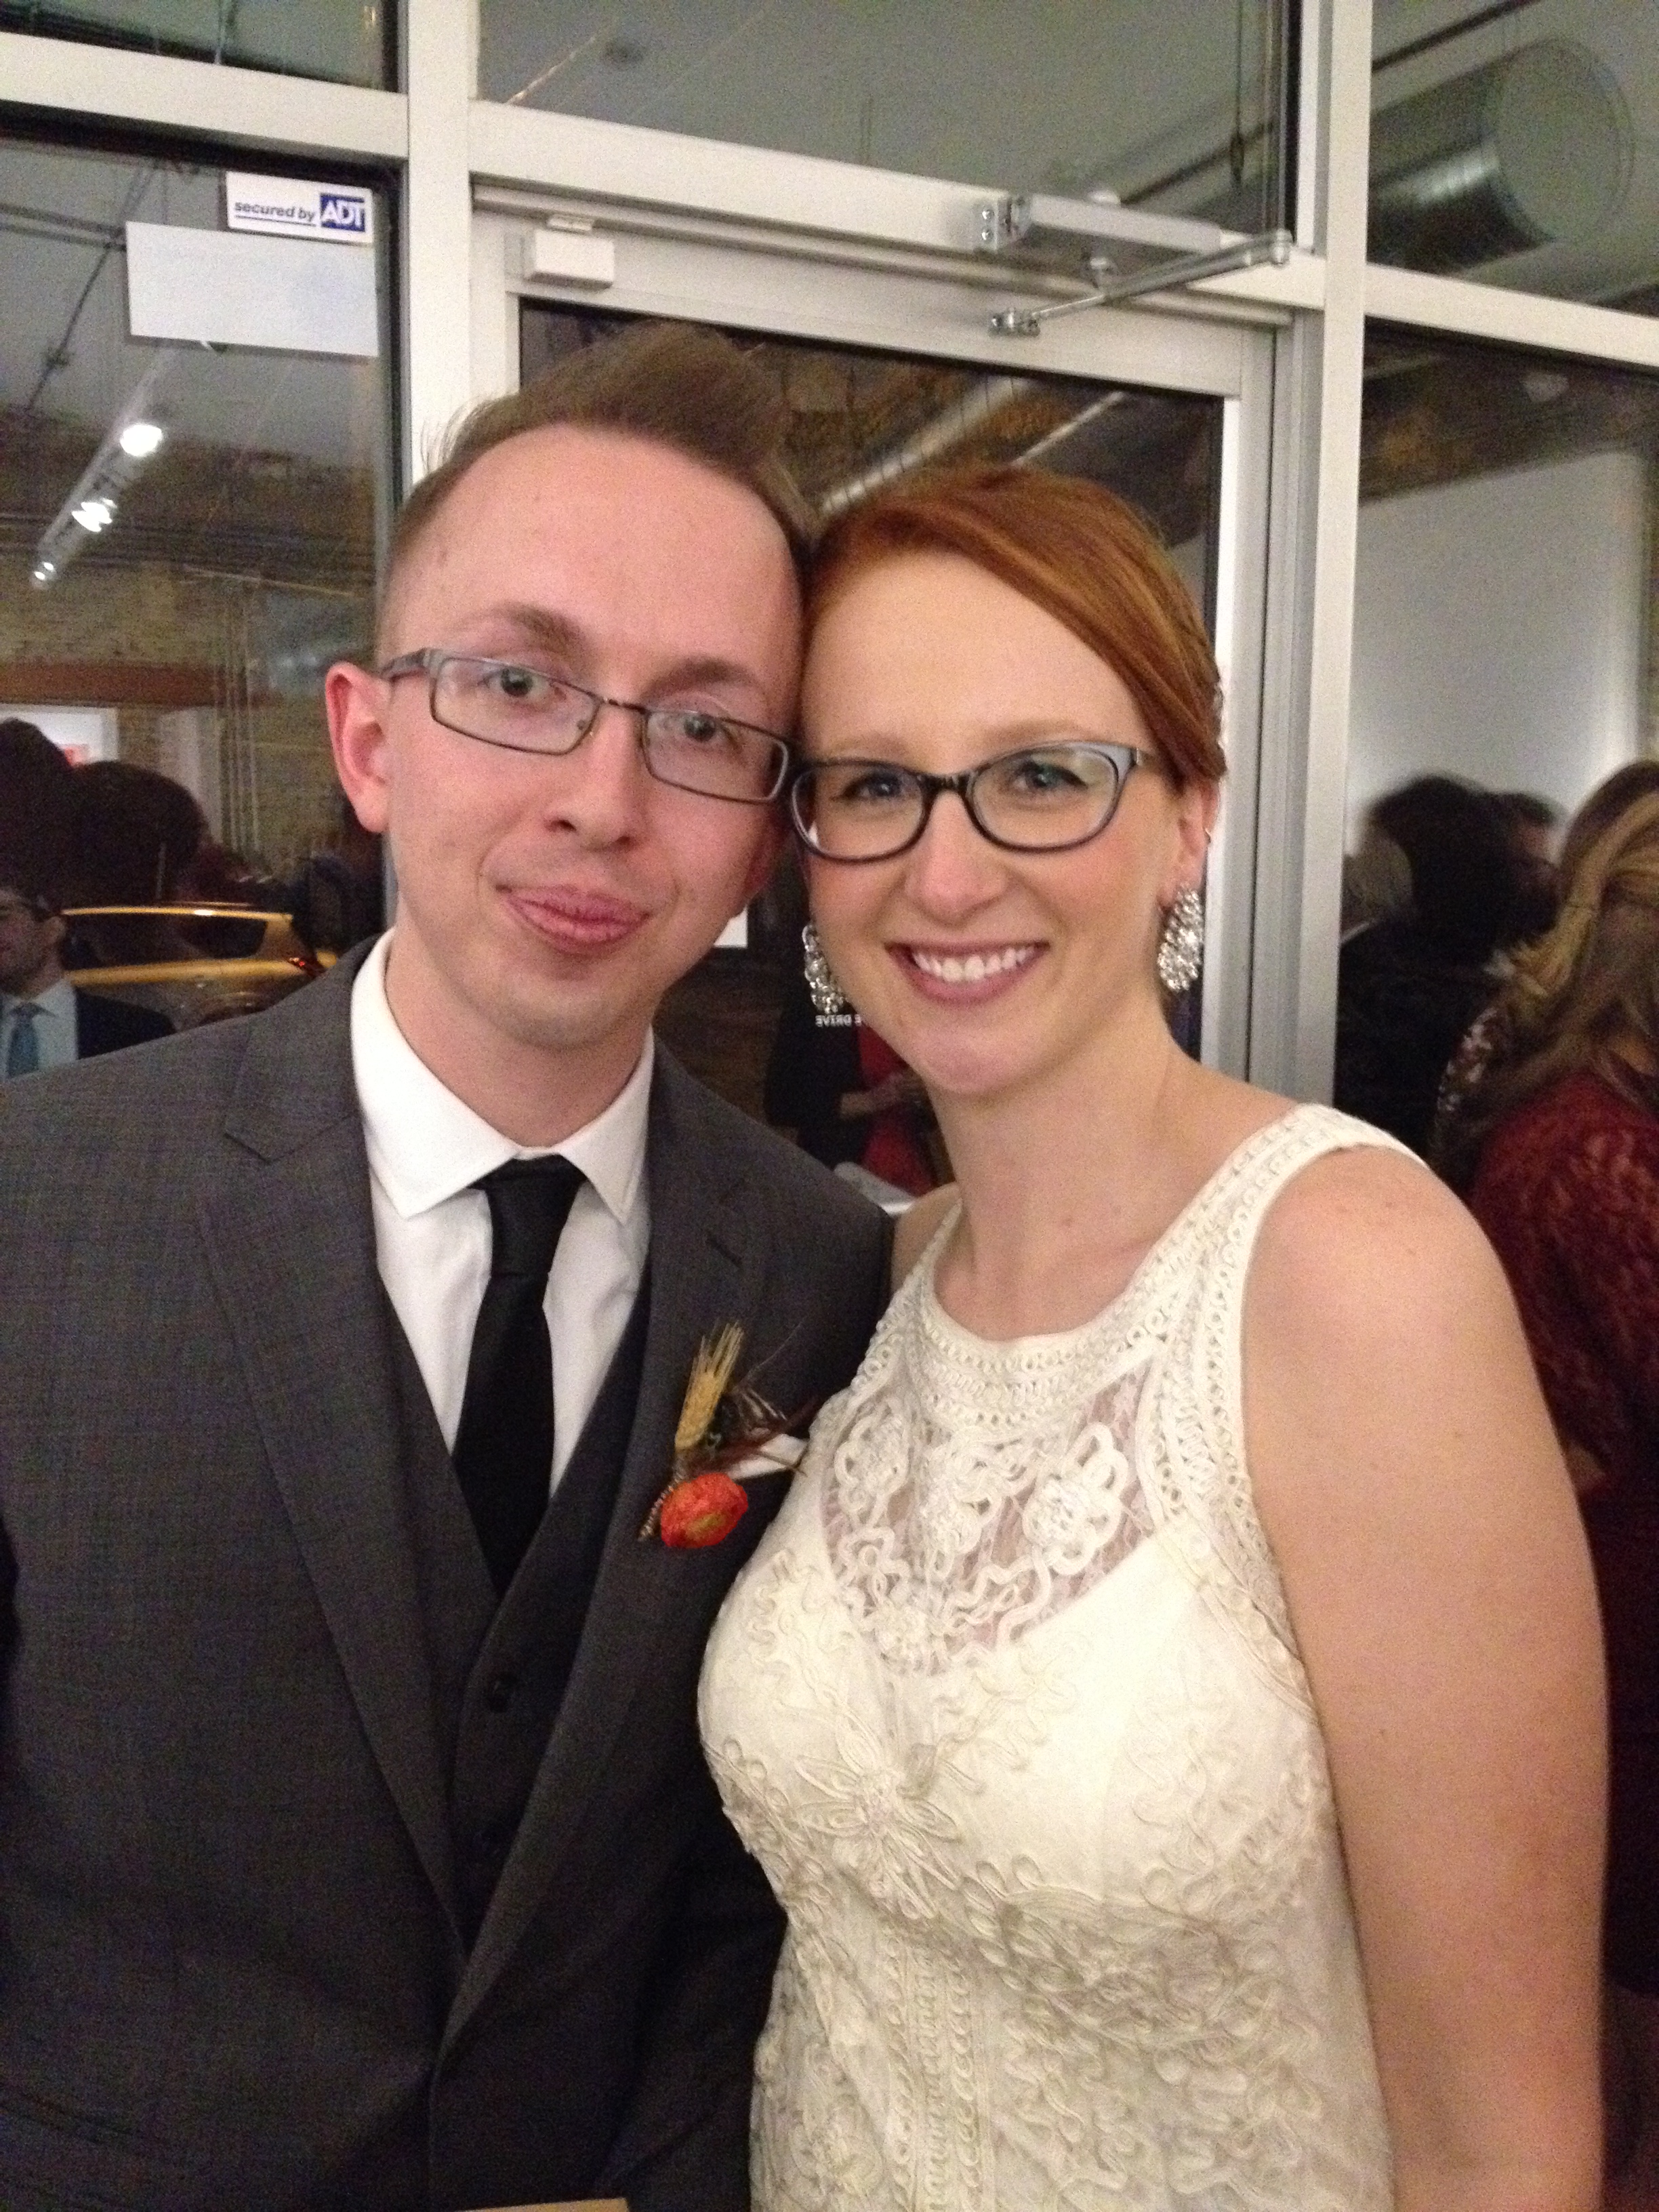
Yes, the wedding is over and I have returned!  Here is a picture of the lovely bride and groom, Margot and Jared.   The wedding was just beautiful.  My younger son Kyle performed the ceremony and did a wonderful job.  A new career perhaps?

My husband and I have been doing pretty much nothing all week and have enjoyed every minute of it.  Now it’s back to the grindstone.

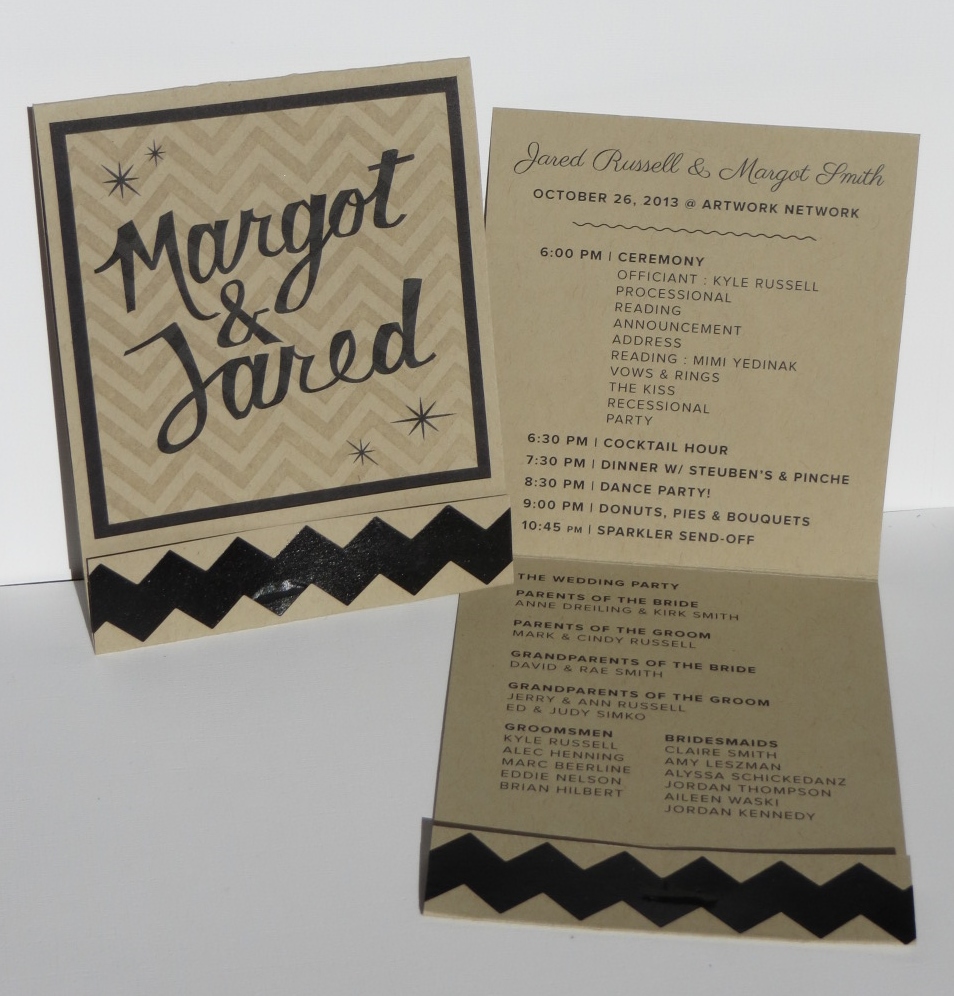
I did think that I should probably show you some kind of project since I’m back.  The second picture is the program that the bride and I created.  She found the idea on Pinterest and we ran with it.

She designed all of the printed parts including the names on the front.  We had those printed and cut professionally.  I then stamped the Positively Chevron stamp over the names with Versamark ink before we layered them on the matchbook card.  The black chevron strip on the bottom is actually washi tape.  No, not Stampin’ Up!, but it sure is cute!  I ordered way too much so I’ll definitely be using it on a project or two for my upcoming classes!  🙂

The program matches the invitations that Margot designed.  I’ll have to find mine and show you.  They were stinkin’ cute!

Have a great day!  Take care and Happy Stamping!

25% Off 25 Stamps!!!!

Scan0056Happy Birthday Stampin’ Up!  It’s their birthday this week and they want to celebrate!  What better way to celebrate than having a sale?!

For one week and one week only they are offering 25 stamp sets at 25% off!  There’s some great sets on sale so be sure to check them all out on my website.  I have to go place my order now!  Don’t wait!  The sale ends October 28th!

Don’t forget about Stampin’ Up!’s Weekly Deals!  This week they have five more items on sale:

Stuff on sale!  My favorite!  Have a great day!  Take care and Happy Stamping!Scan0057

The Chevron Punch: Trees!

005No, I haven’t fallen off the face of the earth…yet!  Things are starting to pick up around here with my son’s wedding just one week away.  Did I say one week?  Yikes!

I have the dress, the shoes, the jewelry, the purse and the spanx!  The nail appointment is made as is the hair appointment.    I’m ready to go so now I just need to help the bride with all of the crafty things she wants to get done this next week.  Wish us luck!

I made this card back in August for my Holiday Catalog Open House.  I had seen a similar card and knew I had to get out my new Chevron Punch and give it a try.  The new Chevron Punch is pretty darn fun!

I punched my Old Olive card stock with the Chevron Punch, trimmed it to look like a tree and layered it on Pear Pizzazz card stock.  I added a trunk and had a tree.  Too darn cute not to copy.

Have you played with the Chevron Punch yet?

I’m not sure you’ll hear from me again before the wedding.  I’ll give it a try but don’t hold your breath!  I’ll tell you all about it after the 26th!

Have a great day!  Take care and Happy Stamping!

Sweater Weather Thankful

020This card was pretty easy to make.  I stamped the Magnificent Maple on a piece of designer paper from the Sweater Weather designer paper pack, added a piece of ribbon, a couple of layers and finished it off with the Thinlit “thankful”.

These Thinlit Expressions dies add so much to a card.  Be sure to check out Tuesday’s post for a tip on using these thinlits.

What are you thankful for?

Have a great day!  Take care and Happy Stamping!


Tip of the Day Tuesday: Thinlits

001I know, I know….it’s not even Halloween yet and I’m showing you Thanksgiving cards.  You can never be to ahead of the game though!

I made this card using the Harvest of Thanks stamp set and the Expressions Thinlits Dies.  I just love these new Thinlits….especially since I now know the secret to them!  Do you want to know?  Of course you do!  😀

The secret to getting the die-cut image out of the Thinlit easily is using wax paper and a toothpick!  Just place a piece of wax paper between your card stock and the die.  It makes the card stock slip right out of the die.  If it doesn’t simply fall out just use a toothpick in the little holes found on the die to give the card stock a little poke.  If you use anything sharper like a paper piercing tool you make leave a little hole in the card stock.  That is your tip of the day:  wax paper and a toothpick!  Don’t you love it when you can use everyday things found in your home!

Have a great day!  Take care and Happy Stamping!

Shoebox Swap: Magnificent Maple

026

Back to fall!  I made this card for a Shoebox Swap with some of my fellow demonstrators.   Shoebox Swaps are just one of the many fun aspects of being a Stampin’ Up! Demonstrator and a member of my SASsy Stampers Team.   At a Shoebox Swap you design a card and cut all the pieces and parts for everyone attending.  Then we pass around the shoeboxes and make everyone else’s cards.  You get great ideas and get to hang out with friends.

Have you thought about becoming a demonstrator?  20% discount, a little extra income, new friends?  Now is the PERFECT time!  For two weeks only, starting tomorrow October 7th, you can join my team for only $25!  Yes, that’s right!  $25!  The price of the Starter Kit has never been this low.  Now is the time!

As a demonstrator you have a quarterly minimum in sales of $300 that you have to achieve which would mean that the next minimum would be due December 31st.  BUT….as a NEW demonstrator you don’t have to reach this minimum until March 31st!  How great is that?!

Contact me today for more information!  Don’t miss out on this fabulous opportunity!

Have a great day!  Take care and Happy Stamping!

Simple Saturday: Calm Christmas

007Hello!  I’m back from the MN Homeland once again.  It sure is nice being able to go back and visit whenever we want.  Ah….the life of the semi-retired!  😀

It’s Simple Saturday today and I thought a Christmas card would be appropriate since it is pretty darn cold here in Denver and there were light snow flurries on my way home from the airport yesterday!  Brrr….!

This is one of the cards we’re making this week for our Christmas Card Stamp-a-Stack.  Simple, yet elegant.  I used the Calm Christmas stamp set from the Holiday Catalog and stamped it with Island Indigo ink.  Quite pretty if you ask me!  😉  Of course, I had to pop it up with Stampin’ Dimensionals!  Just three little layers, that’s it!  Simple!

Have a great day!  Take care and Happy Stamping!

Spooky Halloween Banner

002

First of all I’d like to apologize for my posts that are few and far between.  Life is catching up with me and I can’t seem to stay on top of things.  Bear with me for the next month as I go into panic mode before my son’s wedding at the end of the month.  All will be well, I just need to concentrate on getting things ready for the big day!  Thanks for understanding!

Today’s fun project is the Spooky Halloween Banner.  This was SO much to make.  These banners are GREAT!  You really need to try one.  They’re not hard at all.   Click on the picture and you can see it up close and get a better view of all the pieces and parts.

The first thing you need for this project is the Build a Banner Simply Created Kit (#133507 $19.95).  This kit contains your banners, the jute and all of the stencils for your backgrounds and letters.  Then you need the Halloween Banner Simply Created Accessory Kit (#132698  $9.95)  Both of these items are found on page 31 of the Holiday Catalog.  The stencil kit comes with a Stampin’ Spritzer that you can use to apply your color but I preferred using a sponge dauber and ink pad.  I used a twisting motion to apply the ink to the banner and it worked out pretty well.

Stampin’ Up! also offers a Christmas Banner Simply Created Kit and I can’t wait to try that one too.  They’re SO fun.  I also want to make one for Thanksgiving but since I don’t seem to have a lot of spare time anymore I may have to punt on that one!  We’ll see!

Have a great day!  Take care and Happy Stamping!

Simple Saturday!

014So, you can’t get much simpler than this!  Designer Paper, card stock and a little ribbon!  Sure is cute though!  Ha!

I made this little card for my open house last month.  I wanted to show how you can coordinate your envelope with the card when you use the new Envelope Liner Framelits.   This envelope is from the Notecards & Envelopes.

The liners are so fun and simple to use.  OK….I did have a little trouble adhering the liner in the envelope.  I had adhesive all over the back side of the liner and then tried sticking it in the envelope.  Not so easy.  Then about a week later I was talking to one of my customers about the liners and telling her of my woes and she’s like “why not just put adhesive on the top part?”  Duh!  Why do I have to make things so difficult all the time?!  That makes much more sense!  The bottom part of the liner isn’t going anywhere!

Back to the card for Simple Saturday…I just used some of the adorable Gingham Garden Designer Paper and added a few layers and some ribbon.  Simple!  😀

Have a great day!  Take care and Happy Stamping!

DYI: Can of Cards!

003Every year my church has an Octoberfest celebration and with it they have a basket auction.  I usually donate a bunch of cards from my stash but always have a problem trying to figure out how to display them.

As I was walking through the “M” store the other day, trying to see what they might have for me, this clear paint can caught my attention.  I stared at it awhile trying to figure out if it would work.  Then I remembered that I had one sitting on the shelf at home so I ran back home.  It worked!  The cards fit perfectly in it.  Then I got the idea to dress it up with a home made bow made from the Big Shot.  Perfect!  I may have to wrap some Christmas gifts like this.  Too fun!  You should try this too!

Have a great day!  Take care and Happy Stamping!

Washi Tape Wednesday: Halloween!

009Have you checked out the adorable Witches’ Brew Washi Tape?  I love it!  But then, I love all washi tape!  😀

Isn’t this a fun layout?  A little washi tape on the diagonal, a fun (but sadly, retired) embossed spider web, ribbon and a fun tag!  I was all set to make this card for a swap and then realized that the darn spider web embossing folder was retired.  🙁  I probably could have used it anyway but I wanted to stick with current products.  Can you see a little shimmer to the spider web?  I lightly brushed some Illuminate Ink over the embossed web with a Sponge Dauber.  It really added a lot to the card.

The tag is from the Tags 4 You stamp set in the Holiday Catalog and it’s punched out with the coordinating Label Bracket Punch.  I love things that coordinate!  😀  I made the Pumpkin Pie layer to my tag by punching out two Label Bracket tags, cutting them in half and just layering them to the outside edges of the stamped tag.  Check out this post for the details on how to do that.

Have a great day!  Take care and Happy Stamping!

A Halloween Hello

012Boo!  How can you be scared of this adorable little skeleton guy?  The Halloween Hello stamp set is way too cute!  My favorite images are probably this little guy and the stinkin’ cute bat.  I’m going to need to design a card now just for the bat!  Ha!

Layers, a little designer paper (Witches’ Brew), a little ribbon and a popped up little skeleton.  That’s it!  Too stinkin’ cute!  Halloween images are so much fun!  What’s your favorite Halloween set from the Holiday Catalog?

Have a great day!  Take care and Happy Stamping!

A Hexagon Halloween!

018I’ve been having an awful lot of fun making Halloween cards lately!  This one was especially fun although it was like working a puzzle trying to figure out where to place all of the different pieces.

I punched out a bunch of hexagons from the Witches Brew Designer Paper.  Then I stamped a few images from the Halloween Hello stamp set and punched them out with the hexagon punch.  I pieced my puzzle on Basic Black card stock and then layered it on Pumpkin Pie card stock.  The end!  Ha!  It is rather busy isn’t it?  But fun!

Have a great day!  Take care and Happy Stamping!

The Envelope Punch Board Is Here!!!

EnvelopePunchBoard.0913It’s here!  It’s here!  This fabulous little tool is SO cool!  You can make 66 different size envelopes with it!

Check out the video!  I know you’re going to love it as much as I do….and the best part is that it’s only $19.95!  Can you beat that?!  (#133774)  You know you want one!  😀

Have a great day!  Take care and Happy Stamping!


Simple Saturday: Another Wedding Card

011OK…I got carried away making simple cards with the Best of Brides and Babies stamp set.  It just worked!  😀

I had originally stamped the image directly on the notecard but it was a little too sparse so I layered the image and popped it up with Stampin’ Dimensionals.  I also added a little bit of color with some markers.

How are you liking Simple Saturday?  Leave a comment and let me know!  Have a great day!  Take care and Happy Stamping!