Best of Flowers: Hydrangea

009It’s March and Spring is (or should be) on it’s way so it’s time for some flowers!  Have you checked out the “Best of Flowers” stamp set?  You should!  This is the perfect set for Spring!

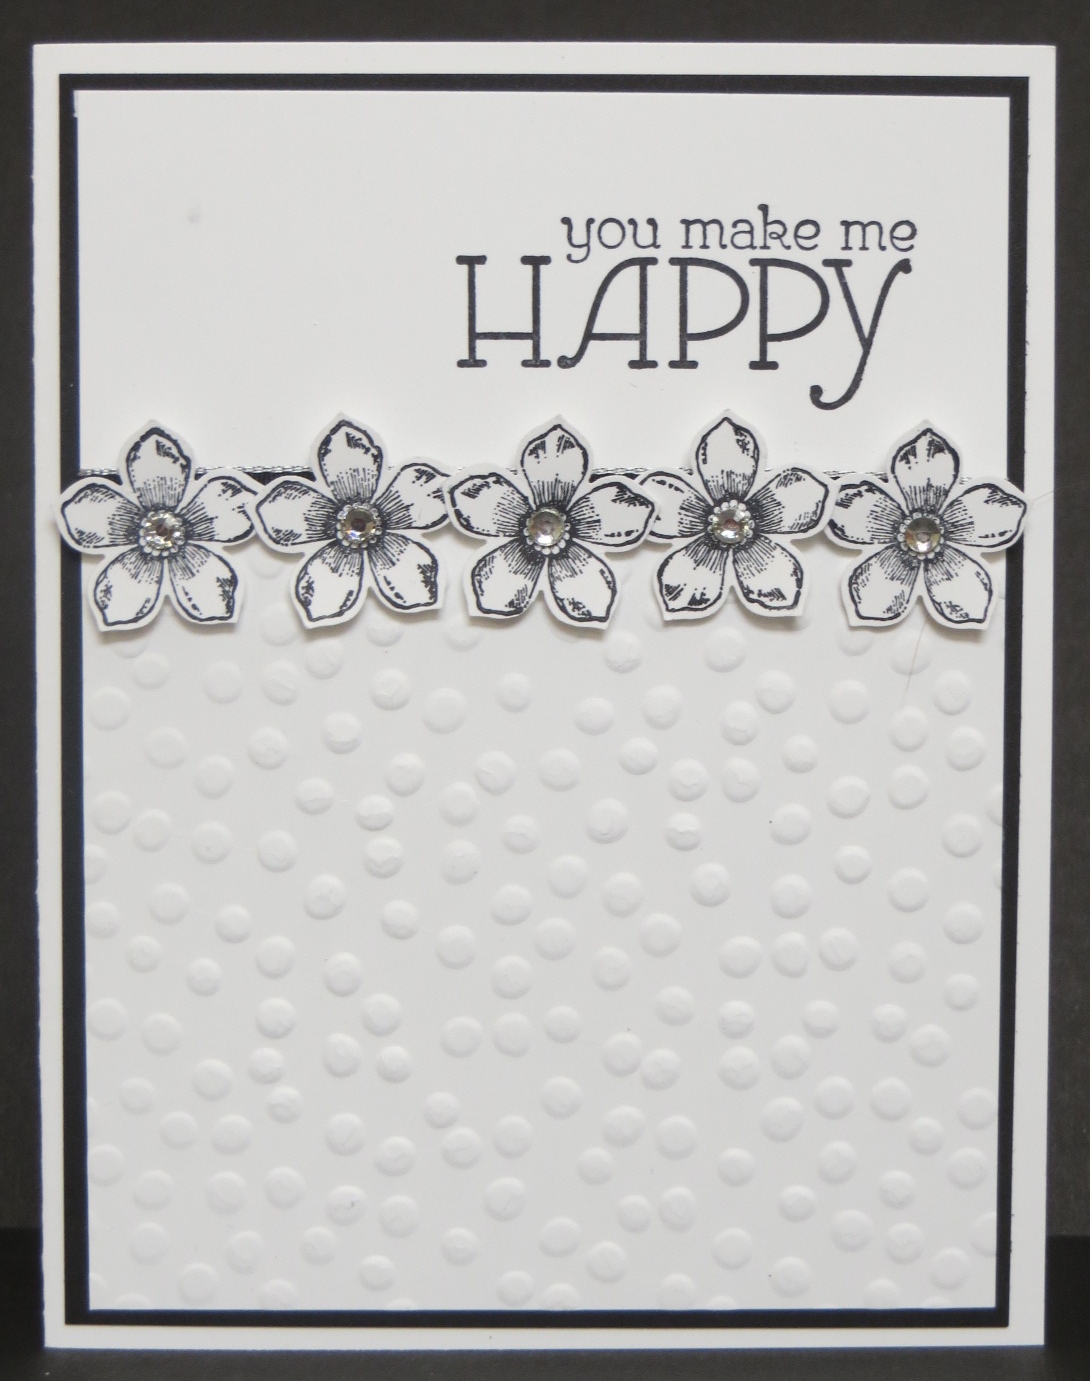
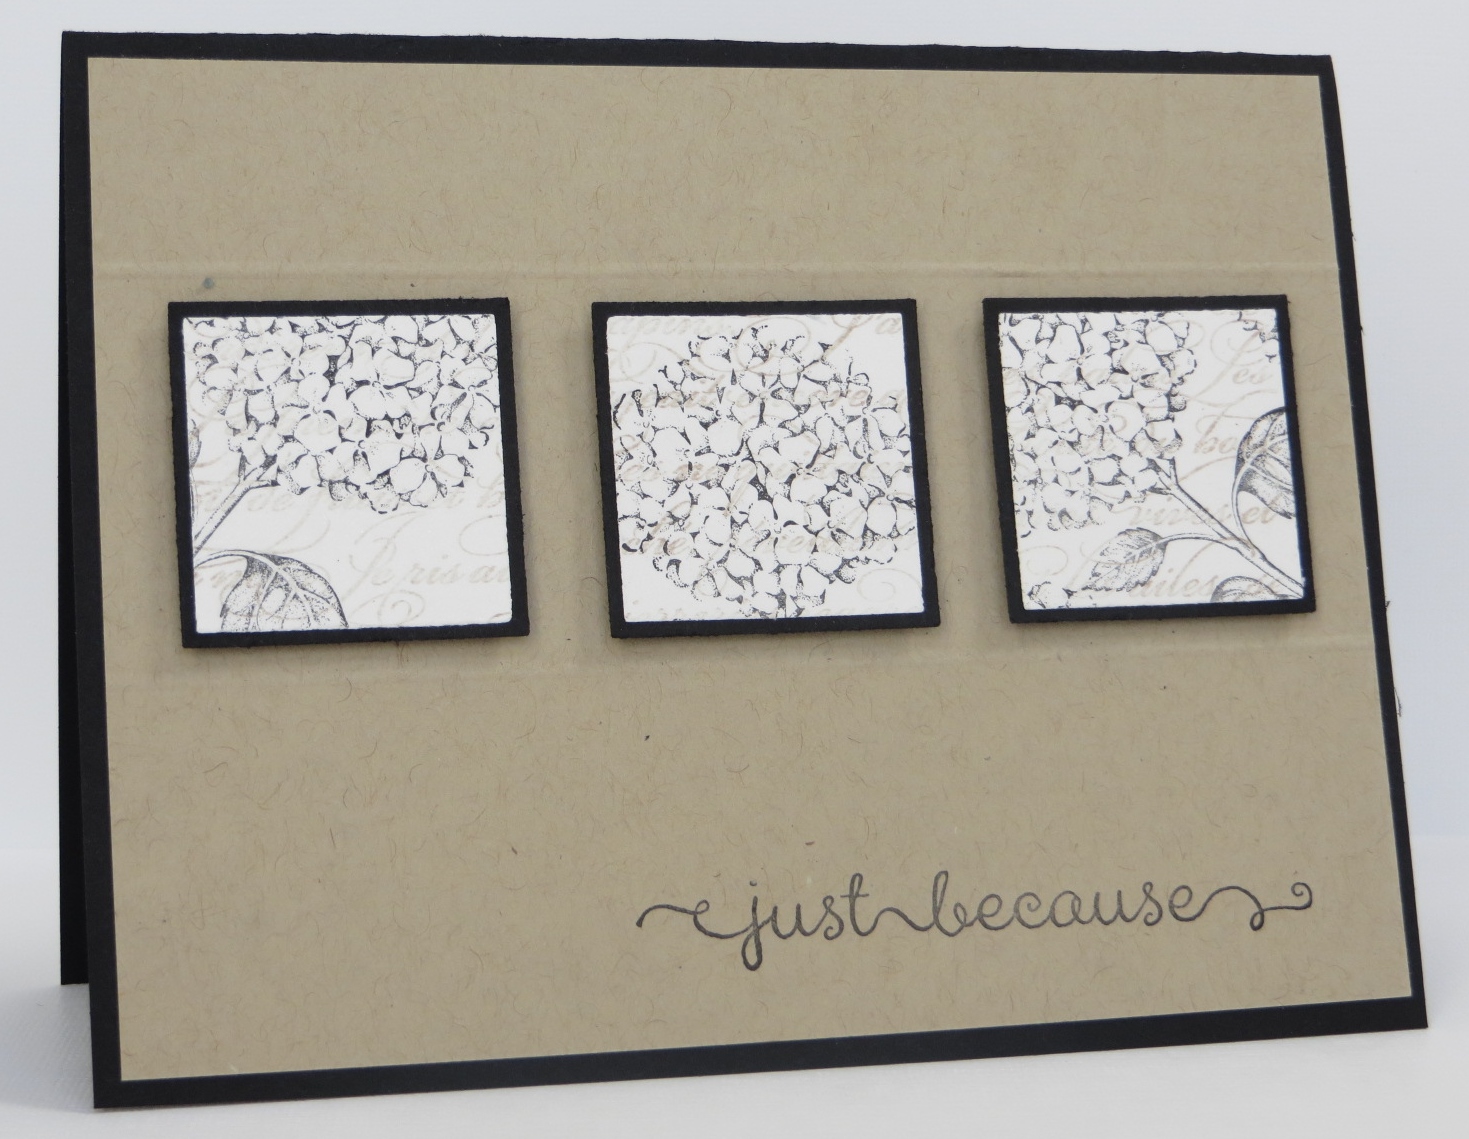
I first stamped the “En Francais” background  stamp on a piece Shimmery White card stock with Crumb Cake ink.  I did stamp off first so that it would be pretty light.  Then I stamped the Hydrangea randomly over the stamped background with Black StazOn ink.  I cut three squares from the background (ok…I used my retired square punches) making sure I had different parts of the flower on each square.  I mounted the flower squares on black and that was it.

It’s hard to see from the picture but before I mounted the black squares with Stampin’ Dimensionals, I scored a couple of lines on the Crumb Cake card stock with my Simply Scored and then centered the squares between the score marks.  It really added to the card.

The sentiment is from the “A Dozen Thoughts” stamp set.  This “just because” is one of my favorite because it’s such a cute font.  This was a pretty easy card and so pretty.  I do need to confess that I CASEd it though.  I don’t want to take credit for something I didn’t completely design!

Have a great day!  Take care and Happy Stamping!

Best of Butterflies: Simple Sunday (?)

012Simple Sunday?  What’s up with that?  It’s suppose to be Simple SATURDAY!  Well, when you’re a little distracted and forget to post on Saturday you just move it to Sunday!  You still have the same alliteration….right?  😉

I decided that since February was over I needed to move on to another “Best of” stamp set.  Don’t worry…I do still have one more really cute card made with “Best of Love”.  However, today’s sample is made with “Best of Butterflies”. 

I’m not kidding when I say simple….I mean simple!  These cute little cards are made on Stampin’ Up!’s Notecards & Envelopes.  I made the card on the left first and decided it was a bit too simple for my taste.  It’s not bad but I liked it a whole lot more when I added another couple layers.  Just call me the Layer Queen!

Don’t you love the font on the “thank you”?  That stamp is from the “Lots of Thanks” stamp set.  They mean it when they say “lots”….there are nine different thank you stamps in the set.

Since the cards were so simple I decided that I really needed to dress up the envelope.  I used the Polka Dot Parade Designer Paper and die cut a liner with my Envelope Liner Framelits!  Too fun!

Simple cards for a Simple Saturday….ooops!  Simple Sunday!

Have a great day!  Take care and Happy Stamping!

Scallop Tag Topper Best of Love

027It’s still February so I just had to share another card made with the “Best of Love” stamp set.   OK….I do have a couple more for you but this one is my favorite!  Have you ever had that great feeling when a card just comes together and you LOVE it?  This was one of those.

I was wishing I had designed it for my Valentines class but then got to thinking….why can’t we still make it for a class?  It doesn’t say Happy Valentines Day so it could be an anniversary card or just an “I love you” card.  So, needless to say, we’ll be making it at our next class.

It did turn out cute, didn’t it?  My favorite part is the background.  After I stamped the hearts from the “Hearts A Flutter” stamp set I ran the Whisper White card stock through the Big Shot with the Decorative Dots Embossing Folder.

TSC!  Too Stinkin’ Cute!

Have a great day!  Take care and Happy Stamping!

Long Lost Create A Cupcake

031When was the last time you used your Create a Cupcake stamp set and the coordinating Cupcake Builder Punch?  Yep….hard to remember isn’t it?  I had originally dug mine out for a workshop I did in January.  My friend originally wanted to do a birthday card and what says birthday more than a cupcake?  🙂

Once I decided on the stamp set I grabbed my Birthday Bash Designer Paper.  Designer Paper makes card making SO easy!  It saves you the trouble of choosing a color scheme because you just go with the colors in the paper!  That’s how I came up with my combination of Raspberry Ripple and Basic Gray.  Such a pretty combination!

We made this card in classes this week and one of the gals commented on the label.  I used to use this combination of Modern Label Punch and Word Window Punch for the Teeny Tiny Wishes sentiment ALL the time and now we hardly ever use it at all.  I’m sad to say it’s true.  I’ve moved on I’m afraid… It’s nice to be able to rely on old friends though when the time is right!  🙂

Have a great day!  Take care and Happy Stamping!

Technique Tuesday: On Film Framelit Shaker Card Tutorial

001 004 012 014A few weeks ago I shared a special shaker card with you and promised you the tutorial.  Well, here it is!

The first thing you need to do is die cut the “polaroid” frame with the On Film Framelit.  The key to this step is placing a piece of wax paper between the framelit and your card stock (picture 1).  This way your paper doesn’t stick in the fine parts of the framelit.


The next step (picture 2) is to place Sticky Strip all around the opening on the back side of your die cut frame.  Stampin’ Up! Sticky Strip is too wide so you’ll need to cut it in half.  Or you can purchase 1/8″ tape from your local craft store or online.


Now remove the backing on your Sticky Strip and place a large Cello Bag on the back of the frame (picture 3).  Line up the bottom of the cello bag over the piece of Sticky Strip at the bottom of the frame and line up one of the sides of the cello bag with one of the sides of the frame.


Trim the edges of the cello bag even with the frame (picture 4).         016


Two of the sides of the cello bag are still open.  Place Sticky Strip between the front and back of the cello bag along these edges (picture 5).

Place your confetti pieces in between the two layers of the Cello Bag.  Remove backing from Sticky Strip pieces and close up your shaker.

That’s it!  I hope this all makes sense.  If you have any questions, please ask.

Enjoy your tutorial! Have a great day!  Take care and Happy Stamping!

Stinkin’ Cute: See Ya Later Alligator Card

014I saw this card on Pinterest and fell in love.  Isn’t this little punch art alligator adorable?  Once I saw him I knew I had to make him.

Can you guess what punch he’s made with? It’s the Pennant Builder Punch!  Punch out both pennant on the punch from Gumball Green card stock.  Run the smaller straight-edged punch through the Big Shot with that fabulous Sale-a-bration product the Decorative Dots Embossing Folder.  Trim off the long sides of the scalloped edge pennant.  Layer them.  Now, punch another scallop-edged pennant from Whisper White.  Cut off enough of  the long scalloped sides so that you can adhere them to the back of your Gumball Green pennants.  These are the teeth!.  The circles that you place the googlie eyes on are the medium circles from the Owl Builder Punch.

Just like the Geometrical card I showed you last week you trim off about 1/2″ from the front of the card a place a strip of designer paper on the inside edge so it show through.  I used the fun Watercolor Wonder Designer Paper here.  Don’t forget the fun zig-zag edge on the front of the card made with the Tasteful Trim Die.  It really adds to the card along with the great new Arrows Embossing Folder.

So many fun new products!  So little time!  What’s a stamper to do?

Have a great day!  Take care and Happy Stamping!

Did I say TSC?  Too Stinkin’ Cute!

Losing It and the Lost Framelits

024Wow….sometimes I think I’m losing it.  Last week I was having a hard time with Framelits.  Not using them….losing them!

Earlier last week I made this card using the “Best of Love” stamp set again.  I die cut the little heart using the heart from the “Hearts A Flutter” Framelits and then I proceeded to put the heart away….or so I thought.  I’ve been trying to be real good about putting my framelits away after I use them.  I put them back in their little package and then put the package in the box where I store my framelits.

Apparently the little heart didn’t make it in the package….in fact it didn’t make it into ANY package.  I looked and looked and looked and couldn’t find the little bugger.  I had resigned myself to the fact that I’d never see it again.  🙁

Then yesterday I lost yet ANOTHER framelit!  What’s going on with me and framelits?  A few weeks ago I shared a shaker card with you using the new “On Film” Framelits and I promised I’d write up a little tutorial for you (coming Tuesday) so I die cut a frame and took the pictures for the tutorial.  I could have sworn that I put that die right back where it belonged….no such luck.

Once again I looked and looked and looked.  The framelit had disappeared.  Now I was getting a little concerned because we’re making that card in classes this coming week and I kind of need it.   I wasn’t panicking….yet.  I decided to look in every single framelit package I had.

So…once I took all of the framelit packages out of the storage box I discovered my little heart framelit!  Woo Hoo!  I THOUGHT I had put it in the package but apparently it didn’t quite make it IN the package and was now sitting at the bottom of the storage box!  Sheesh!  Then once I started looking in all of the packages I found that I had put the frame framelit in the wrong package.  What’s a girl to do but think that she’s losing her mind? Yikes!

So now life is good.  I still think I might be losing my mind…but I have my framelits!  🙂

Enough chatter…..as I mentioned before, this card is another one mad with the “Best of Love” stamp set.  I told you on was on a roll with these stamp sets.  I know the card is kind of a valentine but it could be used as an anniversary or thinking of you card.  Besides, it’s still February so I figure I can still use valentine-type cards!  🙂  Don’t be surprised if you see a few more this week!

Have a great day!  Take care and Happy Stamping!

Simple Saturday: Best of Love

031Welcome back to Simple Saturday!  It’s time I start getting back on schedule, don’t you think?  A few days ago I mentioned that I was starting to play with all of my “Best of” stamp sets.  Well, here’s my first sample.

I used “Best of Love” (item #132987  $14.95) on this card.  The word “love” is from the stamp set.  You can check out the whole set here.

Once I stamped the word I simply punched out three hearts from Red Glimmer Paper and adhered them to the card.  I added a few layers and my card was done!  Simple!

Now, if you’re interested in purchasing any of the “Best of” stamp sets you need to remember that they’re only available until March 31st.  After that, they’re gone!

Have a great day!  Take care and Happy Stamping!

Starbursts and Washi Tape

021Do you love Washi Tape?  I sure do.  Stampin’ Up!’s Retro Fresh Washi Tape is just the thing to use to make a FUN card!

I paired the Retro Fresh Washi Tape with the Starburst Sayings stamp set and it’s coordinating Starburst Framelits.  You may have heard me say this just once or twice…but I LOVE products that coordinate!  They make card creating SO much easier! Won’t this make a fun birthday card?

Did you notice that I snuck one of those fun Candy Dots on the card?  I finally got over just hoarding them and decided to actually use them!  Hopefully you’ll be seeing them a lot more!  They’re a great embellishment for any card!

Have a great day!  Take care and Happy Stamping!

Petite Petals Sympathy Card

019Today’s card is a beauty (in my humble opinion) and once again I copied someone else’s idea.  That’s why we create…..to share!

The flowers are from the new Petite Petals stamp set and punched out with the Petite Petals Punch.  The original card had a lot more flowers and it was beautiful.  I just thought that we’d simplify a bit for class this week.

The gorgeous sentiment is from “Best of Greetings”.  This is one of the stamp sets that Stampin’ Up! came out with exclusively for their 25th Anniversary last year.  They brought back old favorites in each stamp set and introduced one new one.  You can still purchase this stamp set or any of the others until March 31st.  Be sure to come back to my blog in the next few weeks because I plan on sharing samples from all twelve of the “Best of” stamp sets.  I’m having a ball coming up with samples.  🙂

Have a great day!  Take care and Happy Stamping!

\

Happy Watercolor Golden Glitz

022Gold is IN!  That’s what they told us at Leadership Conference last month.  Have you checked out all of the fun new gold products in the Occasions Catalog?  Well, if you haven’t, you can definitely see most of them on this card! 🙂

I have to confess, this is another CASEd card.   Unlike yesterday’s card I did make a few small changes to this one.

Check out all of the GOLD!  Gold Foil Sheets, Gold (Watercolor Wonder) Washi Tape, Gold Ink and Gold Sequin Trim.  Whew!

The sentiment is from the fabulous Happy Watercolor stamp set and is die cut with one of the Apothecary Accents Framelits.   Shiny, sparkly and fun!

Have a great day!  Take care and Happy Stamping!


Geometrical: A Fun Card!

016Hello on a sunny and soon to be warm President’s Day!  Yep…it’s going to be close to 60 degrees here in Denver today!  Much nicer than the below zero weather we experienced while in the Minnesota Homeland last month!  🙂

Today’s card is made with the Geometrical stamp set and I CASEd it completely!  Why reinvent the wheel?   I’ve seen so many FUN cards made with this stamp set.  Have you played with it yet?

I love how the designer has the little strip of Kaleidoscope designer paper along the inside edge of the card and has trimmed off the front of the card so the paper shows.  I also love the little randomly placed triangles on the card.  Isn’t the little triangle punch fun?  I hope you have as much fun playing with this Geometrical stamp set as I did!

Have a great day!  Take care and Happy Stamping!

Anniversary Shaker Card

033How about a fun shaker card for my special day?  It’s my 10 year anniversary with Stampin’ Up! today!  Woo Hoo!  I can’t believe that I’ve been a demonstrator for 10 years!  I’ve LOVED every year of it!  I’ve met tons of great friends and have learned so many great things.  I can’t wait to see what the next 10 years will hold!

Today’s card is one that I designed for one of my upcoming classes.  It’s perfect for my anniversary isn’t it?  One of the presenters at Leadership Conference showed us how to make these fun shaker cards.  I couldn’t resist making my own. The shaker frame is made using the On Film Framelits Dies (#132969 $29.95) and a large Cello Bag (#102210 50/$4.95).  The new cello bags are perfect for this because they don’t have a seam in the back like the old ones.  I die cut the “polaroid frame” from a Silver Foil Sheet (#132178 2/$3.95).  Then what you do is attach your cello bag to the back of the frame with Sticky Strip.  You can either cut Stampin’ Up! Sticky Strip (#104294 $6.95) in half or you purchase narrow sticky tape online or from your local craft store.    Adhere the tape to the bottom and  two sides on the back of the frame.  Line up the cello bag just below the opening of the frame and along one side edge.  Your cello bag is bigger than the frame so you’ll have to trim it.  Fill your cello bag and then use your Sticky Strip to close up the cello bag.

For the shaker portion of my card I punched out stars from Silver (#124005 2/$4.95) and Champagne (#127885 2/$4.95) Glimmer Paper using the star punch from the Merry Minis Punch Pack (#126882 3/$16.95).  You won’t find these little punches in any catalog but they are still available.

To finish off the card I ran the background piece through the Big Shot with the fun Decorative Dots Embossing Folder that you can get for FREE during Sale-a-bration with a $50 order.   FREE stuff!  Woo Hoo!

I will try to do a tutorial on the shaker card next week when I get back from the mountains.  It’s pretty easy and makes such a FUN card!  Have a great day!  Take care and Happy Stamping!

A Week in the Snow

Breck2014Hello from Breckenridge, CO!  We’re spending the week up at our time share.  It’s been snowing almost constantly since we got here Friday evening.

This is a picture from our skiing excursion on Sunday.  The snow was coming down pretty good and the wind was blowing.  The skiing was pretty good though, even for a slacker like me!

I’m enjoying vegging out in the condo.  I’ll see if I can find the time to post a card or two later this week.  I am pretty busy being a slacker….I have my massage later this morning!  It’s a tough life being a slug!  🙂

Have a great day!  Take care and Happy Stamping!

Petite Petals in Black & White

004Hello on another frigid Colorado morning.  Yesterday when I woke up and checked the outside temperature I thought for sure I was back in my home state of Minnesota.  It was below zero!  Yikes!

Enough whining!  Let’s talk about this card!  I used the fun new Petite Petals stamp set along with the coordinating Petite Petals Punch.  You know me….I LOVE coordination!  It makes my life so easy!  🙂

I also used the new Decorative Dots Embossing Folder that you can get for FREE during Sale-a-bration with a $50 purchase!  I love this embossing folder.  It’s so FUN!

Have a very WARM day!  Take care and Happy Stamping!