Watercolor Pencils

There are so many great products in the new Stampin’ Up! Occasions Catalog that comes out in just a couple of days.  One of the products I was excited to check out were the Watercolor Pencils!  I’m so glad we have a new coloring option.  I really miss the Blendabilities Markers.  I’ve played a little bit with the pencils but I’m by no means an expert.  I need to work with them a little more.

Here’s a great video that gives you a little overview on how to use the pencils.  You’re definitely going to want to put them on your wish list!

Have a great day and Happy Stamping!

Happy New Year!

new-yearHappy New Year!  Happy 2017!  Are you ready for the new year and all it has to offer?  Are you ready to try new things, meet new people and live life to it’s fullest?  That’s all any of us can do.  I hope you’re ready to embrace the new year as I am.

I’m going to work on taking my business to the next level and sharing more crafting ideas with you.  I want to do more business online as well as continue holding classes in my home and holding workshop/classes in your homes.  As with many people this time of year I also want to lose weight and get in shape.  I also want to make sure I appreciate what I have.  So let’s go!  Let’s get ‘er done this year!

One of the things I’m excited about in this new year is Stampin’ Up!’s upcoming (only a few more days!) Occasions Catalog.  There are some fantastic things in it and one of my favorites is the Birthday Bright Project Kit.  It’s the perfect way to get a head start on all of those birthdays you have on your calendar in the next few months.  Check out Stampin’ Up!’s video below.  I know you’re going to fall in love with this kit as much as I have!

You can purchase this fabulous kit starting on Wednesday, January 4th.  Don’t miss out!

Have a great day!  Take care and Happy Stamping!

Time is Running Out


Well, it’s the last day of 2016.  Are you sad to see it go or are you more than ready for the New Year?  I know that some people are more than ready for the new year.  They’ve had enough of 2016 and all it entailed.

Overall 2016 was pretty good to me.  I did lose a close friend to cancer but my family and I are all healthy and doing well.  I still love being a Stampin’ Up! Demonstrator and all it entails.  Best of all, I earned Stampin’ Up!’s Incentive Trip to Phuket Thailand next summer.  Woo Hoo!  Of course I couldn’t have done that without all of you so THANK YOU!

thailand

I’m hoping 2017 will be another good year both for my family and friends and for my business as well as for all of you.

Time may be running out for 2016 but there’s still a few more days to take advantage of Stampin’ Up’s Year-end Closeout deals.  There’s also only a few days left of the Holiday Catalog.  Look for the fabulous new Occasions Catalog on January 4th.

Have a great day!  Celebrate the end of 2016 safely and I’ll see you in the new year!  Take care and Happy Stamping!

Happy Holidays!

christmas2016I hope everyone had a wonderful holiday weekend!  Our Christmas was good.  Too much food, more than enough gifts and great fellowship with family and friends!  This is a goofy picture of my boys and I.  The second picture is my baby kitty Tasha by the tree.  She really enjoyed her little catnip toys.  🙂

Did Santa bring you everything on your list?  It was a practical gift year for me.  Lots of things for the kitchen that needed replacing.  🙂

Now it’s time to start thinking about cleaning up from Christmas and packing for our trip to the MN Homeland to see family.

I should probably also start thinking about getting ready for the new Occasions Catalog christmas2016-1and SALE-A-BRATION!!  Woo Hoo!  I really wish I could have carved out more time to play with some of the new products from the publications.  Oh, well.  I’ll just have to do it when I return from the frigid Homeland.  Lucky for us it doesn’t look like the temperatures will be too low while we’re in town.

Are you ready for the new Occasions Catalog and Sale-a-bration?  Have you started making those wish lists?  You better get those lists made!  It all begins next week!

Have a great day!  Take care and Happy Stamping!


Grinch Tag

grinch-1116Christmas is almost here!  Yikes!  Are you ready?

Remember how I mentioned that I thought I was on top of my Christmas preparations but knew that I had to be missing something?  Well, I haven’t missed anything life threatening but little things are popping up here and there that could have gone a bit smoother.

I was watching TV with my husband the other day and in the middle of the show I shout “Crap!”.  I was getting my hair done the next day and I had forgotten to get my hairdresser a Christmas gift.  Lucky for me I had cards on hand and wrote her a check (which I’m assuming she’ll appreciate more than a box of candy…).  A little lame but it worked.

Then on another day we get yet another package from Amazon.  (I’m not sure we’d survive the holidays without Amazon Prime!).  Of course, like all of the other Amazon packages we’ve received it’s addressed to me.  The thing was, none of us were expecting a package.  Finally my husband and older son opened it and it’s a computer keyboard that my younger son wanted.  Well…my older son had already bought one for his brother.  Hmmm….  Ah…..I had given the same list to my sister-in-law when she asked for ideas for son #2.  Dang!  I blew it!  Of course, it’s not the end of the world, just a tad bit frustrating.

But on to today’s project!  Didn’t this little Grinch turn out rather cute?  Well, I suppose that the Grinch really isn’t cute but I think this tag turned out pretty well.  The only part I had to draw by hand was his mouth area.  The eye area is a stamp found in the Jar of Haunts stamp set.  It’s perfect for the Grinch!

I die cut an oval using the Layering Ovals Framelits for the face and for the mouth area I die cut a heart from the Sweet and Sassy Framelits.  I trimmed the heart a little to make it be a little less heart shaped then I drew the mouth area on it.

I stamped the eyes on the oval and then I stamped them again on a scrap of Crushed Curry card stock, cut them out and adhered them over the stamped image on the oval.

The little hat of course is punched from the Jolly Hat Builder Punch and the nose is a 1/4″ circle.

It’s a fun little tag if I do say so myself.  There’s still time to whip a couple of these up for those last minute packages.  🙂

Have a great day!  Don’t stress too much!  Take care and Happy Stamping!

Totally Trees Beach

totally-trees-1216I guess I should have been looking at this card while we had our frigid cold snap last week!  This would have warmed me up….dreaming of sitting on a sandy beach with the sun shining down on me.  Oh, well.  I can dream now!  🙂

This warm and easy card was made using Stampin’ Up!’s Totally Trees stamp set.  I really like this set and am so sad that it will be gone as of January 4th.  Yes, it’s retiring along with the Holiday Catalog so if you want it, you better order it SOON!

I’m sad to see it go because I’m in love with this palm tree.  The other trees are very nice but this one makes me smile.  How can you not smile thinking of a warm beach (and possibly a frosty drink!)?   I’m pretty sure there’s more than a few of us who would like to be relaxing on a warm beach about now instead running around crazy trying to get ready for the holidays!  🙂

Don’t be sad that you’ve missed out on this stamp set and the others that are retiring as of January 4th.  You only have a few more weeks to get ’em before they’re gone!  Shop now!

Have a great day!  Take care and Happy Stamping!

Sneak Peek: Sealed With Love

sealedwithlovesu-1216Christmas is just a few short days away but have you started thinking about Valentines Day yet?  Ha!  Of course you haven’t unless you’re a Stampin’ Up! Demonstrator and have a chance to play with some of the new products in the upcoming Occasions Catalog!  🙂

Stampin’ Up! posted this photo in our weekly email.  Aren’t these projects cute?  I have just a few more Christmas things to take care of this week and then I can sit down and play.  I do have my projects designed for my first two classes of 2017 but I’d like to just sit and make some cards for the fun of it!

The three projects in the photo use almost all of the products you can find in the Sending Love Suite.  There is an adorable stamp set with COORDINATING framelits, ribbon, embellishments and of course a Designer Series Paper Stack!  Plenty of fun products to make all of those Valentines you’re going to want to send out!  You can see them online starting on January 4th or let me know and I can pop a catalog in the mail for you now!  You’re going to love the new Occasions Catalog.  There’s a little something for everyone!

Have a great day!  Take care and Happy Stamping!

Washi Tape Thank You

endless-thanks-1016Is there still a cold spell in your neck of the woods?  We’re warming up a bit here in Denver and tomorrow we might hit 50 degrees!  That will feel so good after single-digit and below-zero temperatures!  🙂

This card feels warm and springy and will be perfect for those holiday thank you notes that you’ll want to send out.

It’s been so long since I actually designed this card that I’m not sure where I originally found the idea.  I know that I liked that the design used washi tape.  I love the look washi tape but can never really figure out how to incorporate it into my cards.  This was definitely a fun design.

I used the Endless Wishes stamp set on this card and it coordinated well with the Affectionately Yours washi tape.  I just love the font in this stamp set!

I started with the strips of washi tape.  To get the leaves peeking out from behind the tape I simple covered (masked) the tap with a piece of computer paper which is light-weight and thin.  You don’t want to use a thick piece of card stock because you may have trouble getting the image to stamp right next to your mask.

I did have to cut out the Calypso Coral florals by hand….no punches or dies for this.  🙁

I should try this design with some of the other washi tape sets.  I bet the card would look totally different.  Hmmm….

Have a great day!  Take care and Happy Stamping!


Lefse!

lefse1 lefse2What a fun day yesterday!  I learned how to make lefse!  For those of you who are not Scandinavian lefse is like a potato tortilla.  You spread butter on it and roll it up to eat.  Yum!  You can also sprinkle cinnamon sugar on it.

I’m pretty sure that I don’t have a drop of Scandinavian blood in me but growing up in Minnesota with all of those Scandinavian Lutherans I got to eat it and I love it!

Last year my friend Sallie brought me a few pieces after she made it with some gals from our church and this year she invited me to join her!  I was so excited!

Sallie is the fourth person from the left with the light colored hair.  She takes good care of me.  This morning she brought me a tin of Christmas cookies knowing that I haven’t begun my holiday baking yet!  Hey!  I have almost a week, right?!  🙂

Have a yummy day!  Take care and Happy Stamping (and holiday baking!)!

Here’s to Cheers!

heres-to-cheers-1-1116Can you believe that Christmas Eve is in one week?!!!  Yikes!  The holiday parties are winding down but if you have a few left then today’s project will be perfect.

It’s a wine tag made with the Here’s to Cheer’s Bundle.  An all tag bundle:  stamps and COORDINATING framelits!  How perfect for holiday giving!  You can make wine tags as well as regular gift tags for gifts.  There’s even a stamp for a food gift that says “Wishing You a Scrumptious Christmas Season”.

Of course my favorite is the wine tag.  🙂

This tag was pretty easy to make.  The hardest part was getting pieces and parts to adhere to the glimmer paper.  Most everything heres-to-cheers-1116on this tag is glimmery!  Why not, it’s CHRISTMAS!!!  You just need to make sure and use a good liquid glue.

I like how the ribbon slides through the tag and adds a little more “wrapping” to the tag.

Well, it’s darn right cold out here in Denver this morning.  My phone says -2 degrees.  We’re spoiled….it doesn’t usually get this cold.  I know….I’m from the MN Homeland but I’ve been in Colorado for over 21 years and I guess my blood has thinned.  Yes.  I’ve become a weenie.

I do have to go out later this morning.  I’m hanging out with some gals from church and we’re making lefse!  I can’t wait!  I love to eat lefse but I’ve never made it.   It should be a fun time.  I hear that some eggnog will be involved too!  🙂

Stay warm!  I know I’m going to try to.  Take care and Happy Stamping!


Christmas Pines Noel

christmas-pines-1016Check out these pine cones?  Aren’t they great?  They’re so festive and dimensional with the two separate pieces.  Of course that bow is pretty darn cute too!

Are you wondering how I lined up the pine boughs on the card front and the white card stock?  It’s pretty easy.  Using just a little bit of TEMPORARY adhesive, adhere the white card stock where you want it lined up on the card front.  Now stamp your pine boughs.  Part of the pine bough will be on the card front and part on the white card stock.  There may be a little strip right around the edge of the white card stock that doesn’t get stamped but when you add your border of Cherry Cobbler it covers up the space!  My border is a little narrow so it doesn’t cover quite as well as a wider border would but it still is a neat technique.

This was a very popular card in my classes and workshops.  It’s funny because it’s not necessarily my favorite.  It just goes to show that not everyone likes the same type of cards.  I need to remember that when I design.  Just because I don’t love it doesn’t mean that my customers won’t.

Right now I’m working on designing cards for my Love & Friendship class that I’m having in January.  It’s pretty fun playing with new products.  I can’t wait for you to see the new Occasions Catalog and the 2017 Sale-a-bration Brochure!  Fun stuff!

Have a great day!  Take care and Happy Stamping!

Sale-a-bration Sneak Peek: Hey, Chick

hey-chick-1216This 2017 Sale-a-bration stamp set has got to be one of the cutest stamp sets EVER!!!!  OMG!  I’m in love!

This stamp set has three different chickens, a little egg with feet and three sentiments.  Have I mentioned that I LOVE it?!!!

This little chicken with the crazy hair is probably my favorite.  I can’t wait to play with this stamp set some more.

I designed this adorable (if I do say so myself!) card for my team holiday gathering last Saturday.  We had brunch, chatted and made three different cards.  This one was my favorite by far.  How can you not fall in love with this chick?  🙂

This stamp set will be available starting January 4th.  It can be yours for FREE with a $50 purchase!  Sale-a-bration:  a stamper’s favorite time of year.  Purchase the products you love and get FREE products!  Woo Hoo!  FREE stuff!  It doesn’t get any better!  Are you ready for Sale-a-bration and the new Occasions Catalog?  I sure am!

Have a great day!  Take care and Happy Stamping!

Holly Berry Happiness

holly-berry-happiness-1016This is another of my favorite cards from this fall.  Simple, yet elegant.

As soon as I saw the Holly Embossing Folder in the Annual Catalog I knew I wanted to use it on one of my Christmas cards.  Of course it goes perfectly with the Holly Berry Happiness stamp set.  🙂

What do you think of this design?  I copied it straight from the Holiday Catalog.  Have I mentioned how much I love the samples in Stampin’ Up! catalogs?   You don’t have to look too far for inspiration.  It’s right at your fingertips!

holiday16_p26c-110-2This card was also the perfect chance to use washi tape.  I really like washi tape but I have a hard time trying to figure out how to incorporate it into my card designs.  I thought using it on this card turned out pretty well.  What do you think?

Yesterday I hit the post office to mail my holiday packages.  I only had to wait 35-40 minutes.  Not too bad at all.  Ha!  If it had been any other time of the year I would probably have been fuming!  Good thing it’s the season of good will.  🙂

Have a great day!  Take care and Happy Stamping!

Simple Christmas Pines

christmas-pines-1116
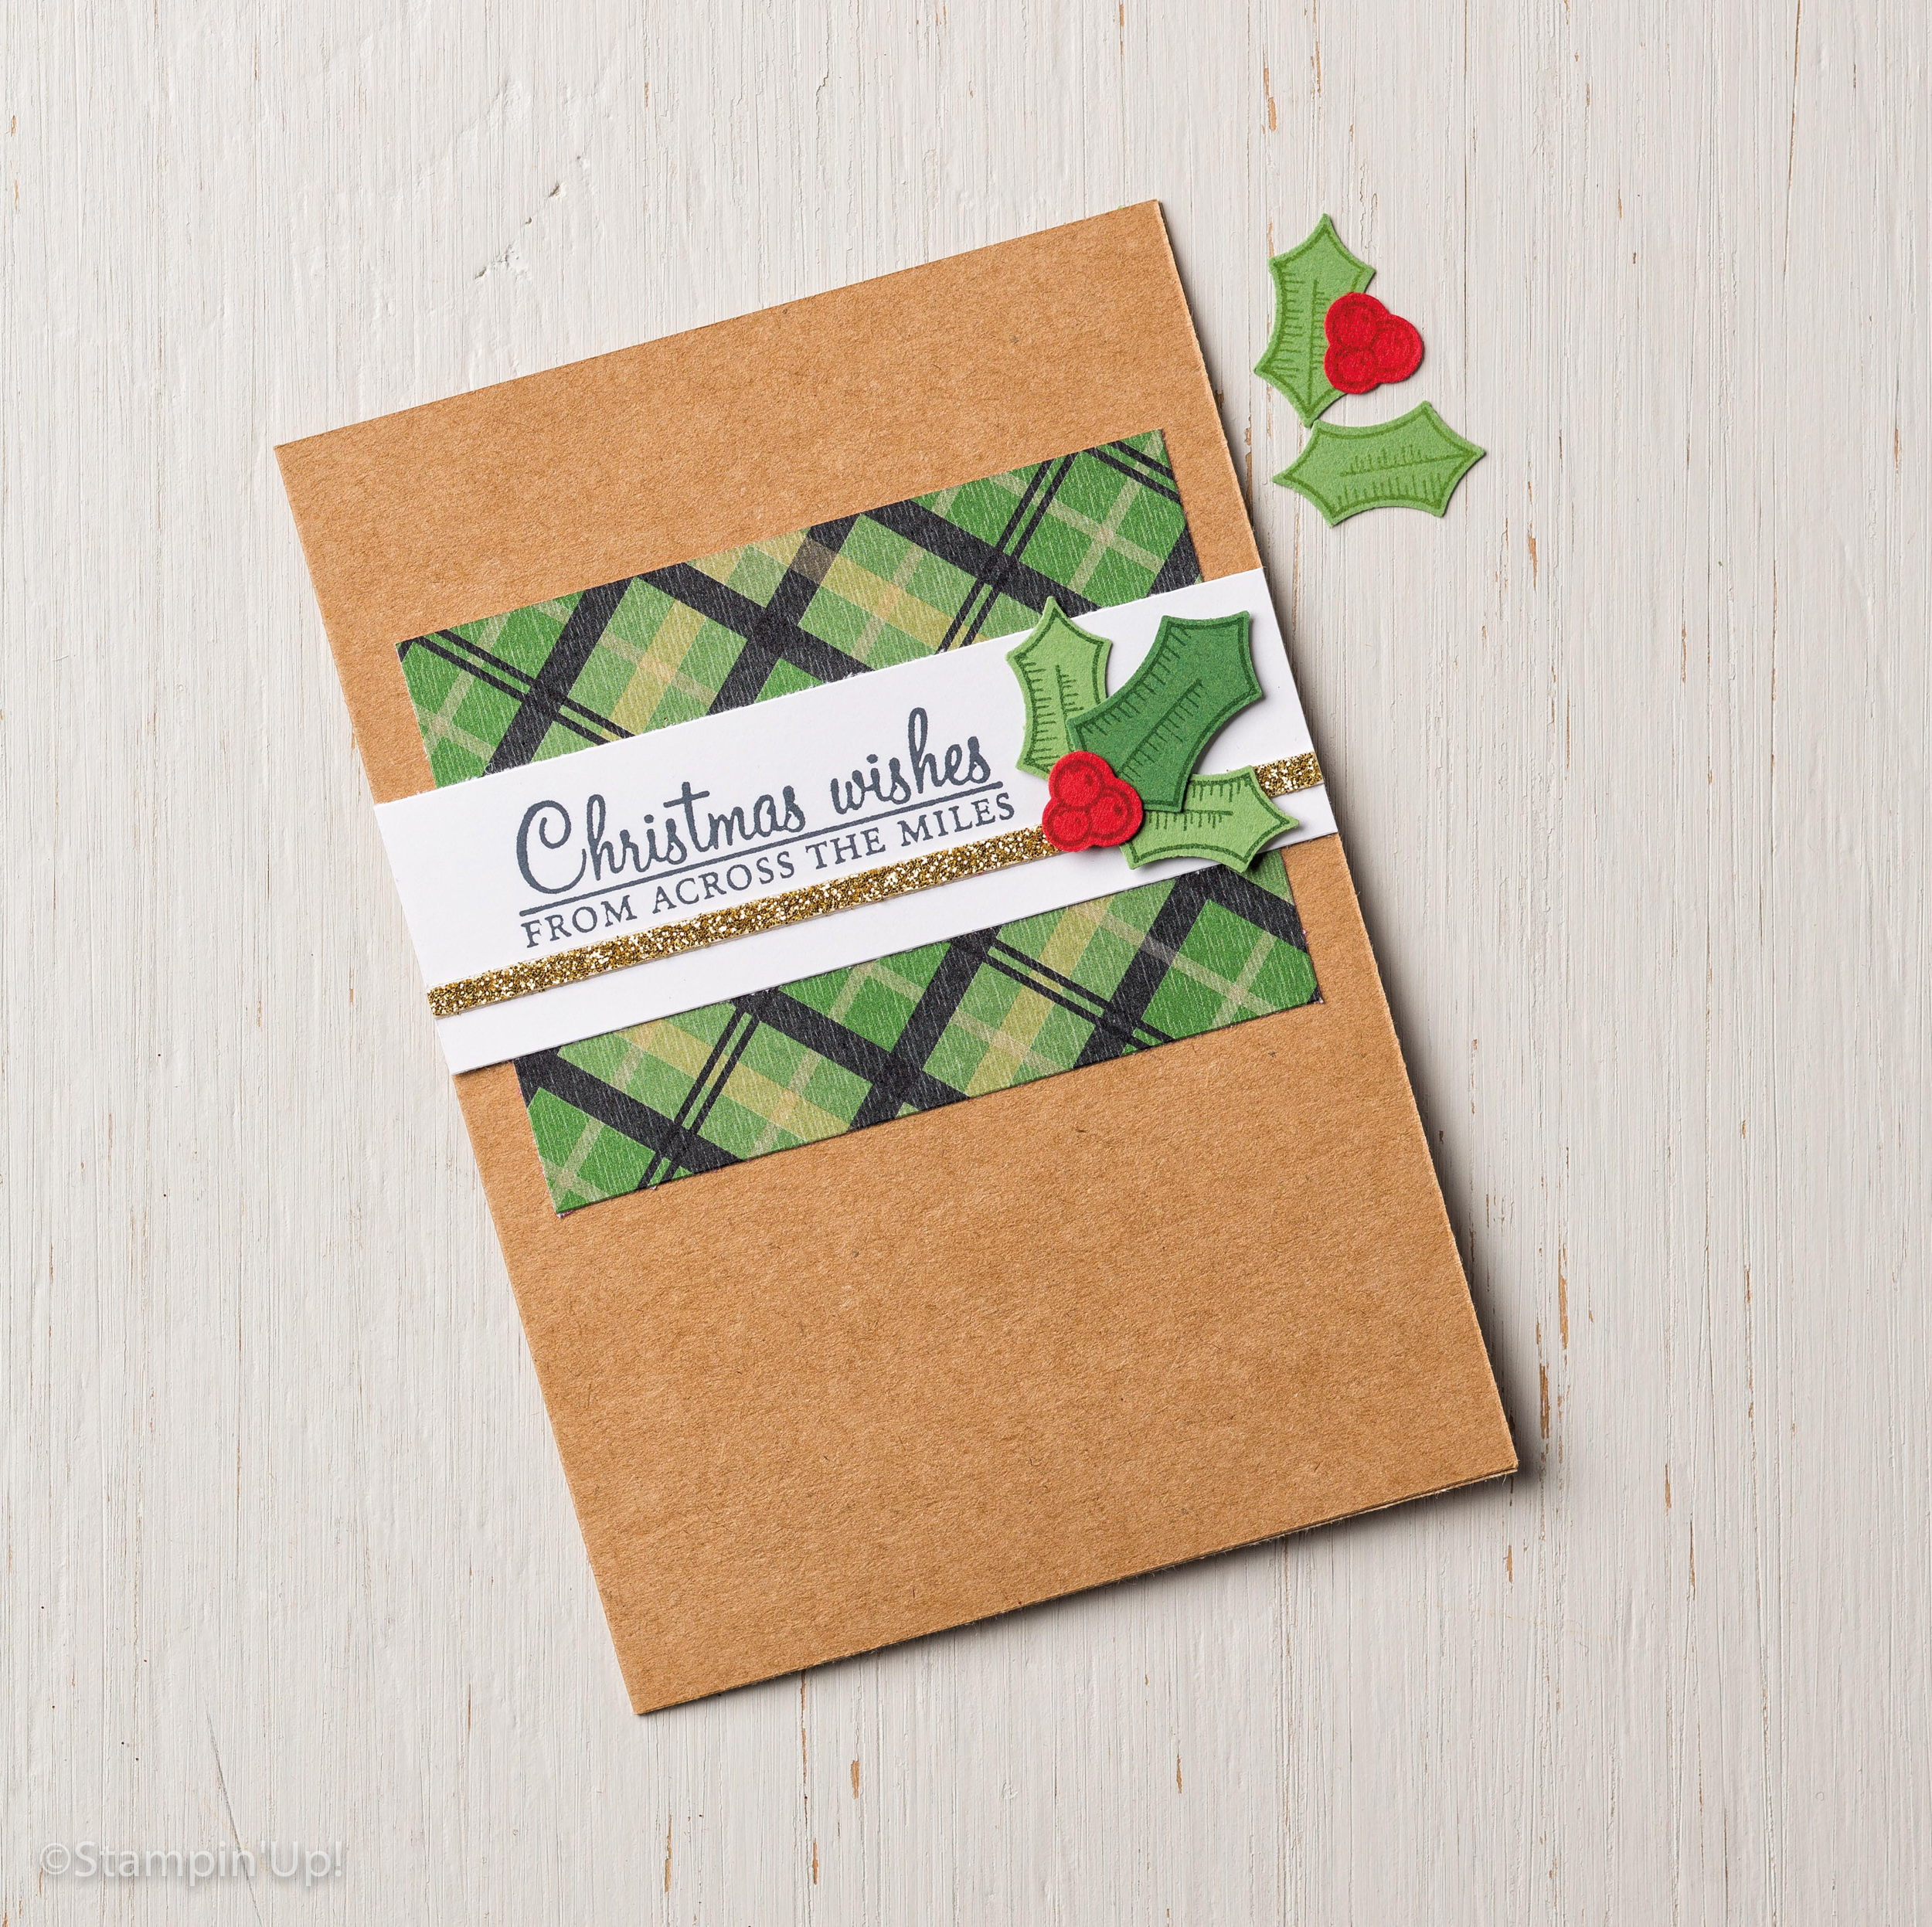
It’s time for another easy Christmas card in case you haven’t completed yours.  This one is made with the Christmas Pines stamp set.

If you have this stamp set did you notice that there are two sets of pine boughs?  One is a little thicker than the other.  When you use them together (it’s easy to do because they’re photopolymer) you get more of a 3D look.  You can see the double stamping more on the ends of my boughs.

I just stamped the boughs a few times in the corner, added my sentiment, bow and some dimensionals and my card was done!  Simple yet elegant.  My favorite!

I was a bit under the weather yesterday and spent most of it reading and messing around.  I did get the out-of-town gifts wrapped and ready for the post office though.  Now today I get the pleasure of standing in line at the post office.  I figured that today should be a little better than yesterday would have been but who knows.  I don’t have any other big plans other than shopping for stocking stuffers and a quick trip to the grocery store.  The big thing is that I need to remember to purchase Christmas stamps at the post office so I can mail my Christmas cards.  I did get the majority of them written out on Sunday so I’m pretty pleased.  Usually I’m pounding through them the weekend right before Christmas so I’m ahead of the game this year!  🙂

I hope you’re on top of all of your Christmas preparations.  Have a great day!  Take care and Happy Stamping!

Merriest Wishes Tags

merriest-wishes-1-1116 merriest-wishes-2-1116I had my Christmas Tag Class a few weeks ago and these were a couple of the easier tags we made.

With the Merriest Wishes stamp set and the COORDINATING Merry Tags Framelits making Christmas tags doesn’t get much easier.

On the first tag I die cut the tag from Whisper White card stock then heat embossed the sentiment with the Copper Embossing Powder.  Punch out a 2″ circle from a Copper Foil Sheet (love these!) and adhere it to the back of the tag.  I added some ribbon and I was done.  OK…you caught me.  The Whisper White Striped Satin Ribbon is retired so in class we used the Whisper White Thick Baker’s Twine.  🙂

The second tag we made using this bundle was even easier because there was no stamping involved.  Die cut the tag from the Dazzling Diamonds Glimmer Paper then punch a 2″ circle from Emerald Envy card stock.  Add some ribbon and baker’s twine and you’re done!

Hmmm…as I’m writing how easy these are to make I’m thinking that I should whip up a bunch for gifts this year……Do you have any homemade gifts that you’re giving this year?  Leave a comment and let me know!

Have a great day!  Take care and Happy Stamping!