Stampin’ Up!’s Watercolor Pencils

141709
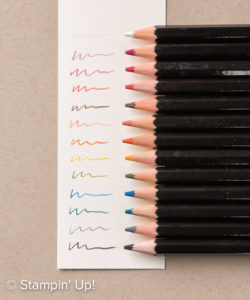
Have you tried Stampin’ Up!’s Watercolor Pencils?  You should!  They’re fun and easy to work with and THEY’RE ON BACKORDER already!  Oh, no!

Stampin’ Up! isn’t sure when they’ll be back in stock so you will be unable to order this fabulous product after Thursday 1/26.  If you want to make sure that you will get this product when they are back in stock place your order before Thursday.  Once they are back in stock I’m sure they’ll go quickly.

You can order your Stampin’ Up! Watercolor Pencils here!  Order them today!

Now you’re wondering WHY you should order them and HOW to use them.  Back on January 2nd I posted a Stampin’ Up! video on the Watercolor Pencils and how to use them.  Here it is again.  If you think you’d like to give them a try be sure to place your order before Thursday so that you can get them when they are back in stock.

Have a great day!  Take care and Happy Stamping!

Make it Mine Monday: Sealed With Love Notes

Sealed With Love.1It’s Monday!  Make it Mine Monday!  Woo Hoo!

It’s also time to start thinking about Valentines.  Yep, Valentines.  These cute little 3 x 3 notes are my take on the ones we made at Stampin’ Up!’s November On Stage event.  You can see the ones that Stampin’ Up! designed in the second picture.

The first thing I changed on my little cards Sealed With Love.2was to get rid of the color green.  I’m sorry….Valentines aren’t green.  Save the green for St. Patrick’s Day!  Ha!

Stampin’ Up! used the Sending Love Designer Series Paper for the bases of the cards but I used Thick Whisper White card stock on all of mine.  On the first and third cards I just cut a 3 x 3 piece of designer paper and adhered it to the front of the card.

On the card in the upper right it’s hard to tell from the picture but I colored the wooden Sending Love embellishment red by rubbing the Real Red ink on it with a Sponge Dauber.  Did you know that you could do that?  Yep.  Just make sure to heat set it so the ink dries before you handle it.

Don’t you love the little envelopes in the center cards?  They’re made from the Sending Love Glassine Sheets and the Love Notes Framelits.

Can you see how easy it is to start with something and just change it up a bit to make it your own?  I hope you’re enjoying my Make it Mine Mondays.  Let me know what you think.  Take care and Happy Stamping!

Simple Saturday: Badges & Banners

Badges & Banners.0816
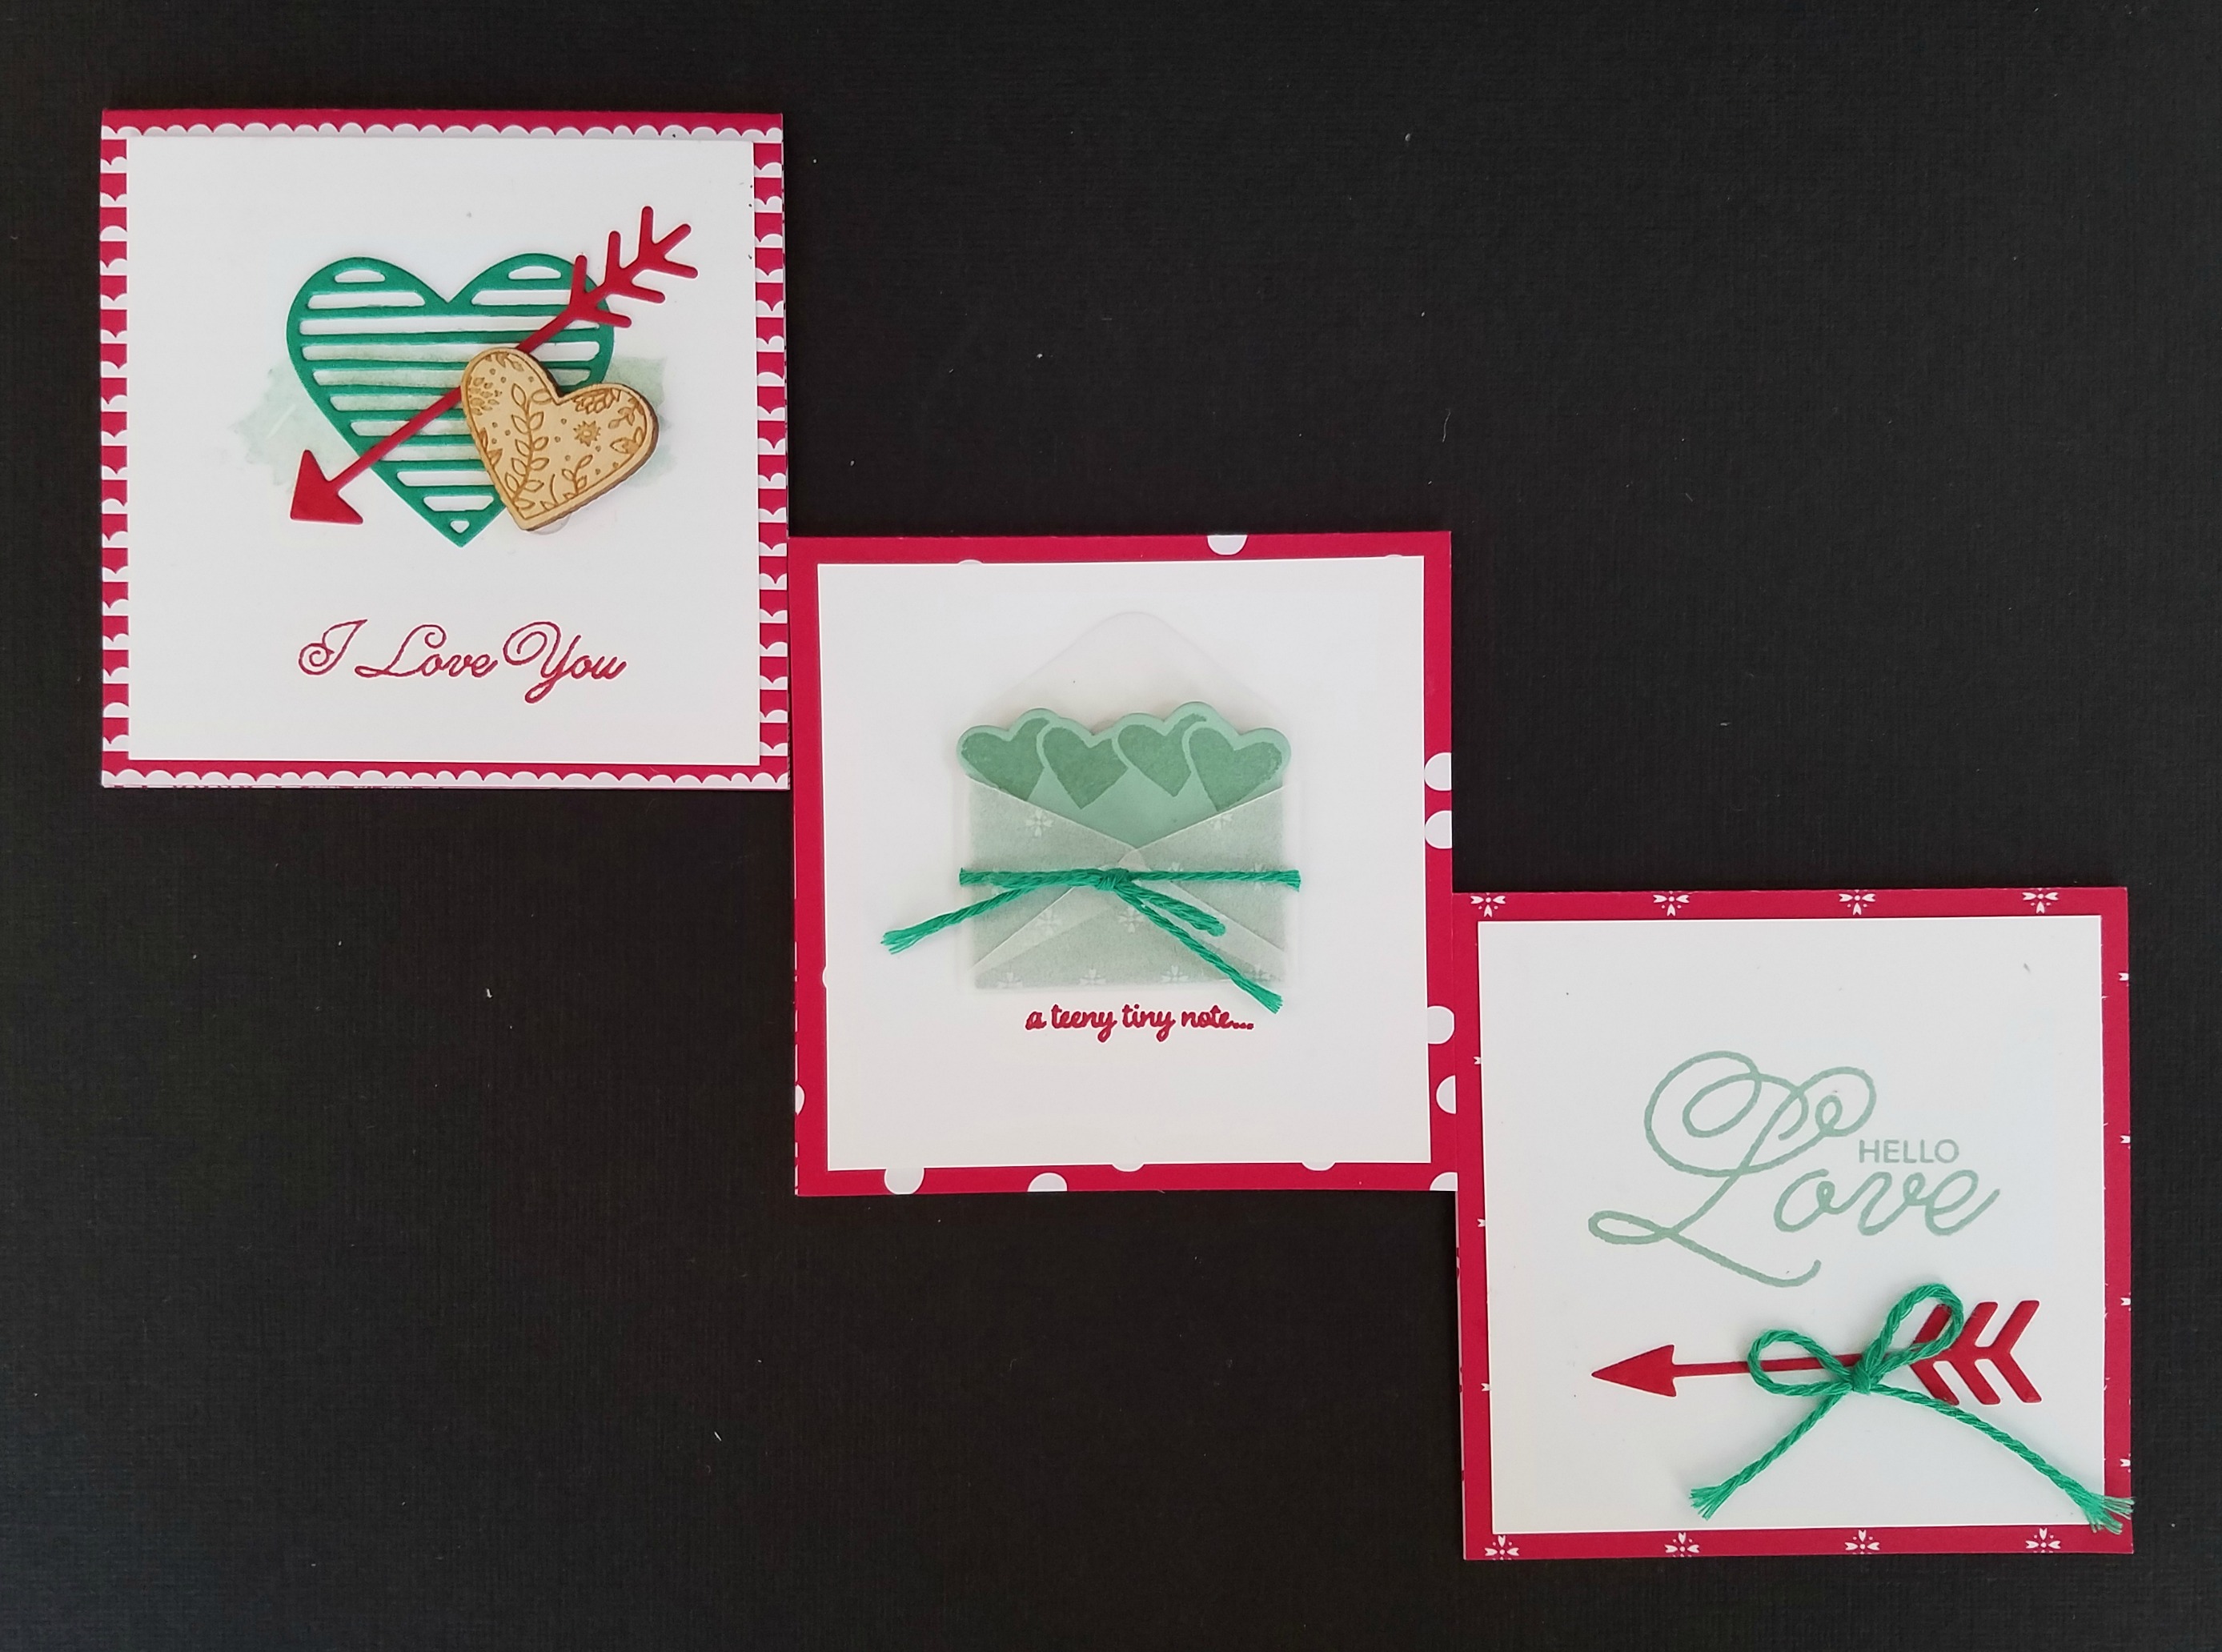
Good morning!  I hope your Saturday is going well for you.  My day is going to entail sitting at my computer entering data that I’ve put off for the past year.  You’d think I would learn to stay on top of things.  I do this every year…..sit down in January and February trying to catch up.  This year…..

I’m not sure I’m going to enjoy my day like the card says but I will enjoy the results when I’m finished.  There is nothing else on my calendar for the day so we’ll see how it goes!

The Badges & Banners stamp set wasn’t one I really needed but once again I saw cute cards made with it and figured I needed to have it.  The stamp set worked out perfectly for my Card Buffet where I want the cards to be fairly easy.  Stamp a few speckles on the card front, stamp the badge, punch it out and layer the card.  That was it!

I used the Moroccan Designer Series Paper on the card.  The great thing about it is that the designs are all similar enough that I could easily change out the paper and the colors for this card and didn’t have to buy too many packages of the designer paper for the class.

I hope you all enjoy your day.  Take care and Happy Stamping!

Love Sparkles

Love Sparkles.0117When I first saw this stamp set I knew it would be perfect for the Love & Friendship class I held this week….and it was!  🙂

I thought of doing this card in one of my favorite pink colors but remember that when I design a card I have to make sure I have ribbon that coordinates!  I guess I could have done the card in Flirty Flamingo but I wanted to use the Sweet Sugarplum….it’s a nice pinky purple.

I started with the Falling Petals Embossing Folder on the front of the card.  Now…don’t ask me why it’s called falling petals instead of hearts or something.  Personally I think the little designs look like hearts.  What do you think?  To highlight my petals (or hearts) I took a sponge dauber with some Sweet Sugarplum ink on it and LIGHTLY rubbed it over the embossed petals (hearts).  It really made them pop.

To get a little more “sparkle” on my card I used the Dazzling Diamonds Glimmer Paper on one layer.  I added a single rhinestone to the heart and then I used my Clear Wink of Stella Pen on all of the little “sparkles” on the word love.  I tried putting a small rhinestone on all of the “sparkles” but it was honestly a bit much.  I hate to admit that….how can you have too much sparkle?  Sheesh!

I hope you all have a sparkly day!  Take care and Happy Stamping!

A Birthday Adventures Card

Balloon Adventures.0117
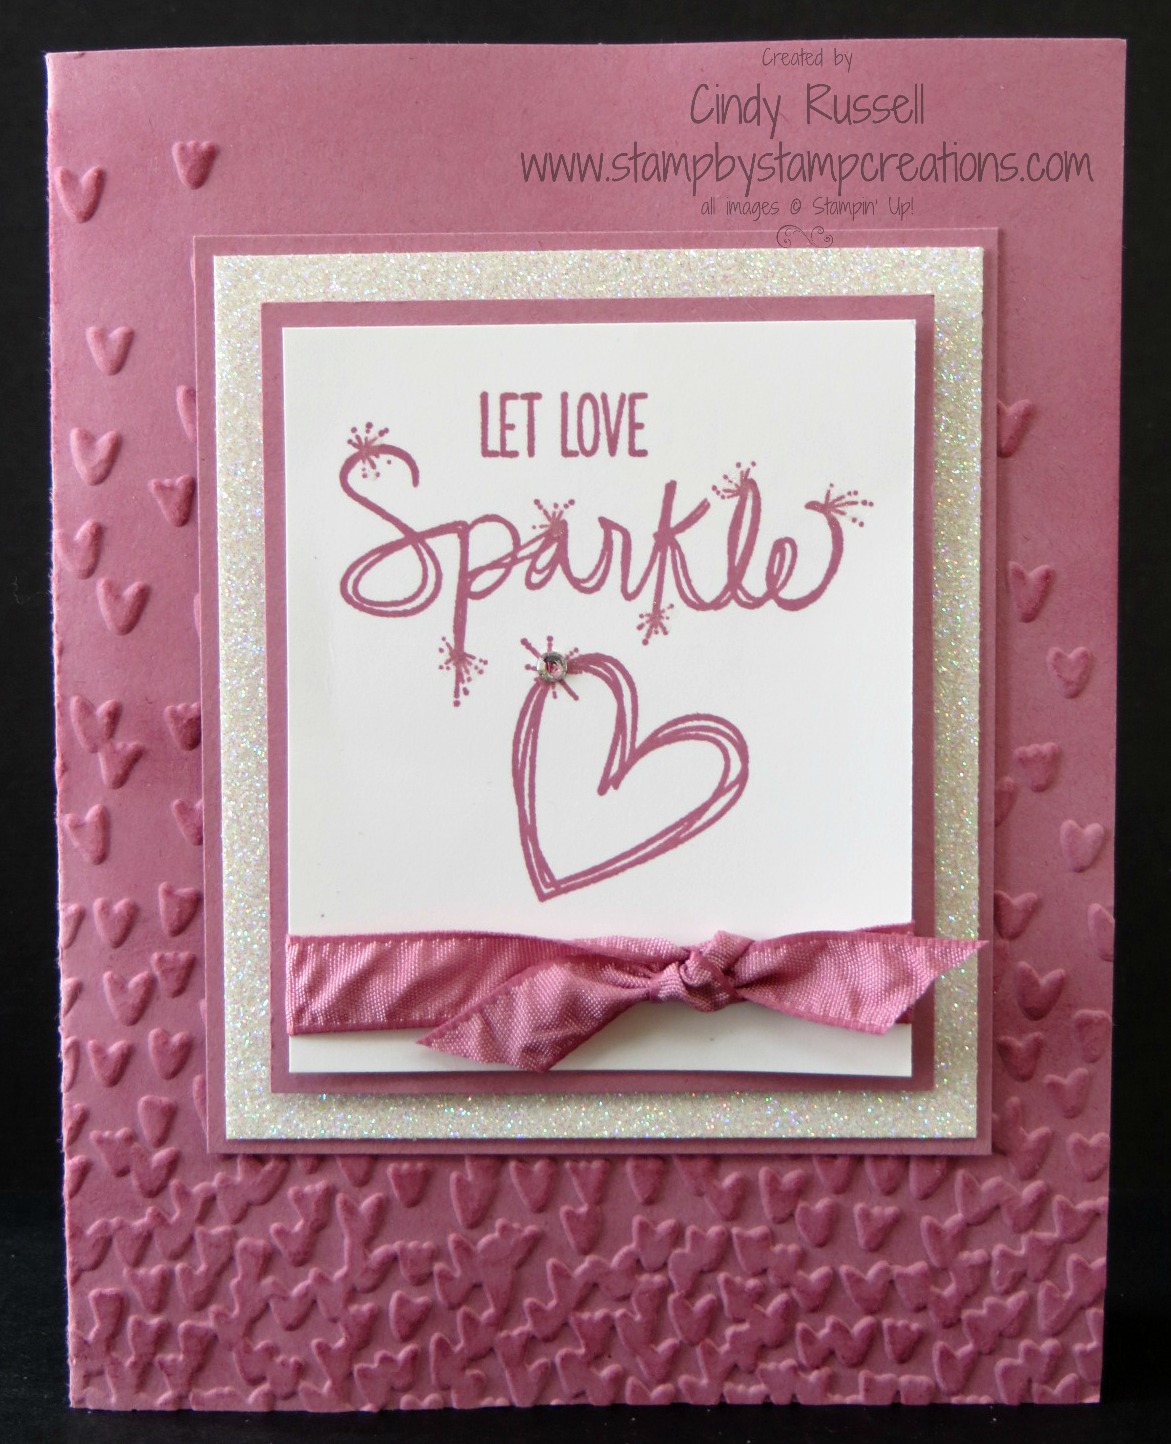
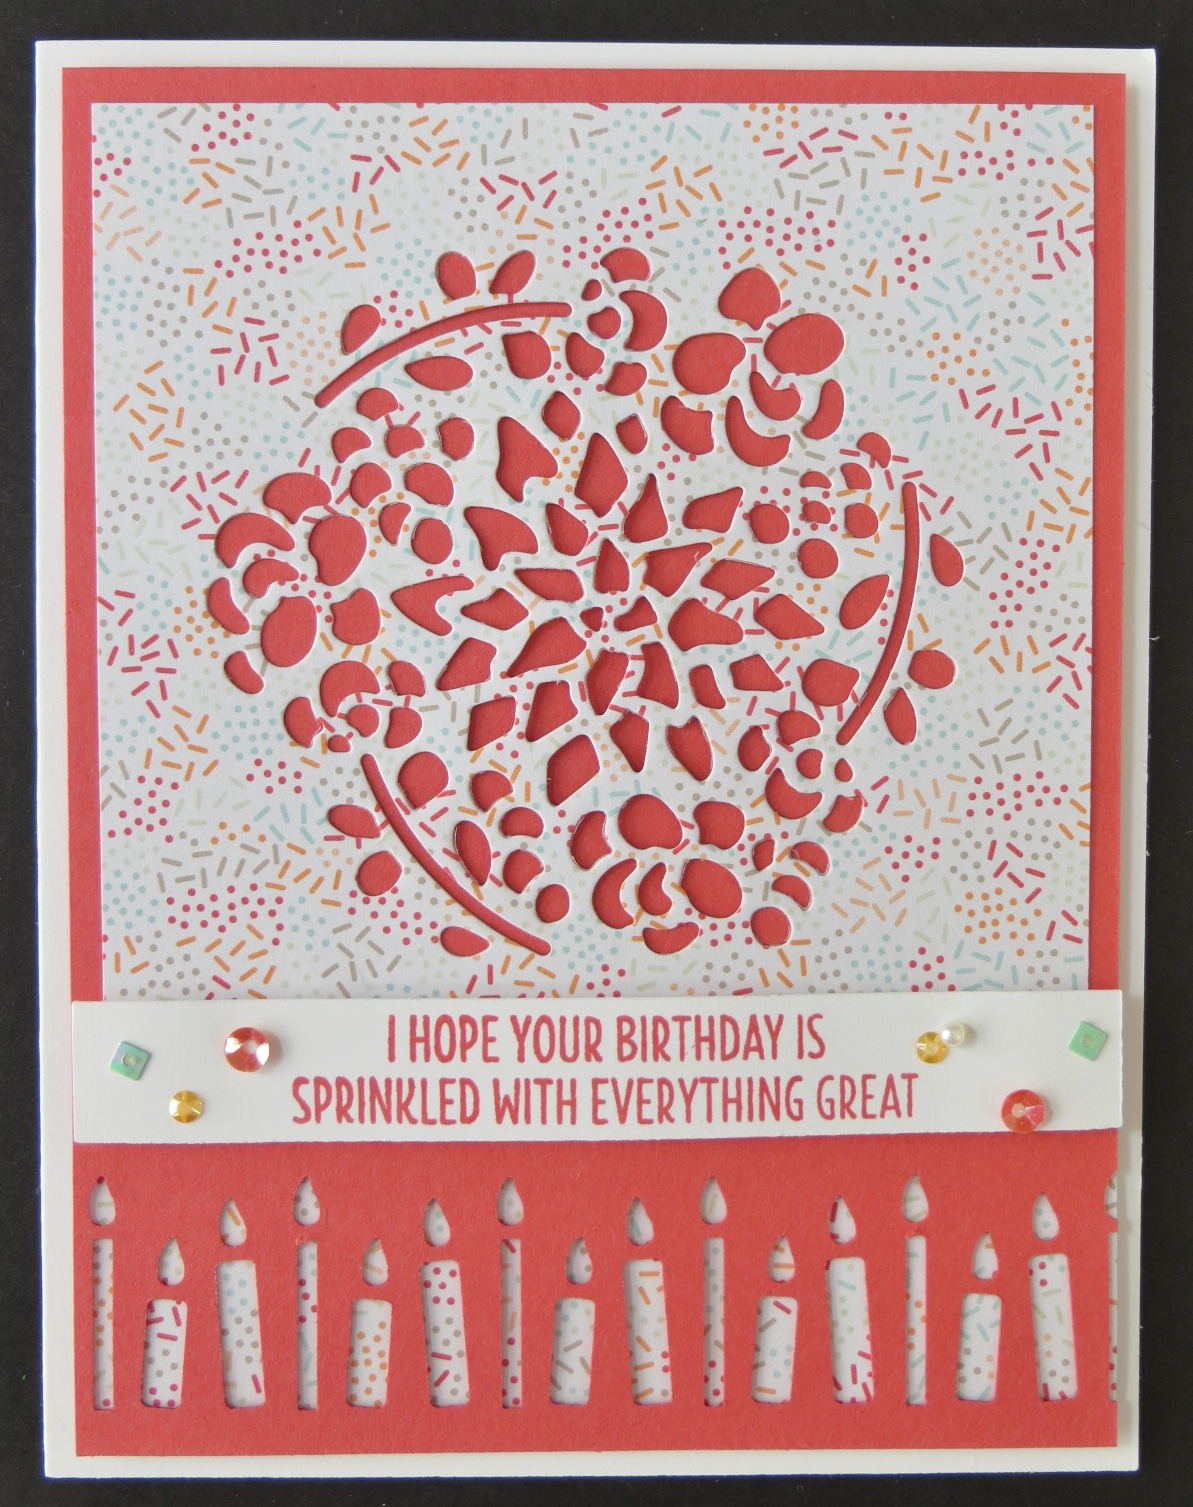
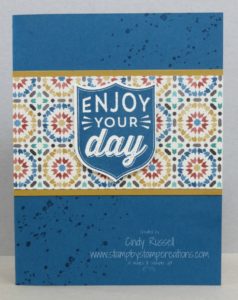
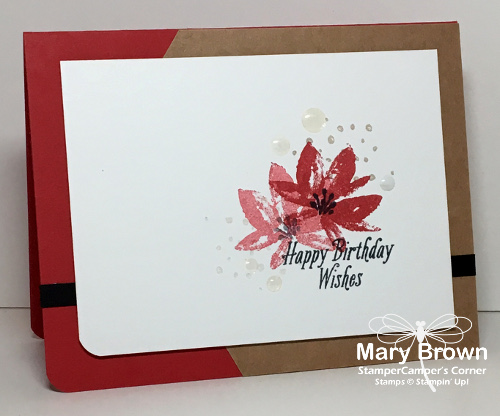
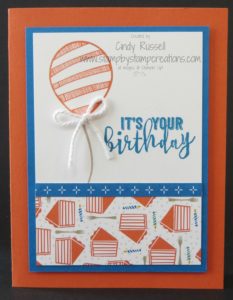
You can never have enough birthday cards on hand.  Someone you know just had, is having or will have a birthday soon.  I can’t seem to keep up.  How do you do with sending out your birthday cards?

Today’s card is one we made at my recent Card Buffet.  No punching or die-cutting.  Just a few layers, some designer paper and a quick bow.

It’s easy to come up with a color combination for a card when you start with designer paper.  These two papers are from the Party Animal Designer Series Paper Pack.  This package of designer paper uses fun colors like Pacific Point and Tangerine Tango that you see on this card.  I really like when Stampin’ Up! comes out with new papers because a lot of time they use colors that I don’t often use.   For example on this card….orange isn’t usually my go-to color unless its October and I’m making Halloween cards but it sure makes this card pop!  Pacific Point also isn’t one of my go-to colors.  If I need a blue I usually start with Night of Navy.  I like when I can get out of my box.

Do you have a favorite designer series paper from the new Occasions Catalog?  I haven’t quite decided what mine is yet.  I love the bright colors in the Party Animal package (pg 5) and the Bohek designs in the Falling in Love package (pg. 51)are gorgeous.  The color combinations in the Tasty Treats Specialty package of papers (pg. 33) are yummy and the colors in the Succulent Garden package (pg. 21) are beautiful together.  It’s a really tough choice.  I’ll let you know if I ever make up my mind.  🙂

Have a wonderful, colorful day!  Take care and Happy Stamping!

Suite Sentiments Friendship Card

Watermark.1
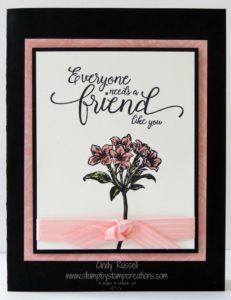
The Suite Sentiments stamp set has some great sentiments in it.  I first shared one of the sentiments here.  The airmail sentiment was perfect for that valentine card I made.

The sentiment I used on this card was another big reason I purchased this stamp set.  I love the font and I love the saying.  Not only can you use it on card just about friendship but you could include it in a birthday card or a thank you card.

If you look closely at the sentiments in this stamp set you’ll notice that many of them coordinate with other stamp sets and suites in the Occasions Catalog.  Check out the full stamp set here and see what I mean.  See if you can link the sentiment with the stamp set or suite that it coordinates with.

It’s hard to tell from the picture but I used one of the swirls from the Swirly Bird stamp set on the Blushing Bride card stock.  I stamped the image with the Blushing Bride ink and it adds a subtle design to the paper which just makes the focal point image pop just a bit more.

I paired this lovely sentiment with the Avant Garden stamp set which is one you can earn for FREE with a $50 purchase during Sale-a-bration.  I stamped the flowers on Shimmery White card stock and colored them in with my Blender Pen and ink pads.  Isn’t it lovely?  As I mentioned the other day, you just can’t go wrong if you pair a color with black.

Have a great day!  Take care and Happy Stamping.  Have you made out your Sale-a-bration wish list yet?  🙂

Perfect Mix Valentine

Perfect Mix.0117
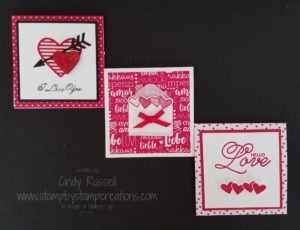
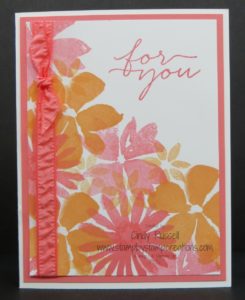
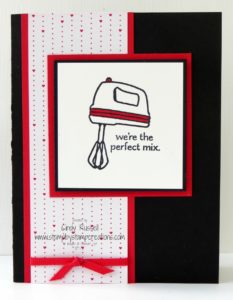
Valentines Day is less than a month away and it’s time to get busy!  This week I’m holding my Love & Friendship Class.  Here is one of the cards we’ll be making.

I love the Perfect Mix stamp set.  It’s so clever!  This little mixer is one of my favorite images from the stamp set.  What’s your favorite?

This card is pretty simple but SO darn cute!  The designer paper is from the Sending Love Designer Series Paper Stack.  The nice thing about this stack of papers is that not all of the images have hearts on them for Valentines Day.  There are a number of non-heart patterns which will make it perfect for the whole year.

I think this week after my classes are over I’m going to sit down and design more cards and projects with all of my Valentines products.  It seems a shame to use them only once.  Even if I won’t be using these projects in a class I can definitely share them with YOU!  🙂

Have a great day!  Take care and Happy Stamping!

Make it Mine Monday: Avant Garden

Avant Garden.0117It’s another fun Make it Mine Monday.  This is a great little challenge for me.  This week I didn’t have any cards on hand that I knew I had CASEd so I went to the internet and started searching for a card to copy.

My favorite place to start looking for ideas is Pinterest.  Sheesh!  You can find almost anything there!  I came upon Mary Brown’s card that you see below and decided to go from there.

I really liked the way she grouped the flowers on her card and how she used only one color ccmc440for the flowers but stamped one off so that is where I began my card.

I could have used Real Red like Mary did on her card but after looking over all of my colors I decided on the seldom-used Rose Red for my card and paired it with the also seldom-used Basic Gray.  I’m really liking that color combination!  What do you think?

I went for the smaller 4 1/4″ x 4 1/4″ size for my card.  I didn’t want to deal with all of the extra white space on the card.  I’m starting to be ok with extra white space but just wasn’t feeling it for this card.

My images are stamped on Shimmery White card stock for some sparkle and when I didn’t think that was sparkly enough I went over my flowers with my Clear Wink of Stella pen.  You just can’t have enough sparkle, can you?  🙂

I’d like to challenge all of you to give Make it Mine Monday.  Ok…you can do it whenever you’d like but I think you should give it a try.  Find a card you like and switch it up.  I’d love to see what you come up with.  Send me both the card you’re copying and the one you came up with.  It will be fun to see what you all do!

Have a great day!  Take care and Happy Stamping!

Simple Remarkable You

Remarkable You.0816
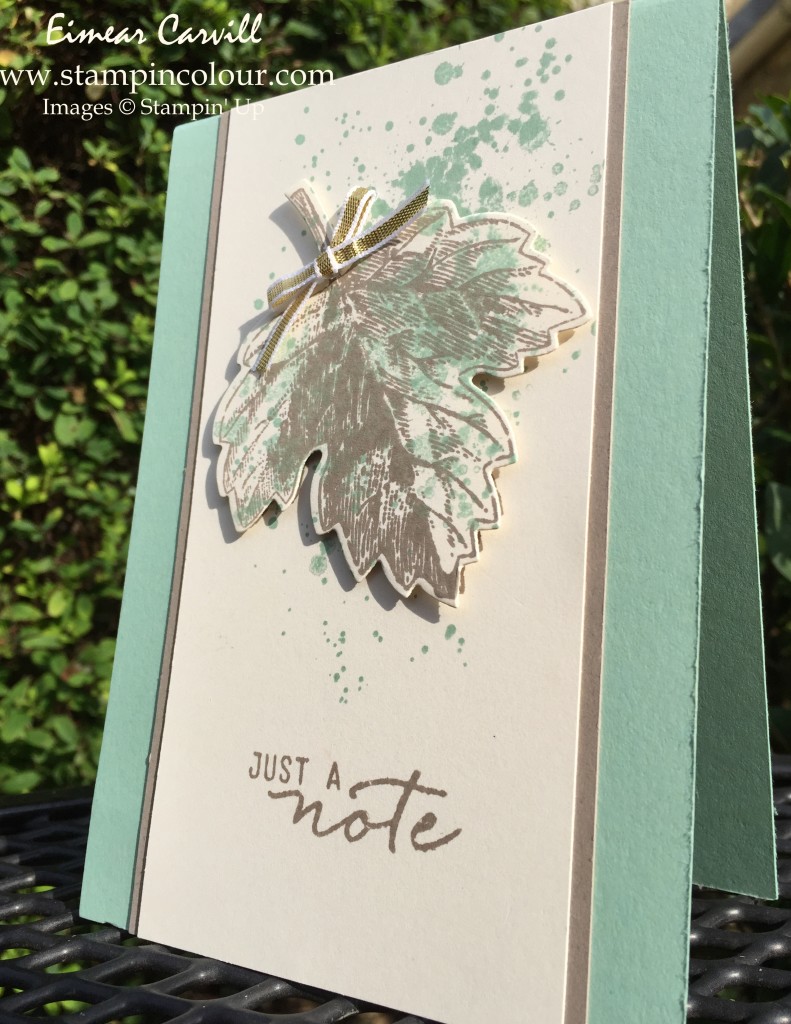
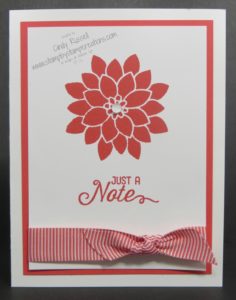
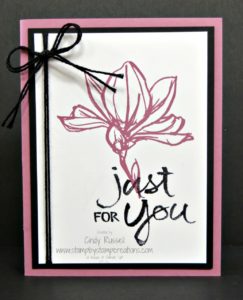
Another simple, yet elegant card perfect for my Card Buffet.  Don’t you just love the flower images in the Remarkable You stamp set?  All of the images are so beautiful.

You can pair almost any color with black and it looks great.  Black makes everything pop.  The beauty of a card like this is that you could pair the black with almost any other color and the card will be beautiful.

I wish Stampin’ Up! had black ribbon of some sort but I’m making due with the Basic Black Baker’s Twine.  I do double it a lot like I’ve done on this card and it works!  🙂

I did play with stamps a bit yesterday as well as work on cleaning my stamp room.  Unfortunately I didn’t get quite as much done as I would have liked.  Isn’t that how it always goes?  Ha!

I’m excited for our Stamp Camp meeting tonight to see what projects the other demos come up with.  I’m also anxious to see what they think about my projects.  Our Stamp Camp will be held on Saturday, February 25th so if you’re going to be in the Denver area and would like to attend just let me know!

Have a great day!  Take care and Happy Stamping!

Simple Saturday: Floral Phrases

Floral Phrases.1.0816
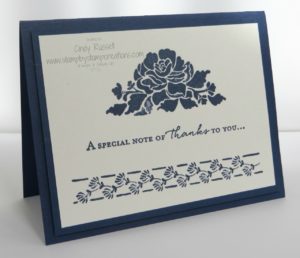
It’s Simple Saturday!

This is one of the easy cards we made at our Card Buffet class this past week.  Three stamps on a piece of Shimmery White card stock.  Mount on Night of Navy.  Adhere to Night of Navy card with Stampin’ Dimensionals.  That’s it!  You’re done!  It really can’t get much easier than that.

Ok…I guess you could just stamp the images on a single layer white card and be done but what’s the fun in that?  🙂

I’m still trying to kick this darn cold that’s lingering around.  The last couple of days I was feeling a little sluggish but yesterday I felt pretty good and got a lot accomplished.  I just sound terrible and am still quite congested.  I guess it’s that time of year though.  We usual return from our after-Christmas visit to MN with something.

I have done quite a bit of stamping in the past few days and am quite excited about some of my projects.  I had to make some swaps for our team swap as well as some samples for our Stamp Camp meeting on Sunday.  Don’t worry…I’ll definitely be sharing them with you at some point.

Hopefully I’ll get to play a little more today although there are a number of other things that I should probably be doing….but stamping is so much more fun!

Have a great day!  Take care and Happy Stamping!

It’s Sale-a-bration Time

Have you been Sale-a-brating?  I love Sale-a-bration!  Who doesn’t like FREE stuff!  If you’re not familiar with Sale-a-bration let me tell you about it.  It’s a special time in Stampin’ Up!’s year where when you spend $50 on catalog products you can choose any item from the Sale-a-bration brochure for FREE!  Yep!  Spend $50 get a free item.  You can’t beat that!

There are 12 fabulous products for you to choose from!  Click on the Sale-a-bration Brochure at the right and see them all.   I know there will be at least one or two that you’ll have to have!  🙂

The video below highlights one of the new Sale-a-bration products.  It shows you the Pretty Pocket Card Kit.  What a fun and easy way to make some cute cards!

The great thing about Stampin’ Up! project kits is that you can always change them up and do something different with them.  If you feel you’re not creative enough or just don’t want to take the time to come up with an idea on your on just head on over to Pinterest!

sw_prettypocketcardkit_potw_jan1017Here’s a glimpse of some alternate ideas that Stampin’ Up! came up with.  Cute!

Take care.  Happy Stamping.  Let’s Sale-a-brate!

Blooms & Wishes

blooms-wishes-0816
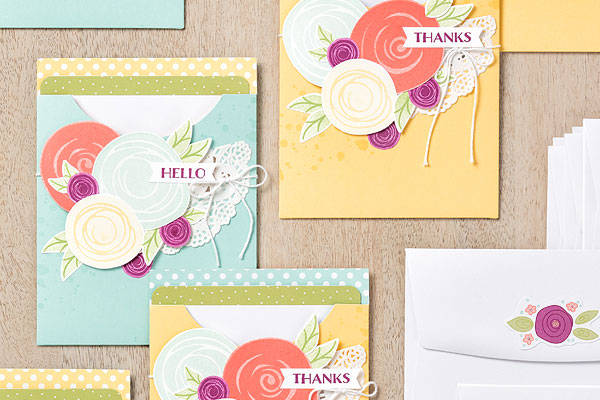
This is probably my favorite card from my Card Buffet classes this week.  You know….it’s PINK!  🙂

A girl’s gotta love Flirty Flaming, right?  Have you used this color combination before?  Flirty Flamingo and Peek-a-boo Peach?  They look pretty good together don’t they?

You know me….I have a hard time with random but I think I did a pretty good job on this card.  I just stamped some flowers full strength and some of them I stamped off before stamping on the card.  Easy peasy!

I have the cards planned for my Love & Friendship classes next week but my team has a meeting on Sunday to plan our next Stamp Camp.  That means I need to design a card or two for that meeting as well as design and make some cards for our team swap that are due that same day.  All this on top of three classes this week.  Yikes!  I think I’m going to be busy!

Have a great day!  Take care and Happy Stamping!

Make it Mine Monday: Vintage Leaves

vintage-leaves-1-1016-2Here’s a new weekly post for you.  Join me on Mondays to find out how a take someone else’s card and make it my own.

Today’s card is one we’ll be making in classes this week.  I usually don’t like to use the Big Shot in a Card Buffet but I couldn’t resist with this card.  I’m not sure what it is about this card but I really, really like it.  It could be the color combination, the bold leaf or maybe just the overall design.  Whatever the reason, this is the card I came up with after seeing the second card here in this post.

Looking at this second card you can see where I got stampin-up-vintage-leaves-gorgeous-grunge-mm-001-791x1024started.  I took the design and pretty much and left it as is.  It looks like I widened the focal piece  but other than that the card design is the same.

The next thing I did was change the color.  I’m weird but when I’m designing and know I want to use ribbon that’s where I start.  I look at all of my ribbons and pick something that will work with the design in my head.  On the original card I didn’t want to use the gold ribbon with the Tip Top Taupe ink so I used the Basic Black Baker’s Twine and Archival Basic Black Ink.    I also changed the color of the card itself from Mint Macaron to Pool Party.  Once I did that my card was born!  🙂

Can you see how easy it is to start with someone else’s card and make it your own?  With this card I basically just changed the colors and you can see what a difference that can make.  Join me again next Monday for another installment of Make it Mine!

Have  a great day!  Take care and Happy Stamping!

Card Buffet: Flourishing Phrases

flourishing-phrases-0816
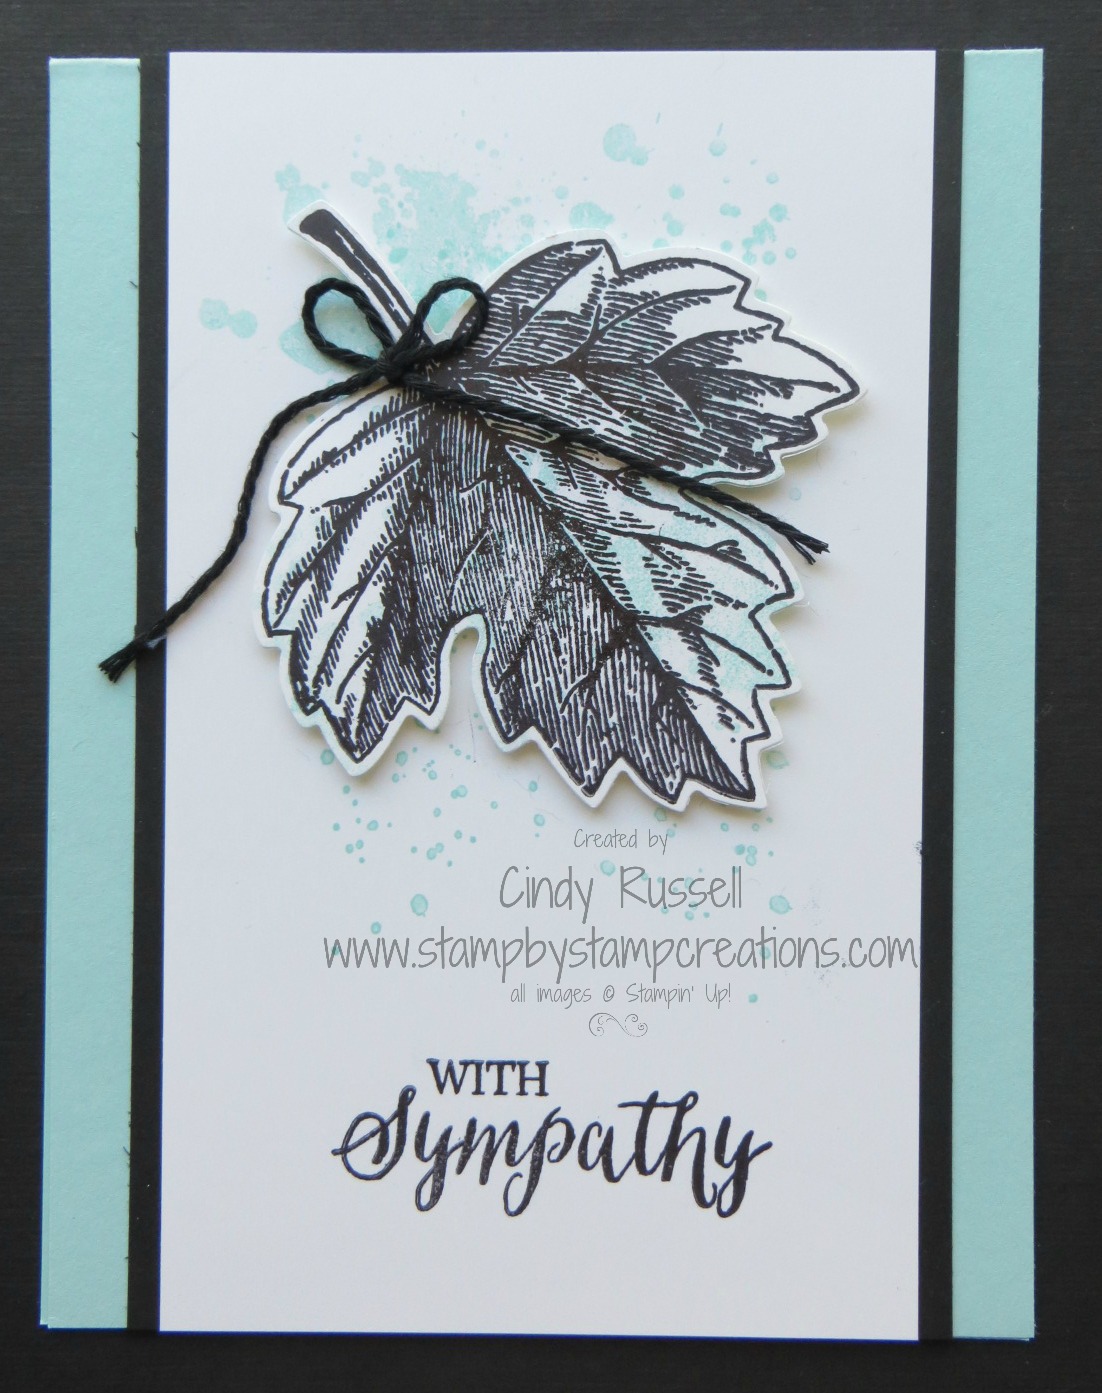
I have my card buffet scheduled for this week.  This is the third time I’m trying to hold this class.  I had to cancel twice already.  Third times the charm, right?

Naturally I came back from the MN Homeland with a cold and today I’m pretty miserable.  Stuffy head, can’t breath….you know how it is.  Anyway, I’m hoping I don’t have to cancel the class yet again!

For a Card Buffet class I’ve designed 8 easy cards.  You can come an make as many of any or all of the cards as you’d like.  The minimum cost for the class is $30 with each card over 8 only $2 a piece.  It’s a great way to build up that stash of cards for the year.

The great thing about these cards is that on most of them you can change out the sentiment for whatever occasion you need!  The hardest part about designing for this class was making sure I didn’t use the same colors on multiple cards (unless I have more than one ink pad of the same color!).  You also realize that easy, simple cards aren’t the easiest for me.  I don’t get too carried away when designing but I do love my Big Shot and I try not to use it for this class.  (Very Difficult!)

If you’re in the Denver area and want to join us on Tuesday or Wednesday let me know!  We’d love to have you join us!  🙂

Take care and Happy Stamping!

Windowbox Die Birthday Card

windowbox-die-swapIsn’t this a fun birthday card?  My down line and friend, Janet, made it for a swap we participated in.  She used some fun new items on it.  How many new items can you spot?

Well, maybe we should count how many items are NOT new!  Ha!  If I’m right, the only old items that I’m seeing are the card stock and the ink.

The designer paper is the new Tasty Treats Specialty DP.  The sentiment is from the Cool Treats stamp set. The row of candles is punched with the Candle Border Punch and the design is die cut from the Window Box Thinlits Dies.  Oh…the little beads are the new Sprinkles Embellishments!  Wow!  That’s a lot of new stuff!  Nice job Janet!  I can’t wait to recreate this card!

Have a great day!  Take care and Happy Stamping!