Make It Mine Monday With Sentimental Swirls

Stampin’ Up!’s Sentimental Swirls stamp set is a fun and simple stamp set that can be found in the January – June Mini Catalog. It is a stamp set perfect for the beginner stamper.

The flowers that you see on this card are punched out with the Flowers & Leaves Punch. There are also smaller flowers in the stamp set that can be punched out with the Strawberry Builder Punch.

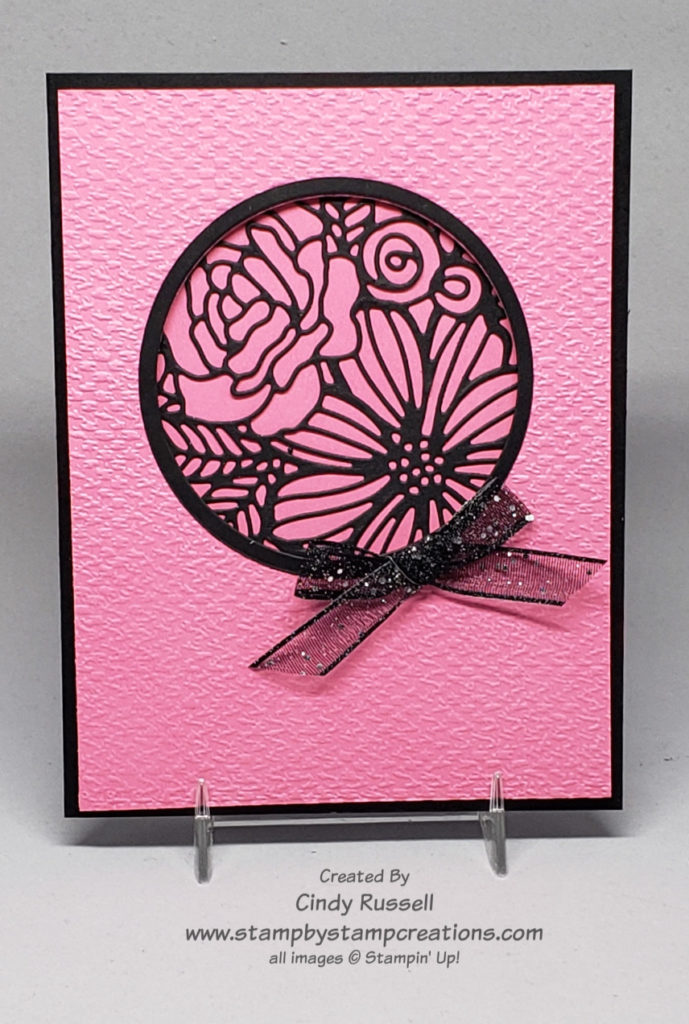
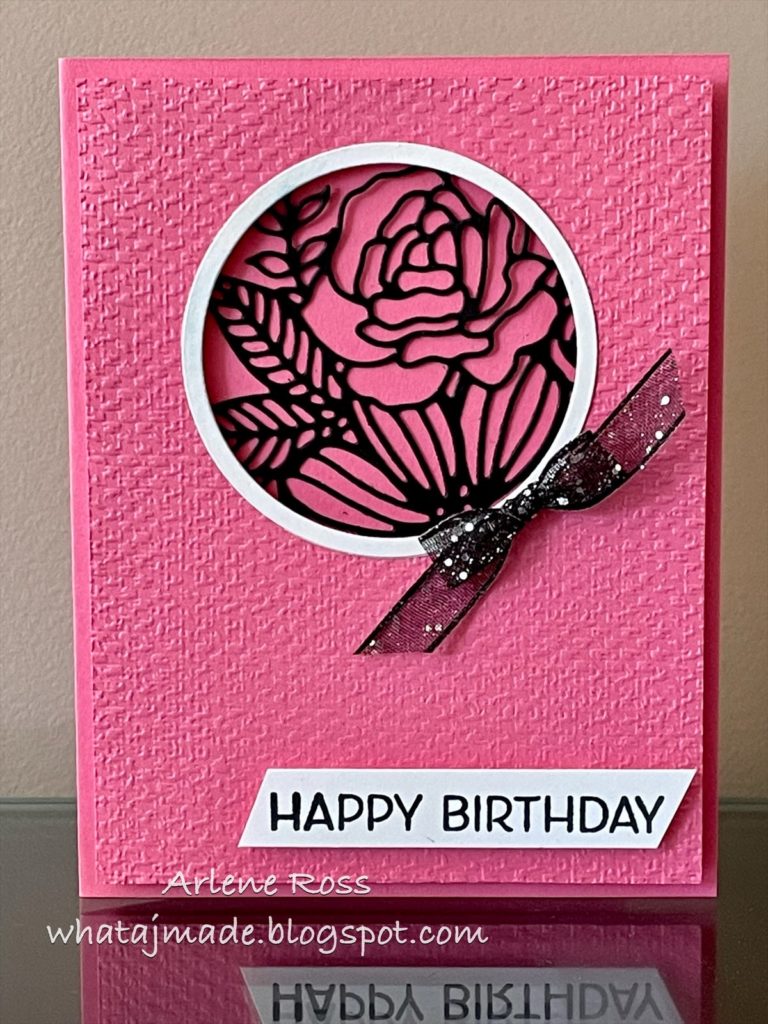
As I was scrolling through Pinterest I came across this card by Carol Brown that caught my eye. I knew I wanted to recreate it for Make It Mine Monday. Pink flowers with a touch of black. Of course it caught my eye! 🙂

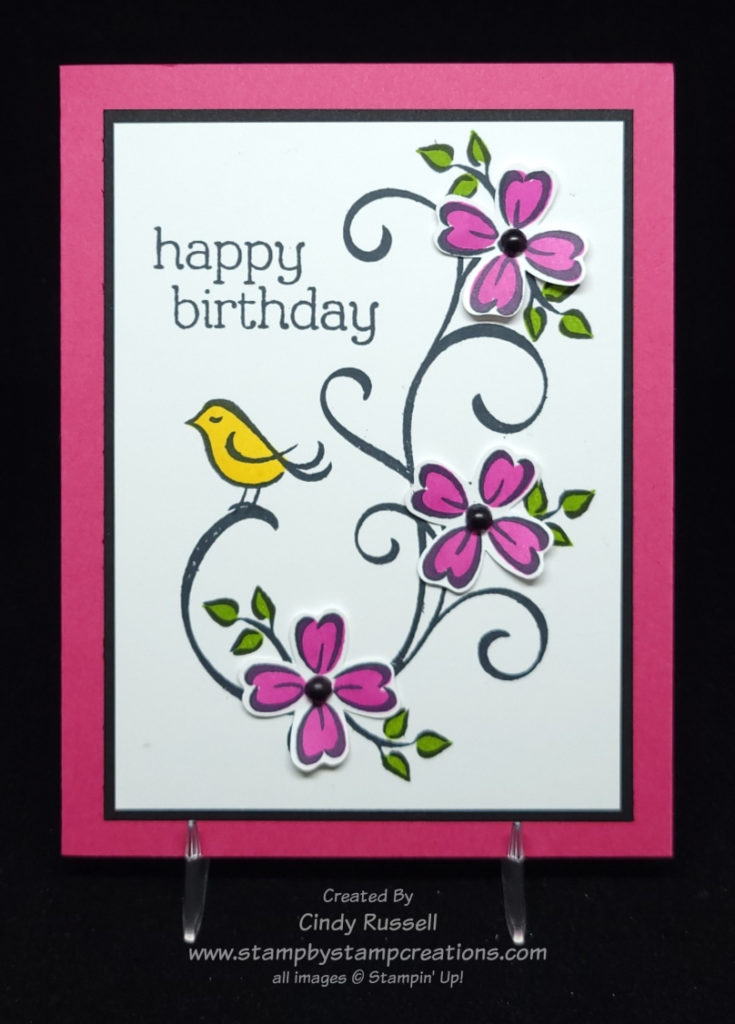
As you can see on my card, I made pink the prominent color and black is just an accent. The card came together easily. I started with the black swirl and went from there. The flowers were stamped on a scrap of Basic White cardstock and then colored and punched out. I set them around the swirl where I was going to adhere them so I could figure out where to stamp the leaves.

The stamp set is photopolymer so it was quite easy to stamp the outlines of the flowers, leaves and bird and then use a second stamp to stamp the colored portion. Two step stamping at it’s best!

Have a great day! Take care and Happy Stamping!

Make It Mine With Dahlia Days

Dahlia Days

Dahlias are a favorite flower in my family. My mom used to grow them in her garden and her dad used to grow them and enter them in the Minnesota State Fair. He even won awards with them. So when I saw the new Dahlia Days stamp set in Stampin’ Up!’s January – June Mini catalog I knew that I had to get it. Then when I saw it on my stamp shelf it was time to create a card or two with it.

Not only do Dahlias come in different sizes and shapes but they can come in many different colors too.

This is my inspiration card. I love Tarabeth’s card but it’s Make It Mine Monday and I had to change it up.

The basic layout of my card is the same as the inspiration card but I did add another layer (of course!). It’s hard to tell in the photo of my card but I used the Gingham Embossing Folder like Tarabeth did.

I added another flower to my card. You know, that Rule of 3 that I’ve talked about before. This rule says that elements in groups of 3, or at least odd numbers, are more pleasing to the eye.

Tarabeth’s card gave me the inspiration that I needed. That’s why I love checking out other people’s cards. I may not copy them exactly, but they give me the little boost I need to get started.

Have a great day! Take care and Happy Stamping!

A Springtime Thank You

Ah, Springtime! It’s finally here! Ok…snow is actually forecast for here in the Denver area today but the calendar says Spring! Woo hoo!

Flowers of Friendship is the stamp set I used on today’s card. It’s Make-It-Mine Monday so I did get my inspiration for today’s card elsewhere. You’ve got to love Pinterest. We Stampin’ Up! Demonstrators also have the Demonstrator Planning Place Facebook Page where we can share ideas with each other which is nice.

The fun gingham designer paper is from the Pansy Petals Designer Paper in the current Annual Catalog. I do love my gingham!

The stitched, scalloped rectangle was die cut using the Scalloped Contours Dies.

AnaMarie’s card definitely caught my eye and is so lovely, but I have to be honest, I couldn’t get over the Soft Succulent green flowers. That’s why I chose to change the main color to Fresh Fresh Freesia.

I kept most of the elements on the card the same but changed up the label and sentiment. It’s rare that I simplify a card instead of adding to it. Ha!

Happy Spring! Have a great day! Take care and Happy Stamping!

A Masculine Card for Make It Mine Monday!

While I was scrolling through Pinterest looking for cards to make for my 40 Projects In 40 Days (find them on my Facebook page), This card caught my eye and knew I had to Make It Mine!  It seems that I have a thing for trees.  I seem to purchase any stamp set that has some type of tree in it.  😊

I love how Rose used the Birch background stamp on her card with the die-cut trees. I also love how she stamped and cut out the “happy birthday” from the Biggest Wish stamp set.

As you can see, I flipped the card and added a layer. It looks like Rose used grays on her card but I used Crumb Cake. The die-cut trees are from the Majestic Mountain dies. My card only has two tree on it to keep it a little more simple.

There’s a tip that I want to remind you of. I shared it with you last fall in my newsletter. What? You don’t get my newsletter? You may want to go to the sign-up box at the top of this page and get on that list today so you don’t miss anything!

Anyway, the tip that I want to remind you of is that when you are cutting around a stamped word like “birthday” here on my card you should lightly sketch around the word so that your scissors have a line to follow. It really makes a difference. The image here on my card was my second attempt. I forgot to trace around the word the first time and really messed it up. Another tip would be to remember to use Adhesive Sheets when die cutting the trees or other intricate images. It makes life a whole lot easier!

This turned out to be a perfect card for a guy. I’m going to have to make a few more of them to keep in my stash! Have a great day! Take care and Happy Stamping!

Make It Mine With A Hello

A simple hello for you on Make It Mine Monday. Once again, the simplicity of a card caught my eye. I have trouble recreating simplicity, but I like it. As the banner above the photo says, this card was created using Stampin’ Up!’s Dressed To Impress stamp set. This fun stamp set is quite “girly”. The coordinating All Dressed Up dies die cut some of the images and also has dies that you can create a 3D purse with.

I love the white on white that Kim did on this card with her layers with just the subtle pink dots to set them apart. That is what made me want to recreate her card.

Of course when I started my creative process things didn’t turn out quite as simple as I wanted.

Stampin’ Up!’s All Dressed Up!

To start with, I didn’t want to use the “fabulous” portion of the “hello fabulous” stamp so I masked that portion of the stamp before inking it up. I also wanted to use a die that fit around my images a little closer so as not to leave quite as much white space. The Hippo & Friends dies fit worked perfectly and I was able to layer my stamped images.

The flowers on my card are colored with the Polished Pink and Just Jade Stampin’ Blend Markers so those are the colors I used on the rest of the card. The larger label is embossed with the Tasteful Texture 3D Embossing Folder. To really change up my card from Kim’s I used a Just Jade card base instead of Basic White.

Even though I changed quite a bit about Kim’s card, I do love hers. One of these days I will figure out simple stamping. How do you do with simple stamping? If you’ve got the hang of it I’d love to see some of your projects.

Have a great day! Take care and Happy Stamping!

A Beachy Make It Mine Card

Oceanfront Seaside Card

This beachy card is so easy and so fun to make with the Oceanfront stamp set.  This was one of those stamp sets that I didn’t think I needed.  I live in land-locked Colorado so I don’t get to the ocean much. I’m more of a lake girl (my Minnesota roots). Ha!

But I fell in love with the New Horizons designer paper and saw all sort of cards online that used both this gorgeous paper and the Oceanfront stamp set.  It was time to make the purchase. 

The Oceanfront stamp set makes it so easy to create a beach scene.  There is one stamp for the sky, one stamp for the ocean and one stamp for the sand.  On my card I stamped the “sand” three times to give it a little more texture and depth.  I used Balmy Blue for the sky, Coastal Cabana for the water and Crumb Cake for the sand.  Easy Peasy!

This stamp set is one of Stampin’ Up!’s DistINKtive stamp sets which is why there is so much texture and shading in the water and the sky. Stampin’ Up! sure does make it easy for us to create a lovely scene like this.

Thank you Tracy for the inspiration. The simpleness of this card is what first caught my attention and I knew I wanted to recreate it.

When you compare the two cards you can see that I added a some more of the grasses and left off the sentiment. I also added the birds from the On The Horizon stamp set as I felt the upper portion of the card needed some type of black element on it. I also made my layers slightly smaller. You know me, I don’t handle white space very well. 🙂

Of course looking at this card while writing this in frigid Minnesota (although the weather is actually very mild right now) makes me want to head to the ocean. How about you?

Have a great day! Take care and happy stamping!

Make It Mine In Black & White

This week’s Make-It-Mine card is black and white with a little bit of gray on it.  Monochromatic is the technical term.  Monochromatic means: “of, relating to, or having tones of one color in addition to the ground hue”.

There’s something about a black and white card that always catches my eye.  Black and white together is simple and it’s stunning.  I like these types of cards so much that I’m sharing them all week on my blog, Facebook and even in my newsletter.  Be sure to check them all out!  (If you don’t get my newsletter yet, just fill out the info in the box to the right.)

I used Stampin’ Up!’s Artfully Layered stamp set on today’s card.  I was inspired by Tess Rollin’s card.  As you can see, I stuck pretty close to Tess’s card and only added a few extra leaves. 

This card is quite simple.  All stamping except the sentiment is done directly on the card base.  The two leaves on the upper portion of the card were stamped first.  Then I used a piece of scrap paper to cover them so I could stamp just a portion of the leaves on the lower section of the card.  The sentiment is layered on black cardstock and adhered to the card front with Stampin’ Dimensionals. Easy Peasy!

I tried using embellishments of some sort on my card like Tess did but they seemed to distract from the simplicity of the card.  I like Tess’s use of embellishments but I just couldn’t make them work.  Sometimes simple is better.

Make It Mine Monday: Hexagons

This card with all the hexagons is so cute! I just had to try it for myself. The hexagon die is from the new Beautiful Shapes die set which coordinates with the Hello Beautiful stamp set. The dies set has all sorts of fun shapes. Tarabeth used designer paper from a few different paper sets on her card. The main colors on her card are the new In Colors this year, Fresh Freesia and Polished Pink.

I was going to stick to the same color scheme as Larabeth but I didn’t seem to have all the designer papers so I had to start from scratch. After perusing my stash of design paper I finally went with the Abstract Beauty pack. This fun package of designer paper is a new size. It’s 4″ x 6″ and many of the sheets have accents of gold foil.

I’m pretty tickled with the way my card turned out. I may have to make a few more of them. The only part I would change would be the gold cord. I would rather have used a thin gold ribbon but Stampin’ Up! doesn’t have any right now.

If you compare the cards, you can see that I have a few more hexagons on my card than the one that inspired me. I just kept gluing them down! Ha!

You’ll notice that my focal point piece with the hexagons is also smaller than the card I copied. I did start with basically the same size as the original but when I had all of the hexagons adhered there was still a little space along the bottom. I was too lazy to die cut any more so I just trimmed down the Basic White card stock. I actually like the smaller focal point better than the larger one so it all worked out fine. 🙂

I used a gold foil layer and the gold cord on my card to pick up the gold on some of the pieces of designer paper. The sentiment, from the Positive Thoughts stamp set, is heat embossed with gold embossing powder.

The finishing touches on my card are the adorable little butterflies. They are Brushed Brass Butterflies (#158136 $10) from Stampin’ Up!’s January – June Mini Catalog. I liked them so much on the outside of the card that I put them on the inside of the card too!

Have a great day! Take care and Happy Stamping!

Make It Mine Monday: Calming Camellia

Calming Camellia

It’s Make It Mine Monday! I’ve enjoyed sharing with you some of the swap cards that I’ve received. I hope you’ve enjoyed them too. I’m not done sharing swaps with you but it’s time to switch things up a bit again.

Isn’t the flower stamp on this card gorgeous? It’s from the Sale-a-bration Host Set Calming Camellia. You can choose this stamp set for free when you place a party order or personal order of $300 or more.

Calming Camellia is one of Stampin’ Up!’s DistINKtive stamp sets. Basically, this type of stamp is very realistic looking with lots of dimension and shading. I think they’re gorgeous! What do you think about DistINKtive stamps?

Calming Camellia

The second card here is the card that inspired me. I love how Vicki used the Wild Roses Background stamp on her card. It coordinates so well with the Calming Camellia stamp. Instead of using a gold layer and gold embellishments I only used Gorgeous Grape on my card.

The Basic Rhinestone Jewels on my card are colored with the Dark Highland Heather Stampin’ Blends marker and then of course I had to add ribbon.

Both my card and Vicki’s card are fairly simple. No dies or punches, no fussy cutting and not too many layers. While I had the stamp set out I wanted to try and make the card even more simple.

Calming Camellia

Check out the third photo. It’s just the stamped image and a coordinating layer adhered to the card with Stampin’ Dimensionals. Simple, yet stunning. It really shows off the floral image.

This simple card would be perfect for any occasion. Just add a sentiment to the inside.

Have a great day! Take care and Happy Stamping!

Make-It-Mine: Awesome Otters Birthday

I’m in love with Stampin’ Up!’s Awesome Otters Sale-a-bration stamp set!  These little critters are adorable!  This stamp set was one of my first Sale-a-bration choices. 

I was so excited when I saw this birthday card to copy.  Not only did it have the Awesome Otters Sale-a-bration item it but the designer paper, Simply Marbelous, is also a Sale-a-bration choice!  Thank you, Monika, for the inspiration!

As much as I loved Monika’s card, I just couldn’t get the angled cardstock to work for me.  I can’t do random and I’m not good at angles either.  I decided to go with my strength which is lots of layers (that line up).  Ha!

On Monika’s card it looks like she stamped the hat on the otter’s head before cutting it out.  I didn’t want to try to line up the hat on the head since the Awesome Otters is a cling stamp set.  I took the easier way out.  I stamped and colored the otter and hat separately, cut them out and lined them up when I put them on the card.

Either one of these cards will be perfect for the next birthday on your calendar, especially if you like to color and fussy cut! Remember that you don’t have to do all of the fancy shading with your Stampin’ Blends if you don’t want to or don’t have the time. You can see that Monika did a much better job of shading on her otter than I did but that’s ok.

If you like my card you can click here for step-by-step instructions.

Now go get that Stampin’ Wish List started so you can choose both the Awesome Otters and the Simply Marbelous Designer Paper Sale-a-bration items on your next order! Have a great day. Take care and Happy Stamping!

It’s Gorgeous!

Late last week I received my order that contained the absolutely GORGEOUS Ever Eden Specialty Designer Series Paper.  The only colors in this pack of paper are Evening Evergree, Soft Succulent, Basic White and Gold Foil.  Be sure to check out this paper here.  Did I mention that it’s gorgeous? 😊

Needless to say, I had to use it on today’s card.  Actually, I have a feeling you’ll be seeing a lot of projects made with this paper in the next three months.  I can’t seem to get enough of it!  Let’s get to today’s Make it Mine project.  It shows off one of the lovely patterns of this paper pack.

Ever Eden Card

The paper pattern on this card is one of the ones that has gold foil on it. It’s hard to tell but the little dots around the leaves are the gold foil. Working with this paper is so easy because there are only a few colors that you’re working with.

As you can see on both pictures, I used one of the dies in the Eden Dies to cut the leafy pattern on the edge of the card front. So pretty. The decorative edge really makes the card and ties in nicely with the designer paper.

Here you can see the card that inspired me. I definitely made it into a “Cindy card” with all of the layers I added. The things I did take from Jaimie’s card was the designer paper (although I did use a different pattern) and the decorative edge on the card front.

Both Jaimie and I used sentiments from the Eden’s Garden stamp set. The sentiments are one of the things that really drew me to this stamp set.

Jaimie stamped her sentiment on a label that was die cut using the Eden Dies. The labels on my card are from the Tasteful Labels Dies and a Layering Circle Die.

I’ll finish this post by once again telling you how much I love this Ever Eden Designer Series Paper. Don’t forget that this paper is only available through Jan 3rd or while supplies last!

Have a great day. Take care and Happy Stamping!

Grateful

Sparkle of the Season Fall Card

Grateful.  It’s something we should always be.  No matter how tough things can get there is always something, big or small, that we can be grateful for.  One thing I am grateful for is that I get to play with all of my crafting supplies and create things to share with you.

Today I wanted to share a Fall wreath with you using Stampin’ Up!’s Sparkle of the Season Bundle.  I’ve seen lots of cards made with this versatile bundle but the card that inspired me had pumpkins on it so that’s the direction I went this week.

When you view the card that inspired me you will notice that there aren’t a lot of similarities between the two cards. I took a lot of creative license with this Make-It-Mine project.

The first thing that I saw on this card by Karen that I wanted to use was the Cork Specialty Paper. It adds that special little touch to a project. The second thing I wanted to incorporate on my card was the double wreath. The second wreath adds another level of dimension to the card.

Instead of copying what Karen did, I combined those two points of inspiration into one. I die cut one of the wreaths on my card from the Cork Specialty Paper. I love how it turned out! When I set it against a Early Espresso colored wreath the cork really popped.

The only other thing that I really took from the inspiration card to my own was to include the three pumpkins on my wreath. Other than those few things there aren’t a lot of other similarities between the cards. That’s ok though. The whole point of Make-It-Mine Monday is to get inspired and find a starting point for my project.

Give it a try. Go get inspired! Maybe start with my card and move on from there. I’d love to see what you come up with! Have a great day. Take care and Happy Stamping!

Make It Mine: Pretty In Pink

It’s time to step away from Fall, Halloween, and Christmas for a bit.  I love making cards and projects for those occasions but today I felt like switching it up.  With the days becoming shorter and cooler it’s time for a little pretty in pink to brighten things up.

This color combination is one of my favorites and I love the contrast between the two colors.  The little window with a peek at the outline of the flower bouquet is gorgeous.  The flower bouquet outline is from Stampin’ Up!’s Artistic Dies.  Of course you can’t go wrong adding a little sparkle with a bow made with the Black Glittered Organdy Ribbon.  This card makes me smile!

I had seen the card that inspired me (thank you Arlene!) months ago and had saved it on my computer in a special place so I could Make It Mine at some point in time. Lucky you that today is that day!

When I saw Arlene’s card I knew I had to recreate it.  But being me, I had to change some things up.  I really only changed a few things.  I changed the color of the card base from pink to black for a little more contrast on the card.  I did the same with “frame” for the window changing from white to black.  The last thing I changed was leaving the sentiment off the front of the card. 

I hope this card brightens your day as much as it did mine.  Have a great day!  Take care and Happy Stamping!

Make It Mine: Inspired Thoughts

Wow!  Are you in for a treat today.  You’re getting the combo post.  What?  It’s Make It Mine Monday but the card I made also uses last week’s card sketch.  It’s a twofer…two for one!  Ha!

Enough silliness (although I do that fairly well…)! Let’s get to the card!  Isn’t it lovely?  The colors are beautiful and the design is simple.  Thank you to Mary H. for the inspiration.

Mary used the Beauty of the Earth Designer Series Paper as the background for the die-cut trees. Some of the designs from this package of paper are absolutely gorgeous! This is one of my favorite designs. The die-cut trees are from the Inspiring Canopy Die Set.  The sentiment is from the Inspired Thoughts stamp set which can be bundled with the Inspiring Canopy dies. If you haven’t checked out this bundle of products (pg. 52 of Stampin’ Up’s Annual Catalog) please do. The stamp set is all lovely sentiments for various occasions.

Here’s my take on Mary’s card combined with last week’s card sketch. As you can see, I switched things up a bit from both cards that inspired me, but not too much.

It’s so fun and easy to create when you’re inspired by others (and/or yourself…). Give it a try! Take care and Happy Stamping!

Fall Inspiration With Gorgeous Leaves

Fall has finally come to Colorado! The highs are finally only going to be in the 60’s so I can finally get my long-sleeves and jeans out! Woo Hoo!

This lovely fall card made with Stampin’ Up!’s Gorgeous Leaves stamp set and the Intricate Leaves Dies was my inspiration for today’s Make It Mine Monday.

I love how Linda masked portions of the card before stamping her background of leaves. So pretty! To do this take a piece of scrap paper and with either washi tape or a removable adhesive, adhere the scrap paper to the portion of the card front you don’t want stamped. Don’t use too much adhesive, just enough so the scrap paper doesn’t move while you are stamping. On this card, you want to mask both at the top and the bottom.

Confession time….I wanted to try to recreate Linda’s card but it just wasn’t working. My background just didn’t turn out as nicely as hers the rest of the card wasn’t working out the way I wanted so I really changed things up.

To start with, I stamped my leaves background vertically instead of horizontal and kind of framed it with strips of cardstock. As I liked the masked edges on Linda’s card, mine wasn’t working but when I added the frame of Old Olive cardstock it really made my leaves background pop.

Then instead of using the intricate leaf dies to add a leaf to my card I stamped the leaf and die cut it before adhering it to the card from. This added a little bit of dimension to the leaf.

I definitely made Linda’s card my own. The only thing on my card that remotely resembles her card is the leaf background. That’s ok though. I was inspired! I may just have to take another run at recreating Linda’s card. Her design is so “clean”.

Trying to recreate Linda’s card reminded me that even when you’re trying to recreate someone else’s card as close as possible it’s ok to go off on your own tangent. Go where your creative juices are leading you!

Have a great day! Take care and Happy Stamping!