Make It Mine: Halloween Tombstone

Halloween Tombstone

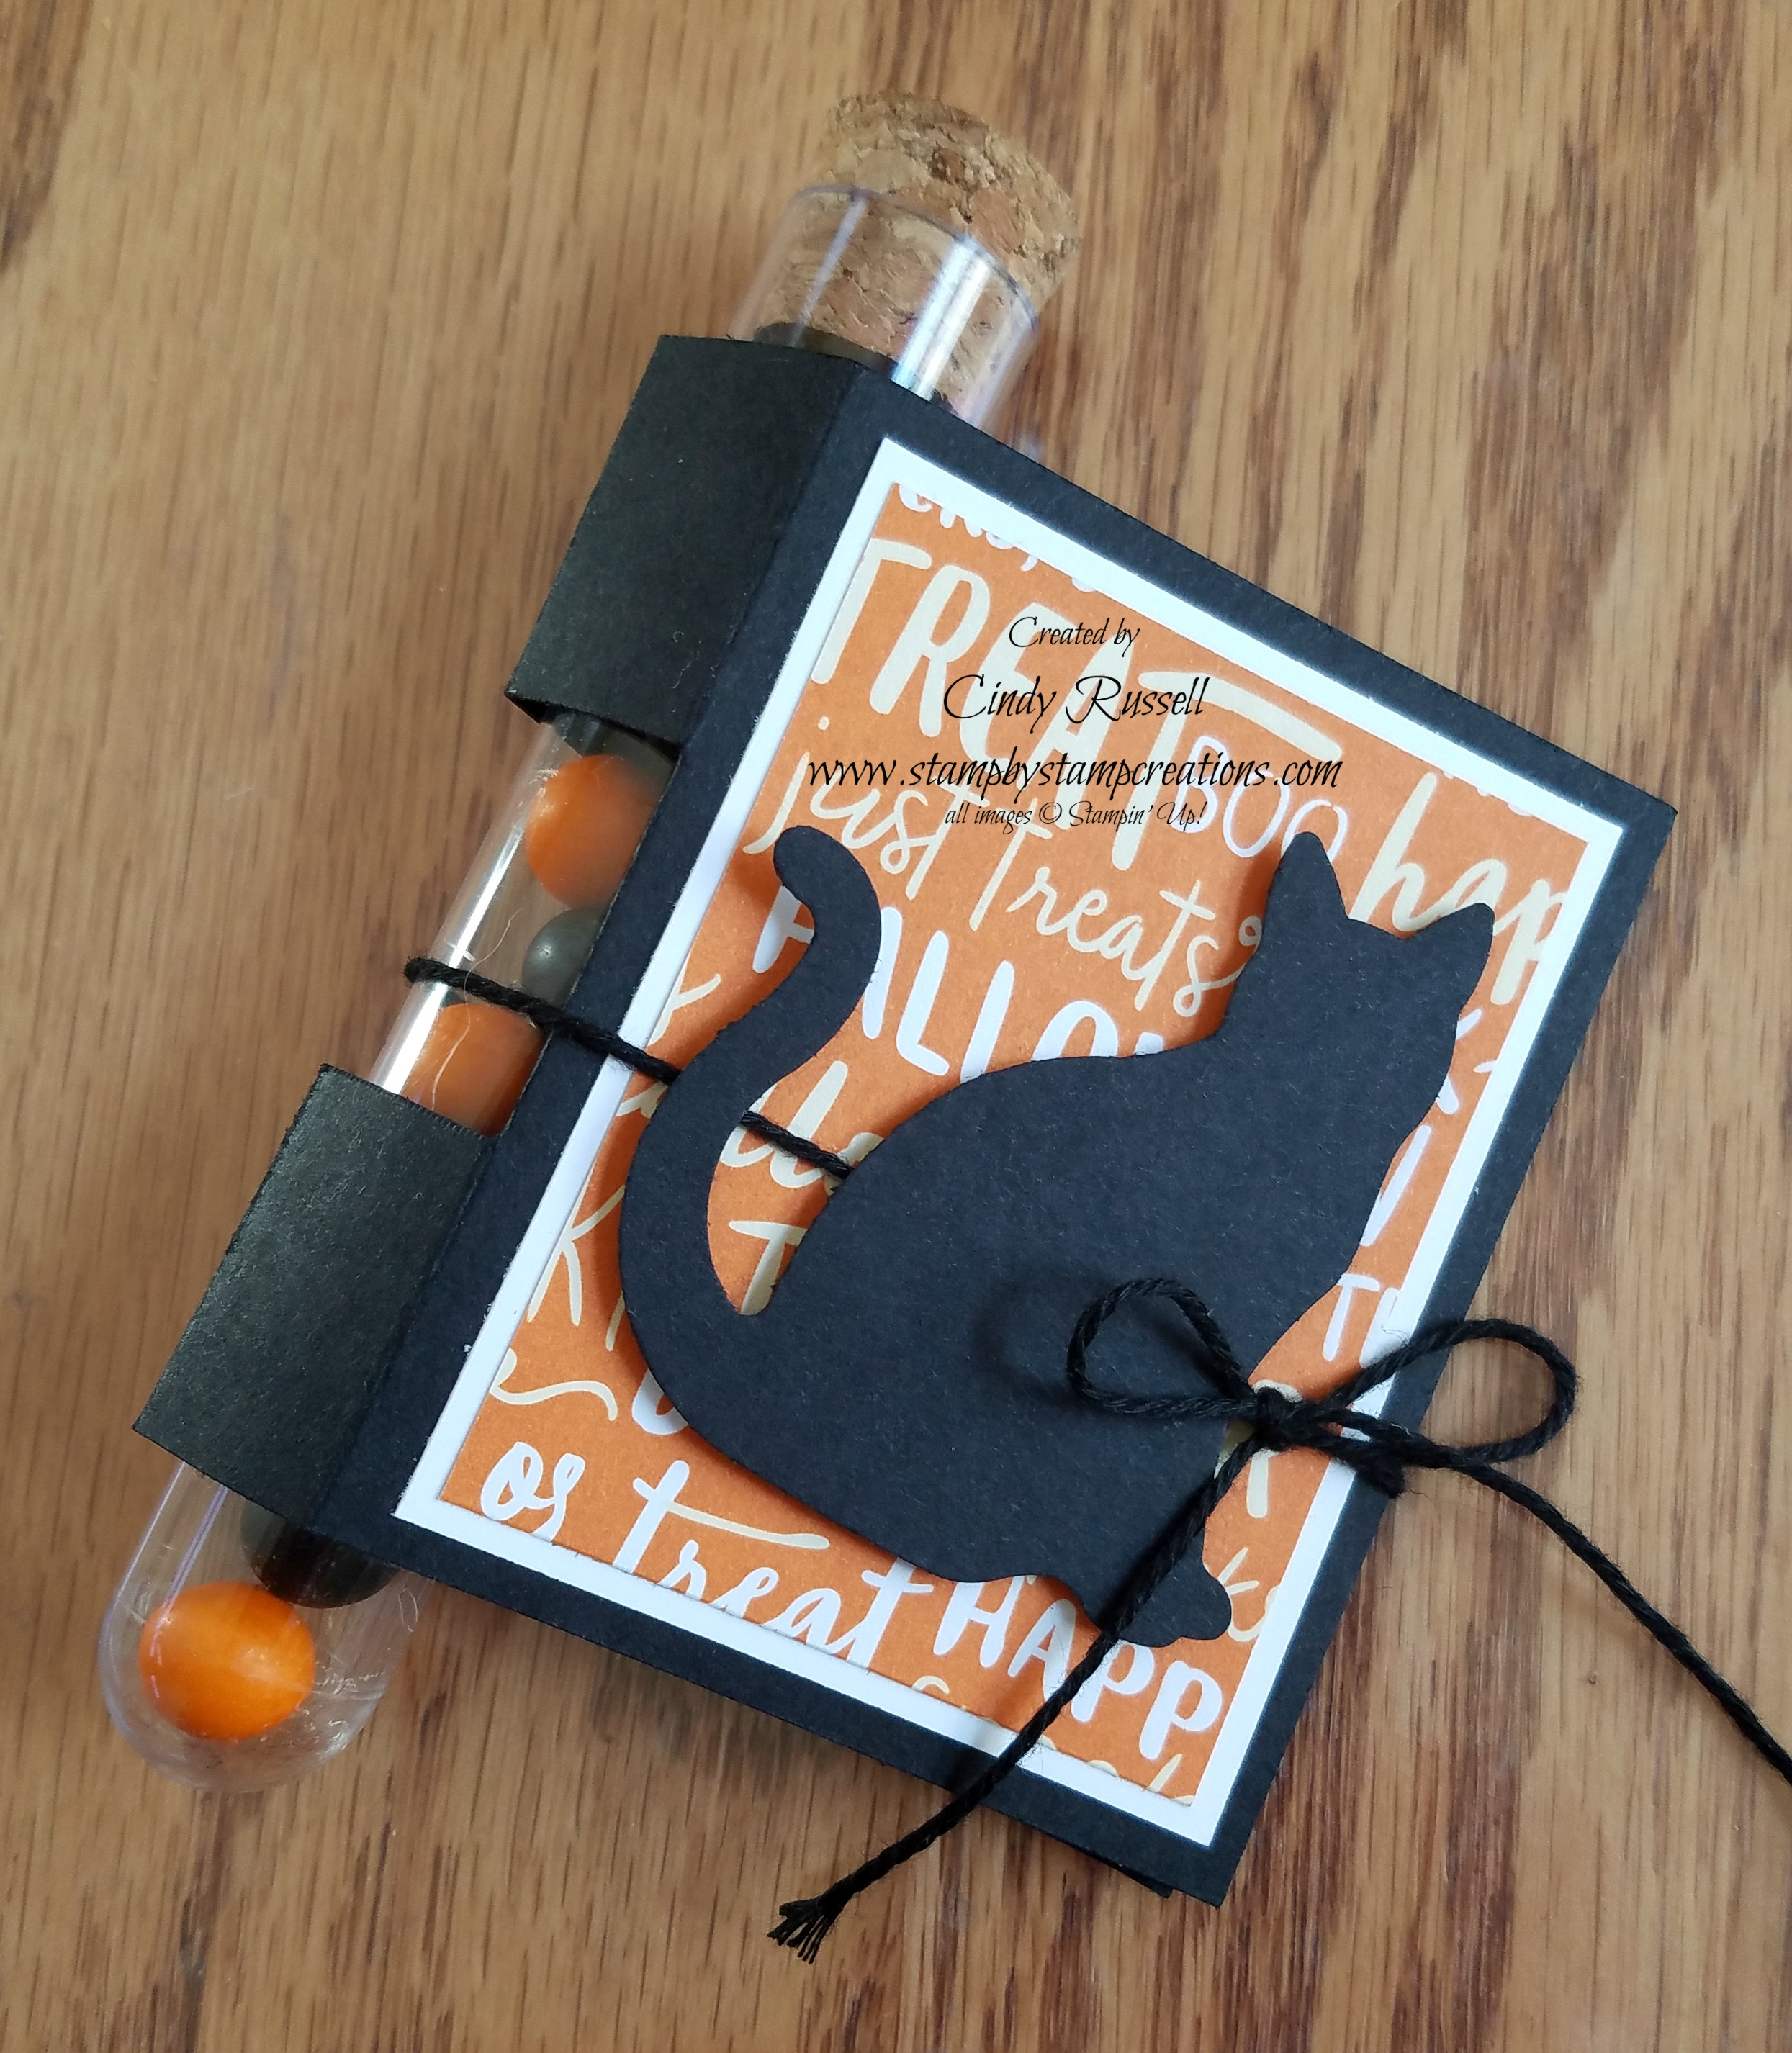
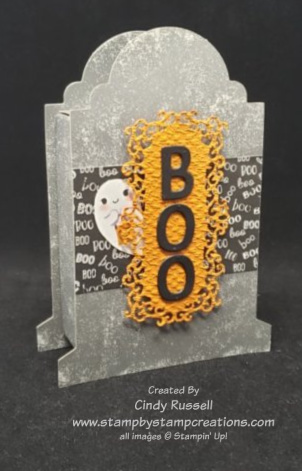
Boo! It’s October and that means it’s time to celebrate Halloween. These tombstone boxes from Stampin’ Up! are adorable and perfect for your Halloween treats. The box portion of the tombstone is 3 3/8″ x 2 1/2″ so it’s a good size. It’s also food safe! The boxes are quick and easy to put together.

I decorated my tombstone box with Stampin’ Up!’s Cute Halloween Designer Series Paper. Yes, I cut out the little ghost right from the paper! I didn’t have the Cutest Halloween stamp set or the coordinating Halloween Punch but my Paper Snips worked out perfectly for my project.

The label is die cut from the Ornate Frames Dies. After die-cutting the label I ran it through my Stampin’ Cut & Emboss Machine with the Tasteful Textile 3D Embossing Folder. The letters are die cut using the Playful Alphabet Dies.

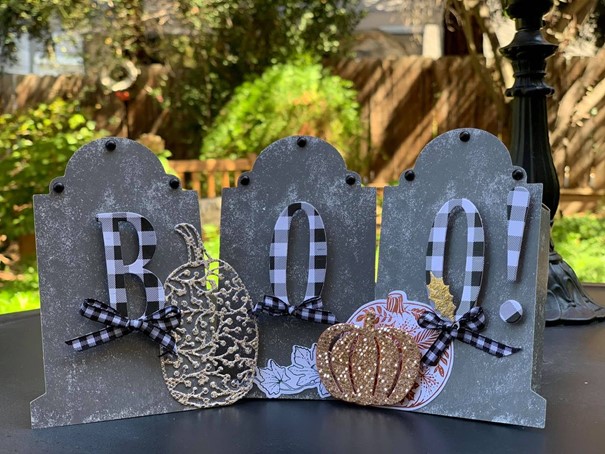
This fabulous little project was my inspiration for Make It Mine Monday. Isn’t it fun? I would have loved to use large letters on my project but unfortunately they are a retired product (although I do still have them…).

Not only did the large letters catch my eye but so did the use of the gingham ribbon and the gingham paper. I love my plaid!

This trio of tombstones is so dang cute you may just see another take on this project from me later this month so stay tuned!

Have a great day! Take care and Happy Stamping!

A Wonderfully Wicked Halloween Card

It’s already the 11th of October and I don’t have my Halloween stuff out yet. I guess I better get that out this weekend so I have at least a few weeks to enjoy it!

I couldn’t resist the Wonderfully Wicked stamp set and coordinating dies in Stampin’ Up!’s 2019 Holiday Catalog (pg. 55). The dies were what sold me on the bundle. I love the font of “wicked”. Then when I saw this spider web paper in the Monster Bash Designer Series Paper pack I had my card.

The images in the Wonderfully Wicked stamp set are pretty darn cute too. I always tell myself I’m going to skip the Halloween items in the Holiday Catalog but I never do. There’s something that always grabs me!

When we made this card in class a few weeks ago I only had the gals die cut one “wicked” and one spider for their cards to save a little time and keep the line at the Big Shot down. If you look closely at my card (and it is quite hard to notice), I’ve actually die cut the images 3 times and adhered them together to give my card some dimension.

Another thing I did that you can’t really notice on the card is that after I drew the line from the word “wicked” down to the spider I went over it with my Wink of Stella Glitter Brush to make it look a little more like a spider web. Very subtle.

On the inside of the card (which I should have photographed) I just stamped the words “Happy Halloween” and the big spider. The spider was stamped on the left side and then I drew a line from the top of the page to the spider.

Even though I wasn’t going to make Halloween cards this year I sure did have fun doing it! I hope you have fun making your cards too! You can find the supplies I used on this card below.

Have a great day! Take care and Happy Stamping.

Are You a Little Batty?

It’s October! Happy Halloween! Ha! We’ve got a few weeks left before Halloween but it’s definitely time for me to share some Halloween projects with you!

To Every Season/Halloween

I just LOVE the little punched bats on this card! They are SO cute! This card was made using the To Every Season Season Bundle which you can find on page 50 of Stampin’ Up!’s Holiday Catalog. This stamp set is so versatile. Not only are there Halloween images and sentiments but there are also images and sentiments for Fall, Christmas and Valentines Day! The stamp set is bundled with the Every Season Punch Pack which has little mini punches for Halloween, Fall, Christmas and Valentines Day. I love purchasing items like this that are so versatile!

The sentiment and the punched bats are from the To Every Season Bundle but the spider web is from another the Wonderfully Wicked stamp set on page 55 of the Holiday Catalog.

This card went together pretty easily and would be perfect for the little ghouls and goblins in your life! You can see all of the items below that I used on this project and they can all be purchased in my online store. To make it even easier you can just click on the photo of the item(s) you’d like to purchase and it will take you directly to that item in my online store.

Have a great day! Take care and Happy Stamping!

Fun Halloween Card

Well, hello again!  Yes, things have been crazy around here but I’m hoping that I’m gaining ground.  You know how it goes.  Just when you think you can start playing catch-up something else comes up that has to get done right there and then.  Oh, well…that’s life.  Right?  🙂

Tena.Camp.1017Last week my group of Sassy Stampers & Friends held a stamp camp and it was a success.  We had 29 attendees and I’m pretty sure they all had a wonderful time.  They loved the cards we designed for them.  Today I’m sharing Tena’s card as it’s an adorable Halloween card.

Who doesn’t love a shaker card?!  Tena used the fun Creep It Real stamp set which you can find in the very back of the Holiday Catalog.  It has some fun images in it including a big open vampire mouth with the words “Brush Your Fangs” on the inside of the mouth.  Too cute!

The “Have a Haunted Halloween” is actually from another Halloween set in the Holiday Catalog called “Graveyard Gate”.  This set has coordinating framelits that make a fun wrought iron gate.

Halloween kind of snuck up on me somehow.  I haven’t even got my decorations out of the attic yet and I’m not sure I will.  Terrible, terrible.  I have some really cute things.  I think I’m going to get my Thanksgiving things out on November 1st so I don’t forget.  I guess it will help that I host Thanksgiving dinner so I’ll need to decorate for that.  🙂

Have a great day!  Take care and Happy Stamping!

Halloween Treat Tube

Cat Punch.1Halloween is coming up fast!  Are you ready?  This year I’m not going to buy my candy until the 30th or 31st.  I have absolutely no will power.  I did buy a few Halloween candies though so I could fill these adorable treat tubes!  Don’t you love them?

These treat tube holders are SO easy to make!  Just start with a piece of 3″ x 6″ cardstock.  Score the long side at 2 5/8″, Cat Punch.23″ and 3 5/8″.  Crease well along all scored lines.  Fold cardstock in half along the 3″ score mark.  Now, about an inch in from each edge snip from the fold up to the other score marks.  You should now have three sections.  Tuck the center section in and slip in your filled treat tube!  Decorate however you’d like.

I used the Spooky Cat stamp set to decorate my treat holder along with the COORDINATING Cat Punch.  The two pieces of cardstock that go on the inside and the front measure 2 1/8″ x 2 3/4″.  The piece of designer paper (from the Spooky Night package) measures 2″ x 2 5/8″.   What a simple and fun item to give away to your friends or your favorite trick-or-treaters!

Have a great day!  Take care and Happy Stamping!

Simple Saturday: A Sneak Peek

Halloween.1.0816It’s Simple Saturday AND a sneak peek!  How great is that?!!!  🙂

Stampin’ Up! has fabulous designer paper and what better way to make a simple card than to use it as the focal point or background of your card.

I couldn’t resist making these little fun and easy 3″ x 3″ cards.  They are both made with the Halloween Nights Designer Series Paper that you will find in the upcoming Holiday Catalog.  The little haunted house scene is printed in strips over and over again on the 12″ x 12″ sheet.  I simply trimmed out one little tiny scene, mounted it on a slightly larger piece of Basic Black card stock and then popped that up on my card.

The spider web card is only slight my involved.  The little spider web, spiders and words are from the Spooky Fun stamp set.  They fit perfectly on my little 3″ x 3″ card.  I added some layers and now I have a fun little spooky card!

The Halloween Nights Designer Paper pack is full of fun and spooky designs.  I know you’re going to love it.  If you don’t have a copy of the upcoming Holiday Catalog you can request one from me (cindy@stampbystampcreations.com) or check online on September 1st.  I know you’re going to love it!

Have a fun and Simple Saturday!  Enjoy!