Tuesday Treats: Halloween Treat

halloween-treat-0916Tuesday Treats!  I think I may have to start a new weekly post….hmm….

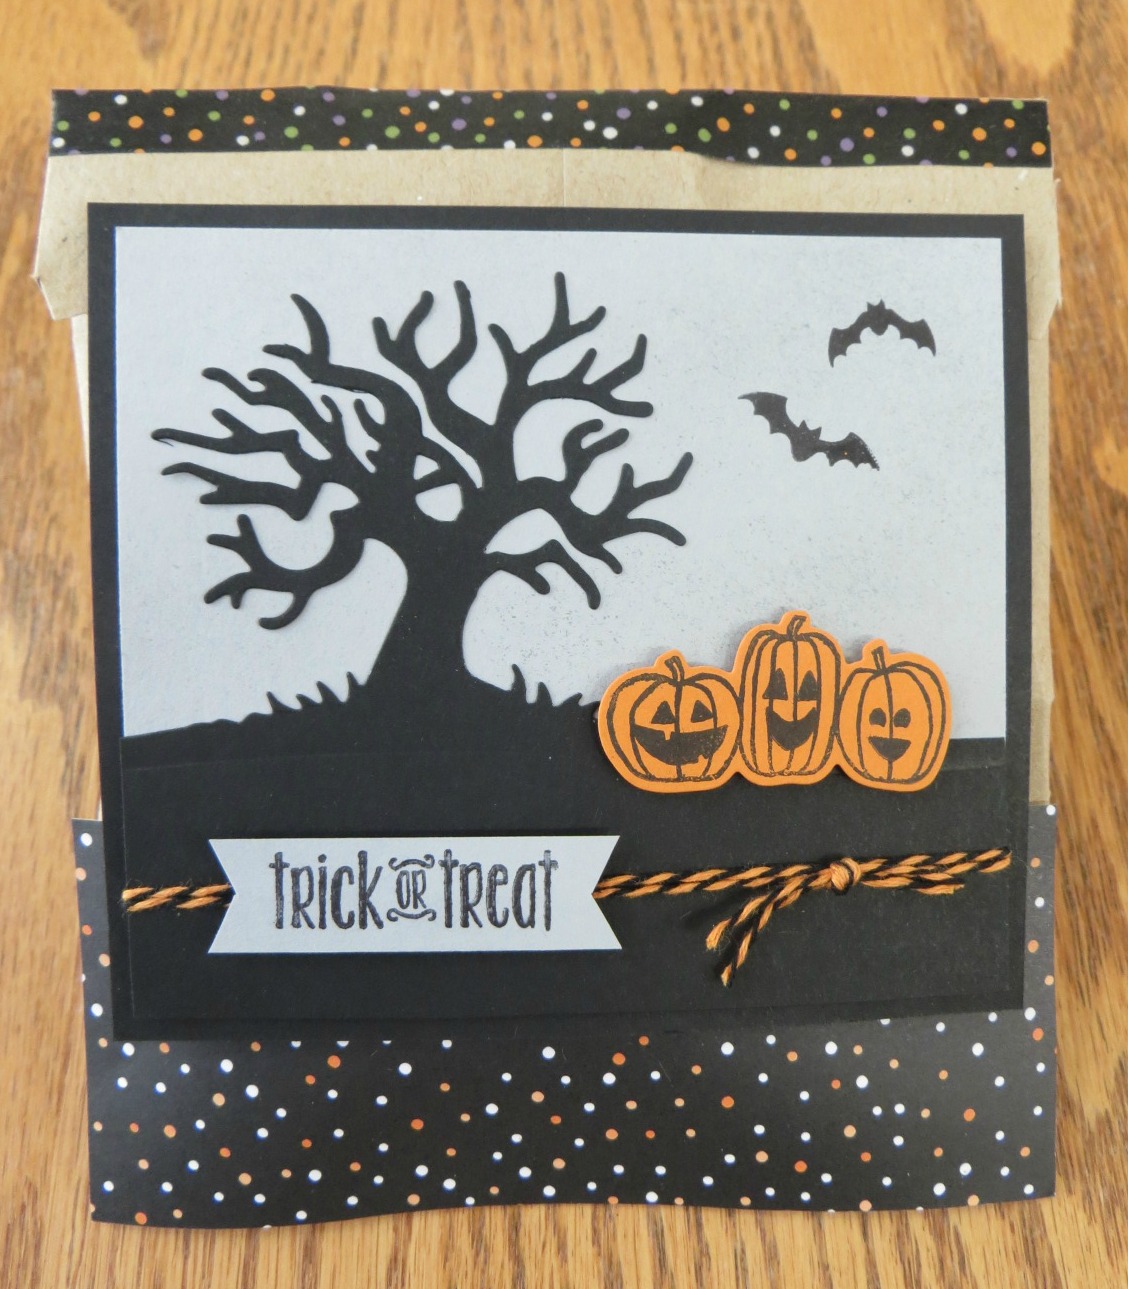
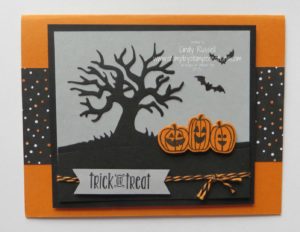
Here is a SIMPLE idea for a Halloween treat.  I put some candy in a cello bag.  Tied it with some fun Halloween Night Baker’s Twine and added the fun Halloween Treat tag.  Like I said…simple!  The most difficult part was coloring in the little pumpkins with my Pumpkin Pie marker and that wasn’t tough at all!

I’ve been debating with myself on whether to make little treat bags or something to hand out to all of the little kiddos that come to my door on Halloween.  I usually just give them a handful of candy.  Of course, that would be a lot of little treat bags to make and fill.  I will get around 50 or so kiddos.  The nice thing about just handing out the candy is that I can grab as much or as little as I like.  Decisions.  Decisions.  I’m guessing that with my upcoming schedule the little treat bags are not going to happen.

What do you hand out on Halloween?  Leave a comment and let me know.  Thanks!

Spooky Fun!

spooky-fun-1-0816Are you like me?  Does life seem to get away from you?  I haven’t actually been stressed this week but I haven’t got as much done as I’ve wanted to get done or should have got done.

I have this great notepad that I can list everything that needs to get done each day.  I’m really good at writing on it but somehow I manage not to look at it during the day.  Sheesh!  Oh well, I can only improve, right?  🙂

spooky-fun-treat-0916This Halloween card is the last one that we made in our Fall/Halloween class.  I really like that spooky tree, don’t you?  It’s the perfect background for the adorable pumpkins and the spooky little bats.  The Halloween Scenes Edgelits are so fun and they coordinate with quite a few of the images from the Spooky Fun stamp set.   You know how I love COORDINATION!  🙂

Halloween is coming up FAST!  Yikes!  I really want to play with all of my Halloween products more but I’m in the midst of planning Christmas classes!  Ah….the work of demonstrator is never done.  Ha!

I hope you have a spooky fun day!  Take care and Happy Stamping!

A Halloween Treat

halloween-treat-boxAre you looking for a fun and easy Halloween treat holder?  I have just the thing for you!

If you’re like me, you’ve completely overlooked the adorable little Clear Tiny Treat Boxes on page 176 in the regular catalog!  They are 2″ x 2″ x 2″ and absolutely perfect for your Halloween treats!

Fold along the score lines on the box, put together according to the enclosed directions, add a strip of the fun Halloween Night Designer Series Paper and a quick topper.  Now you have your fun and easy Halloween treat!

My treat topper is made using the Layering Circle Framelits and the bat is from the Halloween Scares stamp set.  Easy peasy!  It would take you no time at all to make these for a party or a group of friends.  Get busy!

Have a great day!  Take care and Happy Stamping!

It Was a Good Day!

20160720_160027Yes, it was a good day!  My birthday was wonderful even if I did have to turn a year older.  Ha!

I started the day out with breakfast with a friend.  Yummy!  I love breakfasts!  I just kind of relaxed and played a little in my craft room for most of the day.  Then I went out to dinner with my family and then the best part of the day….we went and saw the new Star Trek Beyond!  Woo Hoo!  The perfect ending to a wonderful day!

My lovely customer Sue made me this fun birthday banner!  Isn’t it great?!  It’s definitely something to hang on to and bring out for any birthday celebration.  Thanks Sue!

Well, tomorrow is Stamp Camp so I have a lot of work to get done today in prep for the big day.  No more parties or celebrating.  Definitely no more big meals!  Ha!

Have a great day!  Take care and Happy Stamping!


A Teeny Tiny Gift Box

IMG_7788This adorable little gift box is teeny tiny.  It’s only about 1″ square and fits one Hershey Kiss perfectly.

Yes, this is another find from Pinterest.  How did we ever survive without Pinterest?  🙂

And yes….I’m giving you a link to someone else’s blog so they can show you how to make this adorable little box.  As I mentioned yesterday one of my goals in the near future is to shoot and edit a video for you.  Someday…

This box is really quite easy.  You make it with the Envelope Punch Board!  A few punches and score lines and you have this fun little box.   Once again I used the Botanical Gardens Designer Series Paper.  It’s my favorite paper in the Occasions Catalog.

What’s your favorite designer paper in the Occasions Catalog?  Let me know!

Have a great day!  Take care and Happy Stamping!

Little Gift Purse

IMG_7790 One of the fun parts of getting ready for On Stage (convention) events is making little gifts for my friends who I’ll be hanging out with.  Sometimes it’s a little stressful trying to come up with the idea but making them is always fun.  I actually don’t come up with my own ideas….I get on that wonderful website Pinterest and search until I find something cute to make.  🙂

The first little gift I made was this little purse that one yummy Ghirardelli chocolate candy fits in.  Yep.  Just one.

I used the gorgeous Botanical Gardens Designer Series Paper on the purses and then of course had to die-cut a fun little flower with the Botanical Builder Framelits to finish it off.

The outside of my cute little purse is about 3 1/2″ x 2 1/4″.  I started with a piece of paper that was 5″ x 4″.

Here’s the link to the website and video where I learned how to make this little treat purse.  One of these days I will learn to make my own video and not have to copy others!  Ha!  Honest….one of these days…..  🙂

Have a great day!  Take care and Happy Stamping!


Mini Treat Bag Birthday Card

IMG_7778We’re off!  Yep!  We’re on our way to Salt Lake City for Stampin’ Up!’s On Stage Event.  Woo Hoo!

There aren’t any Stampin’ Up! events scheduled today so we’re going to hang out, have a nice dinner and then go back to the hotel to play.

We’ve each designed a card and brought all of the pieces and parts with us.  Everything is stamped and die cut for us so all we’ll have to do is put each other’s cards together.  Should be fun.

This is my little card/project for tonight.  I made a birthday card using the Mini Treat Bag Thinlits Dies.  If you read my post from yesterday you know that these thinlits are on the Weekly Deals this week and you can get them at a discounted price!  How great is that?!!!  Check out all of the deals here!  Don’t miss out!  These are the last Weekly Deals ever!

IMG_7780Back to my fun little card….Not only did I use the fun Mini Treat Bag Thinlits but I used my very favorite Bear Hugs Thinlits.   If you’re looking at the first picture and wondering what that pink thing poking out of the bag is….it’s a balloon!  This way you have something to grab on to so you can pull the card out of the Mini Treat Bag easily.   Pretty clever, huh?  🙂

This type of card wasn’t exactly my idea.  I actually received a similar card (without the bear!) at convention last summer.  It’s been sitting on my desk since then waiting for my brain to decide to copy it.  I knew I wanted to use the bear on my project for this evening but wasn’t sure what to do with him.  Then I figured out that he fit perfectly on the front of the Mini Treat Bag and the rest is history!

IMG_7781I used all sorts of fun products on this card.  You can check them all out below.  Don’t you love it when things coordinate like the designer paper and the washi tape!  You do know that it’s my favorite crafting word!  🙂

Have a great day!  Take care and Happy Stamping!  Don’t forget to like my Stamp by Stamp page on Facebook so you can see all the crazy things we’re doing!

Enjoy the Little Things Project Kit

IMG_7682Have you checked out this kit in the Occasions Catalog (pg. 33) yet?  You really need to.  I had purchased it way back in January and of course it just sat around in my craft room for the longest time.  I finally decided to put it together during classes last week and I am so glad I did!  It’s so fun!

The “cards” are easy to make and quite fun.  In the kit you get the little clip board easel and all of the paper products and accessories to make the “cards”.  You do need the Enjoy the Little Things stamp set (#140958 $17) as well as all of the inks and your own adhesive.  That’s why it’s the perfect project to make in a class with your demonstrator.  (My class is in May!)

Occasions16_p33_a (2)In the second picture here you can see all 13 of the cute “cards” that you make with the kit.

One of the great things about the kit is that all of the die-cut pieces are number by which card they go on (see instruction sheet).  This really made it easy to put things together.  I did take the organization one step further.  Before I started I placed all the pieces and parts for each card in their own cello bag.  That way I wasn’t shuffling through all the pieces every time I was looking for a specific one.  OK….I started the process with the shuffling and the got fed up with it so I organized into the cello bags.  Once I did that putting the pieces together was EASY!  There’s a color picture of each “card” in the directions so you just have to copy what you see!  There are simple written instructions for each card too.

Check out Stampin’ Up!’s video to see how easy it really is!

I would really recommend getting this kit.  It’s so fun and cute!  I can’t wait to come up with some of my own “cards” to add to the mix!

Have a great day!  Take care and Happy Stamping!

Pyramid Pals Bunny

Playful Pals.0316IMG_7652Look familiar?  It should if you read yesterday’s post.  Yesterday I showed you a bunny card made using the Playful Pals stamp set and the Pyramid Pals Thinlits.  Today I have a little 3-D bunny made with the same two items!  🙂

This little 3-D critter was pretty easy to make.  I just stamped and die cut all the little pieces and put them together.  Oh no!  I just noticed that I forgot her little whiskers!  Poor little bunny!

You make the pyramid base by cutting two  base pieces and adhering them together.  The only thing I haven’t figured out yet is how to put something on the inside of the pyramid like candy and then be able to get it back out without ruining your little critter.  I will definitely let you know how to do that once I get it figured out.

The little pieces like the ears and the tail are easy to adhere to the pyramid because they have little flaps which you can see in the second picture.  I think the little tail really finished off this little bunny, don’t you?  🙂

Now to figure out which little Pyramid Pal to make next.  The photo on page 44 of the Occasions have a number of ideas but wait until you check out Pinterest!  There are TONS of ideas.  Hmmm…

Have a great day!  Take care and Happy Stamping!

Merry Christmas!

WonderlandFrame.1215Merry Christmas!  I know you’re thinking that you’ve seen this before…..you haven’t.  You’ve seen the card that gave me the inspiration for this but not this actual project.

I just had to smile when I finished this.  It turned out just like I had hoped and if I must say….it’s GORGEOUS!  Yep.  It’s simply stunning up close and personal.  The Gold Foil makes it shine and the Black Glimmer Paper makes it shimmer.  What more can you want for Christmas than shimmer and shine?  🙂

Don’t forget the Dazzling Details on the trees and the “snow bank”!   I make this for a gift but I’m definitely going to have to make one for myself now that I’ve seen the finished results.

If you’re thinking of recreating this gorgeous framed piece you’re going to want to place an order prior to January 5th to get the Black Glimmer Paper, the Wonderland stamp set and the 1/8″ Gold Ribbon.  All three of these items are going away with the end of the Holiday Catalog.  You can check out all of the items I used on this card (other than the frame) here.

Christmas Blessings!  I wish you all peace and happiness in 2016.  Take care!

Snow Place Treats

IMG_7016Tell me that this penguin isn’t adorable!  I dare you!  Ha!  TSC!  Too Stinkin’ Cute!

These little treat holders are made using the Ornate Tag Topper Punch.  They are the perfect size for Ghirardelli Minis.  I have the Peppermint Bark candies in my treat holders.  Perfect for the Christmas table.

Start with a piece of card stock that’s 2″ x 7 1/8″.  Score at 3 3/8″ and 3 5/8″.  Punch each end with the Ornate Tag Topper Punch.  Fold along the score lines, run card stock through the Big Shot, add your ribbon and decorate.  That’s it!  I used a Mini Glue Dot to hold the candy to the back of the treat holder.

You can decorate these any way you’d like for any occasion!  The snowman would have looked cute on these but like I mentioned yesterday, I’m rather partial to this little penguin.  🙂

Now that I have treat holders for the Christmas table I need to figure out what to make for Christmas dinner.  Actually, we’re heading over to the neighbor’s for dinner.  I’m bringing a potato dish and dessert.  Now I just need to peruse Pinterest and find the perfect recipes.   Maybe I’ll look for a festive cocktail recipe too….

Have a great day!  Take care and Happy Stamping!

Built for Free Using: My Stampin Blog

Lots of Joy Gift Card Holder

IMG_7379Another gift card holder!  I actually saw this gift card holder way back in July.  My friend Jan gave those in our group attending convention one of these.  Aren’t they cute?  All of the items used on it are from the main Idea Book and Catalog.

The adorable little plaid stamped tree is from the new Lots of Joy stamp set although you could use any of the tree images in the Festival of Trees stamp set which was originally found in last year’s Holiday Catalog.  The little sentiment is from Festival of Trees also.

This little gift card holder isn’t too difficult.  Start with a piece of card stock that’s 10″ x 2 3/4″.  Score it at 2 1/2″ IMG_7367and 6 1/2″.  After that you just fold and decorate.  Most of the decorating is on your belly band.  I love projects that aren’t too complicated.

Well, do you have all of your shopping done?  Nope, be neither.  I should be able to finish the out of town gifts tomorrow.  I do love Amazon Prime!  🙂  However I am still at a loss on what to get my husband and my younger son.  It doesn’t help that hubby has a birthday four days after Christmas.  Well, I have a little over a week, right?

Good luck with the rest of your holiday shopping!  Take care and Happy Stamping!

Built for Free Using: My Stampin Blog

Flurry of Wishes Gift Card Holder

IMG_7373Some people like giving gift cards, some people don’t.  Some people like receiving gift cards, some people don’t.

I kind of like giving and receiving gift cards.  At least with a gift card you can’t buy the wrong thing or get the gift in the wrong size or color.  The recipient can get exactly what they want.  As the recipient of a gift card I can get exactly what I want.  I especially love gift cards for e-books!

If you like to give gift cards then you really must have an attractive gift card holder, right?  I got the idea for this gift card holder online from another talented demonstrator.  I love when those talented stampers share their ideas!  🙂

IMG_7374This gift card holder starts with a Sketched Dot Tag a Bag.  Simple!  Just score and fold and you have two pockets.  One pocket for the gift card and one pocket for a little card to put your sentiment on.

To begin with, score your bag at 3″.  With the bag in front of you fold the bottom edge up along the score line.  You don’t need to use adhesive to adhere the bottom portion of the bag to the top to form your front pocket.  Your decorated belly band holds the bag together.

The sentiment card for the back pocket is 3 3/4″ x 4 1/4″.  I decorated the top corners of mine with the new Curvy Corner Trio Punch.  The other piece of card stock for the front pocket is 5 3/4″ x 4 1/4″.  Score at 3 3/8″ to from the pocket.  You will need to use adhesive on the edges of this to form the pocket.

This gift card holder is pretty quick and easy to make depending on how fancy you get with your belly band.  I’ll probably be making a few more before Christmas arrives!

Have a great day!  Take care and Happy Stamping!

Built for Free Using: My Stampin Blog

Snow Place Tic Tac Holder

IMG_7017Last week or so I showed you a cute Tic Tac holder that was perfect for Thanksgiving and promised you more details on how to make it.  Well, here it is.

This is the holder we made at classes this week.  It’s really easy and everyone liked it.  As you can tell from my two posts on this little project you can change it up for any occasion.

For any Tic Tac holder for the regular size box of candies you want to start with a piece of card stock that is 3″ x 5 3/8″.  With a long side of the card stock at the top place your card stock in the Simply Scored (or your Stampin’ Trimmer) score at 1 3/4″, 2 1/2″, 4 1/4″and 5″.  Just crease well along the score lines and form your little box.

IMG_7020You can decorate your box however you’d like.  I used the adorable Snow Place stamp set and the COORDINATING Snow Friends Framelits on mine.

Fold the wide ribbon (12″) in half, slip the candies between the two sides and then tie a piece of baker’s twine (10″) around the ribbon.  Now just slip the box of candies, ribbon and all, in the box.  That’s it!  An adorable and easy treat holder for those holiday parties or dinner favors!

Have a great day!  Take care and Happy Stamping!

Built for Free Using: My Stampin Blog

Classy Bottle Tag

IMG_7362Did you notice how I didn’t say Classy WINE Bottle Tag in the title?  That’s because this project can be so much more!  You can use it for any type of bottle.  How about fancy home-made flavored oils?  Yep.  There are many types of bottles out there so don’t be limited .

I had to use the word classy just because of the fancy black and gold color scheme.  Isn’t it sharp looking?  This was one of those projects that when I finished it I just sat back and smiled.  It made me happy that it turned out so well!

I started with the Gold Foil sheet then decorated it with the fabulous Winter Wonderland Vellum and some Basic Black card stock.  The vellum is GORGEOUS!  Of course with vellum you have to figure out how to adhere it so that the glue doesn’t show.  Well…I had a brain storm!  🙂

I first adhered my Candy Dots to the vellum with Mini Glue Dots to make sure they didn’t come off.  Then on the back side of the vellum I used a dot of the Fine Tip Glue Pen behind each Candy Dot to adhere the vellum to the card stock.

If you don’t want your bottle tag to be holiday related you could always use the “cheers” or the “thanks” from the Greetings Thinlits.

Such a cute project.  Now I just need to figure out who might need a bottle of wine or flavored oil so that I can give one of these great tags away!

Have a great day!  Take care and Happy Stamping!

Built for Free Using: My Stampin Blog