Oh, Whale!

Stamp Set:  Oh, Whale
Stamp Set: Oh, Whale!
Wheel: Oh, Wave!
Card Stock: Whisper White, Pacific Point, Basic Gray
Designer Paper: Sunshine & Sprinkles
Ink: Pacific Point
Accessories: Frost White Shimmer Paint Mist, Stampin’ Dimensionals, Basic Pearls
Tools: Big Shot, Happy Whale Clearlit

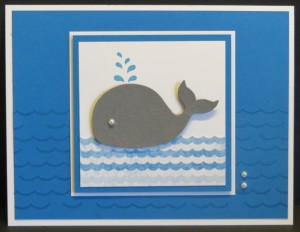
I LOVE the Oh, Whale! stamp set and the coordinating Happy Whale Sizzlit!  These were the first items from the Spring Catalog that I knew I had to have.  Isn’t this little whale too cute?!  He’s even cuter in person because I spritzed him with shimmer mist to make him sparkly!  How fun!

This fun little card is my swap for Leadership.  I can’t wait to see the cute samples I’ll get in return!

Have a great day!  Take care and Happy Stamping!

Happy New Year!

Stamp Set:  Wishes Your Way, Distressed Dots
Stamp Set: Wishes Your Way, Distressed Dots
Card Stock: Melon Mambo, Whisper White
Ink: Melon Mambo
Accessories: Stampin’ Dimensionals, Melon Mambo 3/8″ Strpied Organdy Ribbon, Metallic Brads
Tools: Big Shot, Perfect Polka Dots Embossing Folder, Pinwheel Sizzlits Die

Happy New Year and Happy Spring Catalog!  Isn’t it fun to start the new year with a new catalog?  I love the Spring Catalog!  There are so many fun and exciting products!

This is a card I made for a swap that I hosted.  Cute, huh?  You can’t go wrong with Melon Mambo and a pinwheel!  😀

I need to apologize for being away for so long.  Of course the holidays were a busy time but I also came down with a nasty cold/flu bug in the MN homeland.  I’m on the mend now so hopefully I can keep up with things.  I just got all of the Christmas decorations packed up and put away but we still have to take the ornaments off the trees (yes, two trees…) and pack them away.  Hopefully I can get that done before I leave for Stampin’ Up!’s Leadership Conference in Orlando on Wednesday!

I’m SO excited for Leadership!  It’s always a great time filled with lots of great information and ideas but this year I get to go to the Manager’s Recepton.    It’s a special event for those of us with the title of Manager or above and this year we have the Wizarding World of Harry Potter all to ourselves!  I can’t wait!  I’ll definitely tell you all about it!

Have a great day and Happy Stamping!

Rejoicing With You

Rejoicing With You.1012
Stamp Set: Rejoicing With You
Card Stock: Early Espresso, Very Vanilla
Ink: Early Espresso
Accessories: Champagne Shimmer Mist Paint, Stampin’ Dimensionals
Tools: Stampin’ Spritzer, Big Shot, Lacy Brocade Embossing Folder

Wow!  Christmas is just around the corner and I don’t have my cards out yet?  Do you?  I did finish getting them made.  Now I just need to sign and address them all!

The majority of the cards I’ll be sending out are this design.  This is one of the cards we made in our Christmas Card Stamp-a-Stack.  It’s a lot prettier in person.  It’s hard to see the embossed background from the photo and you definitely can’t see that both pieces of Very Vanilla card stock are shimmery!  That’s the best part I think.  It sparkles!  😀

Hopefully I can get my cards mailed by early next week.  I’m not going to stress over it though.  I’m sure they’ll be mailed before I leave for Minnesota!  Have a great day!  Take care and Happy Stamping!

Bold Snowflake Single Stamp

Stamp Set: Bold Snowflake
Card Stock: Midnight Muse, Whisper White
Ink: Midnight Muse
Accessories: Midnight Muse Striped Satin Ribbon
Stampin’ Dimensionals, Basic Rhinestone Jewel
Tools: Big Shot, Northern Flurry Embossing Folder,
Blossom Punch

Hello!  I have snowflakes on my mind!  We may get a little bit of snow this weekend.  At least it will be cold.  Almost 70 degrees in December is a bit much unless you’re in Florida or California!  Back to the card though!  I used the new single stamp Bold Snowflake on this card.  I just love it….especially because you can punch it out!  Just grab your Blossom Punch and go!

This card was from our Christmas card Stamp-a-Stack.  Nice and simple.  Emboss your background.  Stamp your snowflake, punch it out and adhere it to the front of the card.  Add some ribbon and a rhinestone jewel and you’re all set to go!  Simple is good!  I just need to remember that mantra!  Sometimes I get a bit carried away with layers and such.  Oh, well…what’s a girl to do!  Have a great day!

Snowflake Soiree

Stamp Set: Snow Soiree, Petite Pairs
Card Stock: Crumb Cake, Very Vanilla
Ink: Crumb cake, Illuminate
Accessories: Champaigne Shimmer Paint Mist
Very Vanilla Seam Binding
Stampin’ Dimensionals, Mini Glue Dots
Tools: Big Shot,
Lots of Tags Sizzlits
1/8″ Circle Punch, Fork

I love snowflakes and am waiting patiently for a few to fall here in Denver.  We haven’t had a good snowfall yet this fall and we’re due!  We need snow in the mountains desperately.

This is another card from our Glitz, Glimmer and Glam class.  It’s hard to see the glitz, glimmer or glam from this picture but it’s there!  First you get some Glitz by spritzing the stamped snowflakes with the Champagne Shimmer Paint Mist.   The Glimmer comes from stamping snowflakes on the tag with the Illuminate Ink (you definitely can’t see this in the picture!) and the Glam comes from the adorable little fork bow.  Yes, one of these days I promise to make a video on how to make these perfect and adorable bows!

Glizty Snowflake

Card Stock: Night of Navy, Whisper White, Shimmery White, Silver Glimmer Paper
Accessories: Frost White Shimmer Paint, White Organza Ribbon, Rubbing Alcohol, Mini Glue Dots, Stampin’ Dimensionals, Large Basic Pearl Jewels
Tools: Big Shot, Snow Flurry Die, Northern Flurry Embossing Folder

Another card from the Glitz, Glimmer and Glam Christmas Card Class.  Very sparkly!  😀  That was a really fun class!  Sorry you missed it!  🙁 It’s hard to see but the Night of Navy background is embossed with the Northern Flurry Embossing Folder.  Then I spritzed it with a mixture of Frost White Shimmer Paint and rubbing alchohol.  When you make your own mixture like this be sure to use 70% rubbing alcohol.  A higher percentage will mess up your spritzer.  Have you tried the new Stampin’ Spritzers?  They work great!   Once again, I’m not please with this picture.  There’s almost too much shine!  Not in person though….just enough glitz!

Classes went well this week.  Now I just need to plan the one class for December.  Speaking of December…can you believe it will be here in just a few days?  Yikes!  I’m really kind of anxious for December 1st so I can place a pre-order from the new Spring Catalog!  It’s fabulous!  😀  Unfortunately you have to wait until January for yours.  Bummer!  If you’re lucky though and I find time maybe I’ll make a card to share with you using some of the new product.

Have a wonderful day.  Take care and Happy Stamping!

Glitz, Glimmer & Glam Evergreen

Here’s another card from our Glitz, Glimmer and Glam Christmas Card class.  I just love this tree from the Evergreen Stamp Set!  My picture looks a little fuzzy but I think it’s just all of the shimmer and shine on it!

The green tree is stamped on Very Vanilla card stock and the outline is embossed on Vellum Card Stock with Gold Embossing Powder.  I used a neat trick I learned on Pinterest to adhere the vellum to the regular card stock.  Here’s the trick:  “paint” a little bit of Crystal Effects in each corner of the Vellum to use as your adhesive.  It dries clear!  Wow!  I love learning new stuff!  😀

Stay tuned tomorrow for more Glitz, Glimmer and Glam!  Have a great day!  Take care and Happy Stamping!


Peaceful Ornament

Thanksgiving is over.  The excitement of my son’s engagement (isn’t) over.  It’s time to start showing you some Christmas cards!  Yes!  I know you’ve been waiting  so let’s get started!

This is my favorite card from the Glitz, Glimmer and Glam class we had about a month ago.  I used a Stampin’ Sponge to sponge the Marina Mist ink on the Whisper White Taffeta Ribbon.  I love being able to make that ribbon whatever color I like!  To make the ornament shimmery I sponged Frost White Shimmer Paint directly onto the stamped ornament.  It’s such a pretty look.  This picture doesn’t do the card justice.

Speaking of Christmas cards I suppose I should consider making some to send out this year…..

Have a great day!  Take care and Happy Stamping!

Happy Thanksgiving!

Happy Turkey Day!  I’m excited about a day filled with family, friends and football!  Ooo…that reminds me that I need to check my Fantasy Football Team before the games start!  😉  Anyway…back to giving thanks!  I am so thankful for…everthing!  I am truely blessed and for this I give thanks.

Isn’t this little turkey adorable?  We’re back to that darn owl punch!  Oh, the things you can do with it!  The turkey feathers are made with the paper daisies.  I used two colors of ink on each daisy for a little dimension. TSC!  Too Stinkin’ Cute!

Well, it’s off to have a little breakfast and start making the stuffing.  I already have everything chopped up so it shouldn’t take too long.  Of course, then I have to start thinking about peeling 10-15 pounds of potatoes! Yikes!   Have a wonderful holiday wherever you are and whatever you’re doing.  My company doesn’t come until 3 pm so if I have a chance I’ll come back and show you the cute treat holders I made for everyone and my candle holders.

Take care and have a safe, happy and wonderful Thanksgiving!

French Foliage Welcome

Stamp Sets: French Foliage, Warm Words (retired)
Card Stock: Early Espresso, Riding Hood Red, More Mustard, Very Vanilla
Ink: Early Espresso, Riding Hood Red, More Mustard, Crumb Cake
Tools: Big Shot, Square Lattice Embossing Folder

Hello!  I made today’s card for the church office.  We had a new assistant pastor start this past week so I made this card for the staff to give him.  I still have a tough time with masculine cards.  It took forever for me to come up with an idea for this one.  I finally decided on the aspen leaf since it kind of says “Colorado” and the new pastor is coming from Ohio.

The card is pretty basic.  I did stamp the aspen leaves on the More Mustard background before embossing it to add a little more dimension to the card.  Simple, yet masculine!

Be sure to check back tomorrow for the link to everything that will be on sale during the Online Extravaganza!

Have a great day!  Take care and Happy Stamping!

Open House Evergreen

Good morning!  There’s a little bit of snow on the ground this morning and it made me think of Christmas.  So, when I’m thinking of Christmas, I naturally think of Christmas cards!  Therefore….I have a Christmas card for you today!  😀

We made this card at my Open House way back in August!  It’s a fairly simple card with tons of layers.  I wanted to showcase the new color, Gumball Green, as well as the Core’dinations card stock.

I used the Vintage Wallpaper Embossing Folder on the Gumball Green Core’dinations card stock at my Open House because I didn’t have my new favorite embossing folder, Lacy Brocade.  It looks great with both backgrounds but the Lacy Brocade has a lighter feel to it.  After I embossed the Core’dinations card stock I used the new Stampin’ Up! Sanding Block to distress it.  What a great look!  Just stamp the tree and add some layers and your card is done!  This would make a great and easy card to mass-produce!

Have a great day!  Take care and Happy Stamping!

Paper Daisy Turkey

Stamp Set: Seasonal Sayings
Card Stock: Chocolate Chip, PUmpkin Pie, Very Vanilla, Riding Hood Red
Ink: Chocolate Chip, Daffodil Delight, Pumpkin Pie, Riding Hood Red
Accessories: Paper Daisies, Stampin’ Dimensionals
Tools: Owl Builder Punch, 1/8″ Circle Punch, Stampin’  Sponge

Hello!  Thanksgiving is coming up FAST!  I need to get decorations up so I can enjoy them for awhile.  Today’s card is an adorable card for Thanksgiving.  You gotta love that darn owl punch!  It’s so versatile!  🙂

I used a Stampin’ Sponge to sponge two different colored inks on each daisy.  I used Daffodil Delight and Pumpkin Pie on the small daisy and Pumpkin Pie and Riding Hood Red on the large daisy.  So easy!  The little turkey beak is the heart fromthe same punch!  TSC…too stinkin’ cute!

Only one more card to cut for next week’s Stamp-a-Stack.  Now I need to start planning my class for the week after Thanksgiving.  I would really like to be ahead of the game.  It’s a great aspiration….let’s see if I can get it done!

Have a great day!  Take care and Happy Stamping!

Fall Flowers

Card Stock: Early Espresso, More Mustard, Very Vanilla
Specialty Paper: Early Espresso Core’dinations Card Stock, Howlstooth & Scaringbone Designer Paper
Accesories: More Mustard Scallop Dot Ribbon, Stampin’ Dimensionals
Tools: Big Shot, Flower Garden Embossing Folder, Sanding Block, Dotted Scallop Ribbon Border Punch

Hello!  I’m catching up on things and hopefully I’ll be able to stay up-to-date on my blog posts!  Sheesh!

Today’s card was one we made a few weeks ago and I  CASEd it from a card we made at a Shoebox Swap with the team.  It’s a pretty simple card.  I really like the new Core’dinations card stock.  It really adds a new dimension to your projects, especially when you use the sanding blocks with it.

Today I need to start cutting card stock for next week’s Christmas Card Stamp-a-Stack.  There’s still some space left.  Let me know if you’d like to join us!

Have a great day!  Take care and Happy Stamping!

Gently Falling Emboss Resist

Stamp Sets: Gently Falling, En Francais
Card Stock: Early Espresso, Very Vanilla, Crumb Cake
Ink: Crumb Cake, Versamark
Accessories: Crumb Cake & Early Espresso Tulle, Antique Brads, Stampin’ Dimensionals, Clear Embossing Powder
Tools: Big Shot, Lacy Brocade Embossing Folder, Stampin’ Sponge, Paper Piercing Tools, Heat Tool

I really haven’t forgotten you….I just have to stop leaving town for long periods of time because I get too far behind on everything!  Yikes!  Busy, busy, busy!  Class last week, class this week and Stamp Camp on Saturday.   I may have time for a quick breath starting Sunday but then it’s time to get ready for my Christmas Card Stamp-a-Stack classes.  Good thing I love what I do!

I need to catch you up on all of the great projects we’ve done in the last few weeks.  This card is probably my favorite of the ones we made in our Fall/Thanksgiving class.  I CASEd it from my sister stamper, Gina.  Thanks Gina!  Of course I changed it up just a bit but I love the look of this card.  I used the Emboss Resist Technique on the leaf.  First I stamped the small piece of Very Vanilla card stock with the En Francais Background stamp with the Crumb Cake Ink.  Then I stamped the leaf in Versamark and embossed it with clear embossing powder.  The next step was to rub the Crumb Cake ink gently over the embossed leaf to bring out the design.  Isn’t it gorgeous?

I need to go start working on all of those final details for Stamp Camp.  Have a great day!  Take care and Happy Stamping!

Home, Sweet Home

Hello Denver!  I’m home!  My trip didn’t seem quite so long while I was away but when I got home and saw all of the mail and packages on the kitchen table I realized just how long it had been!  2 1/2 weeks is a long time to be gone.  Glad to be home but now I have to tackle unpacking, laundry and of course the trip to the grocery store that will probably take hours since we have no food in the house!  It should be a very busy day but then I get to watch the Denver Broncos play the Sand Diego Chargers tonight!  Woo Hoo!


Stamp Set: Toxic Treats
Card Stock: Basic Black, Basic Gray, Very Vanilla
Designer Paper: Howlstooth and Scaringbone
Ink: Basic Black, Basic Gray
Tools: Decorative Label Punch
Accessories: Basic Black Taffeta Ribbon

Today’s card is a Halloween card that I CASEd.  I received the original in a swap.  Don’t you love it?  I love the side- step idea.  Doesn’t it work perfect for the grave stones?  I used the Toxic Treat Stamp Set from the Holiday Catalog on this card.  Pretty spooky, huh?!

Well, I should get to work on the millions of things that need to get done.  Have a great day!  Take care and Happy Stamping!